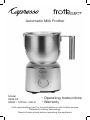
Capresso 209 froth SELECT User manual
- Category
- Milk frothers
- Type
- User manual
This manual is also suitable for

Automatic Milk Frother
Model
#209.05
600W / 120Vac / 60Hz
• Operating Instructions
• Warranty
Visit capressoblog.com for fun and delicious milk frother recipes
Patented Frothing Technology
Read all instructions before operating the appliance

2. 3.
IMPORTANT SAFEGUARDS
When using electrical appliances, basic safety precautions should always be
followed, including the following:
1. Read all instructions before operating the appliance.
2. After having the packaging removed, check that the appliance is intact. If
in doubt do not use the appliance and contact your sales agent.
3. The parts of the packaging, plastic bags etc. must not be left within the
reach of children as they are potential sources of danger.
4. DO NOT touch hot surfaces. Use handles or knobs.
5. To protect against re, electric shock and personal injury do not immerse
cord, plugs, or appliance in water or other liquid.
6. Never immerse the base in water or any other liquid for cleaning.
7. The appliance is not intended for use by persons (including children) with
reduced physical, sensory or mental capabilities, or lack of experience
and knowledge, unless they have been given supervision or instruction.
8. Close supervision is necessary when any appliance is used by or near
children.
9. Unplug from outlet when not in use and before cleaning. Allow to cool
before putting on or taking o parts, and before cleaning the appliance.
10. DO NOT operate any appliance with a damaged cord or plug or if the
appliance has been damaged in any manner. Return the appliance to an
authorized service facility for examination, repair or adjustment.
11. DO NOT operate the appliance if the pitcher shows any signs of cracks
or pitcher has a loose or weakened handle.
12. The use of accessory attachments not recommended by the appliance
manufacturer may result in re, electric shock or personal injury.
13. DO NOT use outdoors.
14. DO NOT let cord hang over edge of table or counter, or touch
hot surfaces.
15. DO NOT place on or near a hot gas or electric burner, or in a heated
oven.
16. Always attach plug to appliance rst, then plug cord into the wall outlet.
17. To disconnect, turn the power switch o, then remove plug from
wall outlet.
18. DO NOT use appliance for other than intended use.
19. Use extreme caution when disposing hot steam.
20. The milk pitcher is not suited for microwave use.
21. Only the supplied milk pitcher can be placed on heating platform
of the base.
SAVE THESE INSTRUCTIONS
FOR HOUSEHOLD USE ONLY
SPECIAL CORD SET INSTRUCTIONS
Regarding your Cord Set:
A. A short power-supply cord (or detachable power-supply cord) is provided
to reduce risks resulting from becoming entangled in or tripping over a
longer cord.
B. Longer detachable power-supply cords or extension cords are available
and may be used if care is exercised in their use.
C. If a long detachable power-supply cord or extension cord is used, (1) the
marked electrical rating of the detachable power-supply cord or extension
cord should be at least as great as the electrical rating of the appliance,
(2) if the appliance is of the grounded type, the extension cord should be a
grounding type 3-wire cord, and (3) the longer cord should be arranged so
that it will not drape over the counter top or table top where it can be
pulled on by children or tripped over.
Note: This appliance has a 3-prong grounded plug. To reduce the risk of
electrical shock, this plug will t in an outlet only one way. If the plug does
not t in the outlet, contact a qualied electrician. DO NOT modify the plug in
any way.
CAUTION
This appliance is for household use. Any servicing other than cleaning and
user maintenance should be performed by an authorized service
representative.
• Do not immerse base in water or try to disassemble.
• To reduce the risk of re or electric shock, do not disassemble the base.
No user serviceable parts inside.
• Repair should be done by authorized service personnel only.
• Check voltage to be sure that the voltage indicated on the name plate
agrees with your voltage.
• Keep your hands and the cord away from hot parts of the appliance
during operation.
• Never clean with scouring powders or hard implements.
WELCOME AND THANK YOU
Thank you for choosing the Capresso froth Select. This compact and space
saving item froths and heats your milk completely and automatically. It is
easy to use, easy to clean. Use it for hot chocolate, frothed milk and iced
cappuccinos. Please read all of the instructions in this booklet before
operating your new machine. Understanding and complying with these
instructions is essential to ensure that the machine is utilized without risk
and to ensure safety during operation and maintenance.

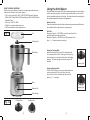
Frothing Disk Heating Disk
Frothing Disk
Heating Disk
4. 5.
Fig. 1
Lid
Milk Pitcher
Frothing Disk
Base
Selector Dial
Disk Storage
HOW TO REACH CAPRESSO
Should you require further information or if particular problems occur
that are not covered in this manual, please
• CALL our toll free HELP LINE: 1-800-767-3554 Monday-Thursday
8AM to 9PM, Friday 8AM to 8PM and Saturday 9AM to 5PM Eastern
Standard Time.
• FAX us at 1-201-767-9684
• E-MAIL us at [email protected]
• VISIT our website at www.capresso.com
Fig. 1a
Using the froth Select
The froth Select Automatic Milk Frother comes equipped with a milk pitcher
with lid, two frothing disks, one heating disk and the base unit. One of the
disks is installed inside the milk pitcher. The other disk and the heating disk
are stored underneath the base of the appliance.
Before First Use
Clean the milk pitcher and the disks under running warm water. Make sure
the underside of the milk pitcher is completely dry.
CAUTION:
Maximum Capacity - FROTHING: never ll more than 16-oz
(see MAX marking inside milk pitcher)
Maximum Capacity - HEATING: never ll more than 20-oz
(see “––––” marking inside milk pitcher)
Using the Frothing Disk
Never ll more than 16-oz of milk or chocolate milk
into the milk pitcher (“MAX” marking); otherwise, hot
milk could spill over the milk pitcher onto the heating
platform. This may damage the interior parts of the
machine.
Using the Heating Disk:
For the CHOC setting, you may use the heating disk
with a minimum of 8-oz of milk. Never ll more
than 20-oz of milk or chocolate milk into the milk
pitcher (“––––” marking).

6. 7.
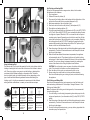
Using the Selector Dial
The selector dial (F) will control the speed of the disk in the pitcher while the
frothing or heating disk will control the milk texture of the frothed or heated
milk. There is no right or wrong way to use the frothing or heating disks
combined with the dierent settings on the selector dial. The below
chart is a helpful guide, but individual results will vary depending on the
type of milk used and dierent ingredients that are added during the
frothing cycle. It is highly recommended to experiment with the dierent
setting and disk combinations, to create your own delicious recipes.
A B C
D E F
Frothing Disk
Heating Disk
(Cold) Froth (Hot) Froth (Hot) Flat (Hot) Choc
Cold milk with
thick, velvety
froth
Heated milk
with maximum
froth, perfect
for cappuccino
Heated milk
with some
froth, perfect
for at white
Use heating disk
for best results
Use the frothing
disk for best
results
Heated milk, no
froth, perfect
for lattes and
steamers
Heated milk, no
froth, perfect
for lattes and
steamers
Heated milk, no
froth, perfect for
hot chocolates
Hot Frothing and Heating Milk
Perfect for hot beverages such as cappuccinos, lattes, hot chocolate,
at whites and milk steamers.
1. Plug in appliance.
2. Remove lid from milk pitcher. (A)
3. Place one of the frothing disks or the heating disk into the bottom of the
milk pitcher. Ensure the disk is completely snapped in. (B)
4. Make sure underside of the milk pitcher is dry.
5. Pour fresh cold milk into the milk pitcher (C) and replace lid. (D)
6. Place pitcher on heating platform. (E)
7. For frothing and heating milk turn the selector dial (F) to the (HOT) FROTH
or FLAT icon. When the (HOT) FROTH icon is selected the disk will rotate
at a high rate of speed. When the FLAT icon is used the disk will spin at
a medium rate of speed. Depending on which disk is used, this will help
control the nal texture of the milk once the cycle is complete. Selecting
the frothing disk with the (HOT) FROTH setting will maximize the froth
produced while selecting the heating disk with the FLAT option will give
almost no froth but will heat/steam the milk.
8. Press the center of the selector dial and the frothing/heating action starts
automatically. The dial will illuminate blue and a short beep will indicate
that the cycle has begun.
9. When the milk has reached the maximum temperature, the appliance
will automatically shut o. The indicator light turns o and the frothing
action stops. A short beep will indicate that the end of the cycle has been
reached. The cycle can always be stopped manually by pressing the
center of the selector dial or lifting the pitcher from the base.
CAUTION: The milk pitcher is now very warm; the bottom of the pitcher
is hot. Only place the milk pitcher on a heat resistant surface.
10. Pour the warm milk into your cup and spoon the froth on top.
11. Always unplug from outlet when not in use and before cleaning.
Allow to cool before putting on or taking o parts, and before cleaning
the appliance.
Cold Frothing and Mixing Milk
Good for cold beverages such as iced cappuccinos, iced fruit lattes, cold
malts and mixing chocolate milk. Follow steps 1 through 6 above in “Hot
Frothing and Heating Milk.”
Note: For the best cold frothing or cold mixing results, it is recommended
to use the frothing disk.
1. For cold frothing or cold mixing (incorporating chocolate syrup into milk,
mixing malt powder, etc.) turn the selector dial (F) to the (COLD) FROTH
setting.
2. Press the center of the selector dial and the frothing/mixing action starts
automatically. The dial will illuminate blue and a short beep will indicate
that the cycle has begun.
3. Once the frothing disk starts spinning, you may add any ingredients like
chocolate syrup, malt powder, etc.

8. 9.
4. After a few minutes, the appliance will automatically shut o. The
indicator light turns o and frothing stops. A short beep will indicate
that the end of the cycle has been reached. The cycle can always be
stopped manually by pressing the center of the selector dial or lifting the
pitcher from the base.
5. Pour milk into cup and spoon froth on top.
6. Always unplug from outlet when not in use and before cleaning.
Making Hot Chocolate
The froth Select features a special hot chocolate function that allows
chocolate chunks or chocolate chips to be added directly to the pitcher.
The heating disk will rotate slowly, allowing the chocolate to gently mix and
heat. You may also add grated chocolate, chocolate syrup or powdered hot
chocolate mix directly to the milk pitcher. Follow steps 1 through 6 above
in “Hot Frothing and Heating Milk.”
Note: For the best hot chocolate results, it is recommended to use the
heating disk. A minimum of 8-oz of milk should be used, otherwise the
milk may burn. A maximum of 16-oz may be used with the CHOC setting.
1. For hot chocolate turn the selector dial (F) to the CHOC setting.
2. Press the center of the selector dial and the frothing/heating action starts
automatically. The dial will illuminate blue and a short beep will indicate
that the cycle has begun.
3. After a few minutes of heating the illuminated dial will start to blink, and a
series of short beeps will indicate that it is time to add the chocolate into
the milk pitcher.
Note: Once the illuminated dial starts to blink, it will continue blinking for
approximately one minute. Once the light becomes solid, stop adding
chocolate and replace the lid. This will help to ensure that the chocolate
melts completely into the milk before the end of the cycle.
4. Remove the lid from the pitcher and gradually add small chunks of
chocolate, chocolate chips, grated chocolate or powdered hot
chocolate mix into the pitcher. For the best results, add the chocolate
slowly by dropping it in small amounts along the edge of the milk pitcher,
away from the rotating disk. It is not recommended to add more than 113
grams (4-oz) of chocolate or powdered hot chocolate mix to the pitcher
for one cycle.
Note: If chocolate chunks are left in pitcher after the cycle stops you may
need to use smaller pieces. For best results, try to add all of the
chocolate while the light is blinking, otherwise the chocolate may not
have time to fully melt into the milk.
5. After a few minutes, the appliance will automatically shut o. The
indicator light turns o and the mixing action stops. A short beep will
indicate that the end of the cycle has been reached. The cycle can always
be stopped manually by pressing the center of the selector dial or lifting
the pitcher from the base.
6. Pour hot chocolate into cup and enjoy!
7. Always unplug from outlet when not in use and before cleaning.
Tips for using the froth Select:
• When adding extra ingredients such as chocolate, smaller pieces will melt
more easily than larger pieces. “Chocolate chips” commonly found in the
baking section of most supermarkets work well.
• Always add extra ingredients along the edge of the pitcher, away from the
rotating disk.
• Always add extra ingredients gradually to help avoid interrupting the cycle.
• It is best to used shaved or grated chocolate when using the (HOT) FROTH
setting, as the smaller pieces are less likely to become stuck in the frothing
disk as it rotates at a higher rate of speed. Use the CHOC setting when
adding larger ingredients like chocolate chunks or chocolate chips.
• If the frothing disk becomes stuck and makes a loud noise, press the center
of the selector dial to stop the cycle. Remove the lid and use a small spoon
to gently mix the ingredients. Press the center of the selector dial to restart
the cycle.
Please note:
• When you remove the milk pitcher from the appliance during operation, the
appliance will automatically shut o. When replacing the pitcher, you need
to press the center of the selector dial to start the cycle again.
• If the heating plate or the bottom of the milk pitcher is still hot, the
appliance may not turn on. In this case, remove the milk pitcher. Cool it
down by running the bottom of the pitcher under cold water. Make sure
the bottom of the pitcher is dry and start over.
CAUTION: Do not place the milk pitcher in the microwave or on any other
heating surface.
Types of Milk
All kinds of milk can be used with this appliance (Whole, 2%, 1%, skim, soy
milk, almond milk, rice milk, etc.) Skim milk will produce the thickest, most
stable froth. Soy milk will produce froth with somewhat larger bubbles, but
the froth is not as stable. Always use milk that is as fresh as possible, to
achieve the best results.
Cleaning
1. Unplug the appliance and let it cool down.
2. Remove the frothing disk or the heating disk from the milk pitcher.
Clean under running warm water.
3. The milk pitcher and lid are dishwasher safe (top-rack).
4. Wipe the heating plate with a moist cloth.
5. Discoloration of the heating plate may occur if milk spills onto the heating
plate. Scrub lightly with baking soda.
Frothing / Heating Disk Storage
One disk can be kept inside the milk pitcher. The two other disks can be
stored underneath the base of the appliance.
Additional Milk Pitcher and Disks
Order an additional milk pitcher or disks by calling Customer Service at:
1-800-767-3554 or by visiting www.capresso.com.

10. 11.
Recipes
Orange Crème Latte
2 servings
• 8-oz low fat milk
• 1-2 tsp vanilla syrup
• 8-oz orange juice
• shaved ice for serving
Insert the frothing disk, add milk and vanilla syrup to frothing pitcher and
choose the (COLD) FROTH setting. Start the cycle by pressing the center
of the selector dial. Wait for the froth Select to automatically shut o. Place
shaved ice into the glasses and ll half way with orange juice. Pour frothed
milk on top and stir.
Chai Tea Latte
4 servings
• 1 cinnamon stick
• 6 whole green cardamom pod
• 6 whole cloves
• 1 (1-inch) piece ginger root or ¼ teaspoon ground ginger powder
• 4 black peppercorns
• 3 cups water
• 3 black tea bags or 3 heaping teaspoons of loose black tea
• 10-oz milk
• 2 tbsp dark brown sugar
Place rst ve spice ingredients into a heat safe pitcher. Pour three cups of
boiling water into pitcher and let steep for fteen minutes. Add three tea bags
to water and continue to steep for ve more minutes. While tea is steeping
prepare frothed milk. Insert the frothing disk, add milk to pitcher and choose
the (HOT) FROTH setting. Start the cycle by pressing the center of the dial.
After three minutes, remove lid and add brown sugar* to the frothing pitcher.
Replace the lid and wait for the froth Select to automatically shut o. Strain
spices and tea bags from pitcher and pour tea into cups. Top each cup with
frothed milk.
*Be sure to break up any lumps in the brown sugar before adding to
the pitcher.
Deluxe Hot Chocolate
4 servings
• 16-oz milk
• 4-oz of your favorite semisweet or bittersweet chocolate, using chips,
chunks, or shaved chocolate
Insert the heating disk, add milk to frothing pitcher and turn selector dial to
CHOC function. Press selector dial to start frothing and heating. Once the
selector dial light starts to blink, remove frother lid and add chocolate.
Replace lid and wait for frother to automatically shut o. Pour into cups
and enjoy.
Deluxe Caramel Latte
2 Servings
• 14-oz milk
• 2 shots of espresso or 4-6 oz of strong brewed coee
• caramel sauce
• whipped cream
Prepare 2 shots of espresso or 4-6 oz of coee and set aside. Insert the
heating disk add milk to the frothing pitcher and choose the FLAT setting.
Start the cycle by pressing the center of the selector dial. While the milk is
heating coat the inside of two cups with the caramel sauce and divide the
prepared coee evenly between the two cups. Once the milk is nished
heating, add 7-oz to each cup and top with whipped cream and more
caramel sauce.
Tip: For a latte with slightly more froth, replace the heating disk with the
frothing disk; follow the MAX guideline for frothing capacity.
Visit www.capressoblog.com for fun and delicious milk frother recipes.
LIMITED WARRANTY
This warranty covers your Capresso machine Model #209.05. This warranty
is in eect for one year from the date of the rst consumer purchase. This
warranty covers all defects in materials or workmanship (parts and labor).
Capresso will repair or replace your machine within one year from the date
of the rst consumer purchase.
The warranty does not cover:
• Any machine not distributed by Capresso.
• Any machine not purchased from an Authorized Capresso Dealer.
• Commercial use of the machine.
• Damage caused by accident, abuse, negligence, misuse, improper
operation or failure to follow instructions contained in this manual.
• Any service or alteration performed by an unauthorized person, company
or association.
• Any used machines bought at auctions and unauthorized websites.
Other limitations and exclusions:
Any implied warranties including tness for use and merchantability are
limited in duration to the period of the express warranty set forth above and
no person is authorized to assume for JURA any other liability in connection
with the sale of the machine. JURA expressly disclaims liability for incidental
and consequential damages caused by the machine. The terms “incidental
damages” refers to the loss of the original purchaser’s time, loss of the use of
the machine or other costs relating to the care and custody of the machine.
The term “consequential damages” refers to the cost of repairing or replacing
other property which is damaged when this machine does not work
properly. The remedies provided under this warranty are exclusive and in
lieu of all others. This warranty gives you specic legal rights, and you may
also have other rights which vary from state to state.

Customer Service
1-800-767-3554
Mon-Thu 8AM – 9PM • Fri 8AM – 8PM • Sat 9AM – 5PM
Eastern Time Zone
JURA Inc.
20 Craig Road, Montvale, NJ 07645
201-767-3999 • Fax: 201-767-9684
www.capresso.com
-
 1
1
-
 2
2
-
 3
3
-
 4
4
-
 5
5
-
 6
6
-
 7
7


Capresso 209 froth SELECT User manual
- Category
- Milk frothers
- Type
- User manual
- This manual is also suitable for
Ask a question and I''ll find the answer in the document
Finding information in a document is now easier with AI
Related papers
-
Capresso 208 froth MAX User manual
-
-
-
-
-
Capresso 202.04 User guide
-
-
-
Capresso #303 User manual
-
Other documents
-
Gastroback 0781101 Operating instructions
-
Gastroback 42399 Operating instructions
-
Gastroback Easy Cino Plus Operating instructions
-
Jura Capresso 64701R2 User manual
-
-
Jura Capresso Impressa E8 User manual
-
-
Cuisinart EM-350 User manual
-
KitchenAid 5KES2102AFP User manual
-