
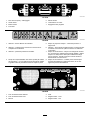
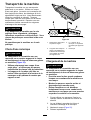
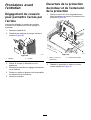
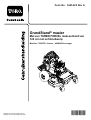
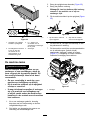
FormNo.3443-227RevA
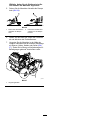
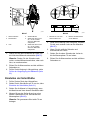
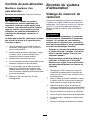
GrandStand
®
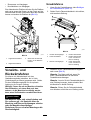
MowerWith122cmRearDischarge
TURBOFORCE
®
CuttingUnit
72542TE
GrandStand
®
RasenmäherMit122cmHeckauswurf
TURBOFORCE
®
Mähwerk
72542TE
TondeuseGrandStand
®
avecunitédecoupeTURBO
FORCE
®
de122cmàéjectionarrière
72542TE
GrandStand
®
maaierMeteenTURBOFORCE
®
maai-eenheidvan122cmmetachteruitworp
72542TE
www.T oro.com.
*3443-227*
Page is loading ...

FormNo.3443-215RevA
GrandStand
®
Mower
With122cmRearDischargeTURBOFORCE
®
CuttingUnit
ModelNo.72542TE—SerialNo.400000000andUp
Registeratwww.Toro.com.
OriginalInstructions(EN)
*3443-215*

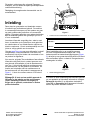
ThisproductcomplieswithallrelevantEuropean
directives;fordetails,pleaseseetheseparateproduct
specicDeclarationofConformity(DOC)sheet.
Pleaserefertotheenginemanufacturer’sinformation
includedwiththemachine.
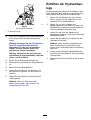
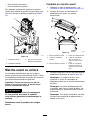
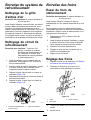
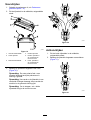
Introduction
Thisrotary-blade,stand-onlawnmowerisintended
tobeusedbyprofessional,hiredoperators.Itis
designedprimarilyforcuttinggrassonwell-maintained
lawnsonresidentialorcommercialproperties.Using
thisproductforpurposesotherthanitsintendeduse
couldprovedangeroustoyouandbystanders.
Readthisinformationcarefullytolearnhowtooperate
andmaintainyourproductproperlyandtoavoid
injuryandproductdamage.Youareresponsiblefor
operatingtheproductproperlyandsafely.
Visitwww.T oro.comformoreinformation,including
safetytips,trainingmaterials,accessoryinformation,
helpndingadealer,ortoregisteryourproduct.
Wheneveryouneedservice,genuineT oroparts,or
additionalinformation,contactanAuthorizedService
DealerorToroCustomerServiceandhavethemodel
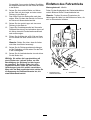
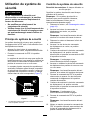
andserialnumbersofyourproductready.Figure1
identiesthelocationofthemodelandserialnumbers
ontheproduct.Writethenumbersinthespace
provided.
Important:Withyourmobiledevice,youcan
scantheQRcodeontheserialnumberdecal(if
equipped)toaccesswarranty,parts,andother
productinformation.
g235457
Figure1
1.Locationofthemodelandserialnumbers
ModelNo.
SerialNo.
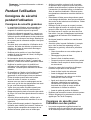
Thismanualidentiespotentialhazardsandhas
safetymessagesidentiedbythesafety-alertsymbol
(Figure2),whichsignalsahazardthatmaycause
seriousinjuryordeathifyoudonotfollowthe
recommendedprecautions.
g000502
Figure2
1.Safety-alertsymbol
Thismanualuses2wordstohighlightinformation.
Importantcallsattentiontospecialmechanical
informationandNoteemphasizesgeneralinformation
worthyofspecialattention.
©2020—TheToro®Company
8111LyndaleAvenueSouth
Bloomington,MN55420
2
Contactusatwww.Toro.com.
PrintedintheUSA
AllRightsReserved

Contents
Safety.......................................................................4
GeneralSafety...................................................4
SafetyandInstructionalDecals..........................4
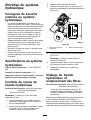
ProductOverview.....................................................8
Controls.............................................................8
Specications....................................................9
Attachments/Accessories...................................9
BeforeOperation.................................................10
BeforeOperationSafety...................................10
AddingFuel......................................................10
PerformingDailyMaintenance...........................11
BreakinginaNewMachine...............................11
UsingtheSafety-InterlockSystem.....................11
DuringOperation.................................................12
DuringOperationSafety...................................12
OperatingtheParkingBrake.............................14
OperatingtheMower-Blade-ControlSwitch
(PTO)............................................................14
OperatingtheThrottle.......................................15
OperatingtheChoke........................................15
OperatingtheIgnitionSwitch............................16
StartingtheEngine...........................................16
ShuttingOfftheEngine.....................................17
OperatingthePlatform......................................17
DrivingForwardorBackward............................18
AdjustingtheHeight-of-Cut...............................19
UsingWeights..................................................20
AfterOperation....................................................20
AfterOperationSafety......................................20
UsingtheFuel-ShutoffValve.............................21
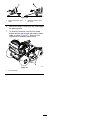
PushingtheMachinebyHand..........................21
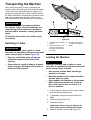
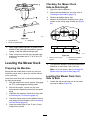
TransportingtheMachine.................................22
Maintenance...........................................................24
MaintenanceSafety..........................................24
RecommendedMaintenanceSchedule(s)...........24
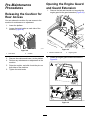
Pre-MaintenanceProcedures..............................26
ReleasingtheCushionforRearAccess............26
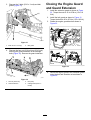
OpeningtheEngineGuardandGuard
Extension......................................................26
ClosingtheEngineGuardandGuard
Extension......................................................27
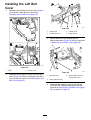
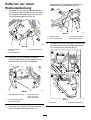
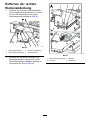
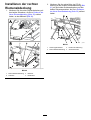
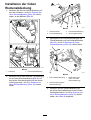
RemovingtheLeftBeltCover...........................28
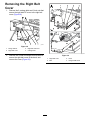
RemovingtheRightBeltCover.........................29
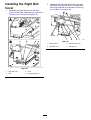
InstallingtheRightBeltCover...........................30
InstallingtheLeftBeltCover.............................31
Lubrication..........................................................32
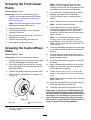
GreasingtheMachine.......................................32
GreasingtheT orsionIdler.................................32
GreasingtheFrontCasterPivots......................33
GreasingtheCaster-WheelHubs.....................33
GreasingtheMotionControls...........................34
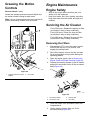
EngineMaintenance...........................................34
EngineSafety...................................................34
ServicingtheAirCleaner..................................34
ServicingtheEngineOil....................................35
ServicingtheSparkPlug...................................37
CheckingtheSparkArrester.............................38
FuelSystemMaintenance...................................39
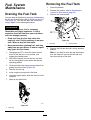
DrainingtheFuelT ank......................................39
RemovingtheFuelTank...................................39
ReplacingtheFuelFilter...................................40
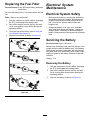
ElectricalSystemMaintenance...........................40
ElectricalSystemSafety...................................40
ServicingtheBattery.........................................40
ServicingtheFuses..........................................42
DriveSystemMaintenance..................................43
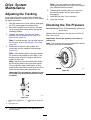
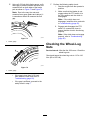
AdjustingtheTracking......................................43
CheckingtheTirePressure...............................43
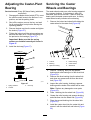
AdjustingtheCaster-PivotBearing...................44
ServicingtheCasterWheelsand
Bearings........................................................44
RemovingtheClutchShim...............................45
CheckingtheWheel-LugNuts..........................46
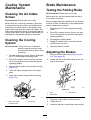
CoolingSystemMaintenance..............................47
CleaningtheAir-IntakeScreen.........................47
CleaningtheCoolingSystem............................47
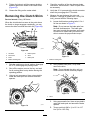
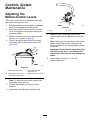
BrakeMaintenance.............................................47
TestingtheParkingBrake.................................47
AdjustingtheBrakes.........................................47
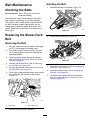
BeltMaintenance................................................48
CheckingtheBelts............................................48
ReplacingtheMower-DeckBelt........................48
ReplacingtheTransmissionBelt......................49
ControlsSystemMaintenance.............................50
AdjustingtheMotion-ControlLevers.................50
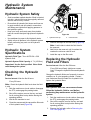
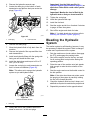
HydraulicSystemMaintenance...........................51
HydraulicSystemSafety...................................51
HydraulicSystemSpecications.......................51
CheckingtheHydraulicFluid............................51
ReplacingtheHydraulicFluidand
Filters............................................................51
BleedingtheHydraulicSystem.........................52
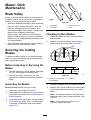
MowerDeckMaintenance....................................53
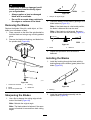
BladeSafety.....................................................53
ServicingtheCuttingBlades.............................53
LevelingtheMowerDeck..................................55
AdjustingtheDeck-LiftSpring...........................57
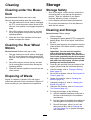
Cleaning..............................................................58
CleaningundertheMowerDeck.......................58
CleaningtheRearWheelMotors......................58
DisposingofWaste...........................................58
Storage...................................................................58
StorageSafety..................................................58
CleaningandStorage.......................................58
Troubleshooting......................................................60
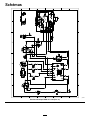
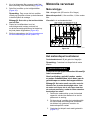
Schematics.............................................................62
3

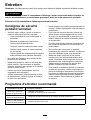
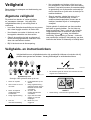
Safety
Thismachinehasbeendesignedinconsideration
withENISO5395.
GeneralSafety
Thisproductiscapableofamputatinghandsand
feetandofthrowingobjects.Alwaysfollowallsafety
instructionstoavoidseriouspersonalinjury.
•Readandunderstandthecontentsofthis
Operator’sManualbeforestartingtheengine.
•Donotputyourhandsorfeetnearmoving
componentsofthemachine.
•Donotoperatethemachinewithoutallguards
andothersafetyprotectivedevicesinplaceand
functioningproperlyonthemachine.
•Keepclearofthedischargeopening.
•Keepbystandersandchildrenoutoftheoperating
area.Donotallowchildrentooperatethemachine.
Allowonlypeoplewhoareresponsible,trained,
familiarwiththeinstructions,andphysically
capabletooperatethemachine.
•Stopthemachine,shutofftheengine,andremove
theignitionkeybeforeservicing,fueling,or
uncloggingthemachine.
Improperlyusingormaintainingthismachinecan
resultininjury.T oreducethepotentialforinjury,
complywiththesesafetyinstructionsandalways
payattentiontothesafety-alertsymbol
,which
meansCaution,Warning,orDanger—personalsafety
instruction.Failuretocomplywiththeseinstructions
mayresultinpersonalinjuryordeath.
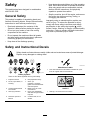
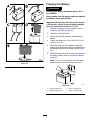
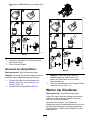
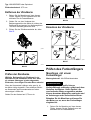
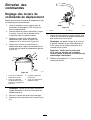
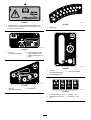
SafetyandInstructionalDecals
Safetydecalsandinstructionsareeasilyvisibleandarelocatednearareasofpotentialdanger.
Replaceeverydamagedormissingdecal.
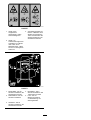
decalbatterysymbols
BatterySymbols
Someorallofthesesymbolsareonyourbattery.
1.Explosionhazard6.Keepbystandersaway.
2.Nore,openames,or
smoking
7.Weareye
protection—explosive
gasescancauseblindness
andotherinjuries.
3.Causticliquid/chemical
burnhazard
8.Batteryacidcancause
severeburns.
4.Weareyeprotection.9.Flusheyesimmediately
withwaterandgetmedical
helpfast.
5.ReadtheOperator’s
Manual.
10.Containslead;donot
discard.
decaloemmarkt
Manufacturer'sMark
1.Thismarkindicatesthatthebladeisidentiedasapart
fromtheoriginalmachinemanufacturer.
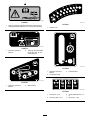
decal106-5517
106-5517
1.Warning—donottouchthehotsurface.
4

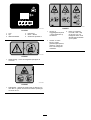
decal116-8283
116-8283
1.Warning—readtheOperator'sManualforinstructionson
torquingthebladebolt/nutto75to81N∙m(55to60ft-lb).
decal116-8775
116-8775
1.ReadtheOperator’s
Manual.
2.Warning—lltothebottom
ofthellerneck;donot
overllthetank.
decal131-3507
131-3507
1.ReadtheOperator's
Manual.
2.Belttensioner
decal131-3521
131-3521
1.Heightofcut
decal131-3524
131-3524
1.ReadtheOperator's
Manual.
3.Colduidlevel
2.Transmissionuid
131-3528
15A 15A 10A
7.5A
decal131-3528
131-3528
1.Keyswitch—15A
3.Powertakeoff(PTO)—10
A
2.Accessoryport—15A
4.Infocenter—7.5A
5

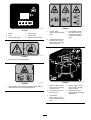
decal131-3536
131-3536
1.Battery4.Parkingbrake
2.Time5.Engine—start
3.Powertakeoff(PTO)
6.Engagethehandlebars.
decal133-4641
133-4641
1.Warning—donotcarrypassengers.
decal133-4665
133-4665
1.Tippinghazard—donotoperateupslopesgreaterthan10°;
donotoperateacrossslopesgreaterthan15°.
decal139-5557
139-5557
1.Thrownobject
hazard—keepbystanders
away.
3.Entanglementhazard,
belt—stayawayfrom
movingparts;keepall
guardsandshieldsin
place.
2.Cutting/dismemberment
hazardofhandorfoot,
mowerblade—stayaway
frommovingparts.
decal139-5571
139-5571
1.Engineairlter—Check
every50hours;Change
every200hours
4.Engineoillter—Check
every8hours;Change
every100hours
2.TirePressure—Check
every50hours
5.ReadtheOperator’s
Manualbeforeperforming
maintenance.
3.Transmission
uid—Checkevery50
hours;Changeevery500
hours
6

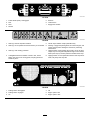
decal131-3526
131-3526
1.Powertakeoff(PTO)—disengaged
5.Reverse
2.Fast6.Tractiondrive
3.Slow
7.Engagethehandles.
4.Neutral
decal139-5556
139-5556
1.Warning—readtheOperator’sManual.
5.Thrownobjecthazard—keepbystandersaway.
2.Warning—donotoperatethemachineunlessyouaretrained.
6.Warning—engagetheparkingbrake,shutofftheengine,and
removethekeybeforeleavingthemachineorperforming
maintenance.
3.Warning—wearhearingprotection.7.Tippinghazard—whenloadingontoatrailer,donotusedual
ramps;onlyuseasingularrampwideenoughforthemachine;
backuptheramp(inreverse)anddriveforwardofftheramp.
4.Cutting/dismembermenthazardofhandorfoot,mower
blade—stayawayfrommovingparts;keepallguardsand
shieldsinplace.
8.Tippinghazard—donotoperatethemachineneardrop-offsor
water;stayawayfromdrop-offs.
decal140-4258
140-4258
1.Parkingbrake—disengaged
4.Off
2.Parkingbrake—engaged
5.Enginespeed—fast
3.On
6.Enginespeed—slow
7

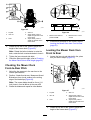
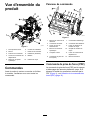
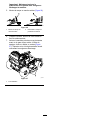
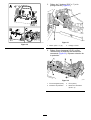
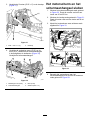
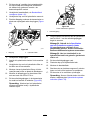
ProductOverview
g273599
Figure3
1.Frontcasterwheel
6.Operatorcushion
2.Engine7.Fueltank
3.Controlpanel8.Platform(downposition)
4.Motion-controllevers9.Battery
5.Hydraulictank10.Mowerdeck
Controls
Becomefamiliarwithallthecontrolsbeforeyoustart
theengineandoperatethemachine.
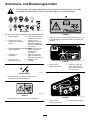
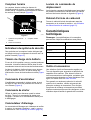
ControlPanel
g301785
Figure4
1.Fuelcap7.Keyswitch
2.Chokecontrol
8.Throttlecontrol
3.Parking-brakelever
9.Height-of-cutlever
4.Hydraulic-tankcap
10.Height-of-cutpin
5.Hourmeter11.Motion-controllever
6.Power-takeoffswitch
(PTO)
12.Referencebar
Power-TakeoffSwitch(PTO)
Usethepower-takeoffswitch(PTO)toengageand
disengagemowerbladesorstartandstoppowered
attachments(Figure4);refertoOperatingthe
Mower-Blade-ControlSwitch(PTO)(page14).
8

HourMeter
Thehourmeterrecordsthenumberofhoursthe
enginehasoperated.Itoperateswhentheengine
isrunning.Usethesetimesforschedulingregular
maintenance(Figure5).
g216020
Figure5
1.Safety-interlocksymbols
3.Hourmeter
2.Batterylight
Safety-InterlockIndicators
Symbolsonthehourmeterindicatewithablack
trianglethattheinterlockcomponentisinthecorrect
position(Figure5).
Battery-IndicatorLight
IfyouturnthekeytotheONpositionforafew
seconds,thebatteryvoltagedisplaysinthearea
wherethehoursarenormallydisplayed.
Thebatterylightturnsonwhenyouturnthekeytothe
ONpositionandwhenthechargeisbelowthecorrect
operatinglevel(Figure5).
ThrottleControl
Thethrottlecontrolstheenginespeed,andithasa
continuous-variablesettingfromtheSLOWtoFAST
position(Figure4).
ChokeControl
Usethechokecontroltostartacoldengine.Pullthe
chokecontroluptoengageit.Pushdownonthe
chokecontroltodisengageit.
KeySwitch
Thekeyswitch,usedtostartandshutofftheengine,
has3positions:OFF,RUN,andSTART.Referto
StartingtheEngine(page16).
Motion-ControlLevers
Usethemotion-controlleverstodrivethemachine
forward,reverse,andturneitherdirection(Figure4).
Fuel-ShutoffValve
Closethefuel-shutoffvalvewhentransportingor
storingthemachine;refertoUsingtheFuel-Shutoff
Valve(page21).
Specications
Note:Specicationsanddesignaresubjectto
changewithoutnotice.
Cuttingwidth122cm(48inches)
Width
127cm(50inches)
Lengthwithplatformdown191cm(75inches)
Lengthwithplatformup155cm(61inches)
Height
122cm(48inches)
Weight
415kg(915lb)
Attachments/Accessories
AselectionofToroapprovedattachmentsand
accessoriesisavailableforusewiththemachine
toenhanceandexpanditscapabilities.Contact
yourAuthorizedServiceDealerorauthorizedT oro
distributororgotowww.T oro.comforalistofall
approvedattachmentsandaccessories.
Toensureoptimumperformanceandcontinuedsafety
certicationofthemachine,useonlygenuineT oro
replacementpartsandaccessories.Replacement
partsandaccessoriesmadebyothermanufacturers
couldbedangerous,andsuchusecouldvoidthe
productwarranty.
9

Operation
BeforeOperation
BeforeOperationSafety
GeneralSafety
•Neverallowchildrenoruntrainedpeopletooperate
themachine.Localregulationsmayrestrictthe
ageoftheoperator.Theownerisresponsiblefor
trainingalloperatorsandmechanics.
•Becomefamiliarwiththesafeoperationofthe
equipment,operatorcontrols,andsafetysigns.
•Shutofftheengine,removethekey,andwait
forallmovingpartstostopbeforeleavingthe
operator’sposition.Allowthemachinetocool
beforeservicing,adjusting,fueling,cleaning,or
storingit.
•Knowhowtostopthemachineandshutoffthe
enginequickly.
•Checkthatoperator-presencecontrols,safety
switches,andguardsareattachedandfunctioning
properly.Donotoperatethemachineunlessthey
arefunctioningproperly.
•Beforemowing,alwaysinspectthemachineto
ensurethattheblades,bladebolts,andcutting
assembliesareingoodworkingcondition.
•Inspecttheareawhereyouwillusethemachine
andremoveallobjectsthatthemachinecould
throw.
•Evaluatetheterraintodeterminetheappropriate
equipmentandanyattachmentsoraccessories
requiredtooperatethemachineproperlyand
safely.
FuelSafety
•Fuelisextremelyammableandhighlyexplosive.
Areorexplosionfromfuelcanburnyouand
othersandcandamageproperty.
–Topreventastaticchargefromignitingthefuel,
placethecontainerand/ormachinedirectlyon
thegroundbeforelling,notinavehicleoron
anobject.
–Fillthefueltankoutdoors,inanopenarea,
whentheengineiscold.Wipeupanyfuelthat
spills.
–Donothandlefuelwhensmokingoraroundan
openameorsparks.
–Donotremovethefuelcaporaddfueltothe
tankwhiletheengineisrunningorhot.
–Ifyouspillfuel,donotattempttostartthe
engine.Avoidcreatingasourceofignitionuntil
thefuelvaporshavedissipated.
–Storefuelinanapprovedcontainerandkeep
itoutofthereachofchildren.
•Fuelisharmfulorfatalifswallowed.Long-term
exposuretovaporscancauseseriousinjuryand
illness.
–Avoidprolongedbreathingofvapors.
–Keepyourhandsandfaceawayfromthe
nozzleandthefuel-tankopening.
–Keepfuelawayfromyoureyesandskin.
•Donotstorethemachineorfuelcontainerwhere
thereisanopename,spark,orpilotlight,such
asonawaterheateroronotherappliances.
•Donotllcontainersinsideavehicleoronatruck
ortrailerbedwithaplasticliner.Alwaysplace
containersontheground,awayfromyourvehicle
beforelling.
•Removetheequipmentfromthetruckortrailer
andrefuelitwhileitisontheground.Ifthisisnot
possible,thenrefuelfromaportablecontainer
ratherthanafuel-dispensernozzle.
•Donotoperatethemachinewithouttheentire
exhaustsysteminplaceandinproperworking
condition.
•Keepthefuel-dispensernozzleincontactwith
therimofthefueltankorcontaineropeningat
alltimesuntilfuelingiscomplete.Donotusea
nozzlelock-opendevice.
•Ifyouspillfuelonyourclothing,changeyour
clothingimmediately.Wipeupanyfuelthatspills.
•Neveroverllthefueltank.Replacethefuelcap
andtightenitsecurely.
AddingFuel
RecommendedFuel
•Forbestresults,useonlyclean,fresh(lessthan
30daysold),unleadedgasolinewithanoctane
ratingof87orhigher((R+M)/2ratingmethod).
•Ethanol:Gasolinewithupto10%ethanol
(gasohol)or15%MTBE(methyltertiarybutyl
ether)byvolumeisacceptable.Ethanoland
MTBEarenotthesame.Gasolinewith15%
ethanol(E15)byvolumeisnotapprovedforuse.
Neverusegasolinethatcontainsmorethan
10%ethanolbyvolume,suchasE15(contains
15%ethanol),E20(contains20%ethanol),orE85
(containsupto85%ethanol).Usingunapproved
gasolinemaycauseperformanceproblemsand/or
10

enginedamagewhichmaynotbecoveredunder
warranty.
•Donotusegasolinecontainingmethanol.
•Donotstorefueleitherinthefueltankorfuel
containersoverthewinterunlessyouuseafuel
stabilizer.
•Donotaddoiltogasoline.
UsingStabilizer/Conditioner
Usefuelstabilizer/conditionerinthemachinetokeep
thefuelfreshlongerwhenusedasdirectedbythe
fuel-stabilizermanufacturer.
Important:Donotusefueladditivescontaining
methanolorethanol.
Addtheamountoffuelstabilizer/conditionertofresh
fuelasdirectedbythefuel-stabilizermanufacturer.
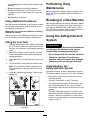
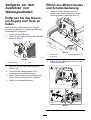
FillingtheFuelTank
1.Parkthemachineonalevelsurface,disengage
thePTO,movethemotion-controlleverstothe
NEUTRAL-LOCKposition,andengagetheparking
brake.
2.Shutofftheengine,removethekey,andwait
forallmovingpartstostopbeforeleavingthe
operatingposition.
3.Cleanaroundthefuel-tankcapandremovethe
cap.
4.Fillthefueltanktothebottomofthellerneck.
Note:Donotllthefueltankcompletelyfull.
Theemptyspaceinthetankallowsthefuelto
expand.
5.Installthefuel-tankcapsecurely.Wipeupany
spilledfuel.
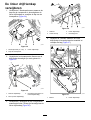
g038312
Figure6
PerformingDaily
Maintenance
Beforestartingthemachineeachday,performthe
EachUse/DailyprocedureslistedinMaintenance
(page24).
BreakinginaNewMachine
Newenginestaketimetodevelopfullpower.Mower
decksanddrivesystemshavehigherfrictionwhen
new,placingadditionalloadontheengine.Allow
40to50hoursofbreak-intimefornewmachinesto
developfullpowerandbestperformance.
UsingtheSafety-Interlock
System
WARNING
Ifsafety-interlockswitchesaredisconnected
ordamaged,themachinecouldoperate
unexpectedly,causingpersonalinjury.
•Donottamperwiththeinterlockswitches.
•Checktheoperationoftheinterlock
switchesdaily,andreplaceanydamaged
switchesbeforeoperatingthemachine.
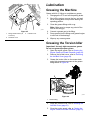
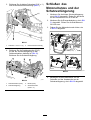
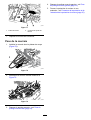
Understandingthe
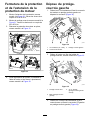
Safety-InterlockSystem
Thesafety-interlocksystemisdesignedtoprevent
PTOfromengagingunlessyoudo1ofthefollowing:
•Moveeithermotion-controllevertothecenter,
unlockedposition.
•PresstheONpositiononthePTOswitch.
Thesafety-interlocksystemisdesignedtostop
theblades/attachmentifyoumoveorrelease
bothmotion-controlleversintotheNEUTRAL-LOCK
position.
Thehourmeterhassymbolstonotifytheuser
wheneachinterlockcomponentisinthecorrect
position.Whenthecomponentisinthecorrect
position,atrianglelightsupinthecorresponding
square(Figure7).
11

g031282
Figure7
1.Thetriangleslightupwhentheinterlockcomponentsare
inthecorrectposition.
TestingtheSafety-Interlock
System
ServiceInterval:Beforeeachuseordaily
Testthesafety-interlocksystembeforeyouusethe
machineeachtime.
Note:Ifthesafetysystemdoesnotoperateas
describedbelow,haveanAuthorizedServiceDealer
repairthesafetysystemimmediately.
1.Starttheengine;refertoStartingtheEngine
(page16).
2.Movethemotion-controlleverstothecenter,
unlockedposition.
Note:Theblades/attachmentshouldstopand
theengineshouldstoprunning.
3.Starttheengineanddisengagetheparking
brake.
4.Moveeithermotion-controllevertothecenter,
unlockedposition.
5.Continueholdingthemotion-controlleverin
thecenter,unlockedpositionandpresstheON
positiononthePTOswitch.
Note:Theclutchandblades/attachmentshould
engage.
6.Moveorreleasethemotion-controlleversinto
theNEUTRAL-LOCKposition.
Note:Theblades/attachmentshouldstopand
theengineshouldcontinuetorun.
7.PresstheOFFpositiononthePTOswitchand
moveeithermotion-controllevertothecenter,
unlockedposition.
8.Continueholdingthemotion-controlleverin
thecenter,unlockedpositionandpresstheON
positiononthePTOswitch.
Note:Theclutchandblades/attachmentshould
engage.
9.PresstheOFFpositiononthePTOswitch.
Note:Theblades/attachmentshouldstop.
10.Withtheenginerunning,presstheONposition
onthePTOswitchwithoutholdingeither
motion-controllevertothecenter,unlocked
position.
Note:Theblades/attachmentshouldnot
engage.
DuringOperation
DuringOperationSafety
GeneralSafety
•Theowner/operatorcanpreventandisresponsible
foraccidentsthatmaycausepersonalinjuryor
propertydamage.
•Wearappropriateclothing,includingeye
protection;longpants;substantial,slip-resistant
footwear;andhearingprotection.Tiebacklong
hairanddonotwearlooseclothingorloose
jewelry.
•Useyourfullattentionwhileoperatingthe
machine.Donotengageinanyactivitythat
causesdistractions;otherwise,injuryorproperty
damagemayoccur.
•Donotoperatethemachinewhileill,tired,or
undertheinuenceofalcoholordrugs.
•Nevercarrypassengersonthemachineandkeep
bystandersandpetsawayfromthemachine
duringoperation.
•Operatethemachineonlyingoodvisibilityand
appropriateweatherconditions.Donotoperate
themachinewhenthereistheriskoflightning.
•Wetgrassorleavescancauseseriousinjuryif
youslipandcontacttheblade.Avoidmowingin
wetconditions.
•Beforeyoustarttheengine,ensurethatalldrives
areinneutral,theparkingbrakeisengaged,and
youareintheoperatingposition.
•Ensurethatyouhavegoodfootingwhileusingthis
machine,especiallywhenbackingup.
•Keepyourhandsandfeetawayfromthecutting
units.Keepclearofthedischargeopeningatall
times.
•Lookbehindanddownbeforebackinguptobe
sureofaclearpath.
•Useextremecarewhenapproachingblind
corners,shrubs,trees,orotherobjectsthatmay
blockyourview.
12

•Stopthebladeswheneveryouarenotmowing.
•Stopthemachine,removetheignitionkey,and
waitforallmovingpartstostopbeforeinspecting
themowerdeckorattachmentafterstrikingan
objectorifthereisanabnormalvibrationinthe
machine.Makeallnecessaryrepairsbefore
resumingoperation.
•Slowdownandusecautionwhenmakingturns
andcrossingroadsandsidewalkswiththe
machine.Alwaysyieldtheright-of-way.
•Disengagethecuttingunitandshutofftheengine
beforeadjustingtheheightofcut(unlessyoucan
adjustitfromtheoperatingposition).
•Operatetheengineonlyinwell-ventilatedareas.
Exhaustgasescontaincarbonmonoxide,which
islethalifinhaled.
•Neverleavearunningmachineunattended.
•Beforeleavingtheoperatingposition(including
toemptythecatchersortounclogthechute),do
thefollowing:
–Parkthemachineonalevelsurface.
–Disengagethepowertake-off.
–Engagetheparkingbrake.
–Shutofftheengineandremovetheignitionkey.
–Waitforallmovingpartstostop.
•Shutoffthemachineanddisengagethedriveto
thecuttingunitinthefollowingsituations:
–Beforefueling
–Beforeclearingblockages
–Beforechecking,cleaning,ormaintainingthe
cuttingunit
–Afterstrikingaforeignobjectorifanabnormal
vibrationoccurs.Inspectthecuttingunitfor
damageandmakerepairsbeforestartingand
operatingthemachine
–Beforeleavingtheoperatingposition
•Donotusethemachineasatowingvehicle.
•Useonlyaccessoriesandattachmentsapproved
byTheT oro®Company.
SlopeSafety
•Slopesareamajorfactorrelatedtolossofcontrol
androlloveraccidents,whichcanresultinsevere
injuryordeath.Youareresponsibleforsafeslope
operation.Operatingthemachineonanyslope
requiresextracaution.Beforeusingthemachine
onaslope,dothefollowing:
–Reviewandunderstandtheslopeinstructions
inthemanualandonthemachine.
–Evaluatethesiteconditionsofthedayto
determineiftheslopeissafeformachine
operation.Usecommonsenseandgood
judgmentwhenperformingthisevaluation.
Changesintheterrain,suchasmoisture,can
quicklyaffecttheoperationofthemachineon
aslope.
•Operateacrossslopes,neverupanddown.Avoid
operationonexcessivelysteeporwetslopes.
•Identifyhazardsatthebaseoftheslope.Do
notoperatethemachineneardrop-offs,ditches,
embankments,water,orotherhazards.The
machinecouldsuddenlyrolloverifawheelgoes
overtheedgeortheedgecollapses.Keepasafe
distance(twicethewidthofthemachine)between
themachineandanyhazard.Useawalk-behind
machineorahandheldtooltooperateinthese
areas.
•Avoidstarting,stopping,orturningthemachineon
slopes.Avoidmakingsuddenchangesinspeedor
direction;turnslowlyandgradually.
•Donotoperateamachineunderanyconditions
wheretraction,steeringorstabilityisinquestion.
Beawarethatoperatingthemachineonwet
grass,acrossslopesordownhillmaycausethe
machinetolosetraction.Lossoftractiontothe
drivewheelsmayresultinslidingandalossof
brakingandsteering.Themachinecanslideeven
ifthedrivewheelsarestopped.
•Removeormarkobstaclessuchasditches,holes,
ruts,bumps,rocks,orotherhiddenhazards.T all
grasscanhideobstacles.Uneventerraincould
overturnthemachine.
•Useextracarewhileoperatingwithaccessoriesor
attachments.Thesecanchangethestabilityof
themachineandcausealossofcontrol.Follow
directionsforcounterweights.
•Ifyoulosecontrolofthemachine,stepoffand
awayfromthedirectionoftravelofthemachine.
13

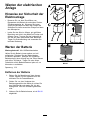
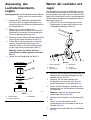
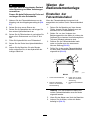
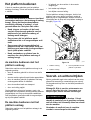
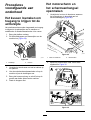
OperatingtheParking
Brake
Alwaysengagetheparkingbrakewhenyoushutoff
themachineorleaveitunattended.Beforeeachuse,
checktheparkingbrakeforproperoperation.
Iftheparkingbrakedoesnotholdsecurely,adjustit;
refertoAdjustingtheBrakes(page47).
Pulltheparking-brakeleverrearwardtoengageit
(Figure8).
Pushtheparking-brakeleverforwardtodisengageit.
g009465
Figure8
1.Parkingbrake—engaged2.Parking
brake—disengaged
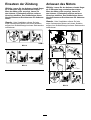
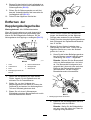
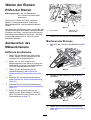
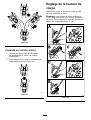
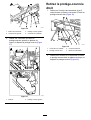
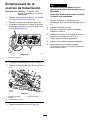
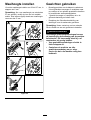
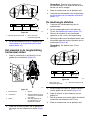
Operatingthe
Mower-Blade-Control
Switch(PTO)
Usetheblade-controlswitch(PTO)inconjunctionwith
themotion-controlleverstoengageanddisengage
themowerblades.
EngagingtheMowerBlades(PTO)
g301277
Figure9
14

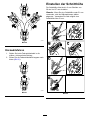
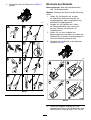
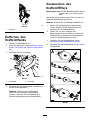
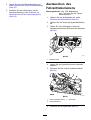
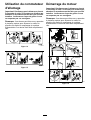
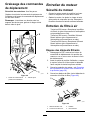
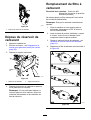
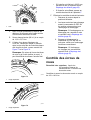
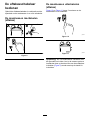
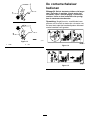
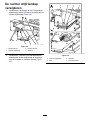
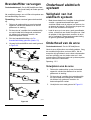
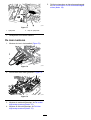
DisengagingtheMowerBlades
(PTO)
Figure10andFigure11show2waystodisengage
themowerblades.
g301401
Figure10
g031593
Figure11
Note:Ifyoudisengagethemowerbladesby
releasingthemotion-controllevers,youcanengage
thebladesagainbypressingtheONpositionofthe
switch(Figure9)withoutpressingtheOFFposition
rst.
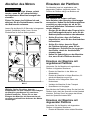
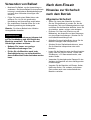
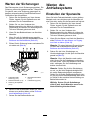
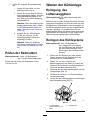
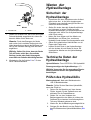
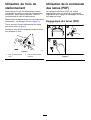
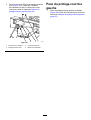
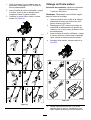
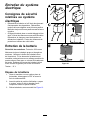
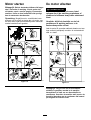
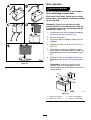
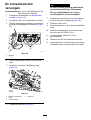
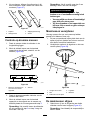
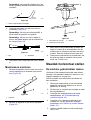
OperatingtheThrottle
YoucanmovethethrottlecontrolbetweenFASTand
SLOWpositions(Figure12).
AlwaysusetheFASTpositionwhenengagingthePTO.
g008946
Figure12
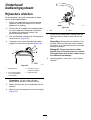
OperatingtheChoke
Usethechoketostartacoldengine.
1.Pullupthechokeknobtoengagethechoke
beforeusingthekeyswitch(Figure13).
2.Pushdownthechokeknobtodisengagethe
chokeaftertheenginehasstarted(Figure13).
g008959
Figure13
1.ONposition2.OFFposition
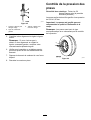
15

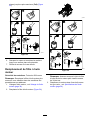
OperatingtheIgnition
Switch
Important:Donotengagethestarterformore
than5secondsatatime.Iftheenginefailsto
start,wait15secondsbetweenattempts.Failure
tofollowtheseinstructionscanburnoutthe
startermotor.
Note:Youmayneedtorepeatthecycleforstarting
theenginewhenyoustartitforthersttimeafteryou
havelledacompletelyemptyfuelsystemwithfuel.
g031239
Figure14
g031281
Figure15
StartingtheEngine
Important:Donotengagethestarterformore
than5secondsatatime.Iftheenginefailsto
start,wait15secondsbetweenattempts.Failure
tofollowtheseinstructionscanburnoutthe
startermotor.
Note:Youmayneedtorepeatthecycleforstarting
theenginewhenyoustartitforthersttimeafteryou
havelledacompletelyemptyfuelsystemwithfuel.
g339443
Figure16
16

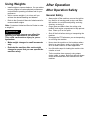
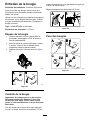
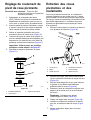
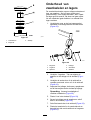
ShuttingOfftheEngine
CAUTION
Childrenorbystandersmaybeinjuredifthey
moveorattempttooperatethemachinewhile
itisunattended.
Alwaysremovethekeyandengagethe
parkingbrakewhenleavingtheoperator’s
position.
Lettheengineidleatslowthrottle(turtle)for60
secondsbeforeturningthekeyswitchtotheOFF
position.
g301288
Figure17
Important:Makesurethatthefuel-shutoffvalve
isclosedbeforetransportingorstoringthe
machinetopreventafuelleak.Beforestoringthe
machine,disconnectthesparkplug(s)toprevent
thepossibilityofaccidentalstarting.
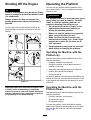
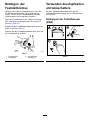
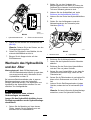
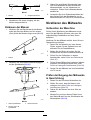
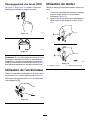
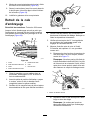
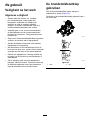
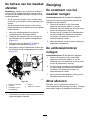
OperatingthePlatform
Youcanusethemachinewiththeplatforminthe
upordownposition.Itisyourpreferenceonwhich
positiontouse.
WARNING
Theoperatorplatformisheavyandmaycause
injurywhenyouraiseorlowerit.Carefully
lowerorraisetheoperatorplatform,as
suddenlydroppingitcouldinjureyou.
•Donotputyourhandsorngersinthe
platform-pivotareawhenloweringor
raisingtheoperatorplatform.
•Makesurethattheplatformissupported
whenyoupullthelatchpinout.
•Makesurethatthelatchsecuresthe
platformwhenfoldingitup.Pushittight
againstthecushionforthelatchpinto
lockintoplace.
•Keepbystandersawayfromthemachine
whenraisingorloweringtheplatform.
OperatingtheMachinewiththe
PlatformUp
Operatethemachinewiththeplatformupforthe
followingconditions:
•Usingthemachineneardrop-offs
•Usingthemachineinsmallareaswherethe
machineistoolarge
•Areaswithlow-hangingbranchesorobstacles
•Loadingthemachinefortransport
•Drivingupslopes
Toraisetheplatform,pullthebackoftheplatformup
sothatthelatchpinandknoblockitintoplace.Push
ittightagainstthecushionforthelatchpintolockit
intoplace.
OperatingtheMachinewiththe
PlatformDown
Operatethemachinewiththeplatformdownforthe
followingconditions:
•Usingthemachineinmostareas
•Drivingacrossslopes
•Drivingdownslopes
Tolowertheplatform,pushtheplatformforward
againstthecushiontoreleasepressureonthelatch
pin,thenpulltheknoboutandlowertheplatform
(Figure18).
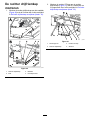
17

g031026
Figure18
1.Platformup
3.Pulltheknobouttorelease
theplatform.
2.Platformdown
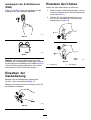
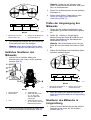
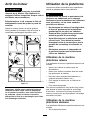
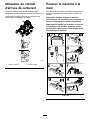
DrivingForwardor
Backward
Thethrottlecontrolregulatestheenginespeedas
measuredinrpm(revolutionsperminute).Place
thethrottlecontrolintheFASTpositionforbest
performance.
Important:Backthemachineovercurbs,1wheel
atatime;drivingitforwardovercurbscould
damagethemachine.
CAUTION
Themachinecanspinveryrapidly,andyou
maylosecontrolofthemachine,causing
personalinjurytoyouanddamagetothe
machine.
Slowdownthemachinebeforemakingsharp
turns.
DrivingForward
1.Disengagetheparkingbrake;refertoOperating
theParkingBrake(page14).
2.Movethemotion-controlleverstothecenter,
unlockedposition.
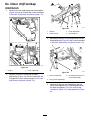
g030983
Figure19
1.Frontreferencebar
4.Rightcontrollever
2.Leftcontrollever
5.Rightcontrolleverinthe
NEUTRAL-LOCKposition
3.Rearreferencebar6.Leftcontrolleverinthe
NEUTRAL-LOCKposition
3.Slowlypushthemotion-controlleversforward
(Figure20).
Note:Theengineshutsoffifyoumovea
motion-controlleverwhiletheparkingbrakeis
engaged.
Note:Thefartheryoumovethemotion-control
leversineitherdirection,thefasterthemachine
movesinthatdirection.
Note:Tostop,pullthemotion-controllevers
backtotheNEUTRALposition.
18

g273674
Figure20
DrivingBackward
1.Movebothmotion-controlleverstothecenter,
unlockedposition.
2.Slowlypullthemotion-controlleversrearward
(Figure21).
g273673
Figure21
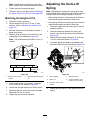
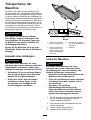
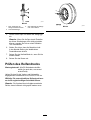
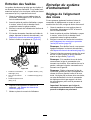
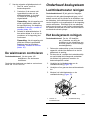
AdjustingtheHeight-of-Cut
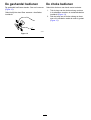
Theheight-of-cutcanbeadjustedfrom38to127mm
(1-1/2to5inches)in6mm(1/4inch)increments.
Note:Usingaheight-of-cutunder51mm(2inches)
increasesthewearonthemower-deckbelt.Usea
height-of-cutthatisgreaterthan51mm(2inches)
wheneverpossible.
g267253
Figure22
19
Page is loading ...
Page is loading ...
Page is loading ...
Page is loading ...
Page is loading ...
Page is loading ...
Page is loading ...
Page is loading ...
Page is loading ...
Page is loading ...
Page is loading ...
Page is loading ...
Page is loading ...
Page is loading ...
Page is loading ...
Page is loading ...
Page is loading ...
Page is loading ...
Page is loading ...
Page is loading ...
Page is loading ...
Page is loading ...
Page is loading ...
Page is loading ...
Page is loading ...
Page is loading ...
Page is loading ...
Page is loading ...
Page is loading ...
Page is loading ...
Page is loading ...
Page is loading ...
Page is loading ...
Page is loading ...
Page is loading ...
Page is loading ...
Page is loading ...
Page is loading ...
Page is loading ...
Page is loading ...
Page is loading ...
Page is loading ...
Page is loading ...
Page is loading ...
Page is loading ...
Page is loading ...
Page is loading ...
Page is loading ...
Page is loading ...
Page is loading ...
Page is loading ...
Page is loading ...
Page is loading ...
Page is loading ...
Page is loading ...
Page is loading ...
Page is loading ...
Page is loading ...
Page is loading ...
Page is loading ...
Page is loading ...
Page is loading ...
Page is loading ...
Page is loading ...
Page is loading ...
Page is loading ...
Page is loading ...
Page is loading ...
Page is loading ...
Page is loading ...
Page is loading ...
Page is loading ...
Page is loading ...
Page is loading ...
Page is loading ...
Page is loading ...
Page is loading ...
Page is loading ...
Page is loading ...
Page is loading ...
Page is loading ...
Page is loading ...
Page is loading ...
Page is loading ...
Page is loading ...
Page is loading ...
Page is loading ...
Page is loading ...
Page is loading ...
Page is loading ...
Page is loading ...
Page is loading ...
Page is loading ...
Page is loading ...
Page is loading ...
Page is loading ...
Page is loading ...
Page is loading ...
Page is loading ...
Page is loading ...
Page is loading ...
Page is loading ...
Page is loading ...
Page is loading ...
Page is loading ...
Page is loading ...
Page is loading ...
Page is loading ...
Page is loading ...
Page is loading ...
Page is loading ...
Page is loading ...
Page is loading ...
Page is loading ...
Page is loading ...
Page is loading ...
Page is loading ...
Page is loading ...
Page is loading ...
Page is loading ...
Page is loading ...
Page is loading ...
Page is loading ...
Page is loading ...
Page is loading ...
Page is loading ...
Page is loading ...
Page is loading ...
Page is loading ...
Page is loading ...
Page is loading ...
Page is loading ...
Page is loading ...
Page is loading ...
Page is loading ...
Page is loading ...
Page is loading ...
Page is loading ...
Page is loading ...
Page is loading ...
Page is loading ...
Page is loading ...
Page is loading ...
Page is loading ...
Page is loading ...
Page is loading ...
Page is loading ...
Page is loading ...
Page is loading ...
Page is loading ...
Page is loading ...
Page is loading ...
Page is loading ...
Page is loading ...
Page is loading ...
Page is loading ...
Page is loading ...
Page is loading ...
Page is loading ...
Page is loading ...
Page is loading ...
Page is loading ...
Page is loading ...
Page is loading ...
Page is loading ...
Page is loading ...
Page is loading ...
Page is loading ...
Page is loading ...
Page is loading ...
Page is loading ...
Page is loading ...
Page is loading ...
Page is loading ...
Page is loading ...
Page is loading ...
Page is loading ...
Page is loading ...
Page is loading ...
Page is loading ...
Page is loading ...
Page is loading ...
Page is loading ...
Page is loading ...
Page is loading ...
Page is loading ...
Page is loading ...
Page is loading ...
Page is loading ...
Page is loading ...
Page is loading ...
Page is loading ...
Page is loading ...
Page is loading ...
Page is loading ...
Page is loading ...
Page is loading ...
Page is loading ...
Page is loading ...
Page is loading ...
Page is loading ...
Page is loading ...
Page is loading ...
Page is loading ...
Page is loading ...
Page is loading ...
Page is loading ...
Page is loading ...
Page is loading ...
Page is loading ...
Page is loading ...
Page is loading ...
Page is loading ...
Page is loading ...
Page is loading ...
Page is loading ...
Page is loading ...
Page is loading ...
Page is loading ...
Page is loading ...
Page is loading ...
Page is loading ...
Page is loading ...
Page is loading ...
Page is loading ...
Page is loading ...
Page is loading ...
Page is loading ...
Page is loading ...
Page is loading ...
Page is loading ...
Page is loading ...
Page is loading ...
Page is loading ...
Page is loading ...
Page is loading ...
Page is loading ...
Page is loading ...
Page is loading ...
Page is loading ...
Page is loading ...
Page is loading ...
Page is loading ...
Page is loading ...
Page is loading ...
Page is loading ...
Page is loading ...
Page is loading ...
Page is loading ...
Page is loading ...
Page is loading ...
Page is loading ...
Page is loading ...
Page is loading ...
Page is loading ...
-
 1
1
-
 2
2
-
 3
3
-
 4
4
-
 5
5
-
 6
6
-
 7
7
-
 8
8
-
 9
9
-
 10
10
-
 11
11
-
 12
12
-
 13
13
-
 14
14
-
 15
15
-
 16
16
-
 17
17
-
 18
18
-
 19
19
-
 20
20
-
 21
21
-
 22
22
-
 23
23
-
 24
24
-
 25
25
-
 26
26
-
 27
27
-
 28
28
-
 29
29
-
 30
30
-
 31
31
-
 32
32
-
 33
33
-
 34
34
-
 35
35
-
 36
36
-
 37
37
-
 38
38
-
 39
39
-
 40
40
-
 41
41
-
 42
42
-
 43
43
-
 44
44
-
 45
45
-
 46
46
-
 47
47
-
 48
48
-
 49
49
-
 50
50
-
 51
51
-
 52
52
-
 53
53
-
 54
54
-
 55
55
-
 56
56
-
 57
57
-
 58
58
-
 59
59
-
 60
60
-
 61
61
-
 62
62
-
 63
63
-
 64
64
-
 65
65
-
 66
66
-
 67
67
-
 68
68
-
 69
69
-
 70
70
-
 71
71
-
 72
72
-
 73
73
-
 74
74
-
 75
75
-
 76
76
-
 77
77
-
 78
78
-
 79
79
-
 80
80
-
 81
81
-
 82
82
-
 83
83
-
 84
84
-
 85
85
-
 86
86
-
 87
87
-
 88
88
-
 89
89
-
 90
90
-
 91
91
-
 92
92
-
 93
93
-
 94
94
-
 95
95
-
 96
96
-
 97
97
-
 98
98
-
 99
99
-
 100
100
-
 101
101
-
 102
102
-
 103
103
-
 104
104
-
 105
105
-
 106
106
-
 107
107
-
 108
108
-
 109
109
-
 110
110
-
 111
111
-
 112
112
-
 113
113
-
 114
114
-
 115
115
-
 116
116
-
 117
117
-
 118
118
-
 119
119
-
 120
120
-
 121
121
-
 122
122
-
 123
123
-
 124
124
-
 125
125
-
 126
126
-
 127
127
-
 128
128
-
 129
129
-
 130
130
-
 131
131
-
 132
132
-
 133
133
-
 134
134
-
 135
135
-
 136
136
-
 137
137
-
 138
138
-
 139
139
-
 140
140
-
 141
141
-
 142
142
-
 143
143
-
 144
144
-
 145
145
-
 146
146
-
 147
147
-
 148
148
-
 149
149
-
 150
150
-
 151
151
-
 152
152
-
 153
153
-
 154
154
-
 155
155
-
 156
156
-
 157
157
-
 158
158
-
 159
159
-
 160
160
-
 161
161
-
 162
162
-
 163
163
-
 164
164
-
 165
165
-
 166
166
-
 167
167
-
 168
168
-
 169
169
-
 170
170
-
 171
171
-
 172
172
-
 173
173
-
 174
174
-
 175
175
-
 176
176
-
 177
177
-
 178
178
-
 179
179
-
 180
180
-
 181
181
-
 182
182
-
 183
183
-
 184
184
-
 185
185
-
 186
186
-
 187
187
-
 188
188
-
 189
189
-
 190
190
-
 191
191
-
 192
192
-
 193
193
-
 194
194
-
 195
195
-
 196
196
-
 197
197
-
 198
198
-
 199
199
-
 200
200
-
 201
201
-
 202
202
-
 203
203
-
 204
204
-
 205
205
-
 206
206
-
 207
207
-
 208
208
-
 209
209
-
 210
210
-
 211
211
-
 212
212
-
 213
213
-
 214
214
-
 215
215
-
 216
216
-
 217
217
-
 218
218
-
 219
219
-
 220
220
-
 221
221
-
 222
222
-
 223
223
-
 224
224
-
 225
225
-
 226
226
-
 227
227
-
 228
228
-
 229
229
-
 230
230
-
 231
231
-
 232
232
-
 233
233
-
 234
234
-
 235
235
-
 236
236
-
 237
237
-
 238
238
-
 239
239
-
 240
240
-
 241
241
-
 242
242
-
 243
243
-
 244
244
-
 245
245
-
 246
246
-
 247
247
-
 248
248
-
 249
249
-
 250
250
-
 251
251
-
 252
252
-
 253
253
-
 254
254
-
 255
255
-
 256
256
-
 257
257
-
 258
258
-
 259
259
-
 260
260
-
 261
261
-
 262
262
-
 263
263
-
 264
264
-
 265
265
-
 266
266
-
 267
267
-
 268
268
-
 269
269
-
 270
270
-
 271
271
-
 272
272
-
 273
273
-
 274
274
-
 275
275
-
 276
276


Toro GrandStand Mower, With 122cm Rear Discharge TURBO FORCE Cutting Unit User manual
- Type
- User manual
- This manual is also suitable for
Ask a question and I''ll find the answer in the document
Finding information in a document is now easier with AI
in other languages
- français: Toro GrandStand Mower, With 122cm Rear Discharge TURBO FORCE Cutting Unit Manuel utilisateur
- Deutsch: Toro GrandStand Mower, With 122cm Rear Discharge TURBO FORCE Cutting Unit Benutzerhandbuch
- Nederlands: Toro GrandStand Mower, With 122cm Rear Discharge TURBO FORCE Cutting Unit Handleiding
Related papers
-
Toro GrandStand Mower, With 48in TURBO FORCE Cutting Unit User manual
-
Toro GrandStand Multi Force Mower, With 52in TURBO FORCE Cutting Unit User manual
-
-
-
-
Toro GrandStand Mower, With 122cm TURBO FORCE Cutting Unit User manual
-
Toro GrandStand Mower, With 91cm Rear Discharge TURBO FORCE Cutting Unit User manual
-
Toro TimeCutter 6000 Riding Mower User manual
-
Toro Proline 91 cm Mid-Size Commercial Walk Behind Mower 44410TE User manual
-
Other documents
-
 EMAK EF 106/16 K H User manual
-
Ransomes JLGXX006/JLGXX008 Owner's manual
-
-
Stiga READY AMBIANCE User manual
-
McCulloch GBV 345 Owner's manual
-
 MASTER PUMP MPG33HP7 Owner's manual
-
Husqvarna PP 345 E Owner's manual
-
Dhollandia DH-AR4 Series User manual
-
APRILIA SL 750 SHIVER Owner's manual
-

