Page is loading ...

User Guide
Grill Gazebo
YEAR WARRANTY
2
MODEL: 43472-14
AFTER SALES SUPPORT
[email protected]1800 599 8898
USA
Now that you have purchased a
Gardenline® product you can rest
assured in the knowledge that as well as
your 2 year parts and labor guarantee
you have the added peace of mind of
dedicated helplines and web support.

2
AFTER SALES SUPPORT 1800 599 8898 [email protected] 43472-14
2
3
AFTER SALES SUPPORT 1800 599 8898 [email protected] 43472-14
1
1
Introduction
2
Parts List
3
Getting Started
4
Assembly Instructions
5
Instructions for Use
6
Warranty
Contents Introduction
Congratulations!
You have made an excellent choice with the purchase of
this quality Gardenline® product. By doing so you now
have the assurance and peace of mind which comes from
purchasing a product that has been manufactured to the
highest standards of performance and safety, supported
by the high quality standards of ALDI.
We want you to be completely satisfied with your
purchase so this Gardenline® product is backed by a
comprehensive manufacturer’s 2 year warranty and an
outstanding after sales service through our dedicated
Helpline.
We hope you will enjoy using your purchase for many
years to come.
If you require technical support or in the unlikely event
that your purchase is faulty please telephone our
Helpline for immediate assistance. Faulty product claims
made within the 2 year warranty period will be repaired
or replaced free of charge provided that you have satis-
factory proof of purchase (keep your receipt). This does
not affect your statutory rights. However, be aware that
the warranty will become null and void if the
product is found to have been deliberately damaged,
misused or disassembled.

4
AFTER SALES SUPPORT 1800 599 8898 [email protected] 43472-14
4
5
AFTER SALES SUPPORT 1800 599 8898 [email protected] 43472-14
Parts List
2
PARTS
Picture Description Qty
A Pole A 1
B Pole B 1
C Pole C 2
D Long Arch 2
E Short Arch 2
F Shelf 2
G
Canopy
Two Tier Rib
4
H Canopy Rib 2
I
Top Canopy
Connector
1
J
Main Canopy
Connector
1
K Rib Brace 6
L Shelf Brace 4
Parts List
2
PARTS
Picture Description Qty
M Utensil Rack 1
N Stake 8
O Bottle Opener 1
P Pole Foot 4
Q Top Canopy 1
R Main Canopy 1
S
Black Zinc Screw
(M6*15 mm)
33
T
White Zinc Screw
(M6*15 mm)
2
U
Screw
(M6* 28 mm)
6
V Knob Screw 8
W Bolt 6

6
AFTER SALES SUPPORT 1800 599 8898 [email protected] 43472-14
6
7
AFTER SALES SUPPORT 1800 599 8898 [email protected] 43472-14
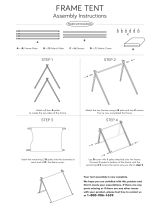
1. Place a Pole Foot (P) through Pole A (A) and slide the Pole Foot (P)
down the length of Pole A (A) until it reaches the bottom of the
pole. Follow this same procedure with Pole B (B) and both of Pole
C (C).
Screw in a Rib Brace (K) at the top of Pole A (A), using M6x15mm
screw (S). Follow this same procedure with Pole B (B) and both of
Pole C (C).
Screw in a Rib Brace (K) into the center of a Long Arch (D), using
M6x15mm screw (S). Follow this same step with the second Long
Arch (D).
Screw in one side of a Long Arch (D) into the top of Pole A (A), us-
ing two M6x15mm screws (S). Screw in the other side of the same
Long Arch (D) into the top of Pole C (C), using two M6x15mm
screws (S).
A
C
D
S
K
S
P
P
P
Identify all parts packaged in carton against the
parts list. Remove all protective materials and place
parts on a non-abrasive surface to avoid
scratching. If any parts are missing or damaged,
DO NOT attempt to assemble. Please contact our
customer service center (Monday-Friday 9:00am –
5:00pm EST) at 1-800-599-8898.
Caution
Read all the instructions before assembly. Failure to do so may result
in faulty assembly and potential injury! Assemble product on a soft,
non-abrasive surface such as a carpet or cardboard to avoid
damaging the item. Seek assistance to assemble bulky or heavy
items. After final alignment, make sure all bolts and nuts are
securely tightened with screw covers pressed in place.
Getting Started Assembly Instructions
43

8
AFTER SALES SUPPORT 1800 599 8898 [email protected] 43472-14
8
9
AFTER SALES SUPPORT 1800 599 8898 [email protected] 43472-14
3. Screw in a Shelf Brace (L) onto the bottom of either end of the
Shelf (F), using two M6x15mm screws (S). Follow this same step
with the second Shelf (F).
Screw in Utensil Rack (M) with hooks facing inward into the bot-
tom of one Shelf (F), using three M6x15mm screws (S).
Place the Shelf (F) with the Utensil Rack (M) between Pole A (A)
and Pole C (C). Tighten four Knob Screws (V) through the Shelf
Braces (L) attached to the Shelf (F) and to Pole A (A) and Pole C (C).
Place the second Shelf (F) in between Pole B (B) and the second
Pole C (C). Tighten four Knob Screws (V) through the Shelf Braces
(L) attached to that Shelf (F) and to Pole B (B) and the second Pole
C (C).
2. Screw in one side of Long Arch (D) into the top of Pole B (B), using
two M6x15mm screws (S). Screw in the other side of the same
Long Arch (D) into the top of the second Pole C (C), using two
M6x15mm screws (S).
Screw in one side of a Short Arch (E) into the second set holes at
the top of Pole A (A), using two M6x15mm screws (S). Screw in
the other side of the same Short Arch (E) into the top of Pole C (C),
using two M6x15mm screws (S).
Screw in one side of a Short Arch (E) into the second set holes at
the top of Pole B (B), using two M6x15mm screws (S) . Screw in
the other side of the same Short Arch (E) into the top of the
second Pole C (C), using two M6x15mm screws (S).
C
B
E
E
D
S
A
C
D
F
F
V
S
M
S
F
L
Assembly Instructions Assembly Instructions
44

10
AFTER SALES SUPPORT 1800 599 8898 [email protected] 43472-14
10
11
AFTER SALES SUPPORT 1800 599 8898 [email protected] 43472-14
5. Screw in Bottle Opener (O) with the bottle opener hole facing the
ground into Pole A (A), underneath the Shelf (F) with Utensil Rack
(M) attached to it, using two [white zinc] M6x15mm screws (T).
Lift the Pole Foot (P) up from each pole and insert a Stake (N)
through the holes at the bottoms of those poles. Place each Pole
Foot (P) back in its place covering the Stakes (N).
Place the Top Canopy (Q) over the shorter ribs of part G and insert
the ends of those ribs into the canopy pockets found underneath
the Top Canopy (Q).
Place the Main Canopy (R) over the longer ribs of parts G and H
and insert the ends of those ribs into the canopy pockets found
underneath the Main Canopy (R).
4. Insert the longer rib of the four Canopy Two Tier Ribs (G) into the
longer ends of the Main Canopy Connector (J) until they snap into
place and will not budge. Insert the shorter rib of the four Canopy
Two Tier Ribs (G) into the Top Canopy Connector (I) until they snap
into place and will not budge.
Insert two Canopy Ribs (H) into the shorter ends of the Main
Canopy Connector (J) until they snap into place and will not
budge. Place the longer ribs of the four Canopy Two Tier Ribs (G)
in between the Rib Bracers (K) that are at the tops of Pole A (A),
Pole B (B), and both Pole C (C). Insert M6x28mm screw (U) through
each Rib Bracer (K) and through each long rib of the Canopy Two
Tier Ribs (G) and tighten them down with a Nut (W).
Place the Canopy Ribs (H) in between the Rib Bracers (K) that
are at the tops of both Long Arches (D). Insert M6x28mm screw
(U) through each Rib Bracer (K) and through each long rib of the
Canopy Ribs (H) and tighten them down with a Nut (W).
G
G
G
U
W
J
I
H
R
N
Q
T
O
Assembly Instructions Assembly Instructions
44

12
AFTER SALES SUPPORT 1800 599 8898 [email protected] 43472-14
12
13
AFTER SALES SUPPORT 1800 599 8898 [email protected] 43472-14
Two Year Limited Warranty
All furniture manufactured and sold by Aldi is warranted to
the original purchaser against defects in workmanship and
materials, provided the item was a factory sealed at the time
of purchase and is maintained with care and used only for
personal purposes. If a product fails during the first two years
from date of purchase under the terms of our limited war-
ranty, the manufacturer will replace the item at no charge. If
the item was purchased as an open box, previously returned,
or clearance item, the purchaser may obtain replacement
parts for a nominal cost if parts are still available. After two
years, it will be the original purchasers’ responsibility to pay
for freight and packing. The manufacturer reserves the right,
in the case of discontinued or out of production models, to
replace with an item of similar quality. Warranty is to the
original purchaser and is non-transferable.
Note: You must retain original receipt to obtain
warranty!
Frame
The frame is warranted against defects in materials and workman-
ship from the date of original purchase. Damage to frame or welds
due to commercial use, improper assembly, exposure to water and
sub-freezing temperatures, and/or abuse are not covered.
Steel components are treated with rust inhibiting paint that protects
them from rust. However, due to the nature of steel, rusting will
occur if the protective coating is scratched. It is recommended that
care be taken when assembling and handling the product in order
to prevent the paint from being scratched. If scratching or damage
Warranty
6
occurs, it is recommended that the area be touched up immediately
with rust inhibiting paint. Surface rust can be removed easily using
a very light application of common cooking oil. If rusting occurs and
is not treated correctly, the oxidation may start dripping onto the
deck or patio. This may result in stains that are difficult to remove.
Fabric
Umbrella fabric is warranted against separation at the seams.
Fading, mildew, and/or discoloration due to exposure to elements,
chemicals, and spills are not covered.
Umbrella
Umbrella frames are warranted against manufacturer’s defects in
workmanship and materials.
Safety Warning! Umbrellas must be closed when not in
use and taken down in windy conditions.
Powder coat and/or Paint
The finish is warranted against blistering, peeling, or cracking.
Fading resulting from exposure to elements, chemicals, and spills are
not covered. Scratches and chips due to normal wear and use are
not covered
Freight & Packing
The manufacturer will be responsible for shipping, handling, and
packaging charges for all valid warranty claims.
Care & Maintenance
Be careful to never allow water build up in frames as this will cause
corrosion and freeze damage in cold climates. Wash all frames with
Warranty
6

15
AFTER SALES SUPPORT 1800 599 8898 [email protected] 43472-14
14
AFTER SALES SUPPORT 1800 599 8898 [email protected] 43472-14
14
a solution of mild soap and water. Rinse with clean water and dry
with a soft absorbent cloth towel. Frames can be treated with a liq-
uid wax for maximum protection against UV rays and/or salty damp
air. If your set includes cushions, slings, and/or an umbrella, they
may be cleaned by hand with a solution of soap and water with a
clean water rinse.
Exclusions
• Damage caused by acts of nature (weather damage)
• Wind damage
• Failure caused by unreasonable, unanticipated or abusive use
• Failure caused by a lack of reasonable and necessary care and
maintenance
• Normal fade of fabrics
• Glass table tops
• Bursting or cracking of tubing due to exposure to water and
freezing temperatures
• General frame rusting
• Lack of original receipt will void warranty.
Proof of purchase (dated register receipt and store name) is required
for warranty claims. Lack of original receipt will void warranty.
Customer Service
Monday-Friday 9:00am-5:00pm EST
Phone: 800-599-8898
Fax: 973-227-7189
E-mail: [email protected]
Web: www.tdcusainc.com
Address: 14 Madison Rd, Fairfield, NJ 07004
Warranty
6
WARNING
KEEP ALL FLAME AND HEAT SOURCES AWAY FROM THIS TENT
FABRIC. This tent is made with fabric that meets CPAI-84 speci-
fications for flame resistance. It is not fire proof. The fabric
will burn if left in continuous contact with any flame source.
The application of any foreign substance to the tent fabric
may render the flame-resistant properties ineffective.

YEAR WARRANTY
Your details:
Date of purchase*
Name
Address
E mail
Description of malfunction:
Name of Product:
Location of purchase
Phone lines available
Monday to Friday
9am - 5pm EST.
Return your completed
warranty card and a copy
of your receipt to:
TDC USA, Inc.
14 Madison Road
Fairfield, NJ 07004
United States of America
* Please keep your receipt with this warranty card. In order to validate warranty, you must include a
copy of your receipt.
USA
AFTER SALES SUPPORT
[email protected]1800 599 8898
Grill Gazebo
MODEL: 43472-14
/