Spektrum SPMXSER1025 Firma 25A Brushed Smart ESC User manual
- Category
- Remote controlled toys
- Type
- User manual
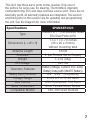
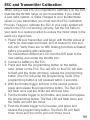
Spektrum SPMXSER1025 Firma 25A Brushed Smart ESC is a waterproof and programmable ESC with a built-in dual protocol receiver. It is compatible with Spektrum DSM2®/DSMR®/SLT surface transmitters and includes built-in SMART telemetry. Use a Spektrum transmitter with SMART compatible telemetry to view ESC and battery data. This 2-in-1 ESC/receiver is perfect for brushed motors in 1/10-scale and 1/12-scale vehicles. It features a 25-amp continuous current handling capacity and a 70-amp burst current handling capacity. The ESC also has a built-in BEC with a 6-volt output and a 1.
Spektrum SPMXSER1025 Firma 25A Brushed Smart ESC is a waterproof and programmable ESC with a built-in dual protocol receiver. It is compatible with Spektrum DSM2®/DSMR®/SLT surface transmitters and includes built-in SMART telemetry. Use a Spektrum transmitter with SMART compatible telemetry to view ESC and battery data. This 2-in-1 ESC/receiver is perfect for brushed motors in 1/10-scale and 1/12-scale vehicles. It features a 25-amp continuous current handling capacity and a 70-amp burst current handling capacity. The ESC also has a built-in BEC with a 6-volt output and a 1.


-
 1
1
-
 2
2
-
 3
3
-
 4
4
-
 5
5
-
 6
6
-
 7
7
-
 8
8
-
 9
9
-
 10
10
-
 11
11
-
 12
12
-
 13
13
-
 14
14
-
 15
15
-
 16
16
-
 17
17
-
 18
18
-
 19
19
-
 20
20
-
 21
21
-
 22
22
-
 23
23
-
 24
24
-
 25
25
-
 26
26
-
 27
27
-
 28
28


Spektrum SPMXSER1025 Firma 25A Brushed Smart ESC User manual
- Category
- Remote controlled toys
- Type
- User manual
Spektrum SPMXSER1025 Firma 25A Brushed Smart ESC is a waterproof and programmable ESC with a built-in dual protocol receiver. It is compatible with Spektrum DSM2®/DSMR®/SLT surface transmitters and includes built-in SMART telemetry. Use a Spektrum transmitter with SMART compatible telemetry to view ESC and battery data. This 2-in-1 ESC/receiver is perfect for brushed motors in 1/10-scale and 1/12-scale vehicles. It features a 25-amp continuous current handling capacity and a 70-amp burst current handling capacity. The ESC also has a built-in BEC with a 6-volt output and a 1.
Ask a question and I''ll find the answer in the document
Finding information in a document is now easier with AI