Cisco IOS XR Software Release 5.3 User guide
- Type
- User guide

Cisco Software Manager User Guide
Americas Headquarters
Cisco Systems, Inc.
170 West Tasman Drive
San Jose, CA 95134-1706
USA
http://www.cisco.com
Tel: 408 526-4000
800 553-NETS (6387)
Fax: 408 527-0883
Text Part Number: OL-29903-02


CHAPTER 1
Cisco Software Manager User Guide
This document describes how to install and use the Cisco Software Manager (CSM) application that helps
manage the process of software maintenance upgrades (SMUs) and service packs (SPs) on devices that run
the Cisco IOS XR Software.
Information in this guide is relevant only until CSM Release 3.0. For later releases, refer to the Installation
Guide for Cisco Software Manager Server.
Service packs are available only for Cisco ASR 9000 devices, Release 4.3.2 or later versions.
Note
•Introduction, on page 1
•Changes to this Document, on page 2
•Installing CSM, on page 2
•CSM Icons and Monitor Pane, on page 7
•Pre-Requisite for SMU Recommendation, on page 8
•Setting Up CSM, on page 8
•Using CSM, on page 9
•Retrieve and View SMUs or SPs Information, on page 10
•Execute SMU or SP Tasks, on page 12
•Create a Watch List, on page 13
•Obtain SMUs or SPs Recommendations, on page 13
•Obtain an Optimized SMU List, on page 21
•Uninstalling CSM, on page 21
Introduction
Cisco Software Manager (CSM) is a management application for software maintenance upgrades (SMUs),
and service packs (SPs). It provides recommendations to users that reduce their effort in manually searching,
identifying, and analyzing SMUs and SPs that are required for a device. A SMU is a fix for a bug. An SP is
a collection of SMUs bundled in one file.
To provide the recommendations, CSM must be connected through the Internet to the cisco.com domain.
CSM is designed to connect multiple devices and provides SMUs and SPs management for multiple Cisco
IOS XR platforms and releases.
Cisco Software Manager User Guide
1OL-29903-02

CSM is a standalone Java application that can be installed on Windows, Mac OS, or UNIX. CSM supports
Cisco Carrier Routing System and Cisco ASR 9000 Series Aggregation Services Routers.
Changes to this Document
Table-1 lists the technical changes made to this document since it was first printed.
Table 1: Changes to This Document
Change SummaryDateRevision
Republished with documentation updates for CSM
version 2.0:
• Support for service packs was introduced.
• Watch List tab was introduced.
• Proxy settings in Set Up dialog box was
introduced.
• Download SMUs or SPs option was introduced.
• Transfer files option was introduced.
March 2014OL-29903-02
Initial release.May 2013OL-29903-01
Installing CSM
This section explains system software requirements, pre-requisites, and software installation procedures on
Windows, Mac OS, and UNIX for CSM.
To download CSM, click CSM.
System Software Requirements
This table lists system software requirements for installing CSM:
Table 2: System Software Requirements
NotesRequirementsArea
Use the latest patch or Service Pack released
by the OS vendor. Check with the vendor for
the latest patch or Service Pack.
• Windows
• Mac OS
• UNIX
Operating System
To download JRE, click here.• JRE 1.6
• JRE 1.7
Java Runtime Environment
Cisco Software Manager User Guide
OL-29903-022
Cisco Software Manager User Guide
Changes to this Document

Pre-Requisites
The installation script (SetupCSM.cmd for Windows or SetupCSM.sh for UNIX and Mac OS) requires JRE
to be in the search path. If JRE is not present in the search path, users can invoke the installer using the direct
path. For installation steps, see Installing CSM on Windows, on page 4,Installing CSM on Mac OS, on
page 5, or Installing CSM on UNIX, on page 6.
This section lists steps that must be executed to include JRE in the search path on the Windows system:
Procedure
Step 1 Users on Windows 7 system, open ControlPanel>SystemandSecurity>System>AdvancedSystemSettings
and users on Windows XP, open Control Panel>System>Advanced System Settings.
Step 2 In the System Properties window, click Environment Variables.
Step 3 In the System Variables section, select Path and click Edit.
Step 4 Append C:\Program Files\java\jre6\bin to the Variable Value field.
Step 5 Click OK.
JRE is included in the search path.
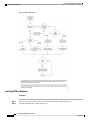
Software Installation Procedures
This section explains CSM installation procedures on Windows, Mac OS and UNIX.
This flow chart shows installing CSM procedure:
Cisco Software Manager User Guide
3OL-29903-02
Cisco Software Manager User Guide
Pre-Requisites

Figure 1: Installing CSM Flowchart
Installing CSM on Windows
Procedure
Step 1 From cisco.com, download the current version of the installation file CSM-<version>.zip.
Step 2 Unzip the installation file, (CSM-<version>.zip).
Cisco Software Manager User Guide
OL-29903-024
Cisco Software Manager User Guide
Installing CSM on Windows

Step 3 Double-click the file, SetupCSM.cmd.
CSM begins to install.
A shortcut that launches CSM is created on the desktop.
If the JRE is not made available in the search path, users must include it in the search path:
double-click SetupCSM.cmd, or execute the “<JREDir>\bin\java" -jar installer.jar command at the
command prompt. The execution of the "<JREDir>\bin\java" -jar installer.jar command should be
done in the directory where the user has unzipped the installation file content. The user needs to
open a DOS window and change over to that directory. JREDir is the location at which JRE is
present; for Windows 7 this is C:\Program Files (x86)\java\jre6 and for Windows XP it is C:\Program
Files\java\jre6.
Note
Step 4 Double-click the CSM icon on the desktop to launch CSM.
What to do next
When upgrading the application from CSM-1.0 version, users need to manually copy LoginInformation.xml
file which has device profiles, stored at the location \Users\<username>\csm\versions\1.0 to the corresponding
location for CSM-2.0 version \Users\<username>\csm\versions\2.0, CSM-2.0 to access device profiles.
Installing CSM on Mac OS
Procedure
Step 1 From cisco.com, download the current version of the installation file CSM-<version>.zip.
Step 2 Double-click the CSM-<version>.zip file, to unzip it.
A CSM-<version number> folder is created.
Step 3 Open a terminal window and change to the directory where you extracted the zip file.
Example:
cd /Users/<username>/Desktop/CSM-2.0.
Step 4 Execute these commands at the terminal window to run the installation script:
• chmod 777 SetupCSM.sh
• ./SetupCSM.sh
CSM begins to install. A shortcut that launches CSM is created on the desktop.
If the JRE is not made available in the search path, users must invoke java (JVM) directly using the
full path: /usr/bin/java -jar installer.jar to include the JRE in the search path.
Note
Step 5 Double-click CSM icon on the desktop to launch the CSM application.
Cisco Software Manager User Guide
5OL-29903-02
Cisco Software Manager User Guide
Installing CSM on Mac OS

What to do next
When upgrading the application from CSM-1.0 version, users need to manually copy LoginInformation.xml
file which has device profiles, stored at the location (base directory)/csm/versions/1.0 to the corresponding
location for CSM-2.0 version (base directory)/csm/versions/2.0, CSM-2.0 to access device profiles. A base
directory is the directory where the user has installed CSM.
Installing CSM on UNIX
Procedure
Step 1 From cisco.com, download the current version of the installation file CSM-<version>.zip.
Step 2 Open a terminal window and execute these commands:
a) Create a new folder.
Example:
mkdir newfolder
b) Unzip the file, CSM-<version>.zip. , at the newly created folder.
Example:
unzip CSM-2.0.zip
c) Change to the directory to the location where you have extracted the zip file.
d) Run the installation script:
• chmod 777 SetupCSM.sh
• ./SetupCSM.sh
CSM begins to install.
If the JRE is not made available in the search path, users must invoke java (JVM) directly using the
full path: /usr/bin/java -jar installer.jar to include the JRE in the search path.
Note
Step 3 To launch CSM, execute one of these commands:
• /users/<username>/csm/bin/CSM2.0.cmd
• /users/<username>/CSM2.0
If CSM is installed in a location other than /users/<username>, use that specific directory location
while executing above commands.
Note
What to do next
When upgrading the application from CSM-1.0 version, users need to manually copy LoginInformation.xml
file which has device profiles, stored at the location (base directory)/csm/versions/1.0 to the corresponding
location for CSM-2.0 version (base directory)/csm/versions/2.0, CSM-2.0 to access device profiles. A base
directory is the directory where the user has installed CSM.
Cisco Software Manager User Guide
OL-29903-026
Cisco Software Manager User Guide
Installing CSM on UNIX

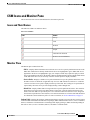
CSM Icons and Monitor Pane
This section lists icons seen in CSM and describes the monitor pane tabs.
Icons and Their Names
This table lists CSM icons and their names:
Table 3: Icons and Names
NamesIcons
Set Up
Task
Refresh
Import
Add Network Elements
Remove Network Elements
Monitor Pane
The Monitor pane contains three tabs:
•SMUs—Displays SMU information retrieved from cisco.com for a specific platform and release in the
SMU table. SMUs that are already installed on the device are highlighted in green. SMUs that are not
applicable to the device are highlighted in gray. For example, a SMU may require the mpls pie, which
may not be installed on the device. By default, CSM uses the Optimal filter option to display SMU entries
in the SMU table. However, the user may select the All filter option to display all SMUs.
•Service Packs—Displays available service pack information for a specific platform and release in the
SP table. The Service Packs tab is applicable only for Cisco ASR 9000 device, Release 4.3.2 and later
versions. The latest service pack is displayed at the top of the table. The existing service packs that are
superseded by the latest service pack are displayed using a strike-through font.
•Watch List—Displays SMUs that are being tracked for a specific platform and release. The watch list
allows the user to keep track of new SMUs that are released for a specific platform and release. The
details of the new SMUs are provided by the Cisco escalation team to the customer or user along with
the customer expected time of arrival (ETA). The Customer ETA date is a reference date and should not
be considered as the actual delivery date. To create a watch list, see Create a Watch List, on page 13.
Package Table—Displays the packages, SMUs and SPs that are currently present on the device in the bottom
window of SMUs tab and Service Packs tab. The packages, SMUs and SPs can have Active, Active Committed,
Inactive, and Inactive Committed state. The Package table displays packages, SMUs and SPs depending on
their state in Active, Active Committed, Inactive, and Inactive Committed tabs.
Cisco Software Manager User Guide
7OL-29903-02
Cisco Software Manager User Guide
CSM Icons and Monitor Pane

This table describes the package states:
Table 4: Package States
DescriptionState
Packages that are not persistent across system reloads. To be persistent
the user needs to execute the install committed command on the
packages.
Active
Active packages that are persistent across system reloads.Active Committed
Packages that are committed and persistent across system reloads; but,
deactivated currently.
Inactive
Packages that are neither active nor committed.Inactive Committed
The SMU, SP, and Package tables have a quick search filter. The filter accepts a string pattern and filters the
display list accordingly. The filter can be used to look for specific DDTS, SMUs or SPs within a specific
functional area; for example, BGP. Turn off the filter if you suspect the SMU and SP list should have more
entries. Click the cross icon in the filter to turn off the filter.
The Monitor pane automatically refreshes at every polling interval configured in the Setup dialog box. Users,
too can manually refresh by clicking the Refresh icon to retrieve the updated SMU and SP information from
cisco.com. A manual refresh does not poll the latest package information from the device. To manually poll
the device, use the Refresh icon on the Network Elements pane.
Pre-Requisite for SMU Recommendation
To keep Cisco IOS XR software up-to-date CSM recommends SMUs and SPs. To enable CSM to provide
SMU recommendations for Cisco Carrier Routing System and Cisco ASR 9000 Series Aggregation Services
Routers, Release 4.2.x, 4.3.0 and 4.3.1, it is mandatory to install the SMU CSCug82278 on the device before
any SMU installation.
Setting Up CSM
After installing CSM, users must first set it up. Setting up involves specifying:
• the location on the system where SMUs are stored.
• the periodicity at which CSM queries cisco.com, to retrieve SMU information.
• the email account where email notifications are sent, when new SMUs are discovered.
• the proxy settings that enable CSM to connect to the Internet, when the system is behind a firewall.
Procedure
1. Launch CSM and click the Set Up icon on the main tool bar.
2. Define these attributes in the Set Up dialog box:
Cisco Software Manager User Guide
OL-29903-028
Cisco Software Manager User Guide
Pre-Requisite for SMU Recommendation

Repository Directory—Specify the location on the system where SMUs and SPs are stored. This is
used to determine whether a particular SMU or SP is present at that location, or not. Depending on
•
whether a SMU or SP is present or not, CSM displays an appropriate graphical icon next to the SMU
or SP entry. A tar file can be created only if SMUs or SPs are present in this location.
• Polling Interval—Specify how often CSM must query cisco.com to retrieve SMU or SP information.
Before querying, CSM first polls all connected devices for up-to-date package information.
• Email Notification Settings—Specify the email account where email notifications are sent when new
SMUs or SPs are discovered. Use the Test Email Account Settings option to verify that the email
delivery system is operational.
• Proxy Settings—Specify the HTTP Proxy and HTTPS Proxy from Proxy tab. The HTTP and HTTPS
Proxy are required only if your system is behind a firewall; CSM requires such settings to connect
to the Internet.
Using CSM
After setting up CSM, users can perform these tasks:
1. Retrieve and View SMUs or SP Information from cisco.com. See Retrieve SMUs or SPs Information, on
page 11.
2. Execute SMU or SP tasks. See Execute SMU or SP Tasks, on page 12
3. Create a Watch List. See Create a Watch List, on page 13
4. Obtain SMUs or SPs Recommendations. See Obtain SMUs or SPs Recommendations, on page 13. After
obtaining SMU and SP recommendations from cisco.com, users can perform these tasks:
• Identify Superseded SMUs and SPs. See Identify Superseded SMUs and SPs, on page 19
• Create and Assign Custom Suggested File. See Create and Assign Custom Suggested File, on page
19
• Generate Conformance report. See Generate the Conformance Report, on page 20
5. Obtain an Optimized SMU List. See Obtain an Optimized SMU List, on page 21.
This flowchart shows how to use CSM:
Cisco Software Manager User Guide
9OL-29903-02
Cisco Software Manager User Guide
Using CSM

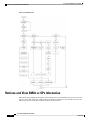
Figure 2: Using CSM Flowchart
Retrieve and View SMUs or SPs Information
Based on the selected platform and release version, CSM retrieves relevant SMUs from cisco.com. The user
can view, at the SMU tab the list of SMUs retrieved. Similarly, CSM retrieves relevant SPs from cisco.com
and the user can view, at the Service Packs tab the list of SPs retrieved.
Cisco Software Manager User Guide
OL-29903-0210
Cisco Software Manager User Guide
Retrieve and View SMUs or SPs Information

Retrieve SMUs or SPs Information
This is the procedure to retrieve SMUs and SPs information from cisco.com:
Procedure
Step 1 Launch CSM.
Step 2 Click Open Tab and select Platform and Releases.
Platform and Releases tab appears in Monitor Pane.
Step 3 From Select a platform and release drop-down, select the desired platform and release version. SMUs and
SPs details retrieved from cisco.com are displayed at their respective tabs.
• Service Packs are available only for Cisco ASR 9000 device, Release 4.3.2, or later versions.
• If CSM fails to retrieve information, a highlight message in red is displayed. You must close
the Platforms and Releases tab and reopen the tab to reconnect to cisco.com. Click Open Tab
and select Platforms and Releases to reopen the tab.
Note
Step 4 In the SMUs tab or Service Packs tab, click the Filter (Optimal) button and choose an appropriate filter:
• Select the Optimal filter option to view only optimal SMUs or SPs. This option excludes all superseded
SMUs or SPs that are not a pre-requisite for other SMUs or SPs.
• Select the ALL filter option to view all SMUs or SPs.
By default, the Optimal filter option is enabled.
View SMU or SP Details
To view details of a specific SMU or SP, click that SMU or SP row. A balloon tool tip that contains the SMU
or SP information (pre-requisites, superseded, and superseded-by information) is displayed. To view information
of other related SMUs or SPs (pre-requisites, supersedes, and so on), click the SMU or SP hyperlink. Use the
blue arrow icons to navigate through different SMU or SP details. To copy SMU or SP information, click
Copy to Clipboard icon (blue icon). You can annotate a SMU or SP by entering the information in the
annotation field at the bottom of the tool tip.
To view SMU or SP DDTS information:
1. Click the DDTS hyperlink. The default browser is launched.
2. Enter the Cisco Authentication login details. The DDTS information from the Software Bug Toolkit web
site is displayed.
Select SMUs or SPs
Use the check box on the table header to select or de-select all SMUs or SPs at a time. If all SMUs or SPs
listed in the SMU or SP table are not selected, the check box is displayed as a clear rectangle. The check box
Cisco Software Manager User Guide
11OL-29903-02
Cisco Software Manager User Guide
Retrieve SMUs or SPs Information

is displayed as a filled rectangle if any SMU or SP is selected. If all SMUs or SPs are selected, the check box
displays a check mark.
Execute SMU or SP Tasks
Actions that users can perform after retrieving SMUs or SPs from cisco.com are:
DownloadSMUsor SPs—Allows users to download SMUs or SPs from cisco.com. If a SMU or SP is missing
from the repository directory, an orange exclamation icon appears.
To download SMUs or SPs, do the following:
1. In the SMUs tab or Service Packs tab, select the SMUs or SPs.
2. Click Tasks icon and select Download Selected SMUs or Download Selected Service Packs. If the
selected SMUs or SPs exist in the repository directory, then user may choose to overwrite or skip existing
SMUs or SPs.
3. Enter Cisco username and password, and then click Ok.
4. Accept the End User License Agreement and click Ok.
After the download is complete, the SMU or SP tar file is decompressed and placed in the repository directory.
The tar file contains the SMU or SP and a readme file. To view the readme file, right-click on the SMU or
SP entry and click .txt menu option. The SMUs or SPs list will refresh and indicate that the SMU or SP is
now locatable by displaying the green check icon.
Transfer Files—Allows users to transfer selected SMUs or SPs to a remote TFTP or FTP server:
1. In the SMUs tab or Service Packs tab, select the SMUs or SPs.
2. Click Tasks icon and select Transfer Files.
3. Click Selected SMUs or Selected Service Packs, and then click Next. An error message is displayed if
the selected SMUs or SPs are not found in the repository directory.
4. Click Select Files Manually to add files other than SMUs or SPs.
5. Select a transfer method, TFTP or FTP and specify connection parameters. Click Transfer.
Create TAR File—The TAR file would contain the SMUs or SPs that can be installed on the device:
1. Manually download the SMUs or SPs from cisco.com at your local system in the repository directory.
The SMUs and SPs that are stored in the repository directory are indicated by a green check icon in the
ST (status) column.
2. In the SMUs tab or Service Packs tab, select the SMUs or SPs with the green check icon.
3. Click the Task icon and select Create TAR File. CSM alerts the user in case of any missing prerequisites.
View/Extract TAR File—Allows viewing of the contents of a TAR file and selectively extracts desired
SMUs or SPs. Click the Task icon and select View/Extract TAR File to perform this action.
Export SMU or SP Information—Allows the export of SMU or SP details of selected SMUs or SPs, or
those SMUs or SPs that are not installed on the device to an HTML file. To export SMU or SP details, do the
following:
1. Click the Task icon and select Export SMU Information or Export Service Pack Information.
Cisco Software Manager User Guide
OL-29903-0212
Cisco Software Manager User Guide
Execute SMU or SP Tasks

2. Select the Export option. The SMU or SP information is saved in the HTML file.
The SMU or SP details are sorted by the posted date. Any annotation entered will be present in the
Comments column of the HTML file.
Create a Watch List
Users can keep track of new SMUs that are released for a specific platform and release by means of a watch
list. A watch list contains SMUs that are tracked along with their expected time of arrival (ETA). The ETA
date is a reference date and should not be considered as the actual delivery date.
To create a watch list, do the following:
Procedure
Step 1 Launch CSM.
Step 2 Click Open Tab and select Platform and Releases.
Platform and Releases tab appears in the Monitor Pane.
Step 3 From Select a platform and release drop-down, select the desired platform and release version.
Because the watch list items are tied to a platform and release, the user needs to select the desired platform
and release.
Step 4 In the Watch List tab, enter the SMU ID or DDTS and click Add. An alert notification is displayed when
the SMU entered in the watch list is available when CSM queries cisco.com to retrieve SMU information
during the next polling interval. To delete a watch item, select the entry and click Delete icon on top right
corner.
Obtain SMUs or SPs Recommendations
The Cisco IOS XR software is constantly updated with software feature enhancements and bugs resolved
from earlier versions. To keep the Cisco IOS XR software up-to-date, CSM recommends software maintenance
upgrades (SMUs) and service packs (SPs).
To obtain SMU or SP recommendations for a specific platform and release, users must provide device package
information to CSM for that particular platform and release, using one of the following three sources:
•CLI Output , on page 14
•Import File, on page 14
•Connected Device, on page 14
CSM processes the information that is provided and displays the SMUs or SPs recommendations in the Monitor
pane. For Monitor pane details, see Monitor Pane, on page 7.
Cisco Software Manager User Guide
13OL-29903-02
Cisco Software Manager User Guide
Create a Watch List

CLI Output
To provide the CLI output of the show install active summary command to CSM, use the CLI Source tab.
Procedure
Step 1 Launch CSM.
Step 2 Click the Open Tab button on the main tool bar and select CLI Source. The CLI Source tab is displayed.
Step 3 Enter the device name and copy-paste the complete show install active summary CLI output.
Step 4 Click Next. The Monitor Pane is displayed. The name at the Monitor pane indicates the input source, platform,
and release number.
Whenever CSM discovers new SMUs or SPs from cisco.com, an alert message is displayed.
Import File
The CLI Source tab is used to provide the show install active summary command output of only one device.
To provide package and SMUs or SPs information of multiple devices at the same time, an external text file
that contains these details can be imported to CSM. To import an external text file, do the following:
Procedure
Step 1 Click the Import icon on the main tool bar.
Step 2 Browse to select the external file and click Import. The external text file must be in the expected format as
outlined in the Import dialog box.
After the external text file is imported, names of the devices whose package information is present in the
external file display as gray icons in the Network Elements pane.
Step 3 Click each device in the Network Elements pane to view the results in the Monitor Pane.
Connected Device
To provide package information through a connected device to CSM, connectivity must be established between
the device and the computer that hosts CSM. Before connecting, users must:
1. Verify device requirements. See Device Requirements, on page 15.
2. Verify mandatory configuration on the device for the required connection type. See Supported Connection
Types, on page 15.
3. Create Login profiles. See Creating Login Profiles, on page 16.
After the three listed conditions are met, the users can login to the device. See Login to Device, on page 16.
Cisco Software Manager User Guide
OL-29903-0214
Cisco Software Manager User Guide
CLI Output

When CSM is successfully connected to the device, it retrieves the package information and adds the connected
device into the Network Elements tree pane. Devices with the same platform and release are grouped under
the same sub-tree. Click each device in the Network Elements pane to view its results in the Monitor pane.
The Package table is updated based on the selection of device. For Monitor pane details, see Monitor Pane,
on page 7.
A connected device can be displayed in the Network Elements pane in either of these two colors—orange or
blue. Orange indicates failure in establishing connection between CSM and the device. Blue indicates successful
connection between CSM and the device.
If the device is in the discovering state for an extended period, the user must remove the device using the
Remove Network Element icon and ensure xml agent tty is configured on the device before attempting to
log into the device again.
Note
Supported Connection Types
The following table lists the connection types that CSM supports to establish connectivity to the device and
the mandatory configuration required on the device:
Table 5: Supported Connection Types
Mandatory Router ConfigurationConnection
telnet vrf default ipv4 server max-servers 20Telnet
ssh server
hostname <hostname>
domain name <domain>
SSHv1
ssh server v2SSHv2
Install crypto key on the router when the sshv1 or sshv2 connection is used.
Note
Device Requirements
This section lists the requirements for Cisco CRS and Cisco ASR 9000 routers to establish connectivity with
CSM:
• Install manageability PIE:
• (Cisco ASR9K) asr9k-mgbl-p.pie must be loaded.
• (Cisco ASR9K) asr9k-k9sec-p.pie must be loaded for SSHv1 and SSHv2.
• (Cisco CRS) hfr-mgbl-px.pie must be loaded.
• (Cisco CRS) hfr-k9sec-px.pie must be loaded for SSHv1 and SSHv2.
• Enable the XML agent—xml agent tty must be configured on the device.
Cisco Software Manager User Guide
15OL-29903-02
Cisco Software Manager User Guide
Supported Connection Types

Creating Login Profiles
Users can create login profiles and save the login information in an XML file. During the consecutive logins
that follow, CSM uses the information present in this XML file and allows the user to login without the need
to re-enter the login details. The XML file (LoginInformation.xml) created is stored at the application directory
(...\csm\versions\<latest version number> ) and can be shared with other users.
To create a login profile, carry out this Login creation procedure:
Procedure
Step 1 Launch CSM.
Step 2 Click the Add Network Elements icon on the main tool bar. The Login dialog box is displayed.
Step 3 Right-click Login Information and choose either Add New Device Group or Add New Device.
Add New Device Group creates a device group to which devices can be added later and Add New Device
adds a device.
The attributes present in the Add New Device dialog box are:
• Connection Category—Choose IP if there is direct connectivity between the computer that hosts CSM
and the device; otherwise, choose Scripted.
• Connection Type —Choose any one of these connection types: Telnet/SSHv1/SSHv2
• Device IP/Name—(Only IP connection category). Enter the device management IP address or the Host
Name.
•Node Name/Port—(Only Scripted connection category). Enter the intermediate server name or IP address.
Enter the port number if the server does not use the default Tenet/SSH port number. Click “…” to add
additional script information. For more information on entering details in this field, refer to the Login
Script Steps, on page 17.
• Device Description—Description of the device.
Login to Device
To login to the device, carry out this procedure.
Procedure
Step 1 Launch CSM.
Step 2 Click the Add Network Elements icon on the main tool bar.
Step 3 Select the device from Login Information space and enter the login credentials that are defined for the device.
See Direct Login and Scripted Login, on page 17.
Step 4 Click OK.
Cisco Software Manager User Guide
OL-29903-0216
Cisco Software Manager User Guide
Creating Login Profiles

Users can log into multiple devices simultaneously if they share the same username and password.
To login to multiple devices, select multiple devices by using the <Ctrl> / <Shift> key, or select
the entire device group in Login Information space.
Note
Direct Login and Scripted Login
The connection between the computer that hosts CSM and the device can be established in two ways:
• Direct Connection or Direct Login—The computer that hosts CSM is directly connected to the device.
In this case, choose IP as the Connection Category in the Login Screen.
• Indirect Connection or Scripted Login—The computer that hosts CSM is connected to the device through
an intermediate server. In this case, choose Scripted as the Connection Category in the Login screen.
The attributes in the Login screen vary according to the choice of Connection Category (IP or Scripted).
Direct Login
When IP is chosen as the Connection Category, these attributes are displayed on the Login screen:
• Device User Name—Enter device user name.
• Device Password—Enter device password.
• Connection Type—Choose Telnet, SSHv1, or SSHv2.
• Device IP/Name—Enter device management IP address.
Scripted Login
When Scripted is chosen as the Connection Category, these attributes are displayed on the Login screen:
• Scripted User Name—Enter intermediate server username.
• Scripted Password—Enter intermediate server password.
• Device User Name—Enter device user name.
• Device Password—Enter device password.
• Connection Type—Choose Telnet, SSHv1, or SSHv2.
•Node Name/Port—Enter intermediate server name or IP. Choose "..." to add additional script information.
Enter port number if the server does not use the default Tenet/SSH port number. For more information,
see Login Script Steps, on page 17 .
• Device Description—Enter device description.
Login Script Steps
You enter additional script information in the Login Script Steps dialog box, while creating a login profile or
while logging into the device.
The steps outlined in the Login Script Steps depict the manual login sequence:
Cisco Software Manager User Guide
17OL-29903-02
Cisco Software Manager User Guide
Direct Login and Scripted Login

1. CSM initiates communication with the intermediate server and waits for a prompted string returned by
the intermediate server in the Wait For data fields.
2. When the prompted string matches with the CSM's Wait For string that is login, Password, or intermediate
server prompt, then CSM responds by sending the data defined in the Send data field.
3. You can choose Scripted Username and Scripted Password as the intermediate server authentication from
the drop-down. During the actual login, these credentials must be entered by the user in the Login screen.
The appearance of the Login prompt (login:) may vary depending on the operating system (Windows,
Mac OS, or UNIX) where CSM is installed.
The following are examples of entering additional script information in the Login Script Steps dialog box.
The examples are based on the connection type (Telnet, SSHv1, or SSHv2) of the connection between the
computer that hosts CSM and the intermediate server, and the connection type between the intermediate server
and the device.
Telnet to Telnet Scripted Login Example
Telnet to Telnet scripted login indicates that the connectivity type of both the connections: the connection
between the computer that hosts CSM and the intermediate server and the connection between the intermediate
server and the device is Telnet.
Table 6: Telnet —>Telnet Scripted Login
Scripted UsernameSend:login:Wait For:
Scripted PasswordSend:Password:Wait For:
telnet <device host name or ip
address>
Send:intermediate server promptWait For:
Telnet to SSH Scripted Login Example
Telnet to SSH scripted login indicates that the connectivity type of the connection between the computer that
hosts CSM and the intermediate server is Telnet, and the connectivity type of the connection between the
intermediate server and the device is SSH.
Table 7: Telnet —>SSH Scripted Login
Scripted UsernameSend:login:Wait For:
ssh -l <device username> <device
password>
Send:intermediate server promptWait For:
<device password>Send:password:Wait For:
SSH to Telnet Scripted Login Example
SSH to Telnet scripted login indicates that the connectivity type of the connection between the computer that
hosts CSM and the intermediate server is SSH, and the connectivity type of the connection between the
intermediate server and the device is Telnet.
Table 8: SSH —>Telnet Scripted Login
Scripted UsernameSend:login:Wait For:
Cisco Software Manager User Guide
OL-29903-0218
Cisco Software Manager User Guide
Login Script Steps
Page is loading ...
Page is loading ...
Page is loading ...
Page is loading ...
Page is loading ...
Page is loading ...
-
 1
1
-
 2
2
-
 3
3
-
 4
4
-
 5
5
-
 6
6
-
 7
7
-
 8
8
-
 9
9
-
 10
10
-
 11
11
-
 12
12
-
 13
13
-
 14
14
-
 15
15
-
 16
16
-
 17
17
-
 18
18
-
 19
19
-
 20
20
-
 21
21
-
 22
22
-
 23
23
-
 24
24
-
 25
25
-
 26
26


Cisco IOS XR Software Release 5.3 User guide
- Type
- User guide
Ask a question and I''ll find the answer in the document
Finding information in a document is now easier with AI
Related papers
-
Cisco 9500 User manual
-
Cisco IOS XR Software Release 6.0 Installation guide
-
-
-
-
Cisco Nexus 9000 Series Switches Configuration Guide
-
-
Cisco 8808 Router Installation guide
-
-
Other documents
-
Tektronix Keithley 4200A-SCS User manual
-
-
Keysight E5260A/E5262A/E5263A/E5270B Quick start guide
-
Monitor Silo Patrol SE 344A Installation & Operation Bulletin
-
 Ossila SuperFACT User manual
-
Agilent Technologies 85225F User manual
-
Hitachi SMU300 Hardware Reference Manual
-
Keysight Technologies B1500A User manual
-
-
