Page is loading ...

Roll-Up II 1
Table of Contents
Standard Operating Information
Parts Checklist
Introduction
What You Need to Use Roll-Up II
Care and Handling
Transporting the Roll-Up II
Installing the Roll-Up II
Using the SuperSet Menu
Changing the Tablet’s Orientation
Configuring for Specific Application Programs
Table 1: SuperSet Menu Codes for Applications
Table 2: Configuration Details for SuperSet Menu Codes
Introduction to the Custom Configuration Menu
Communication Options
Output Format Options
Mode Options
Using the Custom Configuration Menu
Custom Configuration Menu
Controlling the Alarm
Roll-Up II Tones
Troubleshooting Guide
Procedure A: Begin Troubleshooting
Procedure B: Troubleshooting
Procedure C: Troubleshooting
Using GTCOTEST
Technical Specifications
Advanced Operating Information
Roll-Up II Interfacing
Character Format and Baud Rate
Cabling
3
3
3
4
4
4
5
7
7
8
9
17
20
21
21
22
22
24
24
25
25
26
27
28
29
30
32
32
33
33

Roll-Up II 2
Flow Control
Remote Commands
GTCO Roll-Up II Command Summary
Functional Control Commands
Format Selection Commands
Alarm Commands
Diagnostic Commands
CalComp Emulation Commands
Summagraphics Emulation Commands
Command Mode Basics
A Hint for Programmers
Advanced Programming Information
Coordinate Formats
Binary Formats
GTCO/CalComp Binary Format
Summagraphics Binary Format
Low Resolution Binary Format
Cursor Button Codes in Binary Formats
ASCII Formats
Cursor Button Codes in ASCII Formats
Measurement Scales
Digitizing Modes
Point Mode
Line Mode
Continuous Mode
Line Incremental Mode
Continuous Incremental Mode
Remote Request Mode
Programming Examples
General Product Information
Radio and Television Interference
Bescheinigung des Herstellers/Importeurs
Limited Warranty for Roll-Up II
33
34
35
36
39
40
40
42
44
46
47
49
49
49
50
51
52
53
54
57
57
58
59
60
60
61
61
61
62
65
65
66
67

Roll-Up II 3
Standard Operating Information
Parts Checklist
Roll-Up II digitizing tablet
Transducer (stylus or 4-button cursor
or 16-button cursor)
Computer interface cable with 9-pin
connector
9- to 25-pin adapter
Power supply
TabletWorks CD
Accessory pouch
Deluxe Travel Bag (optional)
Cardboard tube, insert and end caps
NOTE: The Deluxe Travel Bag is intended to be used only in conjunction with the heavy
gauge cardboard tube, insert and end caps supplied. The Deluxe Travel Bag does not
provide complete protection if used alone. The product will be subject to damage, not
covered by the warranty, if not protected by the tube, insert and end caps. If you have
misplaced or disposed of the items, contact GTCO CalComp by Turning Technologies at
1.866.746.3015 for replacements.
Introduction
The Roll-Up II belongs to a class of computer input devices called graphic tablets or
graphic digitizers. A graphic digitizer consists of a transducer (usually a handheld cursor
or stylus) and an electronic tablet work surface. The Roll-Up II converts the position of the
transducer into data for computer processing. Data output from the digitizer is in the form
of an XY coordinate pair that pinpoints the location of the transducer on the tablet surface.
Roll-Up II works with a wide variety of graphic application software programs. It can
be used to:
Move a pointer on a display screen.
Create and manipulate objects in a graphic composition.
Trace a drawing (or other source material) to create an image on the screen.
Select commands or functions from a menu of such items placed on the tablet
surface.
Choose items from a pull-down menu on the screen.
Determine dimensions of objects on drawings and blueprints.

Roll-Up II 4
What You Will Need to Use Roll-Up II
PC with an RS-232C serial communication port. (Signal levels must conform to EIA
RS2320 specifications.)
Graphic application software that accepts digitizer input via the computer’s RS-232C
serial port.
Care and Handling of Roll-Up II
The Roll-Up II was designed to be both portable and durable. As with any product, it
requires proper care and handling for reliable operation. By following these
recommendations, the Roll-Up II will provide you with many years of service:
Always use the digitizer on a flat surface.
Before moving the digitizer, disconnect the transducer and the interface cable.
Before moving the digitizer, roll it up. The housing along the side of the tablet is
designed as a rolling aid and it allows you to easily control rolling action. (See
Transporting Roll-Up II for specific moving instructions.)
Do not permanently attach anything to the tablet.
Do not use sharp instruments on or near the tablet, to avoid scratching or cutting it.
Cuts in the tablet will violate the warranty.
Do not crease, dent or abuse the tablet. Creases can damage the tablet structure.
Severe creases or abuse will violate the warranty.
Clean the tablet with any mild, nonabrasive household cleaner. Rubbing alcohol is
recommended. After cleaning, wipe the surface dry to avoid possible digitizing
errors.
Transporting Roll-Up II
You MUST transport the Roll-Up II with the factory-supplied shipping materials (heavy
gauge cardboard tube, insert and end caps). Failure to do so could result in serious
damage to the unit and may violate the warranty.
1. Disconnect the transducer and interface cable from the Roll-Up II and the computer.
Remove all material from the tablet.
2. Grasp the housing firmly with both hands and roll it toward the opposite side of the
tablet. The housing and the printing on the digitizer surface must be on the inside
of the roll. The roll diameter should be just smaller than the inside diameter of the

Roll-Up II 5
factory-supplied shipping tube. When correctly rolled, only the digitizer’s black back
will be exposed.
3. Insert the rolled digitizer into the shipping tube and allow it to fully unroll against
the inside of the tube. Place the factory-supplied insert into the center of the rolled
digitizer for support.
4. Place the accessories in the accessory case and put it inside the hollow insert. Set
the factory-supplied end caps on the tube to seal it. Place the tube in the optional
Deluxe Travel Bag (optional).
NOTE: The Deluxe Travel Bag is intended to be used only in conjunction with the factory-
supplied heavy gauge cardboard tube, insert and end caps. The Deluxe Travel Bag does
not provide complete protection if used alone. The product will be subject to damage not
covered by the warranty, if not protected by the tube, insert and end caps. If you have
misplaced or disposed of these items, contact GTCO CalComp by Turning Technologies
(1.866.746.3015) for replacement parts.
Installing Roll-Up II
Follow the instructions below to set up Roll-Up II.
1. Select a large, flat surface on which to place the Roll-Up II. Clear all items from the
surface. Please be cautious that conductive materials on, under or near the Roll-Up
II may cause improper operation.
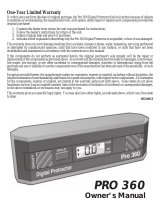
2. Remove Roll-Up II from its container and
unroll it on the selected surface.
3. Connect the stylus or cursor to the
appropriate jack on the tablet’s
connector panel. (The connector is
keyed and will fit only the correct jack.)
4. Plug the power supply into an AC outlet.
Attach the power supply to the jack on
the connector panel. The digitizer should
produce four short tones.

Roll-Up II 6
5. Connect the interface cable to the appropriate jack on the connector panel. (The
connector is keyed and will fit only the correct jack.)
6. Join the 9-pin connector of the interface cable to the serial port on the computer. If
necessary, use the 9- to 25-pin adapter to connect to a PC-compatible (DTE male)
port.
7. Orient the tablet (see Changing the Tablet’s Orientation section) as desired.
8. Use the SuperSet Menu to select the two-digit SuperSet Code (shown in Table 1) for
the application program.
If the application program is not listed in Table 1, find the configuration
settings that apply to the application program in Table 2 and use that
SuperSet Code.
If an appropriate SuperSet Code is not listed in Table 2, use the Custom
Configuration Menu to set up the Roll-Up II.
9. Configure your computer for use with Roll-Up II:
Arrange the graphic application software to operate with the Roll-Up II. A
wide variety of application programs provide configuration information for
specific digitizers. If Roll-Up II digitizer is not listed, use the configuration for
GTCO Digi-Pad Type 5 or Type 5A (T5/T5A), CalComp 9100/9500 or
Summagraphics Microgrid III or ID Series.

Roll-Up II 7
If necessary, install the appropriate digitizer driver(s) from the Digitizer Driver
Diskette supplied (AutoCAD, Windows and mouse drivers are included).
Insert the diskette into drive A or B. From the DOS prompt, type a:\install or
b:\install and follow the on-screen instructions.
NOTE: Install only the drivers necessary for Roll-Up II to work with the application software.
10. Begin digitizing.
Using the SuperSet Menu
Use the SuperSet Menu to:
Change the tablet’s orientation
Configure Roll-Up II for specific application programs
Use the Custom Configuration Menu
Control the alarm
When using the SuperSet Menu, a tone will sound when selecting
indicating a successful selection.
The number blocks through are active only after selecting .
Changing the Tablet’s Orientation
Roll-Up II allows the user to choose between two different tablet orientations: orient the
tablet with the housing on the right (factory default) or on the left.
To change the orientation of the tablet:
1. Turn the tablet to the desired orientation.
2. Relocate the origin by selecting the block on the lower SuperSet Menu. You
should hear four short tones when you do this.
NOTE: The orientation of the 20x24 Roll-Up II cannot be changed.

Roll-Up II 8
Configuring for Specific Application Programs
To configure Roll-Up II for use with specific application programs:
1. In Table 1, find the application program being used with Roll-Up II. Note the
corresponding SuperSet Code.
If the application program is not listed in Table 1, find the configuration
settings that apply to the application program in Table 2 and use that
SuperSet Code.
If an appropriate SuperSet Code is not listed in Table 2, then use the Custom
Configuration Menu to set up Roll-Up II.
2. Select on the SuperSet Menu and then choose the two digits of the SuperSet
code for the application program.
3. You will hear four short tones after a successful menu configuration. An example of
configuring for a specific application program follows.

Roll-Up II 9
Table 1: SuperSet Menu Codes for Selected Application Programs
NOTE: This tablet has been updated to reflect the most current information available at the
time of the release of Roll-Up III. The wt superscript indicates WinTab-compliant
applications. SuperSet Code 99 now designates a non-Plug-N-Play Mode. Plug-N-Play
serial connections and USB support are not available on the Roll-Up II. (12-12-2003)

Roll-Up II 10

Roll-Up II 11

Roll-Up II 12

Roll-Up II 13

Roll-Up II 14

Roll-Up II 15

Roll-Up II 16

Roll-Up II 17
Table 2: Configuration Details for SuperSet Menu Codes
NOTE: MAX = 140 coordinates/second
lpi = lines per inch lpmm = lines per millimeter

Roll-Up II 18

Roll-Up II 19

Roll-Up II 20
Example: Configuring for Specific Application Programs
To configure Roll-Up II to operate with Autodesk’s AutoCAD application program:
1. Find the entry for AutoCAD in Table 1. The SuperSet code is 01.
2. Select on the SuperSet Menu. This places the digitizer in Select Mode.
3. Choose on the SuperSet Menu. This enters the first digit of the SuperSet code
for AutoCAD.
4. Select on the SuperSet Menu. This enters the second digit of the SuperSet
code for AutoCAD.
5. You will hear four short tones, indicating that the configuration is complete. The
Roll-Up II is now configured to operate with AutoCAD. Select Mode is no longer
active.
NOTE: After beginning Select Mode, you must digitize only in the number blocks to
properly enter a SuperSet code. If you digitize in the tablet’s active area during Select
Mode, the sequence will be terminated and the previous configuration will be retained (you
will hear three medium-length tones after an aborted sequence). To cancel a sequence if
the first digit is entered incorrectly, digitize in the tablet’s active area.
Introduction to the Custom Configuration Menu
Roll-Up II uses the Custom Configuration Menu to control baud rate, data format and other
operating characteristics. The Custom Configuration Menu card is stored in one end of the
digitizer’s housing.
Configuration parameters for Roll-Up II are divided into three categories:
Communication Options
Output Format Options
Mode Options
/