Page is loading ...

INSTRUCTION MANUAL
IN 192 Rev. B 02/09
Providing Exceptional Consumer Optical Products Since 1975
Customer Support (800) 676-1343
E-mail: [email protected]
Corporate Offices (831) 763-7000
89 Hangar Way, Watsonville, CA 95076
Orion
®
AstroView
™
Equatorial Mount
#9822 AstroView Equatorial Mount

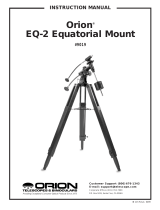
Right ascension slow-motion
control cable
Right ascension lock lever
Polar axis finder scope
Latitude scale
Latitude adjustment T-bolts
2
Figure 1.
The AstroView Equatorial Mount.
Declination slow-motion
control cable
Declination lock lever
Large counterweight
Small counterweight
Counterweight lock knobs
Counterweight shaft
“Toe saver”
Tripod leg
Accessory tray bracket
Accessory tray
Leg lock knob

3
Table of Contents
1. Unpacking........................ 3
2. Parts List......................... 3
3. Assembly ........................3
4. Attaching a telescope ............... 4
5. Balancing the telescope ............. 4
6. Setting up and using the
equatorial mount...................5
7. Specifications ..................... 9
1. Unpacking
The entire mount will arrive in one box. Be careful unpack-
ing the box. We recommend keeping the box and the pack-
aging material. In the event that the mount needs to be
shipped to another location, or returned to Orion for war-
ranty repair, having the original packaging will help ensure
that your mount will survive the journey intact.
Make sure all the parts in the Parts List are present. Be
sure to check box carefully, as some parts are small. If
anything appears to be missing or broken, immediately
call Orion Customer Support (800-676-1343) or email
suppor[email protected] for assistance.
2. Parts List
Qty. Description
1 German-type equatorial mount
3 Tripod legs attached accessory tray bracket
2 Slow-motion control cables
1 Large counterweight
1 Small counterweight
1 Counterweight shaft
1 Accessory tray with mounting wing screws
3 Leg attachment screws with wingnuts and washers
3 Leg lock knobs
1 Polar axis finder scope
1 Polar axis cover
3. Assembly
Assembling the mount for the first time should take about 20
minutes. No tools are needed, other than the ones provided.
All screws should be tightened securely to eliminate flexing
and wobbling, but be careful not to over-tighten or the threads
may strip. Refer to Figure 1 during the assembly process.
1. Lay the equatorial mount on its side. Attach the tripod legs
one at a time to the mount using the leg attachment screws.
Line up the holes in the top of the leg with the holes in the
base of the mount, and install the screw so it passes
through the leg and the mount with one washer on both
sides of the tripod leg. Tighten the wingnuts only finger-
tight, for now.
2. Install and tighten the leg lock knobs at the base of the tri-
pod legs. For now, keep the legs at their shortest (fully
retracted) length; you can extend them to a more desirable
length later, after the mount is completely assembled.
3. With the tripod legs now attached to the equatorial mount,
stand the tripod upright and spread the tripod legs apart as
far as they will go, until the accessory tray bracket is taut.
Attach the accessory tray to the bracket with the three wing
screws already installed in the tray. Push the screws up
through the holes in the bracket, then thread them into the
holes in the tray.
4. Next, tighten the wingnuts at the top of the tripod legs, so
the legs are securely fastened to the equatorial mount.
Use the wrench and your fingers to do this.
5. Orient the equatorial mount as it appears in Figure 1, at a
latitude of about 40°, i.e., so the pointer next to the latitude
scale is pointing to the line at “40”. To do this, loosen one of
the latitude adjustment T-bolts and then tighten the other
latitude adjustment T-bolt until the pointer and the “40” line
up (Figure 2). The declination (Dec.) and right ascension
(R.A.) axes many need re-positioning (rotation) as well. Be
sure to loosen the RA and Dec. lock levers before doing
this. Retighten them once the equatorial mount is properly
oriented.
6. Thread the counterweight shaft into the equatorial mount
at the base of the declination axis until tight. Make sure the
metal casting at the top of the bar is threaded clockwise as
far as it will go before attaching the shaft.
Congratulations on your purchase of a quality Orion mount. Your new AstroView Equatorial Mount was
developed to work with many different telescope optical tubes. Designed for astronomical use, this preci-
sion mount allows convenient “tracking” of celestial objects as they move slowly across the sky, so they
remain within your eyepiece’s field of view. The setting circles will assist you in locating hundreds of fas-
cinating celestial denizens, including galaxies, nebulas, and star clusters, from their catalogued coordi-
nates. With a little practice, you’ll find that the AstroView Equatorial Mount is an invaluable tool for getting
the most out of your astronomical observing sessions.
These instructions will help you set up and properly use your equatorial mount. Please read them over
thoroughly before getting started.

4
7. Remove the knurled “toe saver” retaining screw on the bot-
tom of the counterweight shaft and slide both coun ter-
weights onto the shaft. Make sure the counterweight lock
knobs are adequately loosened to allow the counterweight
shaft to pass through the hole. Position the counterweights
about halfway up the shaft and tighten the lock knobs.
Replace the toe saver on the end of the bar. The toe saver
prevents the counterweights from falling on your foot if the
lock knobs happen to come loose.
8. Attach the two slow-motion cables to the R.A. and Dec.
worm gear shafts of the equatorial mount by positioning
the small screw on the end of the cable over the indented
slot on either end of the worm gear shaft. Then tighten the
screw. We recommend using the shorter control cable for
the R.A. axis.
9. Install the polar axis finder scope into its housing inside the
R.A. axis of the equatorial mount (Figure 3). First loosen
the three thumbscrews on the housing, which is located at
the rear of the R.A. axis. Insert the front end of the polar
finder (the end without the eyeguard) into the housing so
only about 1" of the polar finder extends from the back of
the housing. Do this slowly and with a twisting motion to
prevent the internal O-ring from becoming unseated.
Should the O-ring become unseated, remove the entire
housing from the mount to locate the O-ring and reseat it
by rotating the entire housing counterclockwise. Once the
polar axis finder scope is in the housing, tighten the three
thumbscrews. These thumbscrews will be used later to
align the finder with the mount’s R.A. axis.
4. Attaching a Telescope
The AstroView equatorial mount is designed to hold telescope
tubes weighing up to approximately 12lbs. For heavier tele-
scopes, the mount may not provide sufficient stability for
steady imaging. Any type of telescope can be mounted on the
AstroView, including refractors, Newtonian reflectors, and cat-
adiotropics, provided a set of tube rings is available to couple
the tube to the mount. Orion sells a variety of telescope tube
rings, please visit our website at telescope.com for details. To
attach the tube rings to the mount, you will need to line up the
holes in the tube rings with the holes in the top of the mount.
Push a mounting screw up through the hole in the top of the
mount and thread it into the tube ring. Use a wrench to tighten
the screw and secure the tube ring.
5. Balancing a Telescope
To ensure smooth movement of a telescope on both axes of
the equatorial mount, it is imperative that the optical tube is
properly balanced. We will first balance the telescope with
respect to the R.A. axis, then the Dec. axis.
1. Keeping one hand on the telescope optical tube, loosen
the R.A. lock lever. Make sure the Dec. lock lever is locked,
for now. The telescope should now be able to rotate freely
about the R.A. axis. Rotate it until the counterweight shaft
is parallel to the ground (i.e., horizontal).
2. Now loosen both counterweight lock knobs and slide the
weights along the shaft until they exactly counterbalance
the telescope (Figure 4a) That’s the point at which the
shaft remains horizontal even when you let go with both
hands (Figure 4b).
3. Retighten the counterweight lock knobs. The telescope is
now balanced on the R.A. axis.
4. To balance the telescope on the Dec. axis, first tighten the
R.A. lock lever, with the counterweight shaft still in the hor-
izontal position.
5. With one hand on the telescope optical tube, loosen the
Dec. lock lever. The telescope should now be able to rotate
freely about the Dec. axis. Loosen the tube ring clamps a
few turns, until you can slide the telescope tube forward
and back inside the rings. Its often helpful to use a slight
twisting motion on the optical tube while you push or pull
on it. (Figure 4c).
Figure 2. To adjust the latitude angle of the equatorial mount,
loosen one of the two latitude adjustment T-bolts, then tighten the
other.
Figure 3. The polar axis finder scope installed in the right
ascension (R.A.) axis of the mount.
R.A. setting circle
lock thumbscrew
Pointer
R.A. setting circle
Meridian
offset scale
Polar scope
housing
Polar axis
finder scope
Date circle
Ring with
engraved time
meridian indicator
mark
Polar scope
alignment
thumbscrew (3)

5
6. Position the telescope in the mounting rings so it remains
horizontal when you carefully let go with both hands. This
is the balance point for the optical tube with respect to the
Dec. axis. (Figure 4d)
7. Retighten the tube ring clamps.
The telescope is now balanced on both axes. When you loos-
en the lock lever on one or both axes and manually point the
telescope, it should move without resistance and should not
drift from where you point it.
6. Setting Up and Using the
Equatorial Mount
When you look at the night sky, you no doubt have noticed
that the stars appear to move slowly from east to west over
time. That apparent motion is caused by the Earth’s rotation
(from west to east). An equatorial mount (Figure 5) is designed
to compensate for that motion, allowing you to easily “track”
the movement of astronomical objects, thereby keeping them
Figure 4a, b, c, d. Proper operation of the equatorial mount requires that the telescope tube be balanced on both the R.A. and Dec. axes.
(a) With the R.A. lock lever released, slide the counterweight along the counterweight shaft until it just counterbalances the tube. (b) When
you let go with both hands, the tube should not drift up or down. (c) With the Dec. lock lever released, loosen the tube ting clamps a few turns
and slide the telescope forward or back in the tube rings. (d) when the tube is balanced about the Dec. axis, it will not move when you let go.
Figure 4a Figure 4b Figure 4c Figure 4d
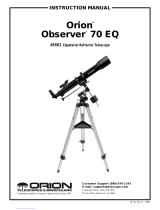
Figure 5. The AstroView equatorial mount (with attached telescope tube).
Declination
setting circle
Declination lock lever
Front opening in R.A.
axis
Latitude scale
Latitude adjustment
T-bolts
Azimuth fine
adjustment knobs
Declination
axis
Right
Ascension
axis
Right Ascension
setting circle lock
thumb screw
Right Ascension setting circle
Polar axis finder scope
Right Ascension lock lever

6
from drifting out of your telescope’s field of view while you’re
observing.
This is accomplished by slowly rotating the telescope on its
right ascension (R.A.) axis, using only the R.A. slow-motion
cable. But first the R.A. axis of the mount must be aligned with
the Earth’s rotational (polar) axis – a process called polar
alignment.
Polar Alignment
For Northern Hemisphere observers, approximate polar align-
ment is achieved by pointing the mount’s R.A. axis at the North
Star, or Polaris. It lies within 1° of the north celestial pole
(NCP), which is an extension of the Earth’s rotational axis out
into space. Stars in the Northern Hemisphere appear to
revolve around the NCP.
To find Polaris in the sky, look north and locate the pattern of
the Big Dipper (Figure 6). The two stars at the end of the “bowl”
of the Big Dipper point right to Polaris.
Observers in the Southern Hemisphere aren’t so fortunate to
have a bright star so near the south celestial pole (SCP). The
star Sigma Octantis lies about 1° from the SCP, but it is barely
visible with the naked eye (magnitude 5.5).
For general visual observation, an approximate polar align-
ment is sufficient.
1. Level the equatorial mount by adjusting the length of the
three tripod legs.
2. There are two latitude adjustment T-Bolts (see Figure 2);
loosen one T-Bolt while tightening the other. By doing this
you will adjust the latitude of the mount. Continue adjusting
the mount until the pointer on the latitude scale is set at the
latitude of your observing site. If you don’t know your lati-
tude, consult a geographical atlas to find it. For example, if
your latitude is 35° North, set the pointer to 35. The latitude
setting should not have to be adjusted again unless you
move to a different viewing location some distance away.
3. Loosen the Dec. lock lever and rotate the telescope’s opti-
cal tube until it is parallel with the R.A. axis, as it is in Figure
5. The pointer on the Dec. setting circle should read 90°.
Retighten the Dec. lock lever.
4. Move the tripod so the telescope tube and R.A. axis point
roughly at Polaris. If you cannot see Polaris directly from
your observing site, consult a compass and rotate the tri-
pod so the telescope points north. There is a label bearing
a large “N” at the base of the equatorial mount (Figure 7). It
should be facing north.
The equatorial mount is now polar aligned for casual observ-
ing. More precise polar alignment is recommended for astro-
photography.
From this point on in your observing session, you should not
make any further adjustments to the latitude of the mount, nor
should you move the tripod. Doing so will undo the polar align-
ment. The telescope should be moved only about its R.A. and
Dec. axes.
The Polar Axis Finder Scope
The AstroView Equatorial Mount features a polar axis finder
scope housed inside the R.A. axis of the mount (see Figure 3).
When properly aligned and used, it makes accurate polar
alignment quick and easy to do. Alignment of the polar finder
need only be done once, unless it gets bumped or otherwise
shifts its position.
Remove the round cover cap from the front opening in the
R.A. axis of the mount. Look through the polar finder at a dis-
tant object during the day. Focus the polar finder so that the
images and reticle are sharp by rotating the eyepiece end of
the finder. Notice that the reticle pattern consists of a crosshair
with a circle around the middle. On the circumference of this
circle is a tiny circle; this is where Polaris will be placed for
accurate polar alignment once the finder is properly aligned.
Alignment of the polar finder is best done during the day,
before going out into the field at night.
Figure 6. To find Polaris in the night sky, look north and find the
Big Dipper. Extend an imaginary line from the two "Pointer Stars" in
the bowl of the Big Dipper. Go about five times the distance
between those stars and you'll reach Polaris, which lies within 1° of
the north celestial pole (NCP).
Big Dipper
(in Ursa Major)
Little Dipper
(in Ursa Minor)
N.C.P.
Pointer
Stars
Polaris
Cassiopeia
Figure 7. For polar alignment, position the tripod so that the “N”
label at the base of the mount faces north. The two azimuth fine
adjustment knobs above it are used to make small adjustments to
the mount’s azimuth position.
Azimuth
fine adjustment
knobs
Tripod
attachment
knob

7
Aligning the Polar Axis Finder Scope
Aligning the polar axis finder scope so that it will accurately
point at the true north pole is a two-step procedure. First, the
polar axis finder must be rotated in its housing so that the
small circle in which Polaris will be placed is in the proper ini-
tial position. Next, the polar axis finder must be adjusted so
that it points directly along the mount’s R.A. axis.
We will start by aligning the polar finder rotationally. Refer to
Figure 3.
1. Loosen the R.A. setting circle lock thumbscrew. Rotate the
R.A. setting circle until the line above the “0” on the setting
circle lines up with the pointed indicator that is cast into the
mount (located directly below the large thumbscrew; see
Figure 3). Retighten the thumbscrew.
2. Rotate the date circle until the “0” line on the meridian off-
set scale lines up with the time meridian indicator mark.
The meridian offset scale is printed on the inner circumfer-
ence of the date circle, and is labeled “E20” to “W20”. The
time meridian indicator mark is an engraved line on the
exterior of the polar finder’s housing. It is on the “ring” of
the housing that is closest to the date circle.
3. The R.A. setting circle is labeled in hours, from “0” to “23”
(military time). For Northern Hemisphere observers, refer
to the top numbers on the setting circle. Each small line
represents 10 minutes of R.A. The date circle is labeled
from “1” to “12”, with each number representing a month of
the year (“1” is January, “2” is February, etc.). Each small
line represents a two-day increment.
4. Loosen the R.A. lock lever and rotate the mount about the
R.A. axis until the March 1 indicating mark (the long line
between the “2” and the “3”) on the date circle lines up with
the 4 PM mark (the long line above the “16”) on the R.A.
setting circle. You may find it convenient to remove both the
counterweights and the telescope optical tube to do this.
5. Now, loosen the three thumbscrews on the polar finder
housing and rotate the polar finder so the small circle
where Polaris will be centered is located straight down
from the intersection of the crosshairs. Retighten the
thumbscrews.
The polar axis finder scope is now properly set in its initial
position. Next, we must align it so that it is exactly parallel to
the mount’s R.A. axis:
1. Look through the polar finder at a distant object (during the
day) and center it on the crosshairs. You may need to
adjust the latitude adjustment T-bolts and the tripod posi-
tion to do this.
2. Rotate the mount 180° about the R.A. axis. Again, it may
be convenient to remove the counterweights and optical
tube first.
3. Look through the polar finder again. Is the object being
viewed still centered on the crosshairs? If it is, then no fur-
ther adjustment is necessary. If not, then look through the
polar finder while rotating the mount about the R.A. axis.
You will notice that the object you have previously centered
moves in a circular path. Use the three thumbscrews on
the housing to redirect the crosshairs of the polar finder to
the apparent center of this circular path. Repeat this proce-
dure until the position that the crosshairs point to does not
rotate off-center when the mount is rotated in R.A. Once
this is accomplished, retighten the thumbscrews.
The polar axis finder scope is now ready to be used. When not in
use, replace the plastic protective cover to prevent the polar find-
er from getting bumped, which could knock it out of alignment.
Using the Polar Axis Finder
When using the polar finder in the field at night, you will need
a red flashlight to illuminate the finder’s reticle. Shine the flash-
light at an angle into the front opening in the R.A. axis. Do not
shine it directly into the opening, or the light will be too bright,
and you will also obstruct the view of the polar finder. It may be
helpful to have a friend hold the flashlight while you look
through the polar finder.
For most accurate polar alignment, you will need to know the
approximate longitude of your observing site. This information
can be obtained by looking at a local map. Now, you must fig-
ure the difference between the longitude of your observing
site and the closest standard time meridian. The standard time
meridians are 75°, 90°, 105°, and 120° for the 48 continental
states (150° and 165° for Hawaii and Alaska). Choose the
standard time meridian that is closest in value to your local
longitude, and then calculate the difference.
If your local longitude has a value less than the closest stan-
dard time meridian, then you are east of the standard time
meridian by the calculated amount. If your local longitude has
a value greater than the closest standard time meridian, then
you are west of the standard time meridian by the calculated
amount. For example, if you are in Las Vegas, which has a
longitude of 115°, then the closest standard time meridian is
120°. The difference between these two numbers is 5°. Since
Las Vegas’ longitude value is less than the standard time
meridian value, you are 5° east of the closest time meridian.
Take your calculated difference from the closest standard time
meridian and rotate the date circle so that the meridian offset
scale line that corresponds to your calculated difference lines
up with the engraved time meridian indicator mark on the polar
finder housing. Each line of the meridian offset scale repre-
sents 5° of longitude. Lines to the left of the “0” on the meridian
offset scale indicate east of the closest standard time meridi-
an, while lines to the right of the “0” indicate west of the clos-
est standard time meridian.
Continuing with the prior example of observing in Las Vegas,
you would rotate the date circle so that the first line to the left
of the “0” on the meridian offset scale lines up with the time
meridian indicator mark.
Make sure that the “0” mark on the R.A. setting circle lines up
with the pointed indicator cast into the mount, and that the
large thumbscrew just above it is tightened. Now, rotate the
mount about the R.A. axis until the line on the R.A. setting
circle that corresponds to your current local time lines up with
the line on the date circle that indicates the current date. If you
are on daylight savings time, subtract one hour from your cur-
rent local time.

8
For example, if it was November 1 at 9 PM, standard time, you
would rotate the telescope in R.A. until the line above the “21”
(9 P.M.) on the R.A. setting circle lines up with the long line
between the “10” and “11” on the date circle. The long line
indicates the first day of the higher numbered month, i.e. the
line between “10” and “11” marks November 1st.
Finally, look through the polar alignment finder scope while
shining a red flashlight at an angle down the front opening of
the R.A. axis, and center Polaris in the small circle. Adjust the
tilt of the altitude up-or-down with the latitude adjustment
T-bolts and use the azimuth fine adjustment knobs (Figure 8)
for final positioning. To do this, you will first need to loosen the
big tripod attachment knob directly underneath the base of the
equatorial mount. The fine adjustment knobs work by loosen-
ing one and then tightening the other. Once Polaris is centered
in the small circle, retighten the tripod attachment knob to
firmly secure the mount and tripod. If the fine adjustment
knobs do not allow the mount to move far enough to center
Polaris, you will need to rotate the entire tripod left or right to
get it within the fine adjustment’s range.
The telescope is now accurately polar aligned, and can be
used for advanced observational applications, such as astro-
photography or precise use of the manual setting circles. As
mentioned before, only move the telescope along the R.A.
and Dec. axes; if you move the tripod, or change the tilt of the
equatorial mount, you will need to polar align again.
Remember, accurate polar alignment is not needed for casual
visual observing. Most of the time, approximate polar align-
ment, as outlined previously, will suffice.
Use of the R.A. and Dec.
Slow-Motion Control Cables
The R.A. and Dec. slow-motion control cables allow fine
adjustment of the telescope’s position to center objects within
the field of view. Before you can use the cables, you must
manually “slew” the mount to point the telescope in the vicinity
of the desired target. Do this by loosening the R.A. and Dec.
lock levers and moving the telescope about the mount’s R.A.
and Dec. axes. Once the telescope is pointed somewhere
close to the object to be viewed, retighten the mount’s R.A.
and Dec. lock levers.
The object should now be visible somewhere in the tele-
scope’s finder scope. If it isn’t, use the slow-motion controls to
scan the surrounding area of sky. When the object is visible in
the finder scope, use the slow-motion controls to center it.
Now, look in the telescope’s eyepiece. If the finder scope is
properly aligned, the object should be visible somewhere in
the field of view. Once the object is visible in the eyepiece, use
the slow-motion controls to center it in the field of view.
Tracking Celestial Objects
When you observe a celestial object through the telescope,
you’ll see it drift slowly across the field of view. To keep it in the
field, if your equatorial mount is polar aligned, just turn the
R.A. slow-motion control cable clockwise. The Dec. slow-
motion control cable is not needed for tracking. Objects will
appear to move faster at higher magnifications, because the
field of view is narrower.
Optional Motor Drives for Automatic Tracking
An optional DC motor drive can be mounted on the R.A. axis
of the equatorial mount to provide hands-free tracking. Objects
will then remain stationary in the field of view without any
manual adjustment of the R.A. slow-motion control cable.
Understanding the Setting Circles
The setting circles on an equatorial mount enable you to
locate celestial objects by their “celestial coordinates”. Every
object resides in a specific location on the “celestial sphere”.
That location is denoted by two numbers: its right ascension
(R.A.) and declination (Dec.). In the same way, every location
on Earth can be described by its longitude and latitude. R.A. is
similar to longitude on Earth, and Dec. is similar to latitude.
The R.A. and Dec. values for celestial objects can be found in
any star atlas or star catalog.
The R.A. setting circle is scaled in hours, from 1 through 24,
with small marks in between representing 10-minute incre-
ments (there are 60 minutes in 1 hour of R.A.). The upper set
of numbers apply to viewing in the Northern Hemisphere,
while the numbers below them apply to viewing in the Southern
Hemisphere. The location of the R.A. coordinate indicator
arrow is shown in Figure 3.
The Dec. setting circle is scaled in degrees, with each mark
representing 2° increments. Values of Dec. coordinates range
from +90° to -90°. The 0° mark indicates the celestial equator.
When the telescope is pointed north of the celestial equator,
values of the Dec. setting circle are positive; when the tele-
scope is pointed south of the celestial equator, values of the
Dec. setting circle are negative.
So, the coordinates for the Orion Nebula listed in a star atlas
will look like this:
R.A. 5h 35.4m Dec. - 5° 27'
That’s 5 hours and 35.4 minutes in right ascension, and -5
degrees and 27 arc-minutes in declination (there are 60 arc-
minutes in 1 degree of declination).
Before you can use the setting circles to locate objects, the
mount must be well polar aligned, and the R.A. setting circle
must be calibrated. The Dec. setting circle has been calibrated
at the factory, and should read 90° whenever the telescope
optical tube is parallel with the R.A. axis.
Calibrating the Right Ascension Setting Circle
1. Identify a bright star in the sky near the celestial equator
(Dec. = 0°) and look up its coordinates in a star atlas.
2. Loosen the R.A. and Dec. lock levers on the equatorial
mount, so the telescope optical tube can move freely.
3. Point the telescope at the bright star whose coordinates
you know. Lock the R.A. and Dec. lock levers. Center the
star in the telescope’s field of view with the slow-motion
control cables.
4. Loosen the R.A. setting circle lock thumbscrew (see Figure
3); this will allow the setting circle to rotate freely. Rotate the
setting circle until the arrow under the thumbscrew indicates
the R.A. coordinate listed in the star atlas for the object. Do
not retighten the thumbscrew when using the R.A. setting

9
circles for finding objects; the thumbscrew is only needed for
polar alignment using the polar axis finder scope.
Finding Objects With the Setting Circles
Now that both setting circles are calibrated, look up in a star atlas
the coordinates of an object you wish to view.
1. Loosen the Dec. lock lever and rotate the telescope until the
Dec. value from the star atlas matches the reading on the Dec.
setting circle. Remember that values of the Dec. setting circle
are positive when the telescope is pointing north of the celes-
tial equator (Dec. = 0°), and negative when the telescope is
pointing south of the celestial equator. Retighten the lock
lever.
2. Loosen the R.A. lock lever and rotate the telescope until the
R.A. value from the star atlas matches the reading on the
R.A. setting circle. Remember to use the upper set of num-
bers on the R.A. setting circle. Retighten the lock lever.
Most setting circles are not accurate enough to put an object
dead-center in the telescope’s eyepiece, but they should place
the object somewhere within the field of view of the finder scope,
assuming the equatorial mount is accurately polar aligned. Use
the slow-motion controls to center the object in the finder scope,
and it should appear in the telescope’s field of view.
The R.A. setting circle must be re-calibrated every time you wish
to locate a new object. Do so by calibrating the setting circle for
the centered object before moving on to the next one.
Confused About Pointing the Telescope?
Beginners occasionally experience some confusion about how
to point the telescope overhead or in other directions. In Figure 1
the telescope is pointed north as it would be during polar align-
ment. The counterweight shaft is oriented downward. But it will
not look like that when the telescope is pointed in other direc-
tions. Let’s say you want to view an object that is directly over-
head, at the zenith. How do you do it?
DO NOT make any adjustment to the latitude adjustment T-bolts.
That will spoil the mount’s polar alignment. Remember, once the
mount is polar aligned, the telescope should be moved only on
the R.A. and Dec. axes. To point the scope overhead, first loosen
the R.A. lock lever and rotate the telescope on the R.A. axis until
the counterweight shaft is horizontal (parallel to the ground).
Then loosen the Dec. lock lever and rotate the telescope until it is
pointing straight overhead. The counterweight shaft is still hori-
zontal. Then retighten both lock levers.
What if you need to aim the telescope directly north, but at an
object that is nearer to the horizon than Polaris? You can’t do it
with the counterweights down as pictured in Figure 1. Again, you
have to rotate the scope in R.A. so that the counterweight shaft is
positioned horizontally. Then rotate the scope in Dec. so it points
to where you want it near the horizon.
To point the telescope directly south, the counterweight shaft
should again be horizontal. Then you simply rotate the scope on
the Dec. axis until it points in the south direction.
To point the telescope to the east or west, or in other directions,
you rotate the telescope on its R.A. and Dec. axes. Depending on
the altitude of the object you want to observe, the counterweight
shaft will be oriented somewhere between vertical and horizon-
tal.
Figure 8 illustrates how the telescope will look when pointed at
the four cardinal directions: north, south, east and west.
The key things to remember when pointing the telescope are that
a) you only move it in R.A. and Dec., not in azimuth or latitude
(altitude), and b) the counterweight and shaft will not always
appear as it does in Figure 1. In fact it almost never will!
7. Specifications
Mount: German equatorial
Tripod: Aluminum, adjustable height, accessory tray included
Counterweights 7lbs. 9oz. and 4lbs.
Slow-motion controls: For both R.A. and Dec. axes
Setting circles: R.A. scaled in 10 min. increments, Dec. scaled
in 2° increments. for N or S Hemispheres
Latitude adjustment: 5° to 75°
Motor drives: Optional
Weight: 27.5 lbs.
Polar Alignment: Polar axis finder scope for Northern
Hemisphere included, fine adjustments for latitude and azimuth
Figure 8a,b,c,d. This illustration shows the telescope pointed in the four cardinal directions: (a) North, (b) South, (c) East, (d) West. Note
that the tripod and mount have not been moved; only the telescope tube has move on the R.A. and Dec. axis.
Figure 8a Figure 8b Figure 8c Figure 8d

10
One-Year Limited Warranty
This Astroview Equatorial Mount is warranted against defects in materials or workmanship for a period of
one year from the date of purchase. This warranty is for the benefit of the original retail purchaser only.
During this warranty period Orion Telescopes & Binoculars will repair or replace, at Orion’s option, any
warranted instrument that proves to be defective, provided it is returned postage paid to: Orion Warranty
Repair, 89 Hangar Way, Watsonville, CA 95076. If the product is not registered, proof of purchase (such
as a copy of the original invoice) is required.
This warranty does not apply if, in Orion’s judgment, the instrument has been abused, mishandled, or
modified, nor does it apply to normal wear and tear. This warranty gives you specific legal rights, and you
may also have other rights, which vary from state to state. For further warranty service information, con-
tact: Customer Service Department, Orion Telescopes & Binoculars, 89 Hangar Way, Watsonville, CA
95076; (800) 676-1343.
Orion Telescopes & Binoculars
89 Hangar Way, Watsonville, CA 95076
Customer Support Help Line (800) 676-1343 • Day or Evening
/