Page is loading ...

Belling
Built-In Electric with
Microwave Oven
Part No 082757900 Date 10.10.2011
Users Guide & Installation
Handbook

CONTENTS & INTRODUCTION
CONTENTS
• SAFETY
• USING THE PRODUCT
• CLEANING
• INSTALLATION INSTRUCTIONS
• TECHNICAL DATA
• CUSTOMER CARE
INTRODUCTION
Thank you for buying this British-
built appliance from us.
This guide book is designed to help you
through each step of owning your new
cooker, from installation to use. Please
read it carefully before you start using
your product, as we have endeavored to
answer as many questions as possible,
and provide you with as much support
as we can.
If,however,youshouldndsomething
missing, or not covered, please contact
our Customer Care team. Their number is
located on the back page of this book.
For customers outside the UK and
Northern Ireland, please contact your
local supplier.
When you dial this number you will hear
a recorded message and be given a
number of options. This indicates that
your call has been accepted and is
being held in a queue. Calls are answered
in strict rotation as our Customer care
representatives become available.
Alternatively, general information, spares
and service information is
available from our website. The address
is located on the back page of this book.
WARRANTY
Your new appliance comes with our
12-month guarantee, protecting you
against electrical and mechanical
breakdown. To register your appliance
please call 0844 481 0182, complete
the registration form included or register
online at the web address located on the
back page of this book.
For full terms & conditions of the manu-
facturer’s guarantee, refer to the website
on the back of this book.
In addition, you may wish to purchase
anextendedwarranty.Aleaet
explaining how to do this is included
with your appliance.
Our policy is one of constant
development and improvement,
therefore we cannot guarantee the strict
accuracy of all of our illustrations and
specications-changesmayhavebeen
made subsequent to publishing.

SAFETY
BEFORE USING THE PRODUCT
Make sure that you have removed all
packaging and wrapping. Some of the
items inside this appliance may have ad-
ditional wrapping.
Caution: This appliance is for cooking
purposes only. It must not be used for
other purposes, for example room heat-
ing.
GENERAL
Warning! - Accessible parts may become
hot during use. To avoid burns, young
children should be kept away from the
appliance.
Children should be supervised to ensure
that they do not play with the appliance.
This appliance is not intended for use by
persons (including children with reduced
physical, sensory or mental capabilities, or
lack of experience and knowledge) unless
they have been given supervision or in-
struction concerning use of the appliance
by a person responsible for their safety.
Warning! - Servicing should be carried
out only by authorised personnel.
• The appliance must never be discon-
nected from the mains supply during
use, as this will seriously affect the
safety and performance, particularly
in relation to surface temperatures
becoming hot and gas operated parts
notworkingefciently.Thecool-
ingfan(iftted)isdesignedtorun
on after the control knob has been
switched off.
Do not spray aerosols in the vicinity of
this appliance while it is in operation.
Donotstoreoruseammableliquidsor
items in the vicinity of this appliance.
Do not modify this appliance.
OVEN / GRILL
Do
• Always take care when removing food
from the oven as the area around the
cavity may be hot.
• Always use oven gloves when han-
dling any utensils that have been in
the oven as they will be hot.
• Always make sure that the oven
shelves are resting in the correct po-
sition between two runners. Do not
place the oven shelves on top of the
highest runner, as this is not stable
and can lead to spillage or injury.
• Always use the Minute Minder (if
tted)ifyouareleavingtheoven
unattended - this reduces the risk of
food burning.
Do Not
• Never place items on the door while
it is open.
• Never wrap foil around the oven
shelvesorallowfoiltoblocktheue.
• Never drape tea towels near the oven
whileitison;thiswillcauseare
hazard.
• Never pull heavy items, such as tur-
keys or large joints of meat, out from
the oven on the shelf, as they may
overbalance and fall.
• Never use this appliance to heat any-
thing other than food items and do
not use it for heating the room.
CAUTION: The use of a gas cooking ap-
pliance results in the production of heat,
moisture and products of combustion in
the room in which it is installed. Ensure
that the kitchen is well ventilated espe-
cially when the appliance is in use: keep
natural ventilation holes open or install a
mechanical ventilation device (mechanical
extractor hood).
Prolonged intensive use of the appliance
may call for additional ventilation, for
example opening of a window, or more
effective ventilation, for example increas-
ing the level of mechanical ventilation
where present.

SAFETY
MICROWAVE OVEN
Warning : If the door or door seals
are damaged, the oven must not be
operated until it has been repaired
by a competent person.
Warning : It is hazardous for anyone
other than a competent person to
carry out any service or repair opera-
tion that involves the removal of a
cover which gives protection against
exposure to microwave energy.
Warning : Liquids and other foods
must not be heated in sealed con-
tainers since they are liable to
explode.
Warning : Only allow children to use
the microwave oven without super-
vision when adequate instructions
have been given so that the child is
able to use the microwave oven in a
safe way and understands the haz-
ards of improper use.
Do
•
Beforeusingforthersttime,
removetheprotectivelmoffthe
microwave display and door release
button.
• Only use utensils that are suitable for
use in microwave ovens.
• Keep an eye on the microwave oven
when heating food in plastic or paper
containers, due to the possibility of
ignition.
• If smoke is observed, switch off or
unplug the appliance and keep the
doorclosedinordertostieany
ames.
• Microwave heating of beverages can
result in delayed eruptive boiling,
therefore care must be taken when
handling the container.
• The contents of feeding bottles and
baby food jars shall be stirred or
shaken and the temperature checked
before consumption, in order to avoid
burns.
• Always adhere to the cleaning in-
structions for the door seals, cavities
and parts.
• The microwave oven should be
cleaned regularly and any food de-
posits removed.
• Failure to maintain the microwave
oven in a clean condition, could lead
to the deterioration of the surface
that could adversely affect the life of
the appliance and possibility result in
a hazardous situation.
Do not
• Eggs in their shell and whole hard
boiled eggs should not be heated in
microwave ovens since they may ex-
plode, even after microwave heating
has ended.

USING THE (800W) MICROWAVE OVEN
The Display Screen
The display screen shows the cooking
time, power and program information.
When the microwave is in standby mode,
a green clock symbol will be visible. No
time will be displayed.
Function Controls
• Power level - Press to set the re-
quired power level.
• Grill - Press to set a grill-cooking
program of up to a maximum of 95
minutes.
• Combi 1 & 2 - Combined microwave
and grill cooking power.
• Menu / Time - Turn the control knob
to enter the cooking time or to select
the auto-cooking menu.
• Weight Adjust - Press to specify food
weights or the number of servings.
• Weight Defrost - Press to set the
defrost program based on the weight
entered.
• Preset - Press to set a cooking pro-
gram, this will start automatically at
the time set.
• Start / Quick Start - Press once to
start a cooking program or several
times to set a cooking time at full
power level.
• Pause / Cancel - Press to cancel a
setting or reset the microwave before
setting a cooking program. Press
once to temporarily stop cooking, or
twice to cancel the cooking alto-
gether. This is also used for setting
the child lock.
Afteracookingprogramhasnished,
several beeps will sound and “End” will
be displayed. Press any button or open
the door to clear it before setting another
function.
Level
Adjust
Weight
Weight
Defrost
Cancel
Pause/
Combi 2
Combi 1
Grill
Start/
Menu
Time
Cooking Menu
1. Milk/Coffee
2. Rice/Pasta
3. Spaghetti
4. Potato
6. Fish
5. Auto Reheat
7. Chicken
8. Beef/Lamb
9. Skewered Meat
Quick Start
Preset
Power

USING THE (800W) MICROWAVE OVEN
Cooking with the microwave oven
For microwave cooking, press the POWER
LEVEL button several times to select a
cooking power level, and then use the
MENU/TIME dial to set a desired cook-
ing time. The longest cooking time is 95
minutes.
Select power level by pressing the POWER
LEVEL button to the required cooking
power (see the table below).
Press ‘Power
Level’ button
Display Cooking
Power
once 100 100%
twice 80 80%
3 times 60 60%
4 times 40 40%
5 times 20 20%
6 times 00 0%
Press the Start/Quick Start button to com-
mence cooking.
Grill Cooking
The longest cooking time is 95 minutes.
The grill cooking is particularly useful for
thin slices of meat, steaks, chops, kebabs,
sausages or pieces of chicken. It is also
suitable for hot sandwiches and au gratin
dishes.
Press the Grill button, turn the Menu/
Time dial to the required cooking time and
press the Start/Quick Start button.
Combination Cooking (1)
The longest cooking time is 95 minutes.
The Combination Cooking (1) function is
where 30% of the cooking time will be
microwave cooking and 70% will be grill
cooking.Thisisidealforcookingshorau
gratin dishes.
Press the Combi button until CO-1 is
displayed, turn the Menu/Time dial to the
required cooking time and press the Start/
Quick Start button.
Combination Cooking (2)
The longest cooking time is 95 minutes.
The Combination Cooking (2) function is
where 55% of the cooking time will be
microwave cooking and 45% will be grill
cooking. This is ideal for cooking pud-
dings, omelettes, baked potatoes and
poultry.
Press the Combi button until CO-2 is
displayed, turn the Menu/Time dial to the
required cooking time and press the Start/
Quick Start button.
Auto Cooking
For some foods, you do not need to input
the cooking power and time. If you enter
the food type and weight, the microwave
oven automatically calculates the cooking
time required.
You may need to turn the food over at the
middle of cooking time to obtain uniform
cooking.
In standby mode, turn the Menu/Time dial
to the required food type code you want
to cook (see table). Press the Weight
Adjust button a number of times to the
required weight. Press the Start/Quick
Start button.

USING THE (800W) MICROWAVE OVEN
Code Food Type
01 Milk/Coffee (200ml/cup)
02 Rice/Pasta (g)
03 Spaghetti (g)
04 Potato (each 230g)
05 Auto Reheat (g)
06 Fish (g)
07 Chicken (g)
08 Beef/Lamb (g)
09 Skewered Meat (g)
When you press the Weight Adjust button,
the display will show the number of serv-
ings instead of food weight for milk/coffee
and potatoes.
When cooking items (07) Chicken, (08)
Beef/Lamb and (09) Skewered Meat, the
oven stops and beeps during cooking to
remind you to open the door and turn the
food over for uniform cooking.
The result of auto cooking depends on
factorssuchasvoltageuctuation,the
shapeandsizeoffood,etc..Ifyound
the results not to your liking, adjust the
cooking time a little bit accordingly.
For Spaghetti, add boiling water before
cooking.
Preset Function
This function allows you to preset the time
you wish the cooking programme to start.
Enter the required cooking program, press
the Preset button once. Turn the Menu/
Time dial to set the hour. Press the Preset
button once. Turn the Menu/Time dial to
set the minute. Press the Preset button
once. Press Start/Quick Start button once.
The cooking programme will start at the
preset time.
Note: After a preset function has been
set, you cannot operate other functions.
You can check the preset time by pressing
the Preset button. To cancel a preset time
press the Pause/Cancel button.
Weight Defrost
The oven will defrost food based on the
weight entered by user. The defrosting
time and power level are automatically
set once the weight is programmed. The
frozen food weight ranges from 100g to
1800g.
Press the Pause/Cancel button, press the
Weight Defrost button, enter the weight
of the food to be defrosted by pressing
the Weight Adjust button. Press the Start/
Quick button to start the defrosting.
Note: the oven stops during defrosting to
let the user to turn food over for uniform
defrosting and then press Start/Quick
Start to defrost for the remaining time.
Quick Start
The oven will cook food quickly at HIGH
power (100% power output) for quick
start cooking program.
Press the Start/Quick Start to set the
required cooking time, the oven starts
working immediately at full power. The
maximum cooking time you can enter is
10 minutes.
Child Lock
Use to prevent unsupervised operation of
the oven by children.
To set the Child Lock: Press and hold the
Pause/Cancel button for 3 seconds, a beep
sounds and Child Lock indicator lights and
shows on the display.
Note : The oven can not be operated
while the Child Lock is set.
To cancel the Child Lock: Press and hold
the Pause/Cancel button for 3 seconds
until lock indicator on the display goes off.

Caution: Accessible parts may be
hot when the grill is used - young
children should be kept away.
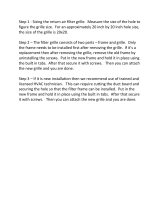
Detachable grill pan handle
Place the handle over the edge of the grill
pan, at the narrow side edges. Slide the
handle to the centre, and locate between
the handle position.The handle should
be removed from the pan during grilling,
to prevent overheating. The handle is
designed for removing/inserting the grill
pan under the grill when grilling.
If cleaning the grill pan when it is hot, use
oven gloves to move it. Do not use the
handle to pour hot fats from the grill pan.
Food for grilling should be positioned
centrally on the trivet.
Using the grill
Important: The grill door must be fully
open when the grill is used.
Open the grill door. Turn the control knob
to the grill setting and the temperature
control all the way around to the grill
setting. For best cooking results, we
recommend that you preheat the grill for
5 minutes.
Push the grill pan towards the back of the
shelf, to position it under the grill.
The speed of grilling can be controlled by
selecting a higher or lower shelf position.
For toasting, and for grilling foods such as
bacon, sausages or steaks, use a higher
shelf position. For thicker foods such
as chops or chicken joint pieces, use a
middle to low shelf position.
The grill trivet, inside the grill pan, can be
inverted to give a high or low position, or
it may be removed.
To switch off, turn the control knobs to the
off position.
Using aluminium foil
Using aluminium foil to cover the grill pan,
or putting items wrapped in foil under the
grillcreatesarehazard.
The cooling fan
When the grill is switched on, the cool-
ing fan comes on to keep the fascia and
control knobs cool during grilling. The fan
may continue to operate for a period after
the grill has been switched off.
During use the fan may cycle on and off,
this is normal.
USING THE GRILL - ELECTRIC

Accessible parts may be hot when
the oven is used. Young children
should be kept away.
To switch on the oven
Turn the oven control knob(s) to the
required setting.
Theredthermostatindicator(iftted)will
come on until the selected temperature
is reached and then go off; it will turn
on and off periodically as the thermostat
operates to maintain the selected tem-
perature.
To switch off, return the control knob to
the “off” position.
When using the oven
As part of the cooking process, hot air
is expelled through a vent in the oven.
When opening the oven door, care should
be taken to avoid any possible contact
with potentially hot air, since this may
cause discomfort to people with sensitive
skin. We recommend that you hold the
underneath of the oven door handle.
PREHEATING
Fanned oven
When cooking sensitive items such as
soufeandYorkshirepuddingsor,when
cooking bread, we recommend that the
oven is pre-heated until the neon switches
offforthersttime.Foranyothertypes
of cooking, a pre-heat may not be re-
quired.
Conventional oven
Preheating is always required
Manual Operation (fanned only)
The programmer must be set to manual
operation before the main oven can be
used. If A (Auto) is on the programmer
display, return the oven to manual by
pressing the up and down buttons simul-
taneously Any programme which has been
set is cancelled.
The cooling fan
The cooling fan may operate when the
main oven is on and may continue to op-
erate for a period after the oven has been
switched off.
OVEN FURNITURE
Oven shelves
The oven shelf must be positioned with
the upstand at the rear of the oven and
facing upwards.
Position baking trays and roasting tins on
the middle of the shelves, and leave one
clear shelf position between shelves, to
allow for circulation of heat.
Baking tray and roasting tins
For best cooked results and even brown-
ing, the recommended size baking trays
and roasting tins that should be used are
as follows;
Baking tray 350mm x 250mm
This size of baking tray will hold up to 12
small cakes.
Roasting tin 370mm x 320mm
We recommend that you use good quality
cookware. Poor quality trays and tins may
warp when heated, leading to uneven
baking results.
USING THE MAIN OVEN - ELECTRIC

USING THE MAIN OVEN - ELECTRIC
Slow cooking ( Setting or 100°C)
• Make sure that frozen foods are thor-
oughly thawed before cooking.
• Do not slow cook joints of meat
or poultry weighing more than
2¼kg/4½lb.
• Preheat the oven to 170°C and cook
for 30 minutes, then adjust the oven
control to or 100°C (slow cook
setting) for the remainder of the
cooking time.
• Slow cooking times will be about 3
times as long as conventional cooking
times.
• Do not open the oven door unneces-
sarily during slow cooking, as this will
result in heat loss at low tempera-
tures.
•
Alwaysusedisheswithtightlytting
lids.Torectifybadlyttinglids,place
foil over the dish underneath the lid.
Aluminium foil
Use foil only to cover food or cooking
dishes, using foil to cover the shelves or
ovenbasecreatesarehazard.
Cooking with a fanned oven
As this is a high efciency oven,
you may notice the emission of
steam from the oven when the door
is opened. Please take care when
opening the door.
If you are used to cooking with a conven-
tionalovenyouwillndanumberofdif-
ferences to cooking with a fan oven which
will require a different approach:
There are no zones of heat in a fan oven
as the convection fan at the back of
the oven ensures an even temperature
throughout the oven.
This makes it ideal for batch baking - eg;
when planning a party as all the items will
be cooked within the same length of time.
Foods are cooked at a lower temperature
than a conventional oven, so conven-
tional recipe temperature may have to be
reduced. Please refer to the conversion
chart.
Preheating is generally not necessary as a
fan oven warms up quickly.
Thereisnoavourtransferenceinafan
oven, which means you can cook strong
smellingfoodssuchasshatthesame
time as mild foods - eg; milk puddings.
When batch baking foods that will rise
during cooking - eg; bread - always
ensure that enough space has been left
between the shelves to allow for the rise.
Notes:
When 2 or more shelves are being used, it
may be necessary to increase the cooking
time slightly.
Because the 2 oven shelves are wider
than in many ovens, it is possible to cook
2 items per shelf - eg; 2 victoria sand-
wiches or 2 casseroles.
Although you need to keep in mind the
points ‘To help the air circulate freely’
with careful choice of dishes and tins, it
is possible to cook a complete meal, and
perhaps something else for the freezer, in
the oven at the same time.
When roasting meats, you will notice that
fat splashing is reduced, which is due in
part to the lower oven temperatures, and
will help keep cleaning of the oven to a
minimum.
Because a fan oven has an even tem-
perature throughout the oven, there is no
need to follow the shelf positions given in
the baking guide.

USING THE MAIN OVEN - ELECTRIC
There is no need to interchange dishes
onto different shelves part way through
cooking, as with a conventional oven.
To help the air circulate freely
Position the shelves evenly within the
oven and maintain a clearance from the
oven roof and base.
If more than one cooking dish or bak-
ing tray is to be used on a shelf, leave a
gap of at least 25mm between the items
themselves and the oven interior.
Defrosting and cooling in the
main oven
To defrost frozen foods, turn the main
oven control to the defrost position, place
the food in the centre of the oven and
close the door.
To cool foods after cooking prior to refrig-
erating or freezing, turn the main oven
control to the defrost position and open
the door.
Defrosting times
Smallorthinpiecesoffrozenshormeat
-eg;shlets,prawns&mincewilltake
approximately 1 - 2 hours.
Placing the food in a single layer will
reduce the thawing time.
A medium sized casserole or stew will
take approximately 3 - 4 hours.
A 1½kg/3lb oven ready chicken will take
approximately 5 hours, remove the giblets
as soon as possible.
Be safe
Do not defrost stuffed poultry using this
method.
Do not defrost larger joints of meat and
poultry over 2kg/4lb using this method.
Never place uncooked food for defrosting
next to cooked food which is to be cooled,
as this can lead to cross contamination.
Defrostingmeat,poultry,andshcanbe
accelerated using this method but make
sure they are completely thawed before
cooking thoroughly. Place meat and poul-
try on a trivet in a meat tin.
MAIN OVEN BAKING GUIDE
Cooking times & temperatures
The temperature settings and times given
in the baking guide are based on dishes
made with block margarine. If soft tub
margarine is used it may be necessary to
reduce the temperature setting.
Allow enough space between shelves for
food that will rise during cooking.
Do not place items on the oven base as
this will prevent air circulating freely.

USING THE MAIN OVEN - ELECTRIC
Note:thisisahighefciencyoven,there-
fore some adjustment will have to be
made to conventional cooking tempera-
tures. The table below shows conven-
tionalcookingtemperatures,‘A’efciency
temperatures and gas marks. For opti-
mum results,
conventional temperatures need to be
convertedto‘A’efciencytemperatures.
For example, an item which would nor-
mally cook at a conventional temperature
of 180 °C, will now cook at the ‘A’ ef-
ciencytemperatureof160°C.
Conventional temperature
(°C)
‘A’ Efciency Oven
(°C)
Gas Mark
100
110
130
140
150
160
180-190
200
220
230
250
100
110
120
130
140
150
160
170
180
190
200
1/4
1/4
1/2
1
2
3
4-5
6
7
8
9
Food Type Temperature set-
tings °C
Time
Approx.
Shelf
Position
Cakes
Small cakes
Victoria sandwich
Semi rich fruit cake
Christmas cake
Conv
190
180
150
150
Fanned
160
160
125
125
15 - 25
20 - 30
2.5
HRS - 3HRS
2.5HRS - 3HRS
2 - 4
3
2
2
Puddings
Bread and butter pud-
ding
Fruit crumble
170
200
150
175
45 - 1hr
40 - 1hr
3
3
Miscellaneous
Yorkshire pudding:
large
small
Shortcrust pastry
220
220
200
200
200
180
40 - 48
15 - 20
Depends on
lling
4 - 5
4 - 5
4 - 5

USING THE MAIN OVEN - ELECTRIC
Traditional fruit cakes
It should be remembered that ovens can
vary over time, therefore cooking times
canvary,makingitdifculttobeprecise
when baking fruit cakes.
It is necessary therefore, to test the cake
beforeremovalfromtheoven.Useane
warmed skewer inserted into the centre of
the cake. If the skewer comes out clean,
then the cake is cooked.
• Follow the temperatures suggested
in the recipe and then adjust accord-
ingly to the conversion table.
• Do not attempt to make Christmas
cakes larger than the oven can cope
with, you should allow at least 25mm
(1 inch) space between the oven
walls and the tin.
• Always follow the temperatures rec-
ommended in the recipe.
• To protect a very rich fruit cake dur-
ing cooking, tie 2 layers of brown
paper around the tin.
• We recommend that the cake tin is
not stood on layers of brown paper,
as this can hinder effective circulation
of air.
• Do not use soft tub margarine for
richfruitcakes,unlessspeciedin
the recipe.
• Always use the correct size and
shape of tin for the recipe quantities.
Roast turkey
Roasting turkey involves cooking two
different types of meat - the delicate light
breast meat, which must not be allowed
to dry out, and the darker leg meat,
which takes longer to cook.
The turkey must be roasted long enough
for the legs to cook, so frequent bast-
ing is necessary. The breast meat can be
covered once browned.
• Always make sure that the turkey is
completely thawed and that the gib-
lets are removed before cooking.
• Turkey should be roasted at 160°C
- 180°C (fanned) or 180°C - 200°C
(conventional) for 20 minutes per lb,
plus 20 minutes, unless packaging
advises otherwise.
• The turkey can be open roasted,
breast side down, for half of the cook
time, and then turned over for the
remainder of the cooking time.
• If the turkey is stuffed, add 5 minutes
per lb to the cooking time.
• If roasting turkey covered with foil,
add 5 minutes per 1lb to the cooking
time.
To test if the turkey is cooked, push a
neskewerintothethickestpartofthe
thigh. If the juices run clear, the turkey
is cooked. If the juices are still pink, the
turkey will need longer cooking.

USING THE MAIN OVEN - ELECTRIC
Roasting guide
The times given in the roasting guide
are only approximate, because the size
andageofthebirdwillinuencecooking
times as will the shape of a joint and the
proportion of the bone.
Frozen meat should be thoroughly thawed
before cooking. For large joints it is advis-
able to thaw over night.
Frozen poultry should be thoroughly
thawed before cooking. The time required
depends on the size of the bird - eg; a
large turkey may take up to 48 hours to
thaw.
Use of a trivet with a roasting tin will
reduce fat splashing and will help to keep
the oven interior clean. Alternatively, to
help reduce fat splashing, potatoes or
other vegetables can be roasted around
the meat/poultry.
Notes:
• When cooking stuffed meat or poultry
calculate the cooking time from the
total weight of the meat plus the
stufng.
• For joints cooked in foil or covered
roasters, and for lidded casseroles,
add 5 minutes per 450g (1lb) to the
calculated cooking time.
• Smaller joints weighing less than
1.25kg (2½lb) may require 5 minutes
per 450g (1lb) extra cooking time.
• Position the oven shelf so that the
meat or poultry is in the centre of the
oven.
• It is recommended that the appliance
is cleaned after open roasting.
Cook in main oven at:
160°C - 180°C (fanned)
180°C - 200°C (conventional)
Approximate Cooking Time
(preheated oven)
Beef
Rare
Medium
Well done
20 minutes per 450g (1lb), plus 20 minutes
25 minutes per 450g (1lb), plus 25 minutes
30 minutes per 450g (1lb), plus 30 minutes
Lamb
Medium
Well Done
25 minutes per 450g (1lb), plus 25 minutes
30 minutes per 450g (1lb), plus 30 minutes
Pork
35 minutes per 450g (1lb), plus 35 minutes
Poultry
20 minutes per 450g (1lb), plus 20 minutes

THE ALTERNATIVE PROGRAMMERS
There are two types of programmer cov-
ered in this section - push button & touch
control. Both programmers have the same
symbol variants & functions but may vary
in their method of operation.
The push button programmer
Sym-
bol
Sym-
bol
What is it?
-
Down/minus
Used to decrease cook
/ end time, remove
minutes from the
minute minder and
adjust the time of day.
Also for listening to
and setting the alarm
tone.
+
Up/plus
Used to increase
cook / end time, add
minutes to the minute
minder and adjust the
time of day.
FUNC-
TION
or
MODE
Function button
Used to select the
functions available on
this timer.
Press once for: Minute
Minder.
Press twice for: Cook
time
Press three times for:
End time.
How to use these
functions is explained
later on in this sec-
tion.
The ‘function’ button in the centre is used
for setting the minute minder and setting
up the automatic cooking. See below for
details.
Symbols on the LED display.
This ‘A’ symbol appears when either
a semi, or fully automatic program is
selected.Thissymbolwillashwhilea
program is being set.
Once a program is set the symbol will
light up, and remain lit until the alarm
sounds, or the program is cancelled.
This bell symbol appears when the Minute
Minder function has been selected.
While the Minute Minder is being set, the
Bellsymbolashes.Oncethelengthof
time is set, the Bell symbol remains lit
until the time runs down, or the function
is cancelled.
This message and ‘A’ symbol appear when
you are asked to set the length of time
you require the oven to cook automati-
cally for.Using the Up and Down buttons
adjusts this accordingly.
This message and ‘A’ symbol appear when
USING THE CLOCK/PROGRAMMER - ELECTRIC

you are asked to enter in an end time, or
when you would like the oven to switch
itself off.
To set the time of day
• Press the Up and Down buttons
together for a few seconds, and
release.
•
The‘•’inbetweenthenumberson
theLEDDisplaywillbegintoash.
• Whilethe‘•’isashingitispossible
to adjust the time using the Up and
Down buttons. Once the time has
been set, allow approximately 30
seconds before using any of the other
timer functions. This ensures that the
time will remain correct.
To select an alarm tone
There are three tones to choose from.
• Press and hold the down button to
listentothersttone.
• Release the down button and press it
again to listen to the second tone etc.
• Releasing the down button after the
tone has sounded will automatically
select that tone.
Setting the minute minder
• To set the Minute Minder, press the
Function button once. The bell sym-
bolwillappearandstartashing.The
ashingonlylastsfor5secondsso
the time must be set within this time
frame.
• Use the Up and Down button to set
the length of time required. Once this
has been done, the Minute Minder is
set.
• When the desired length of time has
counted down the alarm will sound.
• To cancel the tone, press any of the
buttons.
• To cancel the Minute Minder at any
time, press the Up and Down buttons
together.
USING THE CLOCK/PROGRAMMER - ELECTRIC

Semi-automatic cooking
There are two types of semi automatic
cooking available on this appliance.
The oven must be switched on, and in use
to use either of these functions success-
fully.
The Duration method allows you to set the
ovenforaspeciclengthoftime.Ifadish
needed 2 hours to cook, then it would be
possible for you to set the oven to turn off
2 hours later. This allows you to be sure
that your food will be cooked for a set
length of time and no longer.
The End Time method allows you to enter
aspecictimewhenyouwouldlikethe
oven to switch off. If you wish to leave the
oven unattended, then it offers peace of
mind that the oven will have turned itself
off at the set time.
However, once the program is set then it
cannot be adjusted. Extra time cannot be
added, nor can the end time be extended.
To cancel the semi automatic programs,
press both the Up and Down buttons
together. This can be done at any time
during the cooking process. Then if neces-
sary, re program.
For the instructions on how to use both of
these functions, please see the following
page.
Fully automatic cooking
This function incorporates both a duration
and an end time and is meant to be used
when you wish to delay the start time.
Werecommendthattherstfewtimes
this function is used you are in the house,
this will familiarise you with your oven and
prevents food from being over cooked or
under cooked.
Care must be taken when selecting foods
for this function, it is not recommended
for certain food items which may spoil, or
are sensitive to being left.
It is also advisable to set the end time to
be as close to your return as possible to
prevent food being left standing.
USING THE CLOCK/PROGRAMMER - ELECTRIC

SEMI-AUTOMATIC COOKING
The duration method
• Press the Function button twice,(1)
which will skip past the Minute
Minder.
•
TheLEDdisplaywillashtheword
‘dur’,(2)andthe‘A’willashonthe
left hand side of the display.
• Use the Up and Down buttons to set
the length of time you want to cook
for.(3) This must be done within 5
seconds or the time of day will show
again.
Once this is done the oven will automati-
cally switch off once the time has elapsed,
and the alarm will sound.
To switch off the alarm, press any button.
To view any remaining time press the
function button twice.
The end time method
• Press the Function button three times,
which will skip past the Minute Minder
and the Duration programmer. (4)
•
TheLEDdisplaywillashtheword
‘End’andthe‘A’willashontheleft
hand side of the display. (5)
• Use the Up and Down buttons to
select the time the oven is required to
turn off. (6)
Once this is done the oven will turn itself
off at the time you have selected.
To switch off the alarm, press any button.
USING THE CLOCK/PROGRAMMER - ELECTRIC

FULLY AUTOMATIC COOKING (EX-
AMPLE)
This programming method is best suited
for when a delayed start time is required.
Unlike the semi automatic methods this
requires both the duration and the end
time to be entered. The timer will work
out the start time and begin cooking.
• Press the function button twice to
select the length of time your food
will need. (7)
•
The‘A’onthelefthandsidewillash
andthe‘dur’messagewillashup.
(8)
• Using the Up and Down buttons set
the time you require within 5 seconds
of the ‘dur’ message. (9)
• Press the function button three times
untilthe‘A’ashesagainandthe
‘End’ messages appears. (10) & (11)
• Using the Up and Down buttons, set
the time you would like the oven to
switch off. (12)
• Set the temperature of the oven and
place the food inside.
While the automatic function is running,
the ‘A’ will appear statically on the display,
with the time.
Try to keep the end time as close to when
you expect to return, this will prevent
cooked food from being left standing in a
warm oven.
The timer will calculate the appropriate
start time.
To switch off the alarm, press any button.
USING THE CLOCK/PROGRAMMER - ELECTRIC

The touch control programmer
There are three touch control icons for
this timer - the table below shows you
what the symbols look like, depending on
the model type, & their functions.
Note - some functions require you to
‘touch & hold’ an icon for a few seconds,
whilst others require you to just ‘touch’
the icon without holding.
Sym-
bol
Sym-
bol
What is it?
-
Down/minus
Used to decrease
cook / end time, re-
move minutes from
the minute minder
and adjust the time
of day. Also for lis-
tening to and setting
the alarm tone.
+
Up/plus
Used to increase
cook / end time,
add minutes to the
minute minder and
adjust the time of
day.
FUNC-
TION
MODE
Function icon
Used to select the
functions available
on this timer.
Touch once for:
Minute Minder.
Touch twice for:
Cook time
Touch three times
for: End time.
How to use these
functions is ex-
plained later on in
this section.
The ‘function’ icon in the centre is used for
setting the minute minder & setting up the
automatic cooking - see below for details.
Symbols on the LED display.
This ‘A’ symbol appears when either
a semi, or fully automatic program is
selected.Thissymbolwillashwhilea
program is being set.
Once a program is set the symbol will light
up, and remain lit until the alarm sounds,
or the program is cancelled.
This Bell symbol appears when the Minute
Minder function has been selected.
While the Minute Minder is being set, the
Bellsymbolashes.Oncethelengthof
time is set, the Bell symbol remains lit
until the time runs down, or the function
is cancelled.
This message and ‘A’ symbol appear when
you are asked to set the length of time
you require the oven to cook automatically
for. Using the Up and Down icons adjusts
this accordingly.
This message and ‘A’ symbol appear when
you are asked to enter in an end time, or
when you would like the oven to switch
itself off.
USING THE CLOCK/PROGRAMMER - ELECTRIC
/