

Copyright © 2008 Sonim Technologies, Inc.
SONIM, Sonim Xperience, Sonim Xtend and the Sonim logo
are trademarks of Sonim Technologies, Inc. Other company
and product names may be trademarks or registered trade-
marks of the respective owners with whom they are associ-
ated.
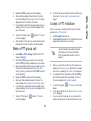
Disposal of old electrical & electronic equipment
Disposal of battery
Declaration of Conformity
Sonim Technologies Inc, declares that the mobile phone
Sonim XP1™(bt) is in compliance with the essential require-
ments and other relevant provisions of Directive 1999/5/EC.
The symbol of the crossed-out wheeled bin
indicates that within the countries in the
European Union, this product, and any
enhancements marked with this symbol, can
not be disposed as unsorted waste but must
be taken to separate collection at their end-
of-life.
Please check local regulations for disposal of
batteries.
The battery should never be placed in munici-
pal waste. Use a battery disposal facility if
available.

i
Contents
General information..........................................1
Network services............................................... 1
Sonim support information................................. 1
Use the guide effectively.................................... 1
Options commonly used across menu items ........ 2
Your safety guidelines ......................................3
Battery care...................................................... 4
Battery performance.................................... 4
Battery replacement.................................... 4
Avoid short circuit ....................................... 4
Avoid high temperatures.............................. 4
Battery disposal .......................................... 4
More safety information..................................... 5
Personal medical devices ............................. 5
Child safety................................................. 5
Emergency calls.......................................... 5
SAR certification.......................................... 5
Getting started..................................................7
Battery information ........................................... 7
Battery usage ............................................. 7
Insert and remove the battery ..................... 7
Charge the battery...................................... 8
Set battery alert.......................................... 8
Your SIM card................................................... 8
Insert the SIM card ..................................... 9
Remove the SIM card.................................. 9
Key operations without your SIM card .......... 9
Parts of the XP1(bt) phone ................................ 9
XP1(bt) keypad........................................... 11
Standby mode .................................................. 11
Operations in standby mode ........................ 12
Keypad functions .............................................. 14
Your XP1(bt) phone ..........................................17
Main menu ....................................................... 17
Home screen indicators ..................................... 18
Settings............................................................ 20
Ringer settings............................................ 20
Phone settings............................................ 20
Network settings......................................... 21
Manage the phone book.................................... 23
Add a new number...................................... 23
Select phone book memory.......................... 23
Send a namecard........................................ 24
Edit or delete phone records........................ 24
Copy or move numbers to other lists ............ 25
Manage personal information....................... 25
Phone book memory ................................... 26
Store the IP service number......................... 26
Make calls .........................................................27
Dial a number................................................... 27
Dial an international number.............................. 27
Dial a number via phone book............................ 27
Dial a number via the call list menu.................... 27
Speed dial ........................................................ 28
Receive a call.................................................... 28
Any key answer .......................................... 29
Forward a call................................................... 29
Call barring....................................................... 29
Call waiting....................................................... 30

ii
Auto redial ........................................................30
Auto answer......................................................31
Filter calls..........................................................31
Black list calls ..............................................31
White list calls .............................................32
Call filter settings.........................................32
Other call settings..............................................32
Review call information ......................................32
Messages.......................................................... 34
Message settings ...............................................34
Text input mode ................................................35
Conventional text input ................................35
Predictive text input .....................................35
Write messages .................................................36
Send an SMS via phone book..............................36
Call a number embedded in a received SMS.........36
Manage your messages......................................37
Inbox..........................................................37
Unsent messages.........................................37
Sent messages.............................................37
Predefined SMS messages ............................37
View SMS memory .......................................38
SMS broadcasts ...........................................38
Voice mail ........................................................38
Hardcoded Shortcuts........................................ 41
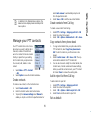
Push-To-Talk quick start................................. 42
Get started........................................................42
PTT functions at a glance ...................................42
Registering with the PTT service. ........................43
Deactivate the PTT service .................................43
PTT settings ......................................................44
PTT display icons...............................................46
Create a PTT contact..........................................47
Create a group ..................................................47
Copy existing contact information .......................47
Make a one-to-one call.......................................47
Move a call to the background ......................48
Dial in a PTT call..........................................48
Make an unplanned group call ............................48
Make a PTT group call........................................49
Accept a PTT invitation.......................................49
Block incoming PTT calls ....................................50
View PTT call log ...............................................50
Copy phone book contacts to PTT list..................50
Refresh the PTT contact list................................51
Push-To-Talk .................................................... 53
PTT settings ......................................................53
General settings...........................................53
Audio settings..............................................53
Backlight.....................................................53
Reject list....................................................54
Display name...............................................54
Report reminder ..........................................54
Standard and Advanced User menu options ...54
Manage your PTT contacts .................................55
Create contacts............................................55
Create contacts from Call log ........................55
Copy contacts from phone book....................55
Add to reject list from Call log.......................55
Set as default ..............................................55
Turn on DnD ...............................................56
Send a PTT invitation ...................................56

iii
Modify contact information........................... 56
Delete a contact.......................................... 56
Delete contacts from call log........................ 57
Manage PTT groups .......................................... 57
Create a new group..................................... 57
Import a group ........................................... 57
Rename a group ......................................... 57
Edit group information................................. 57
Delete members from a group ..................... 58
Delete a group............................................ 58
Send group ID ............................................ 58
Use chat groups................................................ 58
Create a chat group .................................... 58
Rename a chat group.................................. 58
Edit/view chat group information.................. 59
Delete a chat group..................................... 59
Import a group ........................................... 60
Background PoC session.............................. 60
View PTT logs................................................... 60
Outgoing calls list........................................ 60
Answered calls list....................................... 61
Missed calls list ........................................... 61
Rejoin a group session ................................ 62
Delete a list ................................................ 62
Make PTT calls.................................................. 62
Make calls from the PTT contacts list............ 62
Make calls from the PTT calls list.................. 62
Make calls from the GSM calls list................. 62
Make calls from the Standby screen.............. 63
Make calls from the group list ...................... 63
Make unplanned group calls......................... 64
Respond to an invitation.................................... 64
Add more members to the session ..................... 64
Mute or unmute the session............................... 65
Place a call in the background............................ 65
View IPA details............................................... 65
Configurable default PTT list.............................. 66
WAP...................................................................67
Tools..................................................................69
Organizer ......................................................... 69
Create new event entries............................. 69
Edit organizer entries .................................. 70
Delete entries ............................................. 70
Alarm clock....................................................... 70
Calculator......................................................... 70
Audio recorder.................................................. 71
Audio playback ........................................... 71
Bluetooth ......................................................... 71
Activate Bluetooth....................................... 71
Deactivate Bluetooth................................... 71
Bluetooth Settings....................................... 72
Pair devices................................................ 72
Connect a Bluetooth Headset....................... 72
Rename Paired device ................................. 72
Delete Pairing ............................................. 73
Send Data .................................................. 73
Receive data............................................... 73
Stopwatch........................................................ 74
Count-down timer............................................. 74
Universal time................................................... 74
Car Kit.............................................................. 75
Incoming calls............................................. 75

iv
Outgoing Calls .............................................75
Use Handsfree mode for calls........................... 76
When connected to a wired headset....................76
GSM calls ....................................................76
PTT calls .....................................................76
When placed in a Car Kit dashboard holder..........76
GSM Calls....................................................76
PTT Calls.....................................................76
When using a Bluetooth headset.........................77
GSM calls ....................................................77
PTT calls .....................................................77
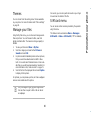
Personalize your phone.................................... 79
Themes.............................................................80
Manage your files...............................................80
SIM card menu..................................................80
Index................................................................ 84

1
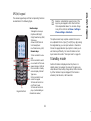
General information
General information
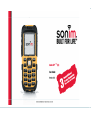
Congratulations on the purchase of a Sonim XP1™ (bt)
mobile phone. The Sonim XP1(bt) phone is fully compliant
with the recently ratified Open Mobile Alliance (OMA) GSM
standard specification. It has an intuitive, feature-rich user
interface that allows you to make the best use of the func-
tions offered on your XP1(bt) device.
Network services
These are additional services that you can avail through
your network service provider. To make the best of these
services, you must subscribe to them through your service
provider and obtain instructions for their use from your
service provider.
Sonim support information
For additional product and support information, visit
www.sonimtech.com
.
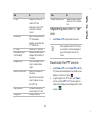
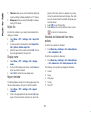
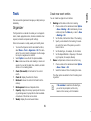
Use the guide effectively
Acquaint yourself with the terminology and symbols used in
the guide to help you use your phone effectively.
Press Means to press and release a key
immediately. For example, Press 2
means that you press the key on
the keypad that is labelled with the
numeral 2 and the alphabets
“ABC”.
Select Means to either press the Left or
Right Selection Key to apply the
command indicated at the bottom
of the screen. The Center naviga-
tion key can also be used to select
options. For example, if this guide
says Select Menu > Messages >
SMS > Write message, you
must press the Left Selection
Key to select Menu, scroll to Mes-
sages and press the Left Selection
Key, scroll to SMS and press the
Left Selection Key, scroll to Write
message and press the Left Selec-
tion Key. To select Exit, press the
Right Selection Key.

2
General information
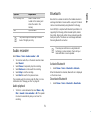
Options commonly used
across menu items
The following are common actions used across various
menu items:
Press and hold Means to press and hold a key for
2–3 seconds before releasing the
key. This action is typically used
when trying to switch on/off the
phone or when using shortkeys to
access specific functions. For
example. press and hold 1 to
access Voicemail.
menu options These options are displayed at the
bottom of the screen. The selec-
tion keys are used to accomplish
the indicated option.
Select Menu Means to press the Left Selec-
tion Key to select the Menu
option or press the Menu key
(centre) for the same result.
A menu item
suffixed with
three dots (…)
Means more options are available
but only one has been mentioned
in the guide.
Signifies a Note.
Signifies a Tip.
Exit Displays the previous screen. Use the
Right Selection key to perform this func-
tion.
Clear Deletes data character by character. Use
the Right selection key to perform this
function.
OK Confirms an action. Use the Left Selec-
tion Key or the Menu key to perform this
function.

3
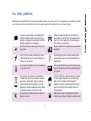
Your safety guidelines
Your safety guidelines
Please read and understand the following safety guidelines before you use the phone. These guidelines provide details to enable
you to operate your phone safely and conform to any legal requirements regarding the use of cellular phones.
Do not to use the phone at a refuelling point.
Observe restrictions when using radio equip-
ment at fuel depots, chemical plants or where
blasting operations are in progress.
Adhere to road safety laws. Do not hold/use a
phone while you are driving; find a safe place to
stop first. Do not speak into a hands-free micro-
phone while you are driving.
Electrical interference may obstruct the use of
your phone.
Observe restrictions in hospitals and near medical
equipment.
Switch off your cellular phone when in an air-
craft. Wireless phones can cause interference
or danger to an aircraft.
Avoid using the phone in close proximity to per-
sonal medical devices, such as pacemakers and
hearing aids.
Do not expose the battery to high temperatures
(in excess of 60°C).
Use only Sonim XP1(bt) approved charging equip-
ment to charge your phone and avoid damage to
your phone.
The symbol of the crossed-out wheeled bin
indicates that within the countries in the Euro-
pean Union, this product, and any enhance-
ments marked with this symbol, can not be
disposed as unsorted waste but must be taken
to separate collection at their end-of-life.
The Sonim XP1(bt) is water-resistant, dust-resist-
ant and rugged. However, it is not water-proof,
dust-proof or incapable of being broken if
dropped or thrown. For best results one should
protect the XP1(bt) from moisture, dust and
strong impacts.
Ensure that only qualified personnel install or
repair your phone.
Make back-up copies of important information
stored in your phone or maintain a written record.

4
Your safety guidelines
Battery care
Battery performance
A rechargeable battery powers your device. Use the battery
only for its intended purpose. Never use any charger or bat-
tery that is damaged. If the battery is completely dis-
charged, it may take a few minutes before the charging
indicator appears on the display or before any calls can be
made.
The full performance of a new battery is achieved only after
two or three complete charge and discharge cycles. The
battery can be charged and discharged hundreds of times
but it will eventually wear out. Unplug the charger from the
electrical plug and the device when not in use. Do not leave
the fully charged battery connected to a charger, since over-
charging may shorten its lifetime. If left unused, a fully
charged battery will lose its charge over time.
Battery replacement
When the talk and standby times are noticeably shorter
than normal, replace the battery with an original Sonim bat-
tery. If a replacement battery is being used for the first time
or if the battery has not been used for a prolonged period, it
may be necessary to connect the charger and then discon-
nect and reconnect it to begin charging the battery.
Avoid short circuit
Do not short-circuit the battery. An accidental short-circuit
can occur when a metallic object such as a coin, clip, or pen
causes direct connection of the positive (+) and negative (-
) terminals of the battery. (These look like metal strips on
the battery.) This might happen, for example, when you
carry a spare battery in your pocket or purse. A short-circuit
at the terminals may damage the battery or the connecting
object.
Avoid high temperatures
Leaving the battery in hot or cold places, such as in a closed
car in summer or winter conditions, will reduce the capacity
and lifetime of the battery. Always try to keep the battery
between 15°C and 25°C (59°F and 77°F). A device with a
hot or cold battery may not work temporarily, even when
the battery is fully charged. Battery performance is particu-
larly limited in temperatures well below freezing.
Battery disposal
Do not dispose of batteries in a fire as they may explode.
Batteries may also explode if damaged. Dispose of batteries
according to local regulations and recycle when possible. Do
not dispose as household waste. Do not dismantle, open or
shred cells or batteries. In the event of a battery leak, do
not allow the liquid to come in contact with the skin or eyes.
In the event of leak or a hazard seek medical help immedi-
ately.

5
Your safety guidelines
More safety information
Personal medical devices
Mobile phones may affect the operation of cardiac pace-
makers and other implanted equipment. Please avoid plac-
ing the mobile phone over the pacemaker, for example. in
your breast pocket. When using the mobile phone, place it
at the ear opposite the pacemaker. If a minimum distance
of 15 cm (6 inches) is kept between the mobile phone and
the pacemaker, the risk of interference is limited. If you
have any reason to suspect that interference is taking place,
immediately turn off your mobile phone. Contact your cardi-
ologist for more information. For other medical devices,
please consult your physician and the manufacturer of the
device.
Comply with instructions to switch off the device or deacti-
vate the RF transmitter function when asked to do so, espe-
cially when posted in hospitals and aeroplanes. Equipment
used in these places may be sensitive to radio waves emit-
ted from the device and adversely affect their operation.
Likewise, observe restrictions at gas stations or other areas
with flammable atmosphere or when close to electro-explo-
sive devices.
Child safety
Do not allow children to play with your mobile phone or its
accessories. Keep it out of their reach. They could hurt
themselves or others, or could accidentally damage the
mobile phone or accessories. Your mobile phone and its
accessories may contain small parts, which could be
detached and create a choking hazard.
Emergency calls
Mobile phones operate using radio signals, which cannot
guarantee connection under all conditions. Therefore you
should never rely solely upon any mobile phone for essen-
tial communications (e.g. medical emergencies).
Emergency calls may not be possible in all areas, on all cel-
lular networks, or when certain network services and/or
mobile phone features are in use. Check with your local
service provider.
SAR certification
When communicating over the wireless network, the mobile
phone emits low radio waves known as radio frequency
energy or RF. The Specific Absorption Rate or SAR is the
unit used to measure the amount of RF energy absorbed by
the body while using the phone and is expressed in watts/
kilogram. In compliance with the product standards in EN
50360:2001, the allowed limit of SAR averaged for 10g tis-
sue is 2.0 (W/kg).

6
Your safety guidelines
The localised (SAR) of the portable XP1(bt) device has been
measured in all cases as requested by the relevant interna-
tional standards. The maximum localised SAR value for
which the device has been tested and certified for specific
exposure limits and different network bands is given below:
Maximum SAR
GSM900 MHz Band
0.604 W/kg Head SAR
0.204 W/kg Body SAR
DCS1800 MHz Band
0.219 W/kg Head SAR
0.137 W/kg Body SAR
You can reduce the exposure of the human body to RF
energy by keeping the phone at a distance of 1.5 cm from
the head/body position. For example, by using a handsfree
headset.

7
Getting started
Getting started
Battery information
Battery usage
Use only an XP1(bt) certified battery, charger or any
other accessories that are designed for this phone
model.
The use of other batteries, chargers and accessories
may void the warranty terms of your phone and cause
damage.
Do not subject the battery to extreme temperature
environments and protect it from moisture.
Please keep the battery out of the reach of children.
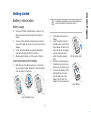
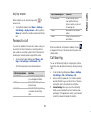
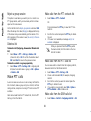
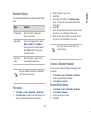
Insert and remove the battery
1. With the back of the phone facing you, turn the bat-
tery cover knob counter-clockwise, to open the battery
cover (as shown in the figure).
2. Lift the flap that covers the
battery.
3. Insert the battery flush into
the battery slot such that the
three metallic contacts at the
top of the battery are aligned
with the metallic contacts
within the battery compart-
ment.
4. Place the cover back and turn
the battery cover knob clock-
wise to lock the battery cover.
5. To remove the battery, lift the
flap behind the phone and
raise the lower end of the
battery from the slot. The
battery can now be removed.
Open the battery cover
Sometimes, the battery cover may be tight and
some extra effort is required to open it.
Lift the battery cover
Insert battery

8
Getting started
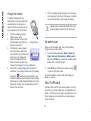
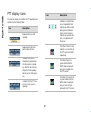
Charge the battery
The battery delivered with your
mobile phone is not fully charged. We
recommend that you charge your
mobile for three hours before you use
your mobile phone for the first time.
1. Insert the charger plug into a
220V AC power outlet.
2. Align the charger connector with
the USB socket at the bottom of
the phone and insert it.
3. If the battery is being charged
when the phone is switched off,
only the battery icon with the mes-
sage Charging is displayed (as
shown in the adjacent figure).
When the battery has been fully
charged, the message Completed is displayed.
4. If the battery is being charged while the phone is
switched on, you will notice that the bars in the battery
charge icon (visible on the home screen) show
movement indicating that the battery is being charged.
After the phone is fully charged the battery bars on the
display stop scrolling. You can safely disconnect the
charger from the phone.
5. After the charging process has begun, the only way to
stop charging is to disconnect the charger. If possible,
use a power jack that is easy to plug and unplug.
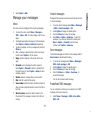
Set battery alert
When you set the battery alert, every time the battery
charge is low you hear an alarm.
1. To set the battery alert select Menu > Quick set-
tings > Normal > Personalize > Battery alert >
On or, press Menu key to select the checkbox beside
Battery alert to activate the alert.
2. Select Exit to go to the previous screen or press
to return to the home screen.
For more information on alerts, refer “Personalize your
phone” on page 79.
Your SIM card
Purchase a SIM card from your mobile operator. Your SIM
card stores your phone number and user registration infor-
mation. The SIM card can be used in any GSM phone. Your
phone number and user registration information always
remain the same.
Charge battery
Vibrate mode is automatically disabled when the
charging cable is inserted into the USB socket.

9
Getting started
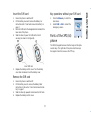
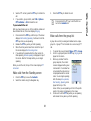
Insert the SIM card
1. Ensure the phone is switched off.
2. Lift the battery cover and remove the battery. For
instructions refer “Insert and remove the battery” on
page 7.
3. Place the SIM card in the designated slot located at the
lower end of the phone.
4. Slide the silver clip over the SIM card to hold it
securely (as shown in the figure B).
5. Replace the battery and the cover. Turn the battery
cover knob clockwise to lock the battery cover.
Remove the SIM card
1. Ensure the phone is switched off.
2. Lift the battery cover to remove the battery. Refer
instructions in the section “Insert and remove the bat-
tery” on page 7.
3. Slide the silver clip upwards and remove the SIM card.
4. Replace the battery and the cover.
Key operations without your SIM card
1. Press the Menu key to enter the
main menu.
2. Select SOS > Call to contact the
Emergency service.
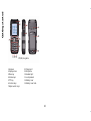
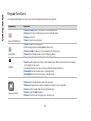
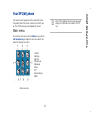
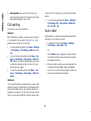
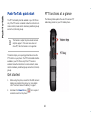
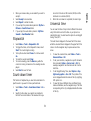
Parts of the XP1(bt)
phone
The XP1(bt) keypad has seven function keys and 12 alpha-
numeric keys. The right side of the phone has three keys
the largest of which is known as the PTT key:
Insert SIM card

10
Getting started
XP1(bt) at a glance
1.Ear piece
2.Display screen
3.Menu key
4.Volume keys
5.PTT key
6.Function keys
7.Alpha-numeric keys
8.Charger port
9.Microphone
10.Headset port
11.Loud speakers
12.Battery cover
13.Battery cover knob

11
Getting started
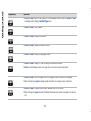
XP1(bt) keypad
The various keypad keys and their corresponding functions
are described in the following figure.
The alpha-numeric keys comprise numbers from one to
zero, alphabets from A-Z, plus [*] and [#] keys. By pressing
the designated key you can input numbers or characters.
Choose the appropriate text input option to enable you to
use these keys efficiently. For more information on text
input modes refer section.“Text input mode” on page 35
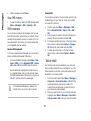
Standby mode
Certain information is displayed when the phone is in
standby mode, for example, the name of the service pro-
vider, date and time, battery charge status, GPRS connectiv-
ity. Other indicators may be displayed (if the feature is
activated), like the alarm, call forward etc.
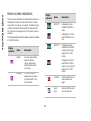
Keypad functions
Function keys
1.Navigation arrow keys
(Up/Down/Left/Right)
2.Right Selection Key (RSK)
3.Menu key
4.Power On/Off/End call
5.Call accept/Send
6.Left Selection Key (LSK)
Numeric keys
7.Press and hold for voice-
mail
8.Press and hold to switch
on and switch off the loud-
speaker during a GSM call.
Press and hold in standby
mode to display Call Alert
Type menu.
9.Press and hold to lock/
unlock the keypad
10.Press and hold to turn
on/off silent mode.
11.Press and hold to dis-
play + (before dialling an
international number)
Based on customization request, some of the
keys may be mapped to other shortcuts than
those represented above. You can also change
many of the shortcuts via Menu > Settings >
Phone settings > Shortcuts.

12
Getting started
The device with a fully-charged battery can remain in the
standby mode for a duration of 200 hours.
Operations in standby mode
The following can be accessed from the home screen when
the phone is in standby mode or when the phone is not in
use.
Basic settings
When you have switched on your phone the name of the
service provider is displayed.
Security settings
1. To prevent unauthorised use of your phone, you can
set a PIN code. In order to change the PIN , the
default PIN 0000 should be activated first .Once this
PIN is activated , then only the PIN can be changed to
the user’s chosen PIN.
2. Select Menu > Settings > Security settings > PIN
code > On > OK. After this is set, every time you
power on the phone, you will be requested to enter
the PIN. If the PIN code is wrong you cannot access
the phone.
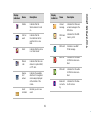
Press To access
Up arrow Call list
Down arrow Phone book list
Right arrow Write Message
Left arrow WAP options
1.GPRS connectivity
2.Signal strength indica-
tor
3.Display icons
4.Battery charge indica-
tor
5.Service provider
6.Local time
7.RSK command
8.LSK command
Standby screen
Menu key Main menu
Left Selection key Main menu
Right Selection key Phone book
Call accept/Send key Outgoing calls list
The four functions that are performed using
the arrow keys are set as factory defaults,
however they can be changed. You can also
configure new shortcuts. For more informa-
tion on shortcuts refer page 21.
Press To access

13
Getting started
3. To change the PIN code select Menu > Settings >
Security settings > Change code > OK. You can
change codes for PIN, PIN2 and Call barring.
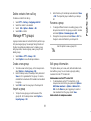
Date and time
1. To set the Date and Time, select Menu > Settings >
Date and time > OK.
Auto keypad lock
1. To lock the keypad, select Menu > Settings >
Phone settings > Auto keypad lock > OK. You can
choose to switch it off or enable the feature.
2. Alternatively press and hold the ‘*’ key to lock and
unlock the keypad.
Silent mode
In the silent mode, the alerts for Calls, Organizer, SMS and
battery status are disabled.
1. Select Menu > Quick settings > Silent > OK >
Enable.

14
Getting started
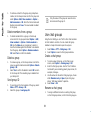
Keypad functions
The following table displays the various keys and the corresponding functions they perform:
Keypad key Operation
Power On/Off/End call
Press and hold to switch on or switch off the mobile phone.
Press when in Menu or Edit modes to return to Standby mode.
Press to end a call.
Press to reject an incoming call.
Accept/Send
Press to answer an incoming call.
After entering a phone number, press to make a call.
Press and hold to make an IP call, provided the IP number is set.
Press while in Standby mode to access Outgoing calls list.
LSK/RSK
These keys are present immediately below the display screen.
Press the Left Selection Key (LSK) or Right Selection Key (RSK) to select the function indicated
at the bottom of the screen.
The indicated functions can vary according to different program definitions.
Press LSK to access the main menu, in standby mode.
Press RSK to access the Phone book, in standby mode.
Menu key (centre)
Present at the centre of the navigation keys.
Press while in standby mode to enter the main menu.
Press when required to be used as a toggle key to select or clear a checkbox.
Press to perform similar tasks as the Left Selection Key.
Press to select the OK command.
Press and hold to mute the ringing of an incoming call.
Page is loading ...
Page is loading ...
Page is loading ...
Page is loading ...
Page is loading ...
Page is loading ...
Page is loading ...
Page is loading ...
Page is loading ...
Page is loading ...
Page is loading ...
Page is loading ...
Page is loading ...
Page is loading ...
Page is loading ...
Page is loading ...
Page is loading ...
Page is loading ...
Page is loading ...
Page is loading ...
Page is loading ...
Page is loading ...
Page is loading ...
Page is loading ...
Page is loading ...
Page is loading ...
Page is loading ...
Page is loading ...
Page is loading ...
Page is loading ...
Page is loading ...
Page is loading ...
Page is loading ...
Page is loading ...
Page is loading ...
Page is loading ...
Page is loading ...
Page is loading ...
Page is loading ...
Page is loading ...
Page is loading ...
Page is loading ...
Page is loading ...
Page is loading ...
Page is loading ...
Page is loading ...
Page is loading ...
Page is loading ...
Page is loading ...
Page is loading ...
Page is loading ...
Page is loading ...
Page is loading ...
Page is loading ...
Page is loading ...
Page is loading ...
Page is loading ...
Page is loading ...
Page is loading ...
Page is loading ...
Page is loading ...
Page is loading ...
Page is loading ...
Page is loading ...
Page is loading ...
Page is loading ...
Page is loading ...
Page is loading ...
Page is loading ...
Page is loading ...
Page is loading ...
-
 1
1
-
 2
2
-
 3
3
-
 4
4
-
 5
5
-
 6
6
-
 7
7
-
 8
8
-
 9
9
-
 10
10
-
 11
11
-
 12
12
-
 13
13
-
 14
14
-
 15
15
-
 16
16
-
 17
17
-
 18
18
-
 19
19
-
 20
20
-
 21
21
-
 22
22
-
 23
23
-
 24
24
-
 25
25
-
 26
26
-
 27
27
-
 28
28
-
 29
29
-
 30
30
-
 31
31
-
 32
32
-
 33
33
-
 34
34
-
 35
35
-
 36
36
-
 37
37
-
 38
38
-
 39
39
-
 40
40
-
 41
41
-
 42
42
-
 43
43
-
 44
44
-
 45
45
-
 46
46
-
 47
47
-
 48
48
-
 49
49
-
 50
50
-
 51
51
-
 52
52
-
 53
53
-
 54
54
-
 55
55
-
 56
56
-
 57
57
-
 58
58
-
 59
59
-
 60
60
-
 61
61
-
 62
62
-
 63
63
-
 64
64
-
 65
65
-
 66
66
-
 67
67
-
 68
68
-
 69
69
-
 70
70
-
 71
71
-
 72
72
-
 73
73
-
 74
74
-
 75
75
-
 76
76
-
 77
77
-
 78
78
-
 79
79
-
 80
80
-
 81
81
-
 82
82
-
 83
83
-
 84
84
-
 85
85
-
 86
86
-
 87
87
-
 88
88
-
 89
89
-
 90
90
-
 91
91


Ask a question and I''ll find the answer in the document
Finding information in a document is now easier with AI
Related papers
-
Sonim XP1 Owner's manual
-
-
 Sonim Technologies XP1520 Bolt SL User manual
-
-
Sonim XP 2.10 Spirit User manual
-
-
-
-
-
Sonim XP5 User guide

Other documents
-
 SAMCOM FPCN10A--02 User guide
-
 Virtual Reality Hands-Free Car Kit VRBT200V User manual
-
Roadmaster VRBT200V User manual
-
Motorola L6 User manual
-
SENDO M550 Owner's manual
-
Bosch Cell Phone GSM-Com 608 User manual
-
Sigma Comfort 50 SOLO User manual
-
Ecom Instruments Ex-GSM 01 EU User manual
-
Response AR-3122 User manual
-
Sharp GX25 User manual

