Page is loading ...

Fitness Reality X-Class Olympic Lat Pull
Down and Row Cable
2852.5-103118
IMPORTANT: Read all instructions carefully before using this product.
Retain this owner’s manual for future reference. The specifications of this
product may vary from this photo and, subject to change without notice.


1
TABLE OF CONTENT
SERVICE---------------------------------------------------------------------
2
LABEL PLACEMENT-----------------------------------------------------
3
IMPORTANT SAFETY GUIDELINES---------------------------------
4
OVERVIEW DRAWING--------------------------------------------------
6
HARDWARE & TOOLS PACK------------------------------------------
7
PART LIST-------------------------------------------------------------------
8
ASSEMBLY------------------------------------------------------------------
10
OPERATIONS & ADJUSTMENTS-----------------------------------
22
WARRANTY-----------------------------------------------------------------
26
PARTS REQUEST FORM-----------------------------------------------
27

2
SERVICE
IMPORTANT: FOR NORTH AMERICA ONLY
For damaged or defective product, questions, replacement parts or any other service
support, please contact our customer service department by the below methods:
For The Best Service, please Email:
service@paradigmhw.com
Response Time: 1-2 Business Days
Emailing us with the information above will be the best method to receive a response
during peak business hours
Website:
www.paradigmhw.com
Toll-Free:
1-844-641-7920
(8:00 AM - 5:00 PM Pacific Standard Time, Monday thru Friday)
Response time may vary via calling
Please have the following information ready when requesting for service:
Your name
Phone number
Model number
Serial number
Part number
Proof of Purchase
For damaged or defective product please contact our customer service before returning
to the store.
Paradigm Health & Wellness, Inc.
1189 Jellick Ave.
City of Industry, CA 91748, USA

3
LABEL PLACEMENT

4
IMPORTANT SAFETY GUIDELINES
Read all instructions carefully before assembling and operating this unit. This unit is
designed with optimum safety in mind. Retain this owner’s manual. Do not remove any
safety labels from the machine, and keep the original purchase receipt for future
reference.
1. Make sure your equipment is correctly assembled before you use it.
2. Do not operate this or any exercise equipment if it is damaged.
3. Be sure all screws, nuts, and bolts are tightened prior to use.
4. Always wear proper exercise apparel when using the equipment. Use care when getting on or
off the unit.
5. If any time you feel faint, light-headed or dizziness while operating the equipment, stop
exercising immediately. You should also stop exercising if you are experiencing pain or any
kind of discomfort.
6. Keep children and pets away from the equipment at all times.
7. Only one person should use the equipment at a time.
8. Wait 2 hours after eating before using the exercise equipment. If you get nauseous, stop
exercising as soon as you feel queasy.
9. Always use this equipment on a clear and level surface. Do not use outdoors or near water.
10. Keep hands and feet away from any moving parts. Do not insert any object into any openings.
11. Keep loose clothes, jewelry, limbs and long hair away from moving parts.
12. Keep children under 13 and pets away from this machine while it is use.
13. There should always be adult supervision.
14. Assemble all the parts and hardware instructed in the direction text; use the illustrations for
the reference.
15. WARNING: CANCER AND REPRODUCTIVE
HARM--WWW.P65WARNINGS.CA.GOV
WARNING: It is highly recommend that you have assistance during the assembly of the
equipment.
WARNING: Before using this equipment you should consult with your personal
physician to see if the product is appropriate for you. Do not use this equipment without
your physician’s approval. Do not use this equipment if you have any of the following
conditions or ailments:
Extreme obesity
Glaucoma, retinal detachment or conjunctivitis
Pregnancy
Spinal injury, Cerebral Sclerosis, or acutely swollen joints
Middle ear infection
High blood pressure, Hypertension, Recent stroke or Transient ischemic attack
Heart or circulatory disorders for which you are being treated
Hiatus hernia or Ventral hernia
Bone weaknesses including Osteoporosis, Unhealed fractures, Modularly pins, or Surgically
implanted orthopedic supports
Use of anti-coagulants including Aspirin in high doses
Do not exceed the maximum rated weight (load)
The maximum weight capacity for this equipment is 360lbs/163kg

5
IMPORTANT SAFETY GUIDELINES
WARNING: It is highly recommend that you have assistance during the assembly of the
equipment.
1. It is highly recommended that a professional installer assembles this equipment. However,
with the proper assistance, the right tools, and strictly following the assembly steps the
assembly of the unit can be achieved without professional help.
2. Thoroughly read each step before proceeding to assemble the items of that step.
3. To aid in assembly of the equipment, the hardware pack (bolts, nuts, washers, tools) have
been presorted according to their corresponding steps. See the HARDWARE & TOOLS
PACK Page.
4. Insert bolts into the frame as illustrated in the drawing of each of the steps.
5. Warning: Do NOT FULLY tighten the bolts, nuts, and screws until instructed to do so.
Hand-tighten all bolts, nuts, and screws during assembly. Hand-tightening will allow for
easier alignment of the bolts , nuts, and screws during assembly .
6. Tools for assembly:
General tools needed for the assembly of the equipment.
Metric Allen Key Set
Metric Wrench Set or Adjustable Wrench
Flat Screwdriver
Phillips Screwdriver )
Rubber Mallet
Silicone Spray Oil
7. When the equipment is fully assembled check all the functions for correct their operation.
Consult the manual if you experience any issues or need further help. Please contact our
service department. See the SERVICE Page.
This product is only to be used alongside with the Fitness Reality X-Class Power Cage
(2867). There may be parts referenced that are NOT on this equipment’s parts list.

6
OVERVIEW DRAWING

7
HARDWARE & TOOLS PACK

8
PARTS LIST
Part#
Description
Q’ty.
Part#
Description
Q’ty.
A
BASE ASSEMBLY
1
52
WASHER D13xD24x2.5
24
B
SLIDER BAR MOUNT
1
75
NYLON NUT M10
8
C
UPPER PIPE ASSEMBLY
1
76
NYLON NUT M12
12
D
SLIDER BAR
1
158
RECTANGLE END CAP
75x50x2
1
E
SLIDER
1
189
FOOTPLATE PADS
100x80x5.0
2
F
FOOT REST
2
192
OLYMPIC PLATE STOPPER
¢80x¢50x16
2
G
PULLEY PLATE
2
209
HANDGRIP D23x3.0x210
2
H
STOPPER PLATE
1
210
HANDGRIP D23x3.0x520
2
I
LAT PULL DOWN BAR
1
225
Square Bushing 60x60x205
1
J
CURL BAR
1
226
OLYMPIC PLATE ADAPTOR
φ48xφ25x200
2
K
CONNECTING PLATE
3
228
PULLEY φ96xφ10.5x26
5
L
WIDE GROOVE PULLEY
D98xD10.5x35
2
274
BUSHING D20xD10.5x14
4
7
HEX BOLT M12x1.75x80L
4
291
UPPER CABLE φ6x4565
1
16
HEX BOLT M12x1.75x105L
4
292
LOWER CABLE φ6*2265
1
22
HEX BOLT M12x1.75x75L
2
293
HOOK
6
24
HEX BOLT M10x1.5x50L
3
294
CHAIN
2
25
HEX BOLT M10x1.5x65L
4
295
STANDARD CLIP
2
26
HEX BOLT M12x1.75x70L
2
482
RUBBER PAD
1
27
BUTTON ALLEN BOLT
M10x1.5x15L
1
51
WASHER D11xD20x2.0
11

9
This Page was intentionally left blank.

10
ASSEMBLY
Step 1
1A. Installing the Base
Slide the Base Assembly (A) underneath the Stability Beam (K-6877) and align it with the bolt
holes on the bottom side of the Stability Beam (K-6877). Place and align the Slide Bar Mount (B)
with the bolt holes on the top side of the Stability Beam (K-6877).
Fasten the Base Assembly (A), Stability Beam (K-6877), and the Slide Bar Mount (B) together
by using two Hex Bolts (16), four Washers (52), two Nylon Nuts (76).
Thoroughly tighten the Bolts (16) and Nuts (76) with the Wrench(s) provided.
This product is only to be used alongside with the Fitness Reality X-Class Power Cage
(2867). There may be parts referenced that are NOT on this equipment’s parts list.

11
ASSEMBLY
HARDWARE PACK
(16) Hex Bolt
2PCS
(52) Washer
4PCS
(76) Nylon Nut
2PCS
Wrench 2PCS
TOOLS

12
ASSEMBLY
Step 2
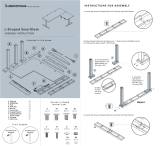
2A. Installing the Foot Rests
Attach the two Foot Rests (F) and two Connecting Plates (K) to the Stability Beam (K-6877) by
using four Hex Bolts (7), eight Washers (52), four Nylon Nuts (76).
Thoroughly tighten the Bolts (7) and Nuts (76) with the Wrench(s) provided.

13
ASSEMBLY
HARDWARE PACK
(7)Hex Bolt
4PCS
(52) Washer
8PCS
(76) Nylon Nut
4PCS
Wrench 2PCS
TOOLS

14
ASSEMBLY
Step 3
3A. Installing the Slider Bar
Insert the Slider Bar (D) into the Slider Bar Mount (B) and hold the Slider Bar (D) in place.
3B. Installing the Stopper Plate
Align the bolt holes of the Stopper Plate (H) with the bolt holes at the rear of the Slider Bar
Mount (B) and fasten the Stopper Plate (H), Slider Bar (D), and Slider Bar Mount (B) together
by using two Hex Bolts (22), four Washers (52), two Nylon Nuts (76).
3C. Installing the Slider
Mount the Slider (E) on to the Slider Bar (D) and gently lower it to the bottom of the Slider Bar
(D).
3D. Installing the Olympic Plate Stopper
Slip an Olympic Plate Stopper (192) onto each of the two Olympic Plate Adaptor (226) parts.
Thoroughly tighten the Bolts (22) and Nuts (76) with the Wrench(s) provided.
Note: If the Slider (E) is difficult to move up and down the Slider Bar (D) then add some of
the silicon lubricant that is included to all the sides of the Slider Bar (D).

15
ASSEMBLY
HARDWARE PACK
(22) Hex Bolt
2PCS
(52) Washer
4PCS
(76) Nylon Nut
2PCS
Wrench 2PCS
TOOLS

16
ASSEMBLY
Step 4
4A. Installing the Upper Pipe Assembly to the Slider Bar
Insert the Upper Pipe Assembly (C) into the Slider Bar (D) and secure it by using two Hex Bolts
(26), four Washers (52), two Nylon Nuts (76) using two Hex Bolts (26), four Washers (52), two
Nylon Nuts (76). Thoroughly tighten the Bolts (26) and Nuts (76).
4B. Installing the Upper Pipe Assembly to the Rear Crossbeam
Attach the Upper Pipe Assembly (C) and one Connecting Plate (K) to the Rear Crossbeam
(G-6877) by using two Hex Bolts (16), four Washers (52), two Nylon Lock Nuts (76). Thoroughly
tighten the Bolts (16) and Nuts (76).

17
ASSEMBLY
HARDWARE PACK
(76) Nylon Nut
4PCS
(52) Washer
8PCS
(16) Hex Bolt
2PCS
(26) HEX BOLT
2PCS
Wrench 2PCS
TOOLS

18
ASSEMBLY
Step 5
5A. Preassembly of the Upper Cables
In preparation for the installation of the pulleys in Step 6 take the Upper Cable (291) and feed the
smaller end into the Upper Pipe Assembly (C) until it can be pulled out from the furthest hole at
the opposite end of Upper Pipe Assembly (C).
Pull the rest of the Upper Cable (291) through and allow it to hang from the hole at the end of
Upper Pipe Assembly (C).
5B. Preassembly of the Lower Cables
Take the Lower Cable (292) and feed the smaller end through the oval hole at the front of the
Base Assembly (A).
Pull the rest of the Lower Cable (292) through and allow it to rest in the pulley brackets at the rear
of the Base Assembly (A).
/