
FormNo.3408-739RevB
PowerPlex™40VMAXAxial
Blower
ModelNo.51690—SerialNo.317000001andUp
ModelNo.51690T—SerialNo.317000001andUp
Registeratwww.Toro.com.
OriginalInstructions(EN)
*3408-739*B

Ifyouhavequestionsor
problems,calltollfree
1-888-367-6631(US)or
1-888-430-1687(Canada)
beforereturningthis
product.
WARNING
CALIFORNIA
Proposition65Warning
Thisproductcontainsachemicalorchemicals
knowntotheStateofCaliforniatocausecancer,
birthdefects,orreproductiveharm.
Introduction
Thisblowerisintendedtobeusedbyresidentialhomeowners
tomoveleaf-likedebrisasneededoutdoors.Itisdesigned
primarilytousebatterypackModel88540(providedwith
Model51690)or88541.
Readthisinformationcarefullytolearnhowtooperateand
maintainyourproductproperlyandtoavoidinjuryand
productdamage.Youareresponsibleforoperatingthe
productproperlyandsafely.
Registeryourproductatwww .Toro.comtoensurethatToro
cannotifyyouinthecaseofasafetyorwarrantyproduct
recall.
Model51690Tdoesnotincludeabatteryoracharger.
Safety
WARNING:Whenusingelectricgardeningappliances,always
followbasicsafetyprecautionstoreducetheriskofre,
electricshock,andpersonalinjury,includingthefollowing:
WARNING
Failuretofollowallwarningsandinstructionsmay
resultinelectricshock,reand/orseriousinjury.
Readallsafetywarningsandallinstructions.
Saveallwarningsandinstructionsforfuturereference.
Theterm“powertool”inallofthewarningsreferstoyourmains-operated
(corded)powertoolorbattery-operated(cordless)powertool.
1.Workareasafety
A.Keeptheworkareacleanandwelllit.Cluttered
ordarkareasinviteaccidents.
B.Donotoperatepowertoolsinexplosive
atmospheres,suchasinthepresenceof
ammableliquids,gasses,ordust.Powertools
createsparkswhichmayignitethedustorfumes.
C.Keepchildrenandbystandersawaywhile
operatingapowertool.Distractionscancauseyou
tolosecontrol.
2.Personalsafety
A.Stayalert;watchwhatyouaredoinganduse
commonsensewhenoperatingapowertool.
Donotuseapowertoolwhileyouaretired
orundertheinuenceofdrugs,alcohol,or
medication.Amomentofinattentionwhileoperating
powertoolsmayresultinseriouspersonalinjury.
B.Usepersonalprotectiveequipment.Always
weareyeprotection.Protectiveequipmentsuchasa
dustmask,non-skidsafetyshoes,ahardhat,orhearing
protectionusedforappropriateconditionswillreduce
personalinjuries.
C.Preventunintentionalstarting.Ensurethat
theswitchisintheOFFpositionbefore
connectingtoapowersourceand/orbattery
packandpickinguporcarryingthetool.
Carryingpowertoolswithyourngerontheswitchor
energizingpowertoolsthathavetheswitchoninvites
accidents.
D.Donotoverreach.Keepproperfootingand
balanceatalltimes.Thisenablesbettercontrolofthe
powertoolinunexpectedsituations.
E.Dressproperly.Donotwearlooseclothingor
jewelry.Keepyourhair,clothing,andgloves
awayfrommovingparts.Looseclothes,jewelry,or
longhaircanbecaughtinmovingparts.
F.Keepyourhandsandfeetawayfromthe
cuttingarea.
3.Powertooluseandcare
©2017—TheToro®Company
8111LyndaleAvenueSouth
Bloomington,MN55420
2
Contactusatwww.Toro.com.
PrintedinChina
AllRightsReserved

A.Donotforcethepowertool.Usethecorrect
powertoolforyourapplication.Thecorrectpower
toolwilldothejobbetterandsaferattherateforwhich
itwasdesigned.
B.Donotusethepowertooliftheswitchdoes
notturnitonandoff.Anypowertoolthatcannot
becontrolledwiththeswitchisdangerousandmustbe
repaired.
C.Removethebatterypackfromthepowertool
beforemakinganyadjustments,changing
accessories,orstoringpowertools.Such
preventivesafetymeasuresreducetheriskofstartingthe
powertoolaccidentally.
D.Storeidlepowertoolsoutofthereachof
childrenanddonotallowpersonsunfamiliar
withthepowertoolortheseinstructionsto
operatethepowertool.Powertoolsaredangerousin
thehandsofuntrainedusers.
E.Storeidleappliancesindoors.Whennotinuse,
appliancesshouldbestoredindoorsinadryandhighor
locked-upplace,outofthereachofchildren.
F.Maintainpowertools.Checkfor
misalignmentorbindingofmoving
parts,breakageofpartsandanyother
conditionthatmayaffectthepowertools
operation.Ifdamaged,havethepowertool
repairedbeforeuse.Manyaccidentsarecausedby
poorlymaintainedpowertools.
G.Keepcuttingtoolssharpandclean.Properly
maintainedcuttingtoolswithsharpcuttingedgesareless
likelytobindandareeasiertocontrol.
H.Usethepowertoolinaccordancewiththese
instructionsandinthemannerintendedfor
theparticulartypeofpowertool,takinginto
accounttheworkingconditionsandthework
tobeperformed.Usingthepowertoolforoperations
differentfromthoseintendedcouldresultinahazardous
situation.
I.Keepguardsinplaceandinworkingorder.
4.Service
Haveyourpowertoolservicedbyaqualiedrepair
personusingonlyidenticalreplacementparts.This
willensurethatthesafetyofthepowertoolismaintained.
5.BatterySafety
A.Donotchargeapplianceinrain,orinwet
locations.
B.Donotusebattery-operatedapplianceintherain.
C.Useonlythefollowingtypeandsizebattery(ies):
TorobatteryModel88540or88541.
D.Removeordisconnectthebatterybefore
servicing,cleaning,orremovingmaterialfromthe
gardeningappliance.
E.Donotdisposeofthebattery(ies)inare.The
cellmayexplode.Checkwithlocalcodesfor
possiblespecialdisposalinstructions.
F.Donotopenormutilatethebattery(ies).Released
electrolyteiscorrosiveandmaycausedamageto
theeyesorskin.Itmaybetoxicifswallowed.
G.Exercisecareinhandlingbatteriesinordernot
toshortthebatterywithconductingmaterials
suchasrings,bracelets,andkeys.Thebatteryor
conductormayoverheatandcauseburns.
SAVETHESEINSTRUCTIONS
SafetyandInstructionalDecals
Safetydecalsandinstructionsareeasilyvisibletotheoperatorandarelocatednearanyareaofpotential
danger.Replaceanydecalthatisdamagedormissing.
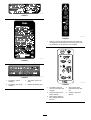
decal136-2467
136-2467
Model51690
decal136-2468
136-2468
Model51690T
3

decal136-2471
136-2471
decal136-2473
136-2473
decal136-2476
136-2476
1.Thebatterypackis
charging.
3.Thebatterypackistoo
warm.
2.Thebatterypackisfully
charged.
4.Replacethebatterypack.
decal136-2533
136-2533
1.Warning—readtheOperator’sManual;keepawayfrom
movingparts;keepallguardsandcoversinplace;wear
eyeprotection;donotoperateinwetconditions.
decal136-2534
136-2534
1.Thebatterydoesnot
comeoutoftheboxfully
charged.
4.Stop—followthese
instructionsbeforerst
use.
2.Placethebatteryinthe
batterycharger.
5.ReadtheOperator’s
Manual.
3.Waituntilthebatteryis
fullychargedbeforethe
rstuse.
4

Setup
Note:Thebatterypackisnotfullychargedwhenyou
purchaseit.Beforeusingthetoolforthersttime,referto
ChargingtheBatteryPack(page7).
MountingtheBatteryCharger
(Optional)
Ifdesired,mountthebatterychargersecurelyonawallusing
thewall-mountkeyholesonthebackofthecharger.
Mountitindoors(suchasagarageorotherdryplace),neara
poweroutlet,andoutofthereachofchildren.
RefertoFigure1forassistanceinmountingthecharger.
Note:Slideandtwistthechargerovertheappropriately
positionedhardwaretosecurethechargerinplace(hardware
notincluded).
g194202
Figure1
AssemblingtheBlower
1.Slidetheblowertubeontotheblowerhousing.You
mayneedtopressdownonthetabfortheblowertube
tolockintoplace(Figure2).
g190102
Figure2
1.Tab
2.Alignthecavityonthebatterypackwiththetongue
inthehandlehousing,graspthehandle,andpushthe
batterypackintothehandleuntilthelatchlocksinto
place(Figure3).
g194149
Figure3
1.Batterylatch
5

Operation
WARNING
Theblowercanthrowdebris,possiblycausing
seriouspersonalinjurytoyouorbystanders.
•Donotblowhardobjects,suchasnails,bolts,
orrocks.
•Donotoperatetheblowernearbystandersor
pets.
•Useextracarewhencleaningdebrisfromstairs
orothertightareas.
•Wearsafetygogglesorothersuitableeye
protection,longpants,andshoes.
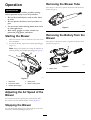
StartingtheBlower
1.Makesurethattheventsontheblowerareclearofany
dustanddebris.
2.Tostarttheblower,squeezethevariable-speedtrigger
(Figure4).
Note:Engagethespeedlocktokeepthemachineon
withoutpressingthevariable-speedtrigger(Figure4).
g194437
Figure4
1.Speedlock
4.Batterylatch
2.Turboboostbutton5.Blowerventingareas
3.Variable-speedtrigger
AdjustingtheAirSpeedofthe
Blower
Toacceleratetheblowerspeed,pressandholdtheturbo
boostbuttonforthedesiredamountoftime(Figure4).
StoppingtheBlower
Tostoptheblower,disengagethespeedlock(ifinuse)and
releasethevariable-speedtrigger(Figure4).
RemovingtheBlowerTube
Pressdownonthetabtoseparatetheblowertubefromthe
blower(Figure5).
g190104
Figure5
RemovingtheBatteryfromthe
Blower
Pressdownonthebatterylatchtoseparatethebatteryfrom
theblower(Figure6).
g194150
Figure6
1.Batterylatch
6

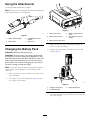
UsingtheAttachments
Usetheprovidedattachmentsasneeded.
Note:TheGutterCleanerKit(Model51667)andOscillating
Tube(Model51664)aresoldseparately.
g194438
Figure7
1.Guttercleaneradaptor3.Oscillator/MPHinsert
adapter
2.Blowertube4.MPHinsert
ChargingtheBatteryPack
Important:Readallsafetyprecautions.
Important:Forbestresults,yourbatterypackshould
bechargedinalocationwherethetemperatureismore
than0°C(32°F)butlessthan50°C(122°F).Toreducethe
riskofseriouspersonalinjury,donotstorethebattery
packoutsideorinvehicles.Chargingtimeincreasesif
youdonotchargeitwithinthisrange.
Note:Atanytime,pressthebattery-charge-indicatorbutton
onthebatterypacktodisplaythecurrentcharge(LED
indicators).
1.Makesurethattheventsonthebatteryareclearofany
dustanddebris.
2.Lineupthecavityinthebatterypack(Figure8)with
thetongueonthecharger.
g192748
Figure8
1.Batterypackcavity4.Battery-charge-indicator
button
2.Batterypackterminals
5.LEDindicators(current
charge)
3.Batterypackventingareas
3.Makesurethattheventsonthebatterychargerare
clearofanydustanddebris.
4.Slidethebatterypackintothechargeruntilitisfully
seated(Figure9).
g194423
Figure9
1.Chargerventingareas
3.Rightindicatorlight
2.Leftindicatorlight
5.Toremovethebatterypack,slidethebatterybackward
outofthecharger.
7

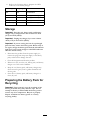
6.RefertothefollowingtabletointerprettheLED
indicatorsonthebatterycharger.
LeftLight
RightLight
Indicates:
Off
Red
Chargerison;nobattery
packinserted
RedRedBatterypackischarging
Green
RedBatterypackischarged
Orange
RedBatterypackistoowarm
RedBlinkingRedReplacethebatterypack
Storage
Important:Storethetool,batterypack,andbattery
chargeronlyintemperaturesthatarebetween-20°C
(-4°F)and70°C(158°F).
Important:Unplugthechargerifyoustoreitbelow
-20°C(-4°F)orabove70°C(158°F).
Important:Ifyouarestoringthetoolforaprolonged
periodoftime,removethebatterypack.Whenreadyto
useagain,chargethebatterypackuntiltheleftindicator
lightturnsgreenonthechargerorall4LEDindicators
turnblueonthebattery.
•Disconnecttheproductfromthepowersupply(i.e.,
removetheplugfromthepowersupplyorthebattery
pack)andcheckfordamageafteruse.
•Cleanallforeignmaterialfromtheproduct.
•Whennotinuse,storethetool,batterypack,andbattery
chargeroutofthereachofchildren.
•Keepthetool,batterypack,andbatterychargeraway
fromcorrosiveagents,suchasgardenchemicalsand
de-icingsalts.
•Storethetool,batterypack,andbatterychargerina
clean,dryarea.
PreparingtheBatteryPackfor
Recycling
Important:Uponremoval,covertheterminalsofthe
batterypackwithheavy-dutyadhesivetape.Donot
attempttodestroyordisassemblethebatterypackor
removeanyofitscomponents.Recycleorproperly
disposeoflithium-ionbatterypacksatabattery
recyclingfacility.
8

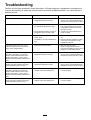
Troubleshooting
Performonlythestepsdescribedintheseinstructions.Allfurtherinspection,maintenance,andrepairwork
mustbeperformedbyanauthorizedservicecenterorasimilarlyqualiedspecialistifyoucannotsolvethe
problemyourself.
Problem
PossibleCauseCorrectiveAction
Thebatterypackloseschargequickly.1.Thebatterypackisoverorunderthe
appropriatetemperaturerange.
1.Movethebatterypacktoaplace
whereitisdryandthetemperatureis
between0°C(32°F)and50°C(122°F).
1.Thebatterychargerisoverorunder
theappropriatetemperaturerange.
1.Unplugthebatterychargerandmove
ittoaplacewhereitisdryandthe
temperatureisbetween0°C(32°F)
and50°C(122°F).
Thebatterychargerisnotworking.
2.Theoutletthatthebatterychargeris
pluggedintodoesnothavepower.
2.Contactyourlicensedelectricianto
repairtheoutlet.
1.Thereismoistureontheleadsofthe
batterypack.
1.Allowthebatterypacktodryorwipeit
dry.
Thetooldoesnotrunorruncontinuously.
2.Thebatteryisnotfullyinstalledinthe
tool.
2.Removeandthenreplacethebattery
inthetool,ensuringthatitisfully
installedandlatched.
Thebatterypackshowsonly3LED
indicatorsafteronlyafewsecondsof
usingafullychargedbattery.
1.Thisisanormaloccurrence.
1.Stopthetoolandpress
battery-charge-indicatorbuttonor
theremovethebatteryfromthetoolto
displaytheactualbatterycharge.
All4LEDindicatorsareblinkingon
thebatterypackafteryoupressthe
battery-charge-indicatorbuttononthe
batterypackandthecurrentcharge
displays(whenthebatterypackisnotin
use).
1.Thebatterypackisoverorunderthe
appropriatetemperaturerange.
1.Movethebatterypacktoaplace
whereitisdryandthetemperatureis
between0°C(32°F)and50°C(122°F).
All4LEDindicatorsareblinkingonthe
batterypackafterreleasingthetrigger
(whenthebatterypackisinuse).
1.Thebatterypackisoverorunderthe
appropriatetemperaturerange.
1.Movethebatterypacktoaplace
whereitisdryandthetemperatureis
between0°C(32°F)and50°C(122°F).
2LEDindicatorsareblinkingon
thebatterypackafteryoupressthe
battery-charge-indicatorbuttononthe
batterypackandthecurrentcharge
displays(whenthebatterypackisnotin
use).
1.Thereisadifferenceinvoltage
betweencellsinthebatterypack.
1.Placethebatteryonthechargeruntil
itisfullycharged.
2LEDindicatorsareblinkingonthe
batterypackafterreleasingthetrigger
(whenthebatterypackisinuse).
1.Thereisadifferenceinvoltage
betweencellsinthebatterypack.
1.Placethebatteryonthechargeruntil
itisfullycharged.
9

Notes:

Notes:

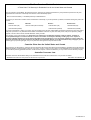
TheToroPromise-ElectricProducts
AThree-Year
1
FullWarrantyforResidentialUsefortheUnitedStatesandCanada
TheT oroCompanyanditsafliate,ToroWarrantyCompany,pursuanttoanagreementbetweenthem,jointlywarrantthisproductforthreeyears
againstdefectsinmaterialorworkmanshipwhenusedfornormalresidentialpurposes.*
1
Doesnotincludethebattery.1YearBatteryWarrantyforResidentialUse.
IfyouthinkyourToroProductcontainsadefectinmaterialsorworkmanship,ifyouhavequestionsorproblems,andbeforereturningthisproductcall
tollfree:
Trimmers:
Chainsaw:
Blowers:
Snowthrowers:
1-800-237-2654(US)1-855-340–7689(USandCanada)1-888-367-6631(US)1-800-808-2963(US)
1-800-248-3258(Canada)1-888-430-1687(Canada)1-800-808-3072(Canada)
Toreceiveareplacementorrepair,atouroption,returnthecompleteunittotheseller.UnitedStatesandCanadacustomersmayreturntheirproduct,
withproofofpurchase,toanyAuthorizedServiceDealer.UnitedStatescustomersmayalsoreturntheirproduct,withproofofpurchase,postage
prepaid,totheToroServiceCenter,5500SEDelaware,Ankeny,IA50021.
Thiswarrantycoversproductdefectsonly.NeitherTheToroCompanynorToroWarrantyCompanyisliableforindirect,incidental,or
consequentialdamagesinconnectionwiththeuseoftheToroProductscoveredbythiswarranty,includinganycostorexpenseof
providingsubstituteequipmentorserviceduringreasonableperiodsofmalfunctionornon-usependingcompletionofrepairsunderthis
warranty.Somestatesdonotallowexclusionsofincidentalorconsequentialdamages,sotheaboveexclusionsmaynotapplytoyou.This
warrantygivesyouspeciclegalrights,andyoumayalsohaveotherrightswhichvaryfromstatetostate.
CountriesOtherthantheUnitedStatesandCanada
ThiswarrantyisnotvalidinMexico.CustomerswhohavepurchasedToroproductsexportedfromtheUnitedStatesorCanadashouldcontacttheirToro
Distributor(Dealer)toobtainguaranteepoliciesforyourcountry,province,orstate.IfforanyreasonyouaredissatisedwithyourDistributor’sservice
orhavedifcultyobtainingguaranteeinformation,contacttheToroimporter.Ifallotherremediesfail,youmaycontactusatT oroWarrantyCompany.
AustralianConsumerLaw
AustraliancustomerswillnddetailsrelatingtotheAustralianConsumerLaweitherinsidetheboxoratyourlocalT oroDealer.
*Residentialusemeansuseoftheproductonthesamelotasyourhome.PartNumber374-0262Rev.G
374-0262RevG
-
 1
1
-
 2
2
-
 3
3
-
 4
4
-
 5
5
-
 6
6
-
 7
7
-
 8
8
-
 9
9
-
 10
10
-
 11
11
-
 12
12


Ask a question and I''ll find the answer in the document
Finding information in a document is now easier with AI
Related papers
-
Toro PowerPlex 40V MAX Axial Blower User manual
-
-
-
-
-
-
Toro Flex-Force Power System 60V MAX Axial Blower User manual
-
-
-

