Page is loading ...

HDX-XT
4K-ready PoE Cat5e/6 and USB 2.0
HD Extender
www.smartavi.com
Installation
Manual
What’s in the Box?
PART NO. QTY DESCRIPTION
HDX-XT-S 1
(1) HDX-XT 4K Extender with USB 2.0 Transmier
and Receiver Unit(s); Quickstart Guide
PS12VDC1A
2
Power Supply DC 12V 1A
© Copyright 2019 SmartAVI, All Rights Reserved
NOTICE
The information contained in this document
is subject to change without notice. Smart-AVI makes
no warranty of any kind with regard to this material,
including but not limited to, implied warranties of
merchantability and fitness for any particular purpose.
Smart-AVI will not be liable for errors contained herein or for
incidental or consequential damages in connection with the
furnishing, performance or use of this material.
No part of this document may be photocopied, reproduced or
translated into another language without prior written consent
from Smart-AVI.
For more information, visit www.smartavi.com.
SmartAVI, Inc.
2455 W Cheyenne Ave, Suite 112
North Las Vegas, NV 89032
(800) AVI-2131 | (702) 800-0005
http://www.SmartAVI.com
4K Video and USB
2.0 KVM Extender
Rack Mountable Option
Our SmartRack is the perfect solution to allow
virtually all SmartAVI devices to be custom mounted
in a standard 19” server rack. The SmartRack is fully
adjustable and can secure/organize several devices.
Technical Specications
VIDEO
Format HDMI
Maximum Pixel Clock 165 MHz
Input Interface (TX)
(1) HDMI, (1) LAN, (1) USB-H, (1) IR-IN, (1) RS-232, (1)
Opcal (Spdif in), (1) Audio In
Output Interface (RX)
(1) HDMI, (1) LAN, (2) USB, (1) IR Out, (1) Audio Out,
(1) RS-232, (1) Opcal (Spdif out)
Resolution
480p, 720p, 1080i, 1080p/60Hz, 4K/30Hz
DDC 5 volts p-p(TTL)
Input Equalization Automatic
Input Cable Length Up to 20 ft.
Output Cable Length Up to 20 ft.
OTHER
Power
DC 12V 1A
Dimensions
160 (W) X 97 (D) X 28 (H)
Weight
450g/TX, 450g/RX
Operating Temp.
32 - 104°F ( 0-40°C)
Storage Temp.
-4 - 140°F (-20 - 60°C)
Humidity Up to 95%
USB
Signal Type USB 2.0
Input Interface (TX) (1) USB-H
Output Interface (RX) (2) USB
RS232
Input Interface Full duplex TXD, RXD signal
IR
Frequency Response 30KHz to 80KHz
Input Interface (RX) (1) 3.5 mm (Female)
Output Interface (TX) (1) 3.5 mm (Female)

Introduction
The HDMI USB KVM (Keyboard, Video, Mouse) Ex-
tender is a tool which can extend your HDMI signal over
328/100 meters to a compable display. It is designed to
convert an HDMI signal to standard extender signal, which
can be transmied by a CAT5e/CAT6/CAT7 cable. It also
supports Transfer Bidireconal Infrared control signal and
RS232 control signal. The HDX-XT also supports the con-
necon of a USB host and (2) USB device ports.
Features
• Zero pixel loss with TMDS signal correcon
• Fully compliant with HDMI 1.4, and compable with HDMI 2.0
(4K2K@60Hz with YCbCr 4:2:0)
• HDCP2.2 and DVI compable.
• Extends signal over a single CAT5e/6/7 cable up to 100m/328.
• Supports pass-through of HD audio formats: LPCM2/5.1/7.1
CH, Dolby Digital, DTS, Dolby TrueHD, DTS-HD Master Audio
• POE (funcon support, either TX or RX powered 24V@1A
• Full HD support: 1080p@60Hz@24/36/48bit/pixels.
• Supports USB 2.0 control.
• Supports external Bi-Direconal SPDIF IN/OUT and available
for mulchannel audio
• Supports stereo audio with PCM 2CH.
• Transfer Bidireconal Infrared control signal together with the
HDMI signal.
• Transfer Bidireconal RS232 control signal together with the
HDMI signal.
Product - Installation Diagram
Connecting the HDX-XT
1. Disconnect power from all devices involved with the
installaon.
2. Connect the display, keyboard, mouse, audio and USB
devices to the ports idened for each item on the HDX-
XT Receiver Unit.
3. Connect the Computer’s Display output and USB port to
the ports idened for each item on the HDX-XT Transmit-
ter Unit.
4. Connect the HDX-XT Transmier Unit to the HDX-XT
Receiver Unit with an CAT5/5e/6 cable. For the best qual-
ity video use a single CAT5/5e/6 cable to connect the
HDX-XT Transmier to the Receiver. The HDX-XT is not
designed to work with Routers, Switches or Hubs.
5. Power on the devices connected to the HDX-XT Re-
ceiver Unit.
6. Connect the power supplies provided for the HDX-XT
Transmier and Receiver and connect them both to power.
7. Power on the Computer.
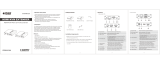
HDX-XT (TX) Front
HDX-XT (RX) Front
HDX-XT (TX) Rear
HDX-XT (RX) Rear
APPLICATIONS
• Security
• PC Networking
• Conference Center Systems
• Point of Sale
• Camera Surveillance
• Video Phone
• Control Room Systems
• Recording Studio
• PC KVM Extension
Connecting more USB devices:
If additional devices needed to be connected,
connect a USB hub to the USB port of the receiver.
/