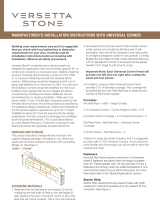
UNIVERSAL, OVERSIZED AND RECEPTACLE MOUNT INSTALLATION
STEP 1 - Place desired mount over the proper application
needed. Align and level mount parallel with siding to be
installed. Nail block into place using all flange holes with
2 ½" roofing nails.
Note: Flashing tape is applied over the flange.
STEP 2 - Flash all sides of block covering the nail flange.
Install siding and caulk sides and bottom of block.
Materials needed:
2 1/2" roofing nails
2" brad nails
OSI Quad caulk
Flashing tape
Penetrations Installation Requirements
For penetrations in the building envelope such as hose bibs and holes 1 ½"
diameter or larger, such as dryer vents. To install a block around an existing vent
pipe, use a SturdiMount Split Block. Weather-cut the trim to fit into place. Install
flashing over top of the trim block.
Installation Guide
SturdiMount by Mid-America
SturdiMount.com
800-521-8486
All 1/8" gaps
between siding
and mount need to
be caulked.
Flashing Tape
Do not caulk
on top of
drip cap!
Flashing Tape

©2014 Tapco International Corporation
SturdiMount.com 800-521-8486
SPLIT MOUNT INSTALLATION
STEP 1 - Detach bottom half of block from plastic flange by
placing finger through 1" hole and then pulling down and
out until block is detached. Remove remaining glue pad
from the face of the plastic flange.
STEP 2 - Feed water spigot or other application through the
rectangular flange hole. Slide bottom half of block back up
until tight. Face nail with 2" brad nails. Do not caulk 22.5°
weathercut edge.
remove
glue
pad
detatch
bottom
half from
flange
22.5° weathercut
1/8" wide double
sided drip edge
1/2" paintable
plastic drip cap
SM2991
/