ZyXEL PLA4201 v2 User manual

Category
PowerLine network adapters
Type
User manual

This manual is also suitable for

Quick Start Guide
www.zyxel.com
PLA Series
Powerline Ethernet Adapter
Utility Version 6.0.1
Edition 2, 04/2013
Default Network Name: HomePlugAV
Copyright © 2013 ZyXEL Communications Corporation
User’s Guide
PLA Series User’s Guide2
IMPORTANT!
READ CAREFULLY BEFORE USE.
KEEP THIS GUIDE FOR FUTURE REFERENCE.
Note: This guide is a reference for a series of products. Therefore some features or
options in this guide may not be available in your product.
Screenshots and graphics in this book may differ slightly from your product due to differences in
your product firmware or your computer operating system. Every effort has been made to ensure
that the information in this manual is accurate.
Related Documentation
•Quick Start Guide
The Quick Start Guide is designed to help you get up and running right away. It contains
information on making your hardware connections.
Table of Contents
PLA Series User’s Guide
3
Table of Contents
Table of Contents .................................................................................................................................3
Part I: Users Guide...........................................................................................5
Chapter 1
Introducing the PLA .............................................................................................................................7
1.1 Overview .............................................................................................................................................7
1.2 LEDs ...................................................................................................................................................8
1.3 Expand Your Network with the PLA ....................................................................................................9
1.4 Ways to Manage the PLA .................................................................................................................10
1.5 Security .............................................................................................................................................10
1.5.1 Passwords ...............................................................................................................................11
1.5.2 Setting Up Security ..................................................................................................................11
1.6 Multiple Networks ..............................................................................................................................12
Chapter 2
Installing the Utility.............................................................................................................................13
2.1 System Requirements .......................................................................................................................13
2.2 Installing the Utility ............................................................................................................................13
2.3 Standby Mode (Power Saving Mode) ................................................................................................16
Part II: Technical Reference............................................................................17
Chapter 3
The RESET/ENCRYPT Button............................................................................................................19
3.1 RESET/ENCRYPT Button Overview .................................................................................................19
3.2 Adding Devices to a Powerline Network ...........................................................................................19
3.3 Removing a Device from a Powerline Network ................................................................................21
3.4 Multiple Separate Powerline Networks .............................................................................................22
3.5 PLAs With One Combination RESET/ENCRYPT Button ..................................................................22
3.6 PLAs with Separate RESET and ENCRYPT Buttons .......................................................................23
3.6.1 ENCRYPT Button Behavior .....................................................................................................23
3.6.2 RESET Button Behavior ..........................................................................................................24
Chapter 4
The Configuration Utility....................................................................................................................25
Table of Contents
PLA Series User’s Guide
4
4.1 Overview ...........................................................................................................................................25
4.1.1 Powerline Network Security .....................................................................................................25
4.1.2 Device Access Key (DAK) .......................................................................................................26
4.2 Starting the Configuration Utility ........................................................................................................26
4.3 Configuration Screen .......................................................................................................................27
4.4 Firmware Screen ..............................................................................................................................28
4.5 Network Info Screen .........................................................................................................................29
4.6 Advanced Screen ..........................................................................................................................30
4.7 About Screen ....................................................................................................................................33
Chapter 5
Powerline Network Setup Tutorial.....................................................................................................35
5.1 Overview ...........................................................................................................................................35
5.2 Important Terms ................................................................................................................................35
5.3 Accessing Your Powerline Adapter ...................................................................................................36
5.4 Adding a Powerline Adapter ..............................................................................................................37
5.5 Setting Up a New Network with a New Adapter ................................................................................38
5.6 Splitting a Network into Two Networks ..............................................................................................40
5.7 Troubleshooting ................................................................................................................................42
Chapter 6
Troubleshooting.................................................................................................................................45
6.1 Power and Light Problems ................................................................................................................45
6.2 Configuration Utility Problems ...........................................................................................................46
6.3 Powerline Problems ..........................................................................................................................47
6.4 RESET/ENCRYPT Button Problems ................................................................................................47
Appendix A Legal Information............................................................................................................49
Index ....................................................................................................................................................53
5
PART I
Users Guide
6
PLA Series User’s Guide 7
CHAPTER 1
Introducing the PLA
1.1 Overview
This chapter introduces the main applications and features of your ZyXEL HomePlug AV compliant
powerline adapter, which is called “PLA” in this guide. The following generic icon is used to
represent all PLA models.
In this User’s Guide the electrical wiring network is referred to as the “powerline network”. The
HomePlug AV standard specifies how network devices communicate using standard electrical
wiring.
This User’s Guide covers the following models:
Note: In this guide RESET/ENCRYPT refers to the ENCRYPT button in PLAs that have
separate RESET and ENCRYPT buttons.
You can directly plug an electrical device (such as a router or computer) into PLAs with an AC power
pass-through socket to supply power to the device.
There are two types of hardware for each of the PLA4101 and PLA4201 v2 models:
One has an Ethernet port on the top and a power plug at the bottom of the rear panel.
One has an Ethernet port on the bottom and a power plug at the top of the rear panel.
The power plug varies depending on your region.
Table 1 PLA Comparison Table
PORT/FEATURE PLA4101 PLA4111 PLA4201 PLA4201 V2 PLA5205 PLA5215
One 10/100 Base-T
Ethernet port
AC Pass-Through
Reset/Encrypt Button
Reset Button
Encrypt Button
Maximum PHY Rate
over Powerline
200 Mbps 200 Mbps 500 Mbps 500 Mbps 600 Mbps 600 Mbps
Chapter 1 Introducing the PLA
PLA Series User’s Guide
8
1.2 LEDs
The following sections describes the lights on the PLA.
The following figure is the front panel of the PLA. Use the lights to determine if the PLA is behaving
normally or if there are some problems on your powerline network.
Figure 1 PLA Lights
The following table describes the behavior of the lights on the PLA.
Table 2 LEDs: 200 Mbps Models
LIGHTS ICON COLOR STATUS DESCRIPTION
POWER Green On The PLA is on and receiving power.
It also indicates a successful connection using the RESET/
ENCRYPT button.
Blinking The PLA is starting up.
It also indicates the PLA is trying to connect with another
device using the ENCRYPT function.
The Power LED blinks when it is in standby mode. Refer to
Section 2.3 on page 16 for details on this feature.
Off The PLA is not receiving power.
HomePlug Green On The PLA detects another powerline adapter. The data transfer
rate is greater than 40 Mbps.
Amber The PLA detects another powerline adapter. The data transfer
rate is between 12~40 Mbps.
Red The PLA detects another powerline adapter. The data transfer
rate is between 0~12 Mbps.
Green/
Amber/
Red
Blinking The PLA is communicating with another powerline adapter.
Data is being transmitted and/or received.
Off The HomePlug port does not detect another powerline
adapter.
ETHERNET Green On The ETHERNET port is on and ready and the PLA detects a
device connected to it.
Blinking The PLA is communicating with a networking device
connected to it.
Off The PLA does not detect any devices connected to its
ETHERNET port.
Chapter 1 Introducing the PLA
PLA Series User’s Guide
9
1.3 Expand Your Network with the PLA
The PLA plugs into an ordinary power outlet to easily extend a cable or DSL broadband connection
or existing Ethernet (LAN) network to any other electrical outlet in any room of a house, all without
the need for any new cabling. Devices can securely communicate with each other at high data
Table 3 LEDs: 500 and 600 Mbps Models
LIGHTS ICON COLOR STATUS DESCRIPTION
POWER Green On The PLA is on and receiving power.
It also indicates a successful connection using the RESET/
ENCRYPT button.
Blinking The PLA is starting up.
It also indicates the PLA is trying to connect with another
device using the ENCRYPT function.
The Power LED blinks when it is in standby mode. Refer to
Section 2.3 on page 16 for details on this feature.
Off The PLA is not receiving power.
HomePlug Green On The PLA detects another powerline adapter. The data transfer
rate is greater than 80 Mbps.
Amber The PLA detects another powerline adapter. The data transfer
rate is between 20~80 Mbps.
Red The PLA detects another powerline adapter. The data transfer
rate is between 0~20 Mbps.
Green/
Amber/
Red
Blinking The PLA is communicating with another powerline adapter.
Data is being transmitted and/or received.
Off The HomePlug port does not detect another powerline
adapter.
ETHERNET Green On The ETHERNET port is on and ready and the PLA detects a
device connected to it.
Blinking The PLA is communicating with a networking device
connected to it.
Off The PLA does not detect any devices connected to its
ETHERNET port.
Chapter 1 Introducing the PLA
PLA Series User’s Guide
10
transfer rates. The PLA uses 128-bit Advanced Encryption Standard (AES) to ensure safe transfer of
information.
Figure 2 Expand Your Network with the PLA
Connect your PLA to an Internet gateway such as a modem and plug it into an ordinary power
outlet in your home. Plug a second PLA into another power outlet and connect a computer to the
PLA for Internet access. Your network can be further expanded by plugging additional PLAs into
other outlets in your home and connecting other computers or network devices (for example, a
printer) to them.
Refer to your Quick Start Guide for hardware connection information.
1.4 Ways to Manage the PLA
Use the RESET/ENCRYPT button to add powerline devices to your powerline network if they have
this button. See Chapter 3 on page 19 for instructions on using the ENCRYPT feature.
Use the ZyXEL PLA Series Configuration utility (or utility, for short) to manage the PLA. See
Section 2.2 on page 13 for instructions on installing the utility.
1.5 Security
Since your powerline network may extend outside your premises, it is important to set up security
on your PLA.
PLA
PLA
Chapter 1 Introducing the PLA
PLA Series User’s Guide
11
1.5.1 Passwords
You use two types of passwords in the HomePlug AV powerline network. The following table
describes the differences between the passwords.
1.5.2 Setting Up Security
The ENCRYPT feature automatically sets up security on your powerline network. Use this feature if
your powerline devices have the RESET/ENCRYPT button.
Alternatively, use the ZyXEL PLA Series Configuration utility to set up security on the PLA.
Although the PLA is a “plug-and-play” network expanding solution there are several reasons for
enabling security on the powerline network in your home.
1 It’s easy and only requires you to change a network name.
2 It’s a good idea to ensure privacy of your communication. When you use the PLA and other
powerline adapters, the electrical wiring in your home becomes an extension of your Ethernet
network. Your network traffic flows freely within the electrical circuit of your home and is bounded
in most cases by a power meter.
Without security (encryption) your information is accessible to anyone using a powerline adapter on
the same electrical circuit. In some cases, a circuit can be shared by more than one household.
To prevent compromising your network security, you can create a private network. A private
network uses a secret password (Network Name) to make sure that only permitted powerline
adapters can communicate in your network. See Section 4.3 on page 27 for information on setting
up a private network.
3 You may need to change the Network Name to create multiple powerline networks. See the next
section for more information on how to set up a multiple network.
1.6 Multiple Networks
Multiple powerline networks can coexist on a single powerline circuit. You might want to implement
multiple powerline networks in a small office environment where you have two separate Ethernet
networks.
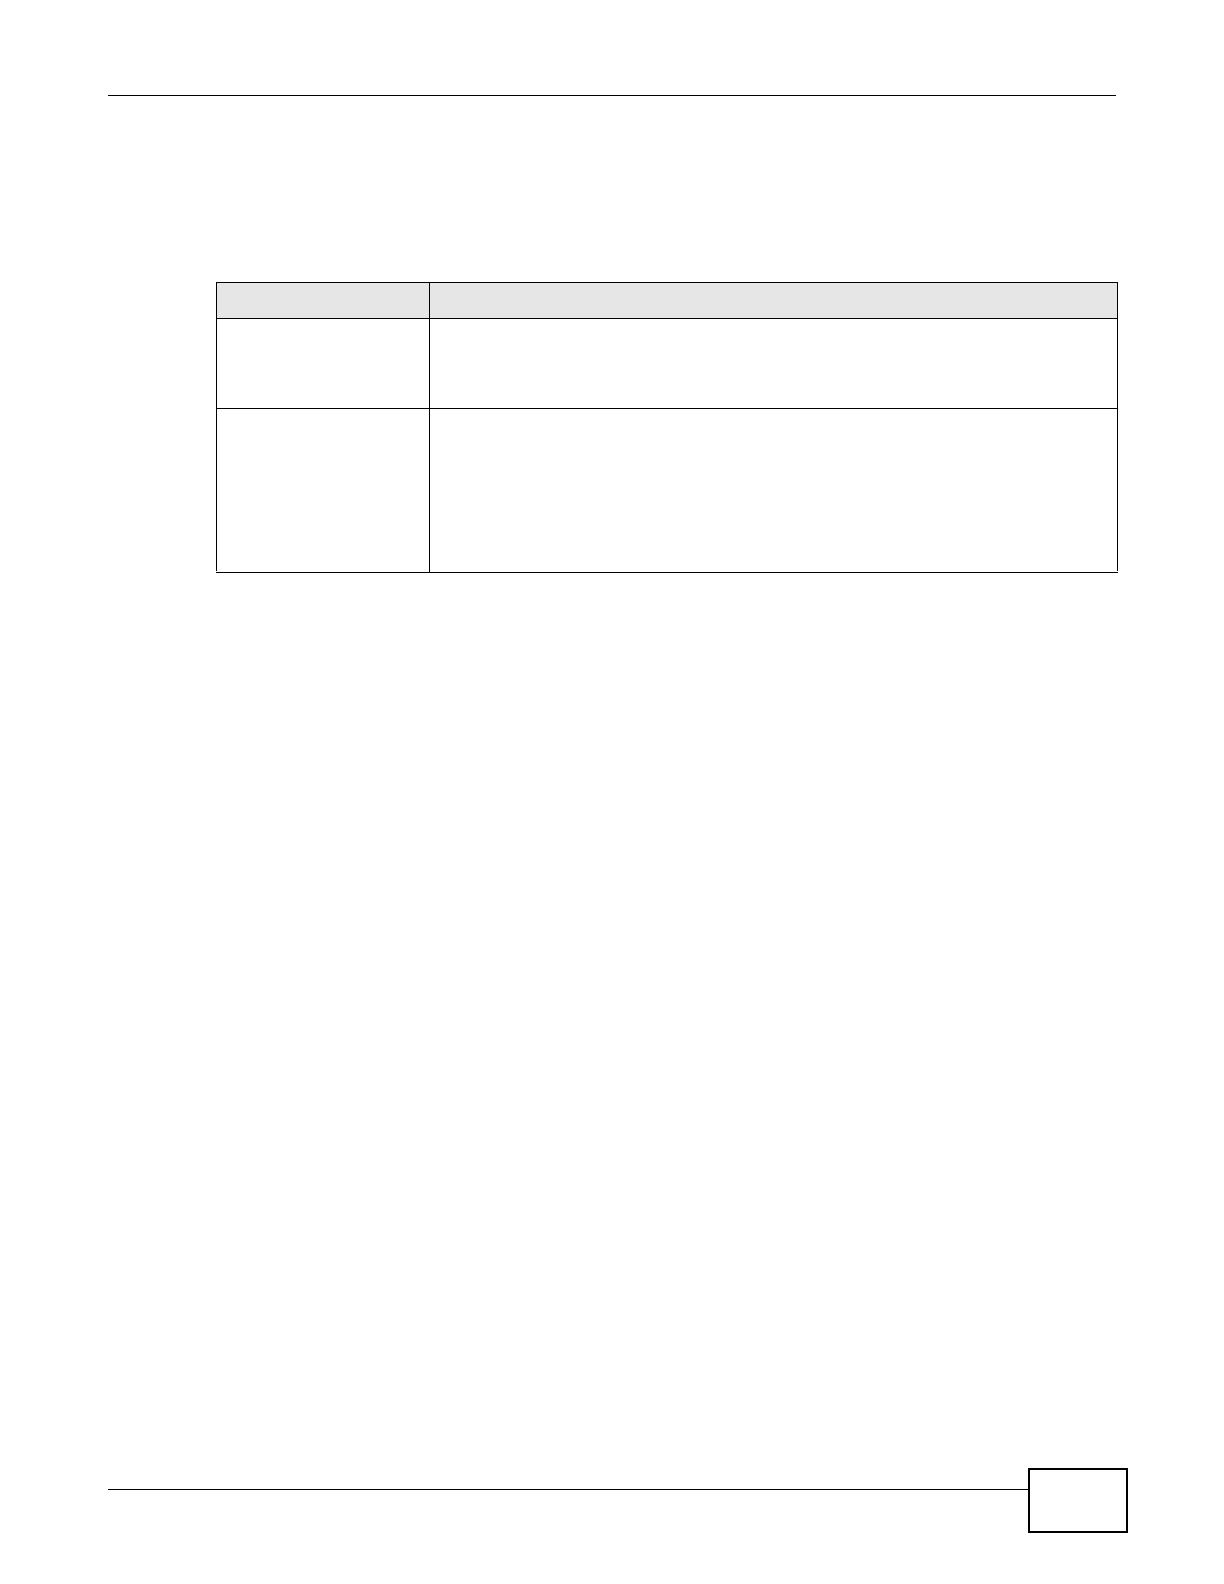
Table 4 Password Summary
PASSWORD DESCRIPTION
Network Name All powerline adapters that follow the HomePlug AV standard are shipped with the
same powerline network name “HomePlugAV”. Change the network name via the
ZyXEL PLA Series Configuration utility or RESET/ENCRYPT button to create a
private network. See Section 4.3 on page 27.
DAK (Data Access Key)
Password
In order to manage the powerline adapters on your powerline network you must
enter the adapters’ DAK password in the ZyXEL PLA Series Configuration utility.
This password is printed on the powerline adapter itself.
You don’t need to add the password for the powerline adapter directly connected to
the computer running the configuration utility (local powerline adapter), you only
have to add the remote powerline adapters’ passwords (those on your circuit, but
not directly connected to your computer).
Chapter 1 Introducing the PLA
PLA Series User’s Guide
12
1 Connect one powerline adapter to a router or switch on the first Ethernet network and assign a
Network Name (for example “Password1”) to this powerline adapter. Add additional powerline
adapters to your network by plugging them into your powerline outlets and assigning them
“Password1”. This completes the configuration of your first powerline network.
2 Connect another powerline adapter to a router or switch on the second Ethernet network and
assign a different Network Name (for example “Password2”) to this powerline adapter. Again, add
additional powerline adapters and assign them “Password2”.
You now have two private networks on your powerline circuit. Information is not shared between
the two networks as only powerline adapters with the same Network Name can communicate with
each other.
PLA Series User’s Guide 13
CHAPTER 2
Installing the Utility
This chapter guides you through the installation of the configuration utility for your PLA.
2.1 System Requirements
At the time of writing, the ZyXEL PLA Series Configuration utility is compatible with:
Windows XP (32-bit version)
Windows XP (64-bit version) (you may need to download and install .NET Framework version
2.0)
Windows Vista (32-bit version)
Windows Vista (64-bit version)
Windows 7 (32-bit version)
Windows 7 (64-bit version)
Windows 8 (32-bit version)
Windows 8 (64-bit version)
Note: To check for your Windows operating system version, right-click on My Computer
> Properties. You should see this information in the General tab.
Microsoft’s .NET Framework version 2.0 software is necessary for the installation of the ZyXEL PLA
Series Configuration utility. The utility automatically installs .NET Framework version 2.0 on all
supported operating systems (if it’s not already installed on your computer) except Windows XP
(64-bit version).
Note: Users with Windows XP (64-Bit version) operating systems can go to Microsoft’s
website to upgrade their systems to .NET Framework version 2.0 so it can work
with the utility.
2.2 Installing the Utility
Follow the steps below to install .NET Framework version 2.0 and the ZyXEL PLA Series
Configuration utility on your computer.
1 Insert the included CD-ROM into your computer’s CD-ROM drive. The Setup utility runs
automatically. Alternatively this can also be done manually by double clicking the setup.exe file on
the CD. A prompt appears asking you to install the .NET Framework version 2.0. Review Microsoft’s
License Agreement, select Accept to proceed.
Chapter 2 Installing the Utility
PLA Series User’s Guide
14
Note: If you already have .NET Framework version 2.0 installed on your computer this
step will be skipped.
Figure 3 .NET Framework Installation Prompt
2 The next screen allows you to see the progress of the installation.
Figure 4 .NET Framework Installation Process
3 The Setup utility runs automatically. Click Yes or Next to continue through the initial screen. Click
Cancel only if you want to abort the installation.
Figure 5 InstallShield Wizard Start Screen
Chapter 2 Installing the Utility
PLA Series User’s Guide
15
4 If you want the utility to be only available to the currently logged in user, select Just me.
Otherwise, click Everyone to allow all users to use the configuration utility. Click Next to install the
utility to the default folder, or click Browse to specify a different location on your computer.
Figure 6 Install Destination Folder
Note: You can also click Disk Cost to know how much available disk space you have in
the hard drives found in your computer.
5 When the installation is finished, a screen appears to confirm the InstallShield Wizard has
successfully installed the PLA Series Configuration Utility to your computer. Click Next.
Figure 7 Confirm Installation
Chapter 2 Installing the Utility
PLA Series User’s Guide
16
6 Click Close to exit the wizard.
Figure 8 Installation Complete
Note: You may be asked to restart your computer when the installation is complete. Click
“Yes” to restart your computer. If you select “No, I will restart my computer later”,
you will not be able to launch the utility until after a restart of your computer.
2.3 Standby Mode (Power Saving Mode)
Your PLA is a certified green product. It goes into standby mode when there is no Ethernet
connection.
When you plug the PLA into an electric socket, it waits for an Ethernet connection. When no
connection is detected after sixty (60) seconds, the Power LED blinks indicating that it is going into
standby mode.
The same process occurs when you disconnect the PLA from a previously working Ethernet
connection. Sixty (60) seconds after disconnecting the Ethernet cable, the PLA’s power LED blinks
signalling that it is going into standby mode.
The Ethernet and HomePlug LEDs are turned off in standby mode.
While in standby mode, you cannot use the RESET/ENCRYPT button. To enable the RESET/
ENCRYPT button again, you have to connect the PLA’s Ethernet cable to a computer/notebook or
modem/router first. The PLA wakes up from standby mode and you can start using the RESET/
ENCRYPT button.
17
PART II
Technical Reference
18
PLA Series User’s Guide 19
CHAPTER 3
The RESET/ENCRYPT Button
Use the RESET/ENCRYPT button to automatically set up a secure powerline connection between
your powerline devices.
Note: In this guide RESET/ENCRYPT refers to the ENCRYPT button in PLAs that have
separate RESET and ENCRYPT buttons.
3.1 RESET/ENCRYPT Button Overview
The RESET/ENCRYPT button allows you to set up a secure powerline connection with other
HomePlug AV compliant powerline devices which also support the ENCRYPT feature. No other
powerline setting changes are required to connect.
You can use the RESET/ENCRYPT button to:
set up a new powerline network.
separate an existing powerline network into multiple networks.
reset the PLA to the factory defaults.
3.2 Adding Devices to a Powerline Network
You can connect a number of PLAs on a powerline network, but you can use the RESET/ENCRYPT
button on only two PLAs at a time.
Place a powerline device close to another powerline device so you have time to set up each one.
After you set up the first powerline device, you have 120 seconds to set up the second powerline
device.
Note: Your PLA must be connected to a networking equipment for the RESET/ENCRYPT
button to work. Refer to Section 2.3 on page 16 for more details.
Follow the steps below to set up your HomePlug AV Network:
Chapter 3 The RESET/ENCRYPT Button
PLA Series User’s Guide
20
1 Press the RESET/ENCRYPT button at the side of your powerline device for 0.5 to 3 seconds. The
power ( ) light will blink as the powerline device tries to set up a connection with a new random
network name.
Figure 9 ENCRYPT Connection Procedure
Note: The RESET/ENCRYPT button’s location varies for each Powerline model.
Note: Check the lights on the two powerline devices. The power ( ) and HomePlug ( )
lights should be on while the devices are connecting. Wait for about two minutes
while your powerline devices connect.
If the power ( ) light does not blink when you press RESET/ENCRYPT, you have probably
pressed the RESET/ENCRYPT button for too long. Try again, pressing the RESET/
ENCRYPT button for 0.5 to 3 seconds.
If the HomePlug ( ) lights on both powerline devices do not light up, the powerline
devices are not connected. Repeat step 1 in this section. If that doesn’t work, see the
Troubleshooting in Section 6.4 on page 47 for suggestions.
2 To add more powerline devices to your network, use any powerline device (A or B) you have
connected to set up a connection with the powerline devices you want to connect (C and D).
3 Press the RESET/ENCRYPT button on both powerline devices (A and C, or B and C) for 0.5 to 3
seconds to add powerline device C. This must be done within 2 minutes (120 seconds) of pressing
the RESET/ENCRYPT button on the PLA.
press 0.5 ~ 3 seconds
within 2
minutes
PLA PLA
  • Page 1 1
  • Page 2 2
  • Page 3 3
  • Page 4 4
  • Page 5 5
  • Page 6 6
  • Page 7 7
  • Page 8 8
  • Page 9 9
  • Page 10 10
  • Page 11 11
  • Page 12 12
  • Page 13 13
  • Page 14 14
  • Page 15 15
  • Page 16 16
  • Page 17 17
  • Page 18 18
  • Page 19 19
  • Page 20 20
  • Page 21 21
  • Page 22 22
  • Page 23 23
  • Page 24 24
  • Page 25 25
  • Page 26 26
  • Page 27 27
  • Page 28 28
  • Page 29 29
  • Page 30 30
  • Page 31 31
  • Page 32 32
  • Page 33 33
  • Page 34 34
  • Page 35 35
  • Page 36 36
  • Page 37 37
  • Page 38 38
  • Page 39 39
  • Page 40 40
  • Page 41 41
  • Page 42 42
  • Page 43 43
  • Page 44 44
  • Page 45 45
  • Page 46 46
  • Page 47 47
  • Page 48 48
  • Page 49 49
  • Page 50 50
  • Page 51 51
  • Page 52 52
  • Page 53 53
  • Page 54 54
  • Page 55 55
  • Page 56 56

ZyXEL PLA4201 v2 User manual

Category
PowerLine network adapters
Type
User manual
This manual is also suitable for

Ask a question and I''ll find the answer in the document

Finding information in a document is now easier with AI

in other languages