Page is loading ...

3
• Read all instructions.
• To protect against risk of electrical shock, do
not put blender base, cord or plug in water or
other liquid.
• Close supervision is necessary when any
appliance is used by or near children.
• Unplug from outlet when not in use, before
putting on or taking off parts and before
cleaning.
• Avoid contacting moving parts.
• Do not operate any appliance with a
damaged cord or plug or after the appliance
malfunctions or is dropped or damaged in any
manner. Contact the consumer service number
listed in this manual.
• The use of attachments, including canning jars,
not recommended or sold by the appliance
manufacturer may cause fire, electric shock or
injury.
• Do not use outdoors.
• Do not let the plug or cord hang over the edge
of table or counter, or touch with hot surfaces
including stove.
• Do not place on or near a hot gas or electric
burner or in a heated oven.
• Keep hands and utensils out of container while
blending to reduce the risk of severe injury to
persons or damage to the blender. A scraper
may be used but must be used only when the
blender is not running.
• Blades are sharp. Handle carefully.
• To reduce the risk of injury, never place blade
assembly on base without the jar properly
attached.
• Always operate blender with cover in place.
• When blending hot liquids, remove the lid cap
from the lid. Do not blend hot liquids for the
personal blender jar.
• Do not use appliance for other than intended
use.
• This appliance is not intended for use by
persons (including children) with reduced
physical, sensory or mental capabilities, or
lack of experience and knowledge, unless they
have been given supervision or instruction
concerning use of the appliance by a person
responsible for their safety.
• Children should be supervised to ensure that
they do not play with the appliance.
PLEASE READ AND SAVE THIS USE AND CARE BOOK.
IMPORTANT SAFEGUARDS.
When using electrical appliances, always follow basic safety precautions to
reduce the risk of fire, electric shock, and/or injury, including the following:
SAVE THESE INSTRUCTIONS.
This product is for household use only.
POLARIZED PLUG (120V models only)
This appliance has a polarized plug (one blade
is wider than the other). To reduce the risk of
electric shock, this plug is intended to fit into a
polarized outlet only one way. If the plug does
not fit fully into the outlet, reverse the plug. If it
still does not fit, contact a qualified electrician.
Do not attempt to modify the plug in any way.
TAMPER-RESISTANT SCREW
Warning: This appliance is equipped with a
tamper-resistant screw to prevent removal
of the outer cover. To reduce the risk of fire
or electric shock, do not attempt to remove
the outer cover. There are no user-serviceable
parts inside. Repair should be done only by
authorized service personnel.
Note: If the power supply cord is damaged, it
should be replaced by qualified personnel; in
Latin America, by an authorized service center.
ELECTRICAL CORD
1) A short power-supply cord is provided to
reduce the risk resulting from becoming
entangled in or tripping over a longer cord.
2) Longer detachable power cords or extension
cords are available and may be used if care is
exercised in their use.
3) If a long detachable power-supply cord or
extension cord is used,
a) The marked electrical rating of the
extension cord should be at least as great
as the electrical rating of the appliance,
b) If the appliance is of the grounded
type, the extension cord should be a
grounding-type 3-wire cord, and
c) The longer cord should be arranged so
that it will not drape over the countertop
or tabletop where it can be pulled on by
children or tripped over unintentionally.
Note: If the power cord is damaged, please
contact the warranty department listed in these
instructions.
SAFETY FEATURES
4
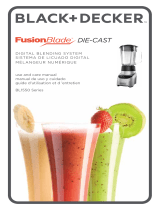
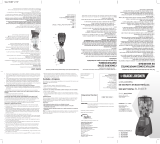
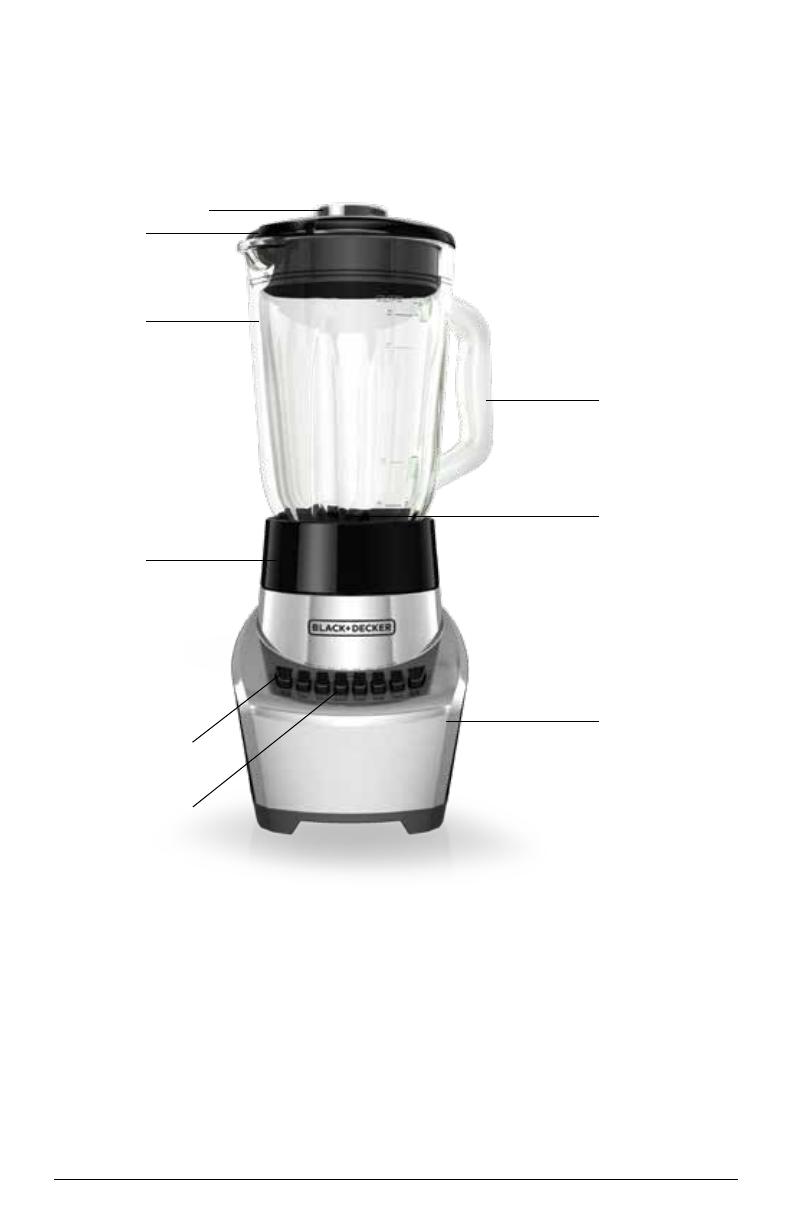
GETTING TO KNOW YOUR
FUSIONBLADE
™
12-SPEED BLENDER
1. Measuring cup lid cap
(Part# BL1130-01)
2. Lid (Part# BL1130-02)
3. Blending jar (Part# BL1130-03)
4. Handle
5. Blade assembly (not shown)
(Part# BL1130-04)
6. Jar base (Part# BL1130-06)
7. Base (blender bases may
differ depending on model
number purchased)
8. PULSE/OFF button
9. Speed Buttons
1
2
3
4
5
6
7
8
9
Product may vary slightly from what is illustrated.
5
GETTING STARTED
• Remove all packing material, any stickers from the product, and the
plastic band around the plug.
• Remove and save literature.
• Please visit www.prodprotect.com/applica to register your warranty.
• Wash all removable parts as instructed in CARE AND CLEANING
section of this manual.
HOW TO USE
This product is for household use only.
USING YOUR BLENDER
Important: Appliance should always have lid in place when in use.
Caution: Do not place blender jar onto base when motor is running.
1. Make sure appliance is OFF.
2. Place foods to be blended into jar. For best results place ingredients in jar
in the following order: liquids, powders, soft foods, hard foods, ice.
3. Place lid on jar; make sure lid cap is in place.
4. Plug power cord into outlet.
Note: When in use, do not leave blender unattended. When using hard
foods, such as ice or cheese, keep one hand on the lid to keep blender in
place.
5. Select the speed that best suits your desired task. (See SPEED CHART)
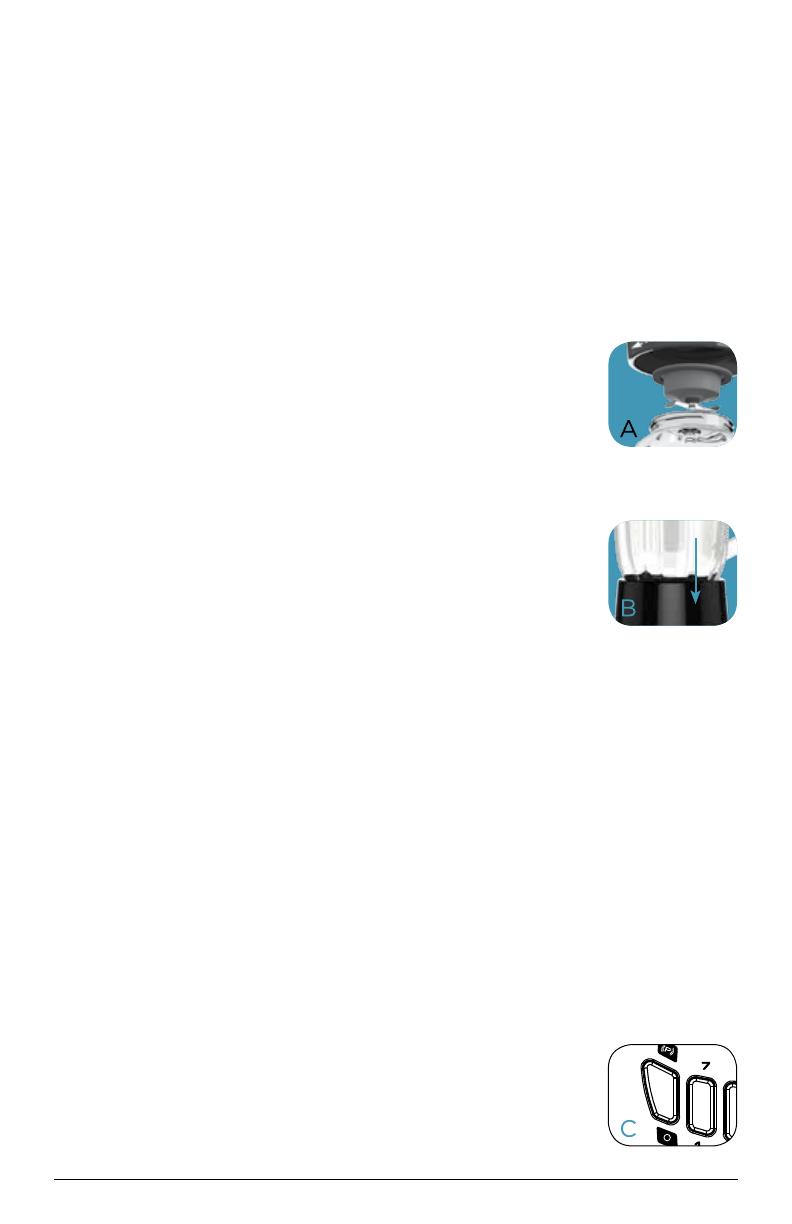
6. When blending thick mixtures such as smoothies and milkshakes, press
the PULSE button for several seconds, then release. Repeat until food has
desired consistency. Releasing the PULSE button automatically turns the
blender off (C).
Note: Use PULSE for no more than five seconds at a time,
allowing the blender to rest briefly between each pulse,
no more than two minutes total. This helps break up the
ice and distribute the ingredients.
BLENDER JAR ASSEMBLY
1. Turn blending jar upside down and place flat on
counter top or work surface.
2. Place the blade assembly in bottom opening of the jar
with blades down. (A)
3. Place jar base onto jar and rotate clockwise until it is tight.
4. Turn assembled jar right side up.
5. Place lid with lid cap on blender jar.
6. Uncoil power cord from storage area under the base.
7. Place jar assembly on base. (B).
8. Blender is now ready for use.

6
BLENDING TIPS AND TECHNIQUES
• Cut food into pieces no larger than
3
⁄4” for use in the blender.
• When preparing foods that have several different kinds of ingredients,
always add liquid ingredients first.
• When ingredients splatter onto the sides of the jar or the mixture is very
thick, press the PULSE/OFF button to turn appliance off. Remove the
lid and use a rubber spatula to scrape down the sides of the jar and to
redistribute the food, pushing food toward the blades. Replace the lid
and continue blending.
• The lid cap holds up to 2 oz. of liquid and can be used as a measure
when adding ingredients such as juices, milk, cream or liquor.
• When making bread crumbs make sure blender jar is completely dry.
• When using PULSE function, use short bursts. Allow the blades to stop
rotating between pulses. Do not use PULSE for more than 2 minutes.
• Use the ICE CRUSH button when preparing beverages that include ice
cubes or anything frozen; this helps to produce a smoother texture.
• It is helpful to begin the blending process on the lowest speed and then
increase to a higher speed, if necessary.
• To stop blending at any time, press the PULSE/OFF button.
• When blending hot ingredients, remove the lid cap and then put it back
partly open, with the opened side tilted away from you. Cover lid with a
cloth to avoid splattering and only use the lowest speed. Do not blend
more than 2
1
⁄2 to 3 cups at a time.
• Do not store foods in the blending jar.
• Do not overfill the blender (the blender is more efficient with less rather
than more).
• Do not run blender for longer than 1
1
⁄2 minutes at a time. Scrape down
sides of blending jar, if necessary, and continue blending.
• Do not use if blending jar is chipped or cracked.
• It is not recommended to use your blender to beat egg whites, mix
dough, mash potatoes, or grind meats.
7. Open the lid cap to add ingredients while the blender is
running and drop ingredients through the opening (D).
Important: Do not remove the lid while the blender is
running.
8. When finished, press the PULSE/OFF button. Make sure
blades have completely stopped before attempting to
remove the blending jar from the base.
9. To remove the jar, grasp the handle and lift up.
10. Remove lid to pour.
11. Always unplug the appliance when not in use.
7
DO NOT PLACE ANY OF THE FOLLOWING IN THE BLENDER:
• Large pieces of frozen foods
• Tough foods such as raw turnips, sweet potatoes and potatoes
• Bones
• Hard salami, pepperoni
• Boiling liquids (cool for 5 minutes before placing in blending jar)
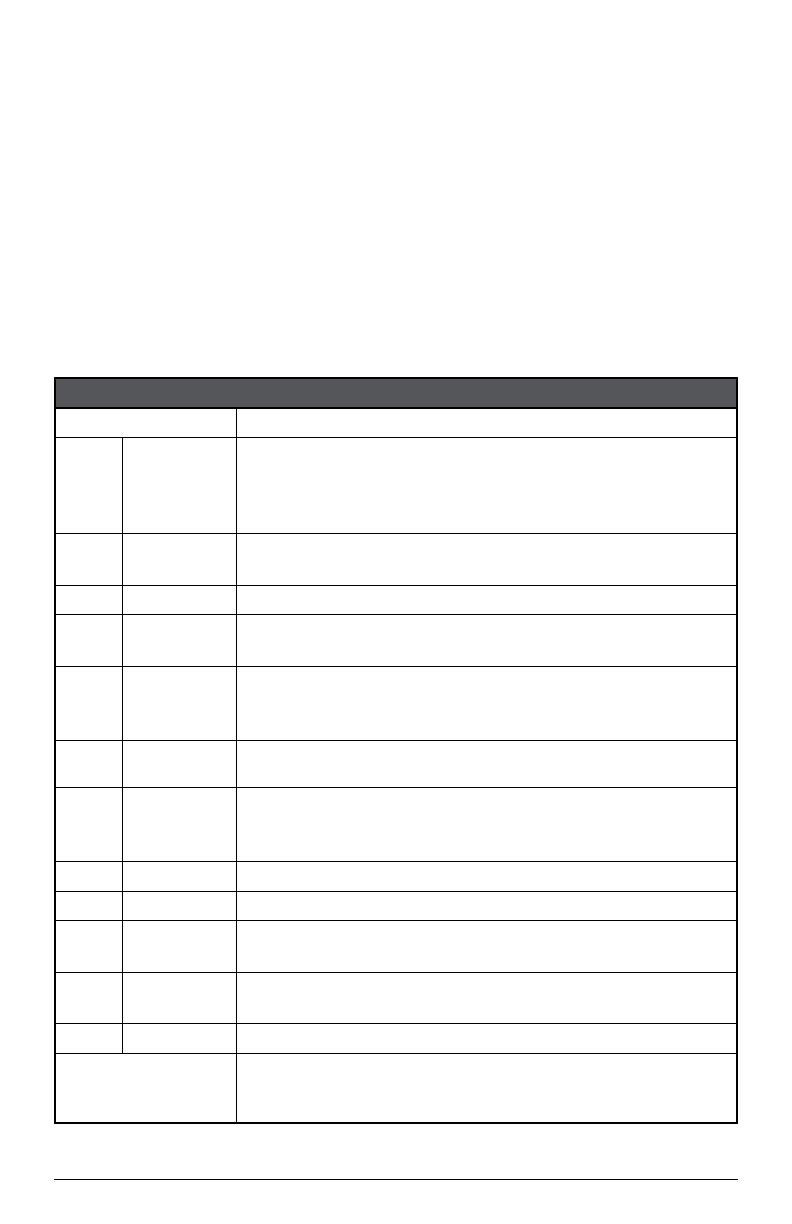
SPEED FUNCTION USAGE
Pulse/Off
Use for thick mixtures. Press and release.
1
Stir
Reconstitute frozen juices, drink mixes and condensed soups
Prepare salad dressings
Blend puddings
Puree hot liquids
2
Mix
Mix batters for pancakes, muffins and quick breads
Mix ingredients for baked goods
3
Crumb
Make cookie, cereal and bread crumbs
4
Chop
Chop fruits and vegetables
Chop cooked meats
5
Whip
Whip homemade whipped cream
Make cream cheese schmears
Mix up butter
6
Clean
Blend drop of dish washing liquid
and hot water to clean blender
7
Blend
Blend salsas
Prepare sauces
Remove lumps from gravies
8
Grind
Grind hard cheese, cooked meats and coconut
9
Puree
Puree fruits and vegetables
10
Liquefy
Blend protein drinks
Liquefy frozen drinks, smoothies
11
Smoothie
Blend milk shakes and malts
Prepare smoothies
12
Ice Crush
Crush ice and frozen food
Hi/Low
Select to change speed between Hi and Low
Hi - the button is out
Low - the button is in
SPEED CHART

8
CARE AND CLEANING
This product contains no user serviceable parts. Refer service to qualified
service personnel.
CLEANING:
1. Before cleaning, turn off and unplug the appliance.
2. Lift the blending jar by the handle off the base.
3. Remove jar base by turning it counterclockwise until loose.
4. Remove the blade assembly.
Caution: Blades are sharp, handle carefully.
5. Remove lid and lid cap.
6. Wash removable parts by hand or in the dishwasher. Place the jar on the
bottom rack and the rest of the parts on the top rack only.
HELPFUL TIPS:
• For quick cleanup, combine 1 cup hot water and a drop of liquid dish soap
in the blending jar.
• Cover and blend on CLEAN for about 30 seconds.
• Discard liquid and rinse thoroughly.
Important:
• Do not place the jar parts in boiling liquids.
• Do not immerse the base in liquid. Wipe the base with a damp cloth and
dry thoroughly.
• Remove stubborn spots by rubbing with a damp cloth and nonabrasive
cleaner.
Note: If liquids spill onto the base, wipe with a damp cloth and dry
thoroughly. Do not use rough scouring pads or cleansers on parts or finish.
RECIPES
BLUE CHEESE SALAD DRESSING
This creamy, fresh dressing is great with any salad greens. Try it as a dip with
chicken wings or as a dip for your favorite veggies.
1
⁄2 cup sour cream
1
⁄4 cup mayonnaise
1 Tbsp. fresh chopped parsley
1 garlic clove, peeled and chopped
2 tsp. lemon juice
1
⁄8 tsp. each, salt and pepper
Place all ingredients in blender jar. Cover; press Blend/Stir and run 30 seconds
or until blended.
Store covered in refrigerator up to 2 days. Stir before using. For a larger
batch, double the recipe and prepare using the full size blender jar.
Makes about 1 cup.

9
QUICK AND EASY SALSA
This fast and easy restaurant-style salsa is a great substitution for fresh Pico
de Gallo when tomatoes are no longer in season. Serve it with your favorite
chips or as a topping for tacos.
2 cans (10 oz.) diced tomatoes
with green chilies
1
⁄2 small onion, quartered
1 small jalapeno pepper, seeded,
deveined
1 clove garlic, peeled and
smashed
1
⁄2 cup loosely packed cilantro
leaves
1 Tbsp. lime juice
1 tsp. sugar
1
⁄2 tsp. cumin
1
⁄2 tsp. salt
Place all ingredients in blender jar. Cover and pulse 30 seconds or to desired
consistency. For a small batch, cut recipe in half and blend in your personal
size blender jar.
NEED HELP?
For support or any questions regarding your appliance, call the appropriate
800 number listed within this section. Please DO NOT return the product
to the place of purchase. Also, please DO NOT mail product back to
manufacturer, nor bring it to a service center. You may also want to consult
our Product Protection Center at www.prodprotect.com/applica .
Two-Year Limited Warranty
(Applies only in the United States and Canada)
What does my warranty cover?
• Your warranty covers any defect in material or workmanship provided;
however, the liability of Spectrum Brands Inc. will not exceed the purchase
price of product.
How long is the warranty period?
• Your warranty extends two years from the date of original purchase with
proof of purchase.
What support does my warranty provide?
• Your warranty provides you with a reasonably similar replacement
product that is either new or factory refurbished.
How do you get support?
• Save your receipt as proof of date of sale.
• Visit the online service website at www.prodprotect.com/applica, or call
toll-free 1-800-231-9786, for general warranty service.
• If you need parts or accessories, please call 1-800-738-0245.
What does my warranty not cover?
• Damage from commercial use
• Damage from misuse, abuse or neglect
• Products that have been modified in any way
• Products used or serviced outside the country of purchase
• Glass parts and other accessory items that are packed with the unit
• Shipping and handling costs associated with the replacement of the unit
• Consequential or incidental damages (Please note, however, that some
states do not allow the exclusion or limitation of consequential or
incidental damages, so this limitation may not apply to you.)
How does state law affect my warranty?
• This warranty gives you specific legal rights. You may also have other
rights that vary from state to state or province to province.

28
TM
2014/8/26/133 E/S
T 2 2 - 5 0 0 1 5 1 9
© 2014 The Black & Decker Corporation
and Spectrum Brands, Inc.,
Middleton, WI 53562
Made in People’s Republic of China
Fabricado en la República Popular de China
Fabriqué en République populaire de Chine
BLACK+DECKER and the BLACK+DECKER logo are trademarks of The Black & Decker
Corporation and are used under license. All rights reserved.
BLACK+DECKER y el logo tipo BLACK+DECKER son marcas registradas de The
Black&Decker Corporation y son utilizados bajo licencia. Todos los derechos reservados.
BLACK + DECKER et le logo BLACK &+DECKER sont des marques de commerce de The
Black & Decker Corporation, et sont utilisés sous licence. Tous droits réservés.
www.BlackAndDeckerAppliances.com
/