Page is loading ...

Backofen
Oven
Four
Oven
Forno
DE BETRIEBSANLEITUNG
EN GUIDE TO INSTALLATION
FR GUIDE D’UTILISATION
NL GEBRUIKSAANWIJZING
PT GUIA DE UTILIZAÇÃO

As part of our commitment to constantly improving our products, we reserve the right to make
changes to them based on technical advances to their technical and functional features and
appearance.
Warning:
Before installing and using your appliance, please carefully read this Guide to
Installation and Use, which will allow you to quickly familiarise yourself with its operation.
Dear Customer,
You have just acquired a
BBRRAANNDDTT
oven and we would like to thank
you.
We have invested all our dedication and know-how in this appliance
so that it would best meet your needs. With innovation and perfor-
mance, we designed it to be always easy to use.
In the
BBRRAANNDDTT
product range, you will also find a wide choice of
microwaves, cooking hobs, ventilation hoods, cookers, dishwashers,
washing machines, driers, fridges and freezers, that you can coordi-
nate with your new
BBRRAANNDDTT
oven.
Visit our website
wwwwww..bbrraannddtt..ccoomm
where you will find all of our pro-
ducts, as well as useful and complementary information.
BBRRAANNDDTT
2

3
TABLE OF CONTENTS
EN
3 / DESCRIPTION OF YOUR APPLIANCE
• Introduction to your oven
____________________________________
4
• Description of your programmer ______________________________ 5
4 / USING YOUR APPLIANCE
• Using the programmer
______________________________________
6
• How to set the time ________________________________________ 6
º
How to adjust the time __________________________________ 6
º
Instant cooking ________________________________________ 7
º
Programmed cooking ___________________________________ 8
º
Using the timer function _________________________________ 9
º
Display brightness _____________________________________ 10
5 / OVEN COOKING MODES_______________________________________ 11
6 / TROUBLESHOOTING __________________________________________ 12
7 / AFTER-SALES SERVICE________________________________________ 13

4
1 / DESCRIPTION OF YOUR APPLIANCE
EN
•
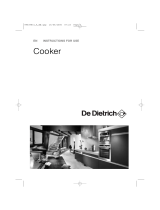
INTRODUCTION TO YOUR OVEN
A
B
Programmer
Temperature selector switch
Function selector switch
C
D
E
Light
Wire shelf supports
Hole for rotisserie
Tip
This Guide to Installation and Use is valid for several models. Minor differences in
details and fittings may emerge between your appliance and the descriptions provided.
F
E
D
B
A
C
F

1 / DESCRIPTION OF YOUR APPLIANCE
EN
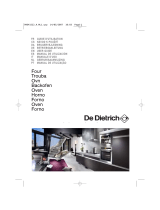
DESCRIPTION OF YOUR PROGRAMMER
•
A
B
Time and cooking time display
ECO cooking indicator
Timer indicator
Cooking end time indicator
C
D
E
Cooking time indicator
Time setting touch controls
Selection touch control (cooking time and time)
Temperature display
F
G
H
5
A
H
E
F
B
C
D
G

6
2 / USING YOUR APPLIANCEEN
•
How to set the time
- When supplied with electricity.
The display flashes at 12:00 (fig.1).
Set the time by pressing the + or - touch con-
trols (holding your finger on the touch control
allows you to scroll through the numbers rap-
idly) (fig.2).
Example: 12:30.
Press the “ ” touch control to validate.
The display stops flashing.
- To set the time on the clock
The function selector switch must be in the 0
position (fig.1).
Press and hold the “ ” touch control for a
few seconds until the display is flashing
(fig.2), then release. Audible beeps indicate
that it is now possible to set the time.
Adjust the clock setting with the + and -
touch controls (fig.3).
Press the “ ” touch control to validate
(fig.4).
Warning
If the “ ” touch control is not
pressed
in order to validate, the time is
recorded
automatically after a few seconds.
USING THE PROGRAMMER
•
fig.1
fig.2
fig.2
fig.3
fig.4
fig.1

7
2 / USING YOUR APPLIANCE
EN
Warning
Do not hang a towel or cloth on the oven handle.
•Instant cooking
— The programmer should display only the
time.
It should not be flashing (fig.1).
Turn the function selector to the position of
your choice.
Example: position (fig.2).
Your oven recommends the optimal tempera-
ture for the chosen cooking mode.
It is, however, possible to adjust the tempera-
ture by pushing the selection lever towards +
or - (fig.3)
Example: temperature set to 210°C (fig.4).
Place your dish in the oven based on the rec-
ommendations provided by the cook book.
After these steps, the oven heats up and the tem-
perature indicator flashes.
A series of beeps will be emitted when the oven
reaches the selected temperature.
The temperature stops flashing.
Warning
All types of cooking are done with the door closed.
Warning
After a cooking cycle, the cooling fan continues to operate for a period of time in order
to guarantee optimal oven reliability.
fig.2
fig.4
fig.1
fig.3

8
2 / USING YOUR APPLIANCEEN
-
Cooking with immediate start and pro-
grammed duration
- Select the desired cooking mode and adjust the
temperature (fig. 1).
- Press the “ ” touch control until the
cooking time indicator starts to flash
.
The display flashes 0:00 to indicate that you can
now adjust the setting (fig.
2).
- Press the + or - touch controls to set the de-
sired time.
Example: 30 mins cooking time (fig.
3).
The cooking time is automatically recorded after
a few seconds.
The cooking time display stops flashing.
The countdown of the cooking time begins im-
mediately after it has been set.
After these three steps, the oven heats up:
A series of beeps will be emitted when the oven
reaches the selected temperature.
At the end of cooking (end of programmed time),
- the oven stops,
- the cooking time indicator and 00:00 both flash
(fig.
4).
- A series of beeps is emitted for a few minutes.
The beeps can be definitively stopped by press-
ing any touch control.
The display shows the time once again when the
function selector switch is returned to 0 (fig.5
).
PROGRAMMED COOKING
•
fig.2
fig.3
fig.1
fig.4
fig.5

9
2 / USING YOUR APPLIANCE
EN
-
Cooking with delayed start and chosen
cooking end time
Proceed as with programmed cooking.
- After setting the cooking time, press the
touch control “ ” until the “ ” end of
cooking indica-
tor flashes.
The display flashes 0:00 to indicate that you
can now adjust the setting (fig.
1).
- Press the + or - touch control to set the de-
sired cooking end time.
Example: end of cooking at 13:10 (fig.
2).
The cooking end time is automatically record-
ed after a few seconds.
The cooking end time display stops flashing.
After these 3 steps, the oven heating is de-
layed so that cooking ends at 13:10.
At the end of cooking (end of programmed
time),
- the oven stops,
- the cooking time indicator and 0:00 both
flash (fig.
3).
- A series of beeps is emitted for a few min-
utes. The beeps can be definitively stopped
by pressing any touch control.
The display shows the time once again when
the function selector switch is returned to 0
(fig.4
),
In the case of programmed cooking cycles,
the cavity lights up until cooking begins, and
remains lit until cooking is finished.
PROGRAMMED COOKING
•
fig.2
fig.3
fig.1
fig.4
fig.5

10
2 / USING YOUR APPLIANCEEN
- Your oven’s programmer can be used as an
independent timer that allows you to count
down a time without operating the oven.
In this case, the timer display has priority over
the clock display.
- Press the “ ”
TOUCH CONTROL (fig.1) until the
timer symbol begins flashing
-> 0.00 and a small hourglass both flash.
- Adjust the chosen time by pressing the
touch controls + or
-
(fig.2).
- Press the touch control “ ” to validate, or
wait for a few seconds.
Warning
It is possible to change or cancel the timer at any time.
USING THE TIMER FUNCTION
•
DISPLAY BRIGHTNESS
•
You can adjust the brightness of your display. To
do this:
- Set and validate the time on your programmer
to 0:10 (fig.1)
- Press simultaneously on the + and
- touch con-
trols for about ten seconds until “CO” is dis-
played, in order to enter the adjustment mode
(fig.2)
.
- Press the touch controls + and
- in order to ob-
tain the desired brightness.
After having adjusted the brightness to your lik-
ing, wait a few seconds and return your pro-
grammer to the current time of day
(fig.3)
.
The display stops flashing after a few seconds and the timer starts working, counting down the
time in seconds.
Once the time has expired, the timer emits a series of beeps to notify you.
The beeps can be stopped by pressing any touch control.
fig.1
fig.2
fig.1
fig.2
fig.3

EN
11
3 / USING YOUR APPLIANCE
* Programme(s) used to obtain the results indicated on the energy label in compliance with
European standard EN 50304 and in accordance with European Directive 2002/40/CE.
CCIIRRCCUULLAATTIINNGG HHEEAATT
(recommended temperature
118800°°CC
- Min. 35°C - Max. 235°C)
•
Cooking is controlled by the heating element located at the back of the oven and by the
fan.
•
Preheating unnecessary except for cooking programmes requiring very short times
(biscuits on several levels).
•
Recommended for preserving tenderness in meats, vegetables and fish and for multi-
ple cooking on up to three levels.
TTRRAADDIITTIIOONNAALL
(recommended temperature
222255°°CC
- Min 35°C Max - 275°C)
•
Cooking controlled by the upper and lower heating elements with no fan.
•
Requires preheating before the dish is placed in the oven.
•
Recommended for
ssllooww,, ggeennttllee ccooookkiinngg::
tender game meat, etc. To seal
rrooaassttss
of red
meat. To simmer in a
ccoovveerreedd sstteeww ppaann
dishes that were begun on the hob (coq au vin,
stew, etc.).
PPUULLSSEEDD BBOOTTTTOOMM EELLEEMMEENNTT
(recommended temperature
220055°°CC
- Min 35°C Max - 275. C)
•
Cooking is controlled by the bottom element combined with a slight dose of the grill
and with the fan.
•
Cooking heat from the bottom with a small amount of heat from the top. Place the grid
on the lowest shelf support.
•
Recommended for
mmooiisstt ddiisshheess
(quiches, juicy fruit tarts, etc.). The crust will be thor-
oughly cooked on the bottom. Recommended for
ddiisshheess tthhaatt rriissee
(
ccaakkee,, bbrriioocchhee
,
kkoouuggllooff,,
eettcc..
) and
ffoorr ssoouuffffllééss
that will not be stuck by a crust formed on the top.
Cooking multiple items on up to three levels.
TTRRAADDIITTIIOONNAALL EECCOO
(recommended temperature
22000
0°°CC
- Min 35°C Max - 275. C)
•
Cooking controlled by the upper and lower heating elements with no fan.
•
This position makes it possible to save approximately 25% while maintaining cooking
properties. The ECO position is used for the energy label performance.
•
You will save energy throughout the cooking cycle, but the time may be slower.
KKEEEEPPIINNGG TTHHIINNGGSS WWAARRMM
(recommended temperature
8800°°CC
min 35°C max 100°C)
•
This position allows food to be kept warm by heat from the bottom of the oven along
with the fan.
•
Recommended for letting dough rise for bread, brioche, kugelhopf, etc, without
exceeding 40°C (plate warming, defrosting).
PPUULLSSEEDD GGRRIILLLL (( ++ RROOTTIISSSSEERRIIEE ((ddeeppeennddiinngg oonn tthhee mmooddeell))
(recommended temperature
220000°°CC
- Min. 180°C - Max. 230°C)
•
Cooking is controlled alternately by the upper element and the fan.
•
Preheating unnecessary. Roasts and poultry that are juicy crispy and all over.
•
Recommended for all
ppoouullttrryy
or
rrooaassttss
to seal and cook through
lleegg rrooaasstt
,
bbeeeeff rriibbss
For preserving tenderness in filets of
ffiisshh
.
•
The rotisserie continues to operate after cooking has finished, until the door is opened.
•
Slide the drip tray onto the bottom shelf support.
HHIIGGHH GGRRIILLLL
(recommended temperature
227755°°CC
- Min 180°C Max - 275°C)
•
Cooking controlled by the upper element without the fan.
• Preheat the oven for five minutes. Slide the drip tray onto the lower shelf support to col-
lect greases.
• Recommended for grilling
cchhooppss
,
ssaauussaaggeess
,
sslliicceess ooff bbrreeaadd
,
pprraawwnnss ppllaacceedd oonn tthhee ggrriidd
.
*
*

12
4 / TROUBLESHOOTINGEN
Tip
In all circumstances, if your efforts are not sufficient, contact the After-Sales Service
Department without delay.
If you have a doubt about the correct functioning of your oven, this does not neces-
sarily mean that there is a malfunction. In any event, check the following items:
Warning
- Repairs to your appliance should only be performed by professionals. Non-standard re-
pairs may be a source of danger for the user.
YOU OBSERVE
THAT…
POSSIBLE
CAUSES
WHAT SHOULD
YOU DO?
The oven is not heat-
ing.
- The oven is not connected
to the power supply.
- Your fuse is out of order.
- The selected temperature is
too low.
➡ Plug in your oven.
➡ Replace the fuse in your electrical
set-up and check its capacity (16A).
➡ Increase the selected temperature.
The oven light is not
working.
- The light is out of order.
- The oven is not connected
or the fuse is not working.
➡ Change the bulb.
➡ Plug in your oven or change the
fuse.
Your oven starts
beeping.
- During cooking.
- At the end of a cooking cy-
cle.
➡ The recommended temperature of
your choice has been reached.
➡ Your programmed cooking cycle is
finished.

13
FFaaggoorrBBrraannddtt SSAASS
, Management company – SAS: social capital of 20,000,000 euros RCS Nanterre 440 303 196.
5 / AFTER-SALES SERVICE EN
Any repairs that are made to your appliance
must be handled by a qualified professional
authorised to work on the brand. When you
call, mention your appliance’s complete refer-
ence (model, type, serial number). This infor-
mation appears on the manufacturer’s name-
plate
(fig.1).
GENUINE REPLACEMENT PARTS
During maintenance work, request that only
certified genuine replacement parts are
used.
• SERVICE CALLS
BRANDT APPLIANCES SAS
7 rue Henri Becquerel
92500 RUEIL MALMAISON
230V ~ 50 Hz
MADE IN FRANCE
fig.1
CZ5700516-00 07/10
/