
NL GEBRUIKS - EN - INSTALLATIEHANDLEIDING
EN OPERATING AND INSTALLATION INSTRUCTIONS
DE BENUTZERHANDBUCH
Ijskast - Diepvrieskast
Fridge-Freezer
Kühlschrank-Tiefkühlschrank

23
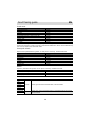
1 Safety and the environment
• Safety instructions............................................................................................ 24
• Respecting the environment and saving energy................................................. 25
• BIOCARE - anti-bacterial walls .......................................................................... 25
2 Description of your appliance
3 How to carry out your initial installation
• Reversing the direction the doors open............................................................. 27
• Installing your appliance................................................................................... 29
• Electrical connection......................................................................................... 30
4 How to use your refrigerator
• Setting your refrigerator's temperature.............................................................. 31
• Mixed or regulated cold (depending on the model)............................................ 32
• Preparing food for the refrigerator.............................................................. 33
• Arranging food in your refrigerator.................................................................... 33
• Your refrigerator’s modular layout..................................................................... 34
• The Maxi-Fresh area (depending on the model)................................................. 34
• Automatic defrosting ........................................................................................ 34
5 How to use your freezer
• Frozen and deep-frozen food...................................................................... 35
• Preparing food for freezing............................................................................... 35
• Food freezing guide................................................................................... 36
• Arranging food in your freezer.......................................................................... 39
• Defrosting food................................................................................................ 39
• Automatic defrosting of your freezer................................................................. 39
6 Ongoing maintenance of your appliance
• Cleaning your appliance.................................................................................... 40
• Changing the light bulb .................................................................................... 40
7 Noises, inconveniences and minor breakdowns
• Normal operating noises................................................................................... 41
• Inconveniences or minor breakdowns............................................................... 41
This guide to installing and using your fridge-freezer is applicable to several models.
There may be slight differences between your appliance's details and features and
those described here.
As you read through the guide, you will come across the following symbols, to warn you of:
Safety precautions that must be observed
Danger of a gas bursting into flame
An electrical danger
Important information and advice
Contents
EN

24
This appliance is intended for domestic use only. It has been designed for preserving and freezing
food.
The following instructions are for your own safety and should be observed without
fail. We can neither be held responsible, nor uphold the guarantee in case of
failure to observe these recommendations, which may lead to material damage or
physical injury.
- This appliance is not intended for use by
persons (including children) with reduced
physical, sensory or mental capabilities, or lack
of experience and knowledge, unless they
have been given supervision or instruction
concerning use of the appliance by a person
responsible for their safety.
- Children should be supervised to ensure that
they do not play with the appliance.
- Your appliance must be installed, fixed if
necessary and used in compliance with the
instructions in this operating and installation
instructions manual in order to avoid any
damage and/or danger due to any lack of
stability or faulty installation.
If the appliance has been delivered
to your home in a horizontal
position, stand it upright and then
wait 2 hours before plugging it in. A
small amount of oil may have
flowed into the refrigeration circuit,
and you must allow time for this to
flow back towards the motor
before connecting the appliance.
Failure to do so may damage the
appliance.
- If you appliance is fitted with castors, please
remember that they are only designed to
assist in small movements. Do not use them
for longer journeys.
- Carry out an initial cleaning operation (see
the section on "Installing your appliance")
before connecting your appliance to the
electrical supply. Disconnect your appliance
prior to performing any maintenance opera-
tion. Grasp the plug directly, instead of
pulling on the power cable.
- Do not place bottles or jars containing
liquids in the freezer unless they are only two-
thirds full: freezing causes liquids to expand,
which can cause the container to explode.
- Do not use any other method than those we
recommend in this manual for speeding up
defrosting.
- Do not use electrical equipment inside
compartments designed for preserving
frozen food unless the manufacturer
recommends otherwise.
- Do not let children play with the appliance
and keep your pets well away from it.
- Worn out appliances must be rendered
unusable. Unplug and cut the electric cable
flush with the appliance. Render the door
catch unusable or, better still, remove the
door, so as to ensure that no child or animal
risks being shut inside whilst playing.
- If a problem arises that you are unable to
resolve using the advice given (see the
"Noise, inconveniences, minor breakdowns"
section), please contact an official after-sales
service or a qualified professional.
Your appliance's refrigeration
circuit is filled with isobutane
refrigerant (R600a), a natural, non-
polluting gas that is, however,
inflammable. Ensure that none of
the components in your appliance's
refrigeration circuit have been
damaged during transport or
installation. If you detect any
damage, keep your appliance away
from flames or any type of source
of heat or combustion and ventilate
it location.
Safety instructions
EN

25
To reduce your appliance’s electrical consuption:
- Install it in a suitable place (see "Installation of your appliance" section).
- Leave the door open as little as possible. Do not place food that is still hot in your refrigerator or
freezer, particularly in the case of soups or dishes that release a lot of steam.
- Ensure that you appliance operates optimally by not allowing too much frost to build up in the
freezer (de-frost it when the frost is more than 5-6 mm thick) and clean its condenser periodically
(See the "Ongoing maintenance of your appliance" section).
- Periodically check the door seals and make sure that the doors close firmly. If they do not, lease
contact our After-sales service.
In compliance with the latest legislation concerning environmental protection, your appliance does
not contain any CFCs. Instead it uses a gas called R600a. The exact type of refrigerant used in
your appliance is also clearly indicated on the identification plate inside your appliance's refrigerator
section, low down on the left-hand wall.
R600a is a non-polluting gas that does not harm the ozone layer and whose contribution to the
greenhouse effect is virtually zero.
ENVIRONMENTAL PROTECTION
This appliance's packaging material is recyclable. Help recycle it and protect the environment by
dropping it off in the municipal receptacles provided for this purpose.
Your appliance also contains a great amount of recyclable material. It is marked with
this label to indicate that in countries that are a members of the European Union the
used appliances should not be mixed with other waste. This way, the appliance recycling
organised by your manufacturer will be done under the best possible conditions,
in compliance with European Directive 2002/96/EC on Waste Electrical and Electronic
Equipment. Contact your town hall or your retailer for the used appliance collection points closest
to your home.
We thank you doing your part to protect the environment.
This is a specific coating on the lining of your refrigerator consisting of silver ions, which prevent
bacteria from developing.
The anti-bacterial coating does not require any particular treatment and remains active throughout
your appliance's operating life.
However, you must clean your appliance regularly. See the section on "Cleaning your appliance".
Respecting the environment and saving energy
EN
BIOCARE - anti-bacterial walls

26
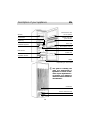
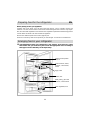
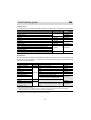
Description of your appliance
EN
Shelves
Lightning
Ventilation System*
Maxi-Fresh*
Bottle rack
Vegetable drawer
Plinth
Anti-bacterial walls
glass shutter
Butter rack with
Door rack
Removables shelves
(as an option)
Thermostat
Freezer door rack
Motor
Condenser
* depending on the models
Water collection tank
This guide to installing and
using your fridge-freezer is
applicable to several models.
There may be slight differenc-
es between your appliance's
details and features and those
described here.

27
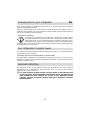
The doors normally open to the left (hinges on the right); if you wish to open the door to the right,
you can modify the direction in which it opens by following the instructions below. To ensure
correct installation, please scrupulously follow the directions and the sequence of operations
below.
1. Gently tilt the appliance backwards (with the doors
facing upwards).
2. Remove the plinth by pulling the lugs A on the lower
part towards you and swivelling the plinth upwards
to disengage it (R1). Remove cover B from its
housing on the left and insert it in the housing on the
right (R2).
3. Remove the bottom hinge pin and release it from its
housing C; retrieve the plastic distance piece placed
between the door and the hinge on the pin; unscrew
the bottom hinge D and screw the pin into the
left-hand hole in the hinge (R3).
4. Remove the refrigerator's door (R3).
5. Unscrew the middle hinge E, taking care not to lose
the plastic distance pieces inserted on the pin (R3).
6. Remove the covers G on top of the freezer’s door
(R4).
7. Free the freezer’s door from the top hinge (R4).
8. Remove the screw and the covers F on the left-hand
side of the appliance and insert them in the holes on
the right-hand side (R3).
9. Remove the covers H from the control panel (R5).
10. Unscrew and remove the top right-hand hinge I
(R5).
11. Take the top left-hand hinge from the accessories
bag and it into the housing on the left on the control
panel M . Fasten it with the two screws (R6).
12. Insert the covers N and fasten them onto the control
panel (R6).
13. So as not to lose the top right-hand hinge, which you
may need later, store it in the accessories bag.
14. Remove the hole covers O on the left-hand side of
the refrigerator's door (R7).
Reversing the direction the doors open
EN
drawing R1
A
A
drawing R2
B
drawing R5
drawing R4
G
I
H
H
drawing R3
D
E
F
C

28
15. Unscrew the metal door stop P on the right-hand
side of the refrigerator's door, turn it over and screw
it to the left-hand side of the freezer's door, aligning
the hole in the plate with the one in the door (R7).
Unscrew the metal door stop P on the right-hand
side of the freezer's door, turn it over and screw it to
the left-hand side of the refrigerator's door, aligning
the hole in the plate with the one in the door (R7).
16. Insert the hole cover O, previously placed on the
left-hand side of the refrigerator's door on the
right-hand side of the same door (R7).
17. Insert the freezer's door in the top hinge (R8).
18. Insert the middle hinge and screw it in place,
checking that the plastic distance pieces are correctly
inserted on the pin (R8).
19. Insert the refrigerator's door into the middle hinge
(R8).
20. Insert the bottom hinge into the refrigerator's door,
checking that the plastic distance piece is correctly
inserted on the pin between the hinge and the door.
Screw the hinge in place (R8).
21. Re-install the plinth.
22. Insert the upper covers .
23. Return the appliance to vertical position.
Wait two hours before restarting your refrig-
erator.
Reversibility of the handle
Unscrew the handle from the left-hand side and refit it
on the right-hand side (Drawing R9). Use the handle to
determine the position of the new holes (2.5mm diam-
eter) for fixing the handle.
If the doors already have holes on both sides:
Remove the plugs covering the handle's screws and
those on the opposite side covering the holes. Unscrew
the handle and place it on the other side (see Drawing
R9). Screw the handle on and insert the plugs covering
the screws and the holes.
Reversing the direction the doors open
EN
drawing R6
drawing R7
M
N
N
P
O
drawing R8
drawing R9

29
Your appliance must be installed in compliance with the instructions given in this
"Operating and installation instructions manual" in order to keep your food under
optimum conditions and with optimal energy consumption.
- The appliance should be installed in a dry,
well-ventilated room.
- Avoid balconies, verandas, and patios: the
excessive heat in summer and the cold in
winter could prevent your appliance from
functioning properly, or may even damage it.
- Do not place your appliance near a heat
source such as an oven or radiator.
- Your appliance has been designed for opti-
mum functioning at a certain ambient temper-
ature; it is designed for a particular "climate
class". This climate class is clearly indicated on
the identification plate situated on the inside of
your appliance, low down on the left wall.
Outside of this temperature range, the perfor-
mance of your appliance may be reduced.
- Maintain a minimum distance between your
appliance and the other units: 3 to 5cm at the
sides, or 10cm if your appliance is close to a
wall, and 10cm above to ensure good circula-
tion of air all around the appliance.
- Position the appliance at a suitable distance
from the wall using the spacers provided in the
accessories packet. The spacers should be
mounted on the back of the appliance (see
Drawing).
Once you have installed your appliance, adjust its feet so that it is tilting backwards slightly:
this helps the door to close correctly.
Before placing any food in your appliance, clean it inside and out with a bicarbon-
ate of soda solution (1 dessertspoon of bicarbonate to 4 litres of water). Do not
use alcohol, scouring powder or detergents, which could damage the surfaces.
See the section on "Cleaning your Appliance".
Installing your appliance
EN
Climate Class Ambient
temperature
SN +10 °C to +32 °C
SN/ST +10 °C to +38 °C
N +16 °C to +32 °C
T +18 °C to +43 °C
ST +18 °C to +38 °C

30
For your own safety, you must comply with the instructions given below.
The electrical installation must comply with Standard NF C *15-100, in particular concerning
the Earth.
Three-core flex 3x2.5 mm², 230V single-phase connected to:
- A 20A single-phase 230V-50Hz supply
- An ELCB and an individual fuse (10 or 16A depending on the model)
We cannot be held responsible for any incident caused by faulty electrical installation.
Recommendations for the electrical installation of your appliance:
- Do not use extension leads, adaptors, or socket strips.
- Always make sure your circuit is earthed.
- The socket must always remain accessible, yet be out of the reach of children.
If you have any doubts, contact your installer.
If the appliance has been delivered to your home in a horizontal position, stand it
upright and then wait 2 hours before plugging it in. A small amount of oil may have
flowed into the refrigeration circuit, and you must allow time for this to flow back
towards the motor before connecting the appliance. Failure to do so may damage
the appliance.
Carry out an initial cleaning operation (see the section on "Installing your appli-
ance") before connecting your appliance to the electrical supply. Disconnect your
appliance prior to performing any maintenance operation. Grasp the plug directly,
instead of pulling on the power cable.
"In case of damage, the supply cord must be replaced by the technical assistance
service or a person with a similar title, in order to prevent any risk."
Electrical connection
EN
Your appliance is compliant with European Directives CEE/73/23 (low voltage
directive), CEE/89/336 (electromagnetic compatibility) and CEE/96/57 (energy
efficiency) as well as their modifications.

31
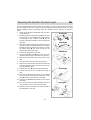
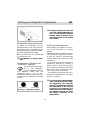
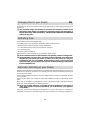
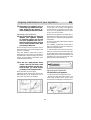
Manipulating the thermostat
To adjust the temperature, set the
thermostat knob on one of the surround-
ing figures. Position 1 corresponds to the
least cold setting: the higher the number,
the colder the temperature setting.
When the thermostat is in position ●,
your refrigerator is off .
The appliance is always pow-
ered.
Temperature indicator and
"Cold Zone" symbols
You will find the symbol oppo-
site in your refrigerator.
It clearly shows the location of
your appliance's coldest zone: the
temperature here is +4°C or less.
A temperature indicator here enables you
to check that your refrigerator is working
correctly:
Prolonged opening of the door will
cause the internal temperature to
rise. You must therefore read the
indicator within 30 seconds of the
door being opened for the reading
to be correct.
Setting the temperature
When putting your appliance into serv-
ice, set the thermostat to a medium
position.
Check the temperature indicator 4 hours
after putting your appliance into service,
or after any change in the thermostat
setting, observe the temperature light
(Drawing 1):
- If the indicator is still black, lower the
temperature gradually by selecting a
higher number around the thermostat
and checking the temperature indicator
again after 4 hours. Repeat this opera-
tion as many times as necessary.
- If the indicator goes green and "OK" is
indicated, the temperature in your refrig-
erator is correctly set.
Your refrigerator's internal temper-
ature is closely linked to the ambi-
ent temperature, how frequently
the door is opened and the amount
and temperature of the food you
have put in your refrigerator. You
must therefore check the tempera-
ture indicator regularly and adjust
the setting if necessary, as ex-
plained above.
Setting your refrigerator's temperature
EN
Temp. to set Correct temp.
Drawing 1 - Temperature indicator

32
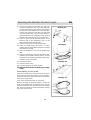
This guide to installing and using
your fridge-freezer is applicable to
several models. Your appliance is
equipped with one or other of these
functions. You can check very
quickly by comparing your refriger-
ator to the illustrations on this
page.
Your appliance is equipped with a cold air
ventilation system:
- Mixed cold (A): the fan mixes the air in the
refrigerator section, providing greater temper-
ature homogeneity and avoiding condensation
forming on the glass shelves.
- Regulated cold (B): a distribution column
directs the air to every level, providing a very
homogeneous temperature and avoiding any
condensation forming on the shelves.
Apart from these everyday advantages,
we recommend that you use the fan:
- When the climatic conditions are extreme
(e.g. a heat wave)
- If you have just placed a large amount of
food in your appliance's refrigerator section.
To start the fan:
- Press the ON button (Drawing C)
- Appliance with electronics: this function is
initiated by electronic system (See the symbols
table in the section "Switching on and
adjusting the appliance").
The fan does not operate
continuously. When it starts up
depends on the refrigerator's inter-
nal temperature. It is therefore
quite normal for the fan not to op-
erate sometimes when the Start
button has been correctly pressed.
Mixed or regulated cold (depending on the model)
EN
C
3
4
5
3
4
5
A
A. Model with mixed cold
B. Model with regulated cold
C. Detail of the Start/Stop button
3. Start/Stop button
4. Air suction
5. Air distribution
B

33
Before placing food in your appliance:
Carefully wrap fresh foods: they will then keep their flavour, colour, humidity content and
freshness. You also avoid the taste of some foods contaminating the taste of others. Only vegeta-
bles, fruit and salad vegetables can be stored in the vegetable compartment without being packed.
Let hot dishes and drinks cool down outside the appliance.
Remove the cardboard packs from around yoghurt pots.
Check the consume-by dates on the products you have bought. You should not exceed these.
The temperature inside your refrigerator is not uniform. Some areas are colder
than others and you must store your food in the appropriate areas according to
their type to ensure that they can be kept safely.
Preparing food for the refrigerator
EN
Arranging food in your refrigerator
Frozen and deep-frozen
food, ice
Cream desserts, cheese,
yoghurts, crème fraîche,
sauces
Eggs, butter
Bottles, milk
Meat, poultry, game and
fresh fish, cooked meats
Fresh vegetables, fruit

34
Leave a space between the food items to allow the air to circulate freely and avoid different
products contaminating each other.
Do not put packages and food in contact with the wall at the back of the appliance: this is a
particularly cold and damp area of the appliance and water droplets and frost condense there as
part of your refrigerator's normal operation.
"Cold Zone" symbols
The coldest area, indicated by the logo opposite, is designed for delicate, sensitive
and highly perishable food: meat, poultry, fish, cooked meats, prepared dishes,
ready-made salads, egg or cream-based dishes and pastries, fresh pasta, pastry,
pizza/quiches, fresh produce and raw milk cheese, ready-to-use vegetables sold in
plastic bags and, more generally, any fresh product whose consume-by date is linked to its storage
at a temperature of +4°C or below.
Your refrigerator has been designed to make arranging food in it easy. You can adjust the shelves
and the racks to suit your wishes.
The Maxi-Fresh area (depending on the model)
The MAXI-FRESH compartment is recommended for storing fish and meat. It can be moved to
different levels inside your refrigerator if the Regulated Cold system is activated (see the section
on Mixed or regulated Cold).
The refrigerator section of your appliance defrosts fully automatically. The water created by
defrosting flows to a collection tank situated over the motor. The heat the motor releases
evaporates the contents of this tank.
It is quite normal for droplets of water or frost to appear on the wall at the back
of your refrigerator. This is a particularly cold and damp area in your appliance and
water droplets and frost condense out as part of your appliance's normal
operation. This frost is removed regularly during your refrigerator's automatic
defrosting phases.
Arranging food in your refrigerator
EN
Your refrigerator’s modular layout
Automatic defrosting

35
Your domestic appliance enables you to freeze food: it lowers its core temperature rapidly and
you can therefore keep it longer.
Deep-freezing is an industrial process that is quicker and more intense that domestic freezing.
The products you purchase from the shops are deep-frozen.
Freezing does not sterilise. It is
therefore important to observe
some simple hygiene rules when
preparing your food for freezing:
wash your hands before you touch
the food and clean the kitchen
tools you have just used before
using them again.
Only freeze fresh, good quality food. Refer to
the table "Food Freezing Guide" to know which
products you can freeze and how long you can
keep them.
Blanch fruit and vegetables before freezing
them to preserve their colour, smell, taste and
vitamins: plunge them in boiling water for a
few moments.
Divide the food you wish to freeze into small
individual portions corresponding to one meal
each. Small portions freeze quicker at their
core.
Pack the food hermetically so that they do not
lose their flavour or dry up. Use plastic bags,
polyethylene film, aluminium foil or special
freezer containers for this.
If you are using plastic bags, compress them
to eliminate the air before sealing them
hermetically.
Do not place bottles or jars
containing liquids in the freezer
unless they are only two-thirds
full: freezing causes liquids to
expand, which can cause the
container to explode.
Note on each package:
- The freezing date
- The consume-by date
- The type of food contained
- The number of portions contained
If you are purchasing deep-frozen food, pick it
up last when you are shopping.
Check that:
- The packaging isn't damaged
- They are not covered in a layer of frost
(which means that they have partially defrost-
ed)
Pack them in an isothermic bag or in newspa-
per. Transport them quickly and store them
immediately.
Comply with the maximum storage dates
shown on the pack. Your appliance has a ****
freezer compartment: this enables you to keep
deep-frozen food in an optimal manner.
Frozen and deep-frozen food
EN
Preparing food for freezing

36
Fresh meat
We recommend that you defrost meat completely before cooking it so as to avoid the exterior cooking
quicker than the interior, except in the case of small breadcrumbed items, which can be sautéed directly
over a low to medium heat, and boiled meats.
Farmyard animals
Prepare them plucked/skinned, gutted, cut into pieces if necessary, washed and rinsed.
Game
Prepare it plucked/skinned, gutted, cut into pieces if necessary, washed and rinsed.
Fish
Food freezing guide
EN
Product Valid for
Lamb,small pieces 8 months
Roast pork 5 months
Pork ribs 4 months
Boiled beef,roast beef 10 months
Beef steak,entrecotes,in sauce,roast veal 8 months
Veal steaks,cutlets 10 months
Minces meat 4 months
Giblets,offal 3 months
Sausages 2 months
Product Valid for
Duck 4 months
Rabbit 6 months
Boiling fowl 7 months
Goose 4 months
Chicken 10 months
Turkey 6 months
Giblets,offal 3 months
Product Valid for
Wild duck,woodcock,pheasant 8 months
Hare 6 months
Partridge,quail 8 months
Product Valid for Preparation
Carp
2 months Descale, gut and remove the head. Wash, rinse and freeze
Pike
Turbot
Salmon
Mackerel
Tench
Trout
Sea bream
3 months
Descale, gut, remove the head and place in cold salty water for 30 seconds,
rinse and freeze. Sole

37
Cooked food
The length of time you can store cooked dishes reduces if you use bacon or smoked ham to season dishes.
Put them directly on the hob or in the oven without defrosting them.
Vegetables
We recommend that you blanch the vegetables with steam so that they do not lose their vitamins and
mineral salts in the cooking water. You therefore do not need to wait until they are dry before freezing
them, just until they cool down.
In general, vegetables are better if they are cooked directly, without being frozen. Reduce the cooking
time, taking into account the blanching time before freezing.
Food freezing guide
EN
Product Valid for Preparatory
cooking
Sauce with meat juices
3 months
half-cooked
Tomato sauce just-cooked
Minestrone with vegetables 2 months no pasta
Lasagne 4 months half-cooked
Roasts 2 months just-cooked
Calf’s leg 1 months
half-cooked
Meat in sauce 3 months
Stewed game 2 months just-cooked
Boiled fish,grilled/baked fish
2 months half-cooked
Sweet peppers,aubergines,courgettes stuffed with meat
Sautéed mushrooms with garlic and parsley,ratatouille
Steamed spinach
Pizza 6 months just-cooked
Product Valid for Preparation Blanching time
Asparagus 12months Wash and remove the strings 2 minutes
Cabbage,cauliflower 6 months Clean an cut into pieces 2 minutes (1)
Artichokes
12months
Remove the external leaves 6 minutes (1)
Beans Shell 3 minutes
Green beans Wash and remove the ends 4 minutes
Mushrooms Clean 2 minutes (1)
Aubergines Wash and slice 4 minutes (2)
Sweet peppers (3) Wash slice and remove the seeds
do not blanchPeas,Tomatoes (3)
Shell and freeze immediately, laying them in
a single layer and then wrapping them
Parsley,basil 8 months
Wash
Spinach
12months
2 minutes
Mixed vegetables for
minestrone (céleri, carrots,
chard,leeks, etc.)
Wash, cut into pieces and divide up into
portions. Do not add potatoes terre: they go
black.
do not blanch
(1) Add a little vinegar or lemon juice to the cooking water (slightly acid water).
(2) Pickle in brine before cooking.
(3) During defrosting, these vegetables reduce to a mush because they contain enormous amounts of water.
We recommend that you defrost them only if you wish to eat them coked.

38
Fruits
Fruit must be covered with sugar or syrup, as appropriate. The amount of sugar to use is around 250g
for 1 kilo of fruit. Syrups are used in varying percentages; these are prepared by boiling sugared
water. The various concentrations are as follows:
- 30% solution, 450g of sugar per litre of water
- 40% solution, 650g of sugar per litre of water
- 50% solution, 800g of sugar per litre of water
So that the fruit's colour does not change, place it in lemon juice before covering it with sugar or pour
lemon juice into the syrup. The receptacles for the fruit to be frozen must remain in the refrigerator for
one hour before being re-inserted into the freezer. The fruit must be completely covered in syrup.
Bread
This can be kept for 2 months. Defrost in an oven set to 50°C, switching it on after inserting the bread.
Butter and cheese
Freeze butter and cheese by dividing them up into pieces for weekly consumption.
Butter and hard cheese (e.g. Parmesan) can be kept for 8 months, other cheese 4 months. They must
be defrosted in the refrigerator, keeping an eye on the condensation that forms on these products.
Food freezing guide
EN
Product Valid for Preparation
Apricots 8 months Wash, pit and cover with 30% syrup
Pineapple
10 months
Peel, slice and cover with 50% syrup
Oranges Peel, slice and cover with 30% syrup
Cherries Wash, pit and cover with sugar or 30% syrup
Strawberries
12 months
Wash, remove the stalk and cover with sugar
Melon Peel, slice, de-seed and cover with 30% syrup
Peaches 8 months Peel, pit, slice and cover in 50% syrup
Grapefruit 12 months Peel, slice and cover in 30% syrup
Juice from citrus fruits 10 months Press, remove the pips and sweeten to taste
Plums
12 months
Wash, pit and cover in sugar or 50% syrup
Grapes De-seed, wash and cover in sugar or 30% syrup
Bilberries, blackberries,
blackcurrants,raspberries
red currants
10 months Wash, remove the stalk and cover with sugar

39
Do not put fresh food next to food that has already been frozen to avoid causing the frozen food
to warm up.
The maximum weight of food that you can freeze over 24 hours is shown on the
information plate (inside your appliance's refrigerator section near the bottom of
the left-hand wall) under the heading: "CAPACITE DE CONGELATION/FREEZING
CAPACITY (kg/24h)".
You can defrost food in five different ways:
- By putting them in your appliance's refrigerator section for several hours
- By leaving them to defrost gently at ambient temperature
- In a conventional oven at a very low temperature (40/50°C)
- In a microwave oven
- By cooking them immediately
Defrosting them in the refrigerator is the slowest but safest method.
Never refreeze food once it has defrosted, even partially, without cooking it first.
We would advise you not to place any items you have just taken out of the freezer
straight into your mouth (ice cream, ice cubes, etc.): they will be at a very low
temperature and you risk frostbite. Avoid touching frozen or deep-frozen food
with wet hands; you may stick to the food. We recommend that you only defrost
food for immediate use.
Defrost your freezer when a layer of frost and ice 5-6mm thick has formed inside your freezer. This
thickness of ice prevents your freezer from operating correctly, reduces its efficiency and causes it
to consume more energy.
Remove all the food from the freezer. Place it in isothermic bags or wrap it in newspaper and store
it in a cool place.
Switch off your appliance by setting the thermostat to ●. Keep the door to the freezer section
open.
Place a pan of hot water on a small plank of wood or a placemat to isolate it and place them both
inside your freezer to speed up the defrosting process.
Never use a heater, hairdryer or any other electrical appliance nor any knives or
other metal objects to speed up defrosting: you could damage your appliance
irremediably.
Clean your freezer before resetting the temperature as shown in the section on "Setting your
refrigerator's temperature" and replacing the food (see the section on "Cleaning your appliance").
Arranging food in your freezer
EN
Defrosting food
Automatic defrosting of your freezer

40
Disconnect your appliance prior to
performing any maintenance oper-
ation. Grasp the plug directly, in-
stead of pulling on the power cable.
Cleaning your appliance
We recommend that you clean and
disinfect your appliance regularly
for improved hygiene and to keep
your food completely safe: the re-
frigerator section should be cleaned
once a month and the freezer after
each time you defrost it.
Remove all the food from the freezer. Place it
in isothermic bags or wrap it in newspaper and
store it in a cool place.
Clean your appliance inside and out with a
bicarbonate of soda solution (1 dessertspoon
of bicarbonate to 4 litres of water). Do not use
alcohol, scouring powder or detergents, which
could damage the surfaces.
Do not use a high-pressure steam
cleaner. The very hot steam could
damage the surfaces and the elec-
trical circuits; you would expose
yourself to a risk of electrocution.
Rinse with water, dry with a cloth.
Periodically check that the drain hole for the
defrosting water is not blocked and clean it
with a stick as shown in the Drawing.
Don't forget to clean the condenser from time
to time: this is at the back of the appliance
(see the section on "Description of your appli-
ance"). Use a dry paintbrush to do this or, bet-
ter yet, your vacuum cleaner.
Reconnect your appliance, and adjust the re-
frigerator's thermostat if necessary, as shown
in the section on "Adjusting your refrigerator's
temperature ".
Wait 3 or 4 hours before placing the food back
in your appliance.
The vegetable compartment is fitted with a
filter for controlling the level of humidity for
optimum food preservation.
To clean this filter: remove the top of the com-
partment, remove the lid and then remove the
"K" filter and wash it under running water. The
sliding basket can be removed as follows: pull
the basket out to the stop, lift the front of the
basket and then pull it towards you.
Changing the light bulb
Disconnect your appliance
- Unclip and remove the transparent cover.
- Replace the bulb with another bulb of the
same model (15 WATT max.), put the cover
back in place and retighten its retaining screw.
Ongoing maintenance of your appliance
EN
K

41
Normal operating noises
So that the selected temperature remains constant, your appliance regularly switches off its motor.
The resultant noises are quite normal operating noises. They reduce automatically as soon as your
refrigerator reaches the desired temperature. These noises are as follows:
Inconveniences or minor breakdowns
Certain problems may appear when you are using your appliance. Before calling the after-sales
service, use the guide below to see if you can resolve the problem yourself:
Noises, inconveniences or minor breakdowns
EN
NOISE CAUSE
Buzzing
Coming from the motor.This buzzing may briefly be louder when
the motor starts.
Gargling or slight buzzing
Coming from circulation of the refrigerant in your refrigerator’s
pipes.
Clicks
These can always be heard when the thermostat turns the motor
on or off.
Slight background noise
If your appliance is fitted with a fan (depending on the model),the
air circulating inside your appliance makes a slight background
noise.
PROBLEM ADVICE
Unusual noises
- check the adjustement of the feet of your appliance and its
stability.
- check that it is not touching a wall.
- check that all the movable parts(trays,racks,etc..)are securely in
place.
- check that the bottles or containers you have placed in your
appliance are not touching each other.
The refrigerator does not get
cold enough
- ckeck that the thermostat is correctly set as indicated in the
section on "Adjusting your refrigerator’s temperature".
- if you have put a large amount of food in your refrigerator at one
time,ensure that you readjust the thermostat as shown in the
section on "Adjusting your refrigerator’s temperature".
- be careful not to open your appliance’s door too often,and not to
leave it open.
Your appliance does not get
cold at all
- ckeck that the thermostat is not in the
● position.
- check that your appliance is connected to the electrical supply.
- check that the circuit-breaker for your house has not cut out and
that the fuse has not blown or been unscrewed.
Page is loading ...
Page is loading ...
-
 1
1
-
 2
2
-
 3
3
-
 4
4
-
 5
5
-
 6
6
-
 7
7
-
 8
8
-
 9
9
-
 10
10
-
 11
11
-
 12
12
-
 13
13
-
 14
14
-
 15
15
-
 16
16
-
 17
17
-
 18
18
-
 19
19
-
 20
20
-
 21
21
-
 22
22


Brandt FA2662 Owner's manual
- Category
- Fridge-freezers
- Type
- Owner's manual
Ask a question and I''ll find the answer in the document
Finding information in a document is now easier with AI
Related papers
-
Groupe Brandt KGT300XD Owner's manual
-
-
-
-
-
-
-
Groupe Brandt 3CFV-19X Owner's manual
-
Groupe Brandt FFA1670 Owner's manual
-
Groupe Brandt DN3120 Owner's manual
Other documents
-
-
-
-
-
-
-
Groupe Brandt ZJ13516 Owner's manual
-
-
Fagor FD-291NF Instructions For Use Manual
-
 De Dietrich 6545UN Owner's manual
