Page is loading ...

PRIER Products, Inc.
4515 E 139th St.
Grandview, MO 64030
800-362-9055 Fax: 800-362-1463
www.PRIER.com
Installation, Operation & Maintenance Instructions for the
PRIER Manseld Style 400 Diamond Series Wall Hydrant
*Please leave this sheet for the property homeowner*
Thank you for purchasing the PRIER Manseld Style 400 Diamond Series Wall Hydrant. Your 400 Diamond Series Wall
Hydrant will provide you years of dependable service with little or no maintenance.
Installation:
Installation procedures may vary slightly depending on the seat option purchased and the installation inlet options. PRIER
Manseld Style 400 Series wall hydrants are available with the following inlet options:
478-D Style 1/2” MIP x 1/2” SWT Bore 1” Hole
479-T Style 3/4” MIP x 1/2” FIP Bore 1 1/8” Hole
480-C Style 1/2” CPVC Bore 1” Hole
481-S Style 1/2” SWT x 3/4” Push-On Bore 1” Hole
482-F Style 3/4” MIP x 3/4” SWT Bore 1 1/8” Hole
490-X Style 1/2” Crimp PEX Bore 1” Hole
491-W Style 1/2” Wirsbo
®
PEX Bore 1” Hole
492-FX Style 3/4” Crimp PEX Bore 1 1/8” Hole
493-FW Style 3/4” Wirsbo
®
PEX Bore 1 1/8” Hole
1. Determine the location for the installation of the hydrant. The valve must be installed into a heated area of the struc-
ture that will not drop below freezing. Ensure there is adequate work room in the interior of the structure for securing
the hydrant to the plumbing piping. Bore the hole size listed above through the wall in the desired position for the
installation.
2. All freezeless wall hydrants require a slight downward pitch to aid the draining process of the hydrant once the prod-
uct is turned to the “off” position. PRIER has included an appropriate siding wedge to install behind the wall ange of
the hydrant. This ensures proper drainage pitch results after installation.
3. Position the spout of the hydrant in the downward position. From the interior of the structure, utilize the spout aligning
mark on the seat. When the mark is pointed down, the spout is oriented in the proper position on the outside of the
structure.
4. If you are planning to solder the connection (478, 481 or 482 style seats), be certain the hydrant is in the fully open
position to prevent seat damage from the heat.
5. Connect the water supply piping to the freezeless wall hydrant as desired. With a closed-end hose attached creating
back pressure, test the installation for leakage.
6. After the water supply connection is made, secure the hydrant to the structure using appropriate screws through the
two mounting holes on the casted back ange and siding wedge.
Operation:
Operation of the PRIER Manseld Style 400 Diamond Series Wall Hydrant is a simple process. Water ows through the
hydrant after turning the handle counter-clockwise to the “on” position. Turn off the hydrant by turning the handle clock-
wise to the “off” position.
The hydrant will drain for a few moments. If the dripping persists after a few moments, tighten the handle slightly until the
dripping stops. Be careful not to overtighten the hydrant.
The 400 Series incorporates an integral atmospheric anti-siphon vacuum breaker that, in the rare occurrence of a back
siphonage, opens to the atmosphere preventing contamination of the water supply.
As well as an atmospheric vacuum breaker, the 400 Series incorporates a backow preventer that operates as a check
valve in the rare case that water is forced backwards into the valve. The backow preventer has been tested to 125 PSI
pressure.
*ALWAYS REMOVE HOSE DURING FREEZING TEMPERATURES*
*INTENDED FOR IRRIGATION USE AND OUTDOOR WATERING*
Maintenance:
The PRIER Manseld Style 400 Diamond Series Wall Hydrant leaves the factory fully air tested and operational. It is
treated with an FDA approved lubrication. The hydrant requires no scheduled maintenance to provide long life.

6
7
4
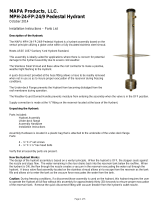
*The 630-7755 Wall Hydrant Repair Kit includes parts for the
300, 400 and 500 Series hydrants, some of which are not
pictured here. When repairing a hydrant you will have parts
left over.
*The 630-7500 Universal Vacuum Breaker Kit ts all current
and past PRIER and Manseld style residential hydrants.
9
ID Part No. Description
1 See Below Stem Assembly, Contains: 1, 2, 3, 4, 5
2 C-134KT-802
Seat Washer Replacement Kit
(00 Beveled)
3 336-0002 Backow Check Valve for 400 Series
4 324-1006 Washer (Stainless Steel)
5 339-3002
Packing for Left Hand Packing Nut
(Graphite)
6 337-3001 Left Hand Thread Packing Nut (Plastic)
7 630-7965
Handle & Screw Kit (Grey Plastic
Handle & Stainless Steel Screw)
630-7975
Handle & Screw Kit (Beige Plastic
Handle & Stainless Steel Screw)
8 337-3012 Space Wedge (Grey, Plastic)
337-3013 Space Wedge (Beige, Plastic)
9 630-7500
Universal Vacuum Breaker
Replacement Kit
630-7755
Service Kit for 300/400/500 Series
Contains: 2, 3, 4, 5, 6
630-8500
Complete Service, Handle & Vacuum
Breaker Kit
5
Part No. Style Description Stem Length
M-231-3204 H Stem for 4” 400 Series Hydrant 6
9
/
16
” OAL
M-231-3206 H Stem for 6 “ 400 Series Hydrant 8
9
/
16
” OAL
M-231-3208 H Stem for 8” 400 Series Hydrant 10
9
/
16
” OAL
M-231-3210 H Stem for 10” 400 Series Hydrant 12
9
/
16
” OAL
M-231-3212 H Stem for 12” 400 Series Hydrant 14
9
/
16
” OAL
M-231-3214 H Stem for 14” 400 Series Hydrant 16
9
/
16
” OAL
1
3
8
2
Stem Overall Length (OAL)
Hydrant Length
3
/
4
”
**For the old style 400 Series wall hydrant stems, see 400 Series retired style spec sheet at www.PRIER.com.
For older styles made prior to 2007, see the retired 500 Series spec sheet.
H Style Manufactured April 2013 - Present
4515 East 139th Street
Grandview, MO 64030
(800) 362-9055
Fax (800) 362-1463
www.PRIER.com
Replacement Parts
Replacement Stems
/