Page is loading ...

1. Carefully remove all parts from the box.
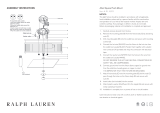
2. Remove the mounting plate (E) from the canopy (H) by loosening the lock collar (I).
3. Drill 4 holes on the ceiling and make sure the hole distance will match to the mounting
plate (E) holes exactly.
4. Knock the anchors (D) into the ceiling holes.
5. Thread tube (M) to the fixture body (N).
6. Let the threaded nipple (K) pass through the tube (J), then thread to the connector (L).
7. Let the lock collar (I) and canopy (H) pass through the tube (J).
8. Attach the mounting plate (E) to the threaded nipple (K) and secure with lock washer (C)
and lock nut (B).
9. Install the mounting plate (E) to the outlet box by mounting screws (G) provided, then
secure the screws (F) to the anchors (D).
10. Connect the fixture ground (bare) wire with the ground wire from the outlet box using
wire nut (A). If your house does not have ground wire, then attach this wire to the
green grounding screw inside of the outlet box.
IT IS IMPERATIVE THAT THIS FIXTURE BE GROUNDED.
11. Connect the fixture Neutral wire (ribbed, no markings) with the neutral wire from the
outlet box using wire nut (A).
12. Connect the fixture Hot (smooth edge,markings) wire with the hot wire from the outlet
box using wire nut (A).
DO NOT REVERSE THE HOT AND NEUTRAL CONNECTIONS OR SAFETY WILL
BE COMPROMISED.
Utopia Large Linear Pendant
Item # KW 5550
WE RECOMMEND INSTALLATION OF THIS LIGHTING FIXTURE BE DONE BY A
LICENSED ELECTRICIAN.
WARNING***SWITCH OFF THE MAIN ELECTRICAL SUPPLY FROM THE MAIN
FUSE BOX/CIRCUIT BREAKER BEFORE INSTALLATION.
INSPECT ITEM CAREFULLY BEFORE ATTEMPTING TO INSTALL. IF THERE IS ANY
DAMAGE OR OBVIOUS DEFECT. DO NOT INSTALL.
ITEM MAY NOT BE RETURNED ONCE IT HAS BEEN INSTALLED.
NOTE: CAREFULLY UNPACK EACH PIECE IN TOP LAYER OF PACKING PRIOR TO
REMOVING. RETAIN ALL PACKING MATERIAL UNTIL INSPECTION AND
INSTALLATION ARE FINAL.
DAMP
TO assemble safety cables:
1.Join fixture safety cables with safety
cable from ceiling.
2.Wrap both safety cable around the
cable lock nut.
3.Insert screws into both holes on cable
lock nut,secure screws with screwdriver.
4.Push the cable lock nut into outlet box.
Safety cable
Cable lock nut

13. Tuck these wire connections neatly into the outlet box to secure.
14. Put canopy (H) to mounting plate (E), and secure with lock collar (I).
15. Insert bulbs (not included ) into the sockets.
16. Put the acrylic diffuser (O) onto the metal frame (P), then attach the metal frame to the
bottom of the fixture body and secure with screws (Q) by using wrench provided.
17. Installation is complete, turn on power at fuse or circuit breaker.
***Clean with a dry, soft cloth only. Use no harsh abrasives or chemical agents.
Utopia Large Linear Pendant
Item # KW 5550
WE RECOMMEND INSTALLATION OF THIS LIGHTING FIXTURE BE DONE BY A
LICENSED ELECTRICIAN.
WARNING***SWITCH OFF THE MAIN ELECTRICAL SUPPLY FROM THE MAIN
FUSE BOX/CIRCUIT BREAKER BEFORE INSTALLATION.
INSPECT ITEM CAREFULLY BEFORE ATTEMPTING TO INSTALL. IF THERE IS ANY
DAMAGE OR OBVIOUS DEFECT. DO NOT INSTALL.
ITEM MAY NOT BE RETURNED ONCE IT HAS BEEN INSTALLED.
NOTE: CAREFULLY UNPACK EACH PIECE IN TOP LAYER OF PACKING PRIOR TO
REMOVING. RETAIN ALL PACKING MATERIAL UNTIL INSPECTION AND
INSTALLATION ARE FINAL.
DAMP
TO assemble safety cables:
1.Join fixture safety cables with safety
cable from ceiling.
2.Wrap both safety cable around the
cable lock nut.
3.Insert screws into both holes on cable
lock nut,secure screws with screwdriver.
4.Push the cable lock nut into outlet box.
Safety cable
Cable lock nut
/