Carro WGS-525DL Installation guide

Type
Installation guide

Carro WGS-525DL is a versatile ceiling fan with a light kit, designed to provide both air circulation and ambient lighting in your indoor spaces. It features adjustable fan speeds for customized airflow, a reversible motor for year-round comfort, and a sleek, modern design that complements various décor styles.

Carro WGS-525DL is a versatile ceiling fan with a light kit, designed to provide both air circulation and ambient lighting in your indoor spaces. It features adjustable fan speeds for customized airflow, a reversible motor for year-round comfort, and a sleek, modern design that complements various décor styles.

ITEM:WGS-525DL
Mounng Bracket
Downrod
Canopy
M4x14 Screws
Coupling Cover
Hairclip Pin Clevis Pin
Fan Motor Assembly
Light Kit
Blade Bracket
Blades
ST5x35 Setscrew
Wall Control
ST5x35
Setscrew
4 pcs
Expansion
Screw
4 pcs
Setscrew stopper
4 pcs
Witing cap
4 pcs
#8-32
Setscrew
2 pcs
Screw
washesr
2 pcs
Screw spring
washer
2 pcs
Balance Pack
1 pc
OFF
OFF
Screws for Blade Bracket
Fabric
washesr
16 pcs
Screws
for Blades
16 pcs
1 )Attach blade brackets to blades using the blade bracket screws and metal or fabric washers .
2)Attach blade assembly to using the screws provided. Tighten screws securely.
1
2
3
2
3
1
1) 2) 3) 4)
1)Remove clamp pin (1) and cross pin (2) from downrod (3).
2)Place downrod assembly (3) into canopy (1) and coupling cover (2). Feed motor wires through the
downrod assembly (3).
3)Feed motor lead wires through downrod/canopy assembly .
4)Place insert downrod into downrod yoke. Make sure to align hole in downrod with the hole in downrod
yoke. Install yoke cross pin (1) through yoke and downrod. Insert clamp pin (2) into cross pin until it
snaps into place. Tighten set screws (3) in yoke.
1
2
3
INSTALLING THE BLADE
1) 2)
1
2
Carefully lift fan assembly onto mounting bracket.
Rotate fan until notch on downrod ball (1) engages
the ridge on the mounting bracket (2).
This will allow for hands free wiring.
Live
Neutral
Ground
Wall Switch
Wall
Outlet Box
Blue Wire
Black Wire
Ceiling
Outlet Box
Blue Wire
Black Wire
Black
Blue
White
Green
FAN
Neutral Wire (White)
Gtounding Wire (Green)
Neutral Wire (White)
Gtounding Wire (Green)
Live Wire (Black)
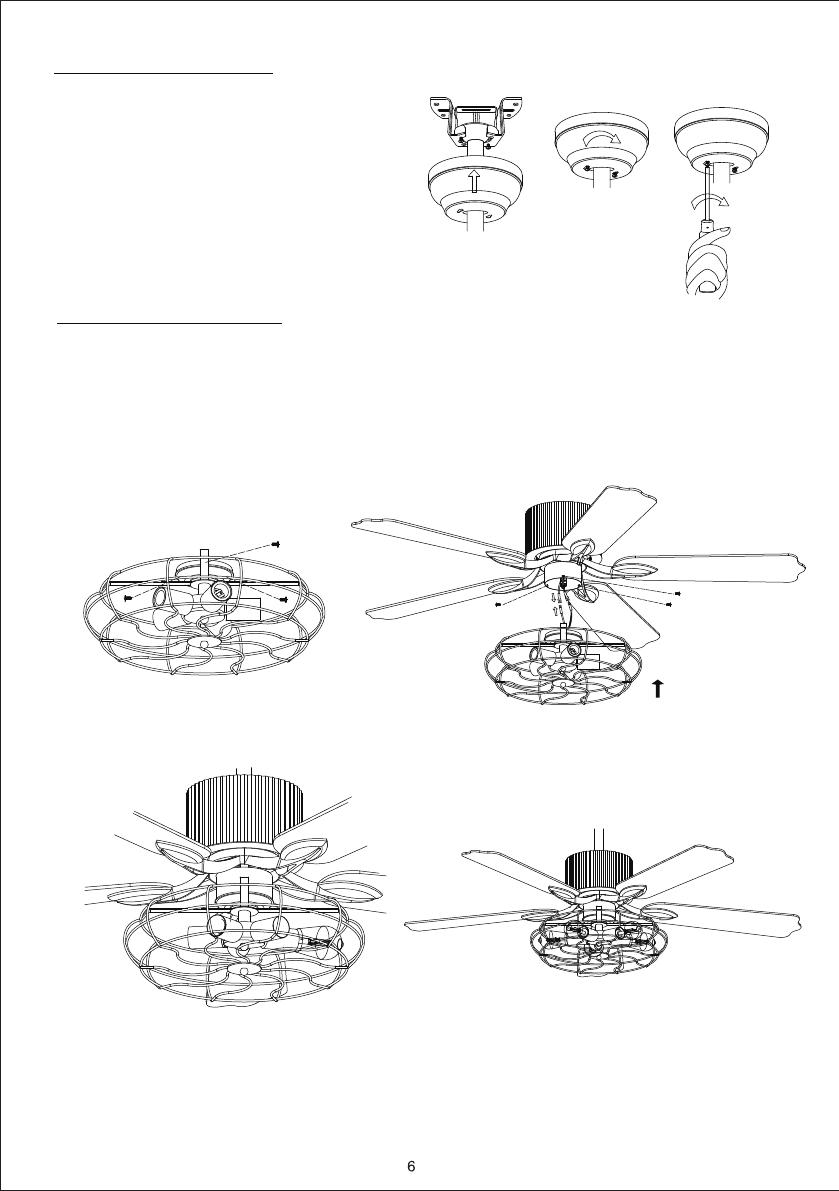
INSTALLING THE LIGHT KIT
1.Remove 3 mounting screws from the light kit.
2.Find the Molex connector from the motor and the Molex connector from the light kit. Slide them
together.
3.Install 3 screws to the junction box of the motor and light kit all 3 screws securely.
4.Install light bulbs (not included).
12
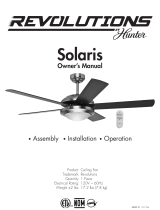
INSTALLING THE CANOPY
Loosen the 2 screws on the bottom of mounting
bracket but do not remove them. Raise the
canopy up and align the keyholes on the bottom
of the canopy with the 2 screws on the bottom of
mounting bracket. Rotate the canopy until both
screws from the mounting bracket drop into the
slot recesses. Tighten screws securely.
34
  • Page 1 1
  • Page 2 2
  • Page 3 3
  • Page 4 4
  • Page 5 5
  • Page 6 6
  • Page 7 7
  • Page 8 8
  • Page 9 9
  • Page 10 10
  • Page 11 11
  • Page 12 12

Carro WGS-525DL Installation guide

Type
Installation guide

Carro WGS-525DL is a versatile ceiling fan with a light kit, designed to provide both air circulation and ambient lighting in your indoor spaces. It features adjustable fan speeds for customized airflow, a reversible motor for year-round comfort, and a sleek, modern design that complements various décor styles.

Ask a question and I''ll find the answer in the document

Finding information in a document is now easier with AI