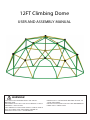
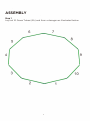
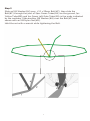
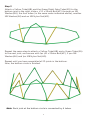
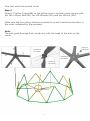
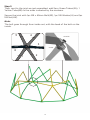
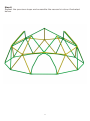
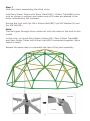
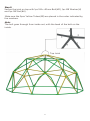
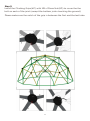
The Home Depot MSXY292401AAF is a 12FT Climbing Dome designed to provide a fun and challenging climbing experience for children. Made from durable materials, this dome can withstand active play and the elements. With its easy-to-grip climbing holds, the dome encourages children to climb, crawl, and explore, helping them develop their coordination, strength, and balance. Perfect for outdoor play, the Climbing Dome can be used in backyards, playgrounds, or any other safe outdoor area.
The Home Depot MSXY292401AAF is a 12FT Climbing Dome designed to provide a fun and challenging climbing experience for children. Made from durable materials, this dome can withstand active play and the elements. With its easy-to-grip climbing holds, the dome encourages children to climb, crawl, and explore, helping them develop their coordination, strength, and balance. Perfect for outdoor play, the Climbing Dome can be used in backyards, playgrounds, or any other safe outdoor area.


-
 1
1
-
 2
2
-
 3
3
-
 4
4
-
 5
5
-
 6
6
-
 7
7
-
 8
8
-
 9
9
-
 10
10
-
 11
11
-
 12
12
-
 13
13
-
 14
14
-
 15
15
-
 16
16


The Home Depot MSXY292401AAF is a 12FT Climbing Dome designed to provide a fun and challenging climbing experience for children. Made from durable materials, this dome can withstand active play and the elements. With its easy-to-grip climbing holds, the dome encourages children to climb, crawl, and explore, helping them develop their coordination, strength, and balance. Perfect for outdoor play, the Climbing Dome can be used in backyards, playgrounds, or any other safe outdoor area.
Ask a question and I''ll find the answer in the document
Finding information in a document is now easier with AI
Other documents
-
Kmart 42828617 User manual
-
LIVING AND HOME 0735940290913 User manual
-
Kmart Large House Shape Shelving Unit User manual
-
-
LIVING AND HOME Toddler User manual
-
Kmart 43235117 User manual
-
Fitness Reality 8476 Owner's manual
-
Lifetime 90612 Owner's manual
-
-