Page is loading ...

NEUTON
Cordless Electric Mower
Safety & Operating Instructions
Model: EM 4.1
COUNTRY HOME PRODUCTS
®
, INC.
www.neutonowners.com
NEUTON
Cordless Electric Mower
Safety & Operating Instructions
Model: EM 4.1
COUNTRY HOME PRODUCTS
®
, INC.
www.neutonowners.com

And congratulations on your purchase of the NEUTON Cordless Electric Mower EM 4.1 — the
Smart Mower for Small Lawns!
The NEUTON Mower EM 4.1 is designed with state-of-the-art battery technology to make
mowing your lawn as easy and enjoyable as possible.
If you haven’t already ordered it, be sure to try the EM 4.1’s Trimmer Attachment, too. This option
makes the EM 4.1 the only mower that can also trim and edge your lawn — saving you steps, plus a
whole garage full of separately powered equipment.
Please call us, toll-free, at 1-(866)-NEUTON1 (638-8661) if you have any questions or difficulties as
you get used to your new mower.
We also hope to hear from you on how much you like your new helper!
Thanks once again!
for all of us at...
Country Home Products, Inc.
Country Home Products
®
, Inc.
Meigs Road
P.O. Box 25
Vergennes, VT 05491
Toll-free phone: 1-(866)-NEUTON1 (638-8661)
Fax: 1-(802)-877-1213
Web site: www.neutonowners.com
E-mail: info@countryhomeproducts.com
COPYRIGHTS AND TRADEMARKS
2002 Country Home Products
®
, Inc. NEUTON
™
and the NEUTON logo are trademarks of Country Home Products, Inc.
All rights reser ved.
DOCUMENTATION
Written by Page Designs Inc.
Produced in Taiwan R.O.C. exclusively for Country Home Products, Inc. Meets CPSC blade safety requirements.

NEUTON EM 4.1 Cordless Electric Mower Safety & Operating Instructions iii
Table of Contents
Chapter 1: Introducing the NEUTON Mower EM 4.1 . . . . . . . . . . . . . . . . . . . . . . . . . . .1
About this Manual . . . . . . . . . . . . . . . . . . . . . . . . . . . . . . . . . . . . . . . . . . . . . . . . . . . . . . . . . . .1
Chapter 2: Important Safety Considerations . . . . . . . . . . . . . . . . . . . . . . . . . . . . . . . . .3
Safety and Information Labels . . . . . . . . . . . . . . . . . . . . . . . . . . . . . . . . . . . . . . . . . . . . . . . . . .3
Protecting Yourself and Those Around You . . . . . . . . . . . . . . . . . . . . . . . . . . . . . . . . . . . . . . . .4
Dressing Appropriately . . . . . . . . . . . . . . . . . . . . . . . . . . . . . . . . . . . . . . . . . . . . . . . . . . . . . . .4
Preparing to Use Your Mower . . . . . . . . . . . . . . . . . . . . . . . . . . . . . . . . . . . . . . . . . . . . . . . . . .4
Operating Your Mower . . . . . . . . . . . . . . . . . . . . . . . . . . . . . . . . . . . . . . . . . . . . . . . . . . . . . . . .5
Servicing Your Mower . . . . . . . . . . . . . . . . . . . . . . . . . . . . . . . . . . . . . . . . . . . . . . . . . . . . . . . .6
Maintaining and Storing Your Mower . . . . . . . . . . . . . . . . . . . . . . . . . . . . . . . . . . . . . . . . . . . . .7
Handling the Battery Safely . . . . . . . . . . . . . . . . . . . . . . . . . . . . . . . . . . . . . . . . . . . . . . . . . . . .7
Chapter 3: Setting Up Your NEUTON Mower . . . . . . . . . . . . . . . . . . . . . . . . . . . . . . . . .8
NEUTON Mower Package Checklist . . . . . . . . . . . . . . . . . . . . . . . . . . . . . . . . . . . . . . . . . . . . .8
Assembling Your NEUTON Mower . . . . . . . . . . . . . . . . . . . . . . . . . . . . . . . . . . . . . . . . . . . . . .10
Controls and Features . . . . . . . . . . . . . . . . . . . . . . . . . . . . . . . . . . . . . . . . . . . . . . . . . . . . . . .15
Chapter 4: Operating Your NEUTON Mower . . . . . . . . . . . . . . . . . . . . . . . . . . . . . . . .17
Pre-Start Checks . . . . . . . . . . . . . . . . . . . . . . . . . . . . . . . . . . . . . . . . . . . . . . . . . . . . . . . . . . .17
Starting the Motor and Engaging the Blade . . . . . . . . . . . . . . . . . . . . . . . . . . . . . . . . . . . . . . .17
Stopping the Motor and Blade . . . . . . . . . . . . . . . . . . . . . . . . . . . . . . . . . . . . . . . . . . . . . . . . .19
When Finished Mowing . . . . . . . . . . . . . . . . . . . . . . . . . . . . . . . . . . . . . . . . . . . . . . . . . . . . . .19
Adjusting the Cutting Height . . . . . . . . . . . . . . . . . . . . . . . . . . . . . . . . . . . . . . . . . . . . . . . . . .19
Mowing and Lawn Care Tips . . . . . . . . . . . . . . . . . . . . . . . . . . . . . . . . . . . . . . . . . . . . . . . . . .20
Chapter 5: Charging and Caring for the Battery . . . . . . . . . . . . . . . . . . . . . . . . . . . . .21
The Battery . . . . . . . . . . . . . . . . . . . . . . . . . . . . . . . . . . . . . . . . . . . . . . . . . . . . . . . . . . . . . . .21
Removing the Battery . . . . . . . . . . . . . . . . . . . . . . . . . . . . . . . . . . . . . . . . . . . . . . . . . . . . . . .21
Inserting the Battery . . . . . . . . . . . . . . . . . . . . . . . . . . . . . . . . . . . . . . . . . . . . . . . . . . . . . . . .22
Caring for the Battery . . . . . . . . . . . . . . . . . . . . . . . . . . . . . . . . . . . . . . . . . . . . . . . . . . . . . . .22
Charging the Battery . . . . . . . . . . . . . . . . . . . . . . . . . . . . . . . . . . . . . . . . . . . . . . . . . . . . . . . .23
Recharging to a Full Charge for Off-Season Storage . . . . . . . . . . . . . . . . . . . . . . . . . . . . . . . .25
Disposing of the Battery . . . . . . . . . . . . . . . . . . . . . . . . . . . . . . . . . . . . . . . . . . . . . . . . . . . . . .25
Getting the Most Out of Your Battery . . . . . . . . . . . . . . . . . . . . . . . . . . . . . . . . . . . . . . . . . . . .26
Chapter 6: Optional Attachments . . . . . . . . . . . . . . . . . . . . . . . . . . . . . . . . . . . . . . . . .27
The NEUTON Trimmer . . . . . . . . . . . . . . . . . . . . . . . . . . . . . . . . . . . . . . . . . . . . . . . . . . . . . .28
Using the Rear Bagger . . . . . . . . . . . . . . . . . . . . . . . . . . . . . . . . . . . . . . . . . . . . . . . . . . . . . .28
Installing the Mulching Kit . . . . . . . . . . . . . . . . . . . . . . . . . . . . . . . . . . . . . . . . . . . . . . . . . . . .29

iv NEUTON EM 4.1 Cordless Electric Mower Safety & Operating Instructions
Chapter 7: Maintaining and Storing Your NEUTON Mower . . . . . . . . . . . . . . . . . . . . .30
Cleaning Your Mower . . . . . . . . . . . . . . . . . . . . . . . . . . . . . . . . . . . . . . . . . . . . . . . . . . . . . . .30
Removing and Attaching the Blade . . . . . . . . . . . . . . . . . . . . . . . . . . . . . . . . . . . . . . . . . . . . .30
Sharpening the Blade . . . . . . . . . . . . . . . . . . . . . . . . . . . . . . . . . . . . . . . . . . . . . . . . . . . . . . .31
Balancing the Blade . . . . . . . . . . . . . . . . . . . . . . . . . . . . . . . . . . . . . . . . . . . . . . . . . . . . . . . . .32
Lubricating Your Mower . . . . . . . . . . . . . . . . . . . . . . . . . . . . . . . . . . . . . . . . . . . . . . . . . . . . . .32
Storing your NEUTON Mower . . . . . . . . . . . . . . . . . . . . . . . . . . . . . . . . . . . . . . . . . . . . . . . . .33
Chapter 8: Troubleshooting Tips . . . . . . . . . . . . . . . . . . . . . . . . . . . . . . . . . . . . . . . . .34
Addendum A: Parts List and Schematic Drawing . . . . . . . . . . . . . . . . . . . . . . . . . . . .36
Schematic Drawing . . . . . . . . . . . . . . . . . . . . . . . . . . . . . . . . . . . . . . . . . . . . . . . . . . . . . . . . .40

NEUTON EM 4.1 Cordless Electric Mower Safety & Operating Instructions 1
Chapter 1: Introducing the NEUTON Mower EM 4.1
Congratulations on purchasing your new NEUTON Mower EM 4.1, the Smart Mower for Small
Lawns. T he advanced technology built into your NEUTON Mower makes lawn care easy and
enjoyable, year after year.
As you get to know your NEUTON, you’ll discover that it’s strong, light, easy to maintain, and
whisper quiet. It’s clean, too, because it runs on a battery. You’ll breathe easy and keep your lawn
beautiful the smart, fun way — with your NEUTON Mower
This manual is shipped with the NEUTON Cordless Electric Mower, Model EM 4.1. It explains
how to set up and safely operate your new NEUTON Mower. Carefully adhering to the safety and
operating instructions in this manual will ensure many years of productive use.
Please let us know if you have any questions. Just call us at our toll-free phone number
1 (866) NEUTON1 (638-8661); our Technical Support Department will be happy to help you.
When you call, please have your serial number or order number available so we can help you quickly.
About this Manual
This manual is broken down into the following chapters:
Chapter 1: Introducing the NEUTON Mower EM 4.1
■ Explains the organization of, and conventions used in, this manual.
■ Provides contact information for Country Home Products, Inc.
Chapter 2: Important Safety Considerations
■ Describes the safety labels on your mower.
■ Explains guidelines for safely operating your NEUTON Mower.
Chapter 3: Setting Up Your NEUTON Mower
■ Describes the contents of the NEUTON Mower package as shipped.
■ Explains how to easily set up your NEUTON Mower.
■ Describes and explains the mower’s features and controls.
Chapter 4: Operating Your NEUTON Mower
■ Provides instructions for starting and stopping your mower.
■ Explains how to adjust the mower’s cutting height.
■ Offers useful tips when using your NEUTON Mower to care for your lawn.
Chapter 5: Charging and Caring for the Battery
■ Explains how to use and care for the battery that powers your NEUTON Mower.
Chapter 6: Optional Attachments
■ Describes the attachments available for use with your NEUTON Mower, and how to use them.
Chapter 7: Maintaining and Storing your NEUTON Mower
■ Provides tips on maintaining your mower.
■ Describes how best to store your NEUTON Mower.
Chapter 8: Troubleshooting Tips
■ Lists common problems and their solutions.
In addition to these chapters, the manual includes a parts list, a schematic drawing of the
NEUTON Mower, a section for your notes, the warranty, and a checklist of daily maintenance
procedures (on the back cover) to help you keep your mower performing well for years to come.

2 NEUTON EM 4.1 Cordless Electric Mower Safety & Operating Instructions
Conventions used in this manual
Important: This information is important for the proper use of your machine. Failure to
follow this instruction could result in injury to you or damage to your mower.
This is a helpful hint to guide you in getting the most out of your mower.
Note: This information may be helpful to you in using your mower.
Tools needed: This indicates you will need a special tool to perform a maintenance function on
your mower.
Note: Country Home Products, Inc. reserves the right to discontinue, change, and improve its
products at any time without notice or obligation to the purchaser. The descriptions and
specifications contained in this manual were in effect at printing. Equipment described within this
manual may be optional. Some illustrations may not be applicable to your machine.
WARNING! The exclamation point within an equilateral triangle alerts you to
essential operating, safety, and maintenance (servicing) instructions.

NEUTON EM 4.1 Cordless Electric Mower Safety & Operating Instructions 3
Chapter 2: Important Safety Considerations
We want you to enjoy years of safe and productive use from your NEUTON Cordless Electric
Mower. We don’t want you to get injured, so please take a few moments to read the following
guidelines for safely operating your new machine.
Important: Please read these instructions before using your mower.
Safety and Information Labels
You will find the following two labels on your NEUTON Mower.
NEUTON Mower safety instructions label (176741)
Warning label (176701)

4 NEUTON EM 4.1 Cordless Electric Mower Safety & Operating Instructions
Protecting Yourself and Those Around You
Tragic accidents can occur if the operator is not alert to the presence of children. Children are often
attracted to the mower and the mowing activity. Never assume that children will remain where you
last saw them.
■ Be sure the area is clear of other people before mowing. Do not allow children, other
bystanders, or pets in your work area when the mower is being operated. Stop the mower if
anyone enters the area.
■ Keep children out of the mowing area and under the watchful care of a responsible adult.
■ Be alert and turn the mower off if children enter the area.
■ Only allow responsible individuals who have a thorough understanding of these instructions to
operate the mower. Never allow children to operate the mower.
■ Before and while moving backwards, look behind and down for small children.
■ Use extra care when approaching blind corners, shrubs, trees, or other objects that may obscure
your vision.
Important: If you are ever unsure about an action you are about to take, contact Country
Home Product’s toll-free at 1-(866)-NEUTON1 (638-8661).
Dressing Appropriately
■ Always use safety goggles or safety glasses with side shields when using your NEUTON
Mower. Use a face or dust mask if operating in dusty conditions.
■ Do not operate the mower when barefoot or while wearing open sandals. Always wear
substantial footwear with soles that grip and long pants. Do not wear loose clothing or
jewelry as they can get caught in the moving parts.
Preparing to Use Your Mower
■ Read, understand, and follow all instructions on the machine and in the manuals. Be thoroughly
familiar with the controls and the proper use of the mower before starting.
■ If you have any questions or are unsure of anything regarding the use of your NEUTON
Mower, please call Country Home Products, toll-free, at 1-(866)-NEUTON1 (638-8661) before
proceeding.
■ Never operate the NEUTON Mower without the proper guards, safety switches, or other safety
and protective devices in place and properly connected. Inspect to determine that these safety
devices are properly installed, in good repair, and operate properly. If the condition or
operation of these devices is questionable, they must be repaired or replaced before using the
mower.
■ Follow the instructions for the proper installation and operation of accessories. Use only
accessories approved by the manufacturer. Do not alter any aspect of the mower, attachments,
or accessories in any way.
WARNING! This cutting machine is capable of amputating hands and feet, and
throwing objects. Failure to observe the following safety instructions could result
in serious injury or death.

NEUTON EM 4.1 Cordless Electric Mower Safety & Operating Instructions 5
■ Thoroughly inspect the area where the mower is to be used, and remove all stones, sticks, wire,
pet supplies or lawn toys, and any other foreign objects that could be thrown by the mower
blade. Objects struck by the lawn mower blade can cause severe injuries. Also note the location
of holes, ruts, bumps, stumps, and other possible hazards.
■ Mow only in daylight or in an area well-lit by artificial light.
Operating Your Mower
■ The length of time that the mower’s battery can hold its charge while mowing a lawn depends
upon lawn conditions; tall, thick, or wet grass make the mower work harder, causing the battery
to discharge faster.
■ Before starting the mower, adjust the cutting height to cut 1 to 2 inches of grass at a time. Cut
thicker grass at a greater cutting height, or cut a narrower swath. Do not force the lawn mower
forward in thick grass. Your NEUTON Mower will do a better and safer job when cutting at a
steady rate.
■ Your mower can operate either as a discharging, mulching, or bagging mower. Learn how to use
the proper cutting blade for the type of mowing you want to perform, and know how to use
the rear discharge plate, rear bagger, and mulching plug as appropriate.
■ Shut the motor off and wait until the blade comes to a complete stop before removing the rear
bagger or other attachments.
■ Do not insert the safety key into the mower until you are ready to operate the mower. Store the
safety key away from children and people not authorized to use the mower.
■ The cutting blade turns when the motor is running. (There is no clutch to allow the blade to
stop while the motor is running.) Learn how to quickly stop the mower’s motor. Remember that
the blade will continue to rotate for up to three seconds after the motor has stopped.
■ Stop the motor, wait for the blade to stop moving, and remove the safety key whenever you
leave the operating position (behind the handlebar) for any reason, including clearing grass and
making any inspections, adjustments, or repairs to the mower.
■ Do not put your hands and feet near or under rotating parts. Be especially careful when the
safety key is still inserted. Keep clear of the discharge area at all times.
■ Before cleaning, repairing, inspecting, adjusting the height of the cut, or exchanging the
mulching plug and rear bagger, shut off the motor, make certain the blade has stopped rotating,
and remove the safety key.
■ Never operate the mower in the rain or when the grass is wet. Always be sure of your footing.
■ Keep a firm hold on the handle, and walk — never run.
■ Never cut grass by pulling the mower towards you. It is designed to only be pushed forward
while cutting.
■ Use extreme caution when maneuvering backwards. Always look first to check your footing,
look down and behind you, and release the control levers to shut the motor off before moving
backwards.
■ Stop the motor when crossing over loose materials such as gravel drives, walks, or roads, as
objects discharged by the mower can be hazardous.

6 NEUTON EM 4.1 Cordless Electric Mower Safety & Operating Instructions
■ After striking a foreign object, or if the mower vibrates abnormally, stop the motor and remove
the safety key. Inspect the mower for any damage and repair the damage before restarting and
operating the lawn mower. Excessive vibration is generall y a sign of tr oub le.
■ Stay alert and watch what you are doing.
■ Do not operate the lawn mower when you are tired or under the influence of drugs or alcohol.
■ Remove the safety key when the mower is not in use.
■ Allow the motor to cool for at least 5 minutes before storing the mower in any type of tight
space or enclosure.
■ Do not modify your mower or over-speed the motor.
■ Do not use your NEUTON Mower for any job other than those for which it is intended.
Mowing on Slopes
Slopes are a major factor related to slip-and-fall accidents, which can result in severe injury.
All slopes require caution. If you feel uneasy on a slope, do not mow it.
Do:
■ Mow across slopes, never up and down. Exercise caution when changing directions on slopes.
■ Remove objects such as rocks and tree limbs, or any other potential object that could be thrown
by the mower blade. Objects struck by the lawn mower blade can cause severe injuries.
■ Watch for holes, ruts, or bumps. Tall grass can hide obstacles.
Do Not:
■ Do not mow steep slopes or other areas where stability or traction is in doubt.
■ Do not mow near drop-offs, ditches, or embankments. You could lose your footing or balance.
■ Do not mow excessively steep slopes.
■ Do not mow on wet grass. Reduced footing could cause you to slip.
Servicing Your Mower
■ Never make adjustments or repairs with the motor running. Remove the safety key to prevent
accidental starting.
■ K eep all nuts and bolts tight, especially blade attachment bolts, and keep the equipment in good
condition.
■ Never tamper with safety devices. Check their proper operation regularly.
■ Keep mower free of grass, leaves, or other debris build-up.
■ Allow mower to cool before storing.
■ Never attempt to make wheel-height adjustments while the motor is running.
■ Grass-catcher components are subject to wear, damage, and deterioration, which could expose
moving parts or allow objects to be thrown. Check components frequently, and replace them
with the manufacturer’s recommended parts when necessary.
■ Mower blades are sharp and can cut. Wrap the blade or wear gloves, and use extra caution when
working with them.

NEUTON EM 4.1 Cordless Electric Mower Safety & Operating Instructions 7
Maintaining and Storing Your Mower
■ Maintain the lawn mower with care — keep cutting edges sharp and clean for the best and
safest performance. K eep all nuts, bolts, and screws tight to be sure the mower is in safe
operating condition. Follow the instructions in this manual for changing accessories.
■ Periodically inspect the cords on the charger unit and the handlebar for damage. I f damage
occurs, do not use the mower until the cords have been replaced or repaired.
■ Do not operate the mower if it does not start normally or does not stop normally when the
control levers are released.
■ Use identical replacement blades only. Check the blade and motor mounting bolts at frequent
intervals for proper tightness.
■ K eep mower clean and dry. Use a damp cloth when cleaning. Never use water, gasoline,
solvents, or other petroleum-based or solvent-based products for cleaning.
■ When not in use, store the lawn mower indoors in a dry place and out of the reach of children.
■ To reduce fire hazard, keep the mower free of grass and leaves.
Handling the Battery Safely
■ Do not charge the lawn mower battery in the rain or in wet locations.
■ Exercise care in handling the battery in order not to short-circuit it with conducting materials
such as rings, bracelets, and keys. When short-circuited, the battery or conductor may overheat
and cause burns.
■ Do not attempt to replace the individual battery cells inside the battery. Mixing fresh and
discharged batteries could increase internal cell pressure and rupture the discharged battery.
Improper wiring within the battery could result in leakage or explosion.
■ Do not dispose of batteries in a fire, as the battery cells may explode. Do not open or mutilate
the batteries. Released electrolyte (battery acid) is corrosive and will cause damage to eyes, skin,
or clothes. Battery acid is toxic if swallowed or if the fumes are inhaled.
WARNING! Please dispose of used batteries responsibly, according to your
local hazardous materials regulations.
WARNING! ALWAYS remove the safety key before performing any adjustments
or repairs, or when storing your mower.

8 NEUTON EM 4.1 Cordless Electric Mower Safety & Operating Instructions
Chapter 3: Setting Up Your NEUTON Mower
This chapter outlines a few simple steps needed to set up your new mower. Before beginning
assembly, it may be helpful to familiarize yourself with the controls and features on your mower
by reviewing the photograph of the mower on the next page and reading about the mower’s
controls and features.
Please check that you have all of the components listed below. If anything is missing, please call
Country Home Products, toll-free, at 1-(866)-NEUTON1 (638-8661).
NEUTON Mower Package Checklist
Country Home Products ships the following items (Figur e 1) in your mower package. Please check to
make sure you have everything listed below:
❏ 1. NEUTON Mower
❏ 2. Upper handlebar assembly
❏ 3. Quick-connect knobs, green (two)
❏ 4. Lower handlebar sections (two pieces) with two black connector knobs attached
❏ 5. Rear discharge plate
❏ 6. Battery (inside the mower)
❏ 7. Battery charger
❏ 8. Safety key
❏ 9. 36 mm wrench (to remove the blade)
❏ 10. NEUTON EM 4.1 Cordless Electric Mower Safety & Operating Instructions Manual

NEUTON EM 4.1 Cordless Electric Mower Safety & Operating Instructions 9
Package Contents
1. NEUTON Mower
4. Lower handlebars with connector knobs
2. Upper handlebar assembly
3. Quick-connect
knobs
5. Rear discharge plate
6. Battery
8. Safety key
7. Battery charger
9. 36 mm wrench
Cable guide

10 NEUTON EM 4.1 Cordless Electric Mower Safety & Operating Instructions
Assembling Your NEUTON Mower
To allow you to quickly begin using your NEUTON mower, it is shipped to you partially assembled.
The assembly process is easy and does not require any special tools, knowledge, or strength.
Assembling your NEUTON takes just a few steps:
Step 1: Read these “Safety and Operating Instructions” before proceeding.
Step 2: Attach the lower handlebar sections.
Step 3: Attach the upper handlebar assembly.
Step 4: Cut and remove the strapping holding the battery in place.
Step 5: Attach the cable to the handlebar assembly.
Step 6: Charge the battery before your first use.
Step 7: Attach the rear discharge plate.
Each of these steps is described in detail below. (See page 14 for the fully assembled mower.)
Step 1: Read the Safety and Operating Instructions
Before Proceeding
The NEUTON Mower is a motorized cutting machine that uses a sharp blade. For your safety, and
for the best results, it is important to read the information in “Chapter 2: Important Safety
Considerations” before you assemble or use the mower.
To familiarize yourself with the assembly, features, and operation of your mower, please read the
remainder of this manual before proceeding.
Step 2: Attach the Lower Handlebar Sections
To keep the mower from moving while you assemble it, put a foot behind one of the wheels.
Use the green quick-connect knobs to attach the lower handlebar sections to the mower. The
installation process is the same for each handlebar.
Note: Set the cutting height to the highest adjustment
position when attaching the lower handlebar sections
(position 6 in Figur e 2 ). T his makes it easier to reach the slots
on the mower frame.
1. Position the lower handlebar, with the indentation facing
out, against the frame of the mower. Slide it down into
the slot on the frame until the holes line up (Figur e 2).
Be sure to slide the lower handlebar with the cable guide
tab (see Figur e 3) on the right side (from the operator’s
point of view) of the mower.
2. Insert a green quick-connect knob through the lined-up
holes in the handle and mower frame to attach each side
of the lower handlebar to the mower.
3. Hand tighten until firmly snug.
Important: Be sure to tighten the green quick-connect knobs by hand. Do not use a tool to
tighten; you could easily over tighten them and damage the parts.
Figure 2. Attaching the lower left
handlebar

NEUTON EM 4.1 Cordless Electric Mower Safety & Operating Instructions 11
Step 3: Attach the Upper
Handlebar Assembly
The black connecting knobs (used to connect the
upper and lower handlebar sections together) are
attached to the lower handlebar sections.
1. Remove the black connector knobs and
connector bolts from the upper ends of the
lower handlebars.
2. Line up the holes of the upper handlebars
with the holes in the lower handlebar sections.
Let the upper handlebar assembly lean on the ground
during this process (Figur e 3). It is easier to start with the
upper assembly in this position, so you don’t have to hold
and balance it while connecting the sections. Once you
have the handlebars loosely connected, you can swing the
upper assembly into place and tighten it further.
3. Slide the connector bolts (from inside to
outside) through the holes in the upper and lower
handlebar sections on each side of the mower. Screw
on the black connector knobs, then hand-tighten
them just enough to hold the upper and lower
handlebar sections together on each side.
4. Swing the upper handlebar assembly into position.
The bars will line up and slide into place (Figur e 4).
Hand-tighten the connecting knobs until they are snug.
To save space, you can loosen these connecting knobs to drop the upper handlebar assembly onto
the mower’s deck when you have placed the mower in storage.
Step 4: Cut and Remove the
Strapping Holding the Battery in
Place
The battery is shipped in the mower. Before using the
mower, open the batter cover, then cut and remove the
strapping used to hold the battery in place.
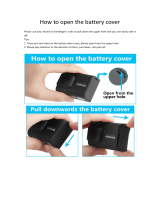
To easily open the battery cover, press down on the
mower body next to the indentation by the battery cover
handle, then pull the cover open (Figur e 5).
Figure 3. Leaning the upper handlebar
assembly on the floor to help connect it
Figure 4. The upper handlebar
assembly after being attached.
Figure 5. Opening the battery cover

12 NEUTON EM 4.1 Cordless Electric Mower Safety & Operating Instructions
Step 5: Attach the Cable to the Handlebar Assembly
1. Run the cable through the cable guide tab
(Figur e 6) on the right lower handlebar section.
2. Align the half-moon cut-out on the cable end
(Figur e 7) with the cable housing on the handlebars,
and slide together.
3. Hand-tighten the locking nut to connect the cable
(Figur e 8).
Figure 6. Cable guide on the
handlebars
Figure 7. The half-moon cut-
out on the cable end
Figure 8. Hand-tightening the
locking nut

NEUTON EM 4.1 Cordless Electric Mower Safety & Operating Instructions 13
Step 6: Charge the Battery Before Your First Use
You MUST charge the battery for 12 hours before you use the mower for the first time. If you do
not charge it before using it, the battery’s charging capacity may decrease.
Read “Charging the Battery” in Chapter 5 before you operate the mower.
Step 7: Attach the Rear Discharge Plate
The rear discharge plate allows the cut grass to be properly
discharged and prevents clogging.
1. Raise the hinged discharge guard on the back of the
mower.
2. Position the black discharge plate with the ribbed bend
facing up, flush against the rear of the discharge guard
(Figur e 9).
3. L ower the hinged guard so the pin locks into the hole
on the plate.
There are other discharge options available. With the rear
bagger, you can bag the cut grass; with the mulching kit, you
can mulch your grass. Please refer to “Chapter 6: Optional
Attachments” to learn more.
Figure 9. Inserting the rear
discharge plate

14 NEUTON EM 4.1 Cordless Electric Mower Safety & Operating Instructions
Figure 10. Your NEUTON Mower!
Start button
Indicator light
Control levers
Mower/Auxiliary switch
Key slot
Battery cover
Cutting height lever
Cable guide

NEUTON EM 4.1 Cordless Electric Mower Safety & Operating Instructions 15
Controls and Features
Make certain that you are familiar with the controls, parts, and operation of your NEUTON Mower
before using it.
Key Slot
The key slot is for both the external battery charger and the safety key. T his design serves as a safety
measure: you can never connect both the external battery charger and insert the safety key at the
same time. In other words, you can either operate your mower or charge its battery; you cannot do
both at the same time.
Safety Key
Insert the safety key to run the motor (Figur e 11). The
safety key can be inserted either way — it has no front
or back.
The safety key has a built-in circuit breaker to protect the
motor. When the built-in circuit breaker is tripped,
the white button on top of the safety key will pop up.
Before attempting to restart the mower, push the white
button all the way down until it locks into place. (There is
no replacement fuse inside the safety key.)
Start Button
The start button starts the motor (but only when the
control levers are depressed).
Control Levers
The control levers are a safety feature. When the levers are depressed, the motor continues to run
and the blade spins. When the levers are released, the motor shuts off and the blade stops spinning
within three seconds.
Indicator Light
The status indicator light on the upper handblebar
assembly (Figur e 12) illuminates when a charged
battery is installed and the safety key inserted. The
light is green.
Note: A green indicator light does not guarantee
that the battery is fully charged, only that it has
some charge, that the electrical system is ready, and
that the mower can be started.
WARNING! If the green light goes out, do not operate the mower again until the
battery is fully charged; otherwise the battery’s charging capacity might be
decreased.
Figure 11. Inserting the safety key
Figure 12. Indicator light

16 NEUTON EM 4.1 Cordless Electric Mower Safety & Operating Instructions
Note: Although you may notice that a short period of rest may restore the indicator light, you must
still fully charge the battery before continuing to mow. For best results, be sure to always fully
charge the battery after every use, no matter how brief.
Cutting Height Lever
The cutting height lever (Figur e 13) allows you to easily
adjust how high or low you cut the grass.
To easily move the cutting height lever, hold the
handlebars with your right hand to keep the mower
steady and adjust the lever with your left hand.
To easily adjust this lever, pull the lever out rather than
lifting or lowering it. Once you pull it out, it very easily
adjusts to a different level.
Mower/Auxiliary Switch
This switch (Figur e 14) controls the optional mower
attachments. This switch has two settings:
■ Mower, used for normal mowing.
■ Auxiliary, used when operating an attachment.
For more information about options available for your
NEUTON Mower, see “Chapter 6: Optional
Attachments.”
Figure 13. Cutting height lever
Figure 14. Pushing the Mower/Auxiliary
switch to the Mower setting
/