Page is loading ...

This document will help you install and configure the BL-WV10 Wireless Camera
Monitoring System and your Network Cameras (sold separately).
Included Items
Confirm that the following items are included in the product box.
BL-WV10 AC adaptor AC cord Ethernet cable
Order No.:
PQLV202X
Cord Length:
About 3 m
Order No.:
PFJA02A006Z
Cord Length:
About 1.8 m
Order No.:
PQJA10138Z
Cord Length:
About 1 m
Video cable Remote control Batteries (2 AA
size)
Order No.:
PSJP01R02Z
Cord Length:
About 1.5 m
Order No.:
EUR648057
Order No.:
R6DW/2ST
• Getting Started (this document)
• Operating Instructions
Getting Started
Wireless Camera
Monitoring System
Model No.
BL-WV10
BL-WV10_GS-en.book Page 1 Wednesday, January 25, 2006 5:18 PM

Getting Started
2
IMPORTANT SAFETY INSTRUCTIONS
When using this product, basic safety precautions should always be followed to
reduce the risk of fire, electric shock, or personal injury.
1. Read and understand all instructions.
2. Keep these instructions.
3. Heed all warnings.
4. Follow all instructions.
5. Do not install this product near any heat sources such as radiators, heat
registers, stoves, or other apparatus (including amplifiers) that produce heat.
6. Protect the AC adaptor cord and AC cord from being walked on or pinched
particularly at plugs, convenience receptacles, and the point where they exit
from this product.
7. The AC cord is used as the main disconnect device. Ensure that the AC outlet
is located/installed near the product and is easily accessible.
8. Use only the included Panasonic AC adaptor and AC cord.
9. The AC adaptor must remain connected at all times. (It is normal for the
adaptor to feel warm during use.)
10. To prevent the risk of fire or electrical shock, do not expose this product to rain
or any type of moisture.
11. Do not touch the product or the AC adaptor and AC cord during lightning
storms.
12. Unplug this product when unused for a long period of time.
13. Refer all servicing to qualified service personnel. Servicing is required when
the unit has been damaged in any way, such as when the AC adaptor, AC cord
or plug is damaged, the unit does not operate normally, or after the unit has
been dropped.
14. Certain Network Cameras are intended for indoor use only. Never use an
indoor camera outdoors.
15. Unplug this unit from power outlets if it emits smoke, an abnormal smell or
makes unusual noise. These conditions can cause fire or electric shock.
Confirm that smoke has stopped and contact an authorised service centre.
SAVE THESE INSTRUCTIONS
BL-WV10_GS-en.book Page 2 Wednesday, January 25, 2006 5:18 PM

Getting Started
3
English
Information on Disposal for Users of Waste Electrical &
Electronic Equipment (private households)
This symbol on the products and/or accompanying documents
means that used electrical and electronic products should not
be mixed with general household waste.
For proper treatment, recovery and recycling, please take these
products to designated collection points, where they will be
accepted on a free of charge basis. Alternatively, in some
countries you may be able to return your products to your local retailer upon
the purchase of an equivalent new product.
Disposing of this product correctly will help to save valuable resources and
prevent any potential negative effects on human health and the environment
which could otherwise arise from inappropriate waste handling. Please
contact your local authority for further details of your nearest designated
collection point.
Penalties may be applicable for incorrect disposal of this waste, in
accordance with national legislation.
For business users in the European Union
If you wish to discard electrical and electronic equipment, please contact
your dealer or supplier for further information.
Information on Disposal in other Countries outside the
European Union
This symbol is only valid in the European Union.
If you wish to discard this product, please contact your local authorities or
dealer and ask for the correct method of disposal.
BL-WV10_GS-en.book Page 3 Wednesday, January 25, 2006 5:18 PM

Getting Started
4
Notice Regarding Battery Safety
1. Do not open or mutilate the batteries. Released electrolyte from the batteries
is corrosive and may cause burns or injury to the eyes or skin. The electrolyte
may be toxic if swallowed. If electrolyte comes in contact with the eyes, flush
eyes with water.
2. Do not mix old and new batteries.
3. Do not heat or expose to flame.
4. Do not take apart or short circuit.
5. Do not attempt to recharge alkaline or manganese batteries.
6. Remove if the remote control is not going to be used for a period of time. Store
in a cool, dark place.
7. Use only non-rechargeable AA batteries. When replacing the batteries, we
recommend using the same type of Panasonic batteries that are included with
this product.
Notice Regarding Wireless Communications
1. To avoid wireless communication interference and instability, do not use this
product near the following devices.
• Wireless transmitters (radio transmitters, cellular transmitters, etc.)
• Wireless devices which operate at 2.4 GHz (security equipment, POS
systems, cordless telephones, etc.)
•Microwave ovens
2. Wireless communication range and quality may be affected if the following
types of objects are located between or near this product and other wireless
devices connected to this product. In the event that images do not refresh at
a regular rate, become cut off, etc., relocate this product, the other wireless
devices, or the obstacles (if possible) for more stable wireless
communications.
• Metal door shutters
• Walls made of concrete, stone, or brick, or walls which contain
aluminium-based heat insulation
• Multiple walls
• Fire doors and glass
• Steel racks or shelves
• Metal fencing or steel mesh
BL-WV10_GS-en.book Page 4 Wednesday, January 25, 2006 5:18 PM

Getting Started
5
English
3. Place cameras and this product at least 2 m away from radios. Do not connect
cameras and this product to a power outlet used by a radio.
Notice Regarding the Pyroelectric Infrared Sensor
Certain Panasonic Network Cameras, such as the BL-C10 and BL-C30, feature a
pyroelectric infrared sensor. This sensor detects temperature differences based on
the infrared rays naturally emitted by human or animal bodies. (In a 20 °C
environment, the sensor can detect temperature differences within 5 m of the
camera.) The detection range of the sensor becomes shorter as the environmental
temperature within the range of the sensor becomes higher. As a result, there may
be times when the sensor does not detect properly in very high temperature
environments, such as during summertime. (In a 35 °C environment, the sensor
can detect temperature differences within 0.5 to 1.5 m of the camera.) Additionally,
the presence of sunlight and the use of air conditioners or heaters can cause the
effective range of the sensor to be reduced or cause incorrect detections. We
recommend taking precautions to avoid these issues when placing the camera.
Other Important Information
This product is not designed to provide surveillance for the prevention of burglary
or theft. We cannot be held responsible in the event of such incidents.
Trademarks
• SD mark is a trademark of the SD Card Association.
• QuickTime and the QuickTime logo are trademarks of Apple
Computer, Inc.
• All other trademarks identified herein are the property of their
respective owners.
BL-WV10_GS-en.book Page 5 Wednesday, January 25, 2006 5:18 PM

Getting Started
6
Compatible Network Cameras (sold separately)
The following cameras are compatible with the BL-WV10, however, certain camera
features cannot be used. See “Camera Compatibility” on page 5 of the Operating
Instructions for more information.
• Panasonic C series Network Cameras (BL-C10: firmware version 1.24 or
higher; All other: 1.30 or higher)
• Panasonic HCM series Network Cameras (firmware version 1.30 or
higher)
• Note that the following HCM series cameras are not supported by the
BL-WV10:
- KX-HCM8
- KX-HCM10
- KX-HCM230
- KX-HCM250
- KX-HCM270
- KX-HCM280
For the latest firmware, visit: http://panasonic.co.jp/pcc/products/en/netwkcam/
Note
• The cameras shown in the illustrations in this document are the BL-C10 and
BL-C30. They are used as examples only.
BL-WV10_GS-en.book Page 6 Wednesday, January 25, 2006 5:18 PM

Getting Started
7
English
Table of Contents
1 Setup .............................................................................. 8
1.1 Using the Remote Control ..............................................................8
1.1.1 Preparing the Remote Control ...................................................................8
1.1.2 Basic Remote Control Operation ...............................................................8
1.2 Setup Overview ..............................................................................9
1.2.1 Connection Examples ................................................................................9
1.3 When Using a Router ...................................................................10
1.3.1 Initial Connections (When Using a Router).............................................. 10
1.3.2 Easy Network Setup (When Using a Router)........................................... 11
1.3.3 Quick Setup (When Using a Router)........................................................12
1.4 When Not Using a Router ............................................................15
1.4.1 Initial Connections (When Not Using a Router) .......................................15
1.4.2 Easy Network Setup (When Not Using a Router) .................................... 16
1.4.3 Quick Setup (When Not Using a Router) ................................................. 17
1.5 Viewing Camera Images ..............................................................19
1.5.1 If the Camera Image Does Not Appear....................................................20
1.6 Adding More Cameras to the System ..........................................21
1.7 Entering Characters with the Remote Control..............................21
2 Error Messages ........................................................... 22
2.1 Quick Setup Error Messages .......................................................22
2.2 Standard Operation Mode Error Messages..................................24
2.3 Sequential Display Mode Error Messages ...................................27
2.4 SD Memory Card Error Messages ...............................................27
2.5 Other Error Messages ..................................................................28
3 Troubleshooting .......................................................... 30
3.1 General Issues .............................................................................30
3.2 Television Screen and Images......................................................31
3.3 Recording .....................................................................................32
3.4 Timer Recording...........................................................................33
3.5 SD Memory Cards........................................................................33
3.6 Quick Setup..................................................................................34
3.7 Wireless........................................................................................36
3.8 Connectivity..................................................................................37
3.9 Camera Indicator ..........................................................................38
3.10 Camera Images, Screen Display..................................................39
3.11 Sensor ..........................................................................................42
BL-WV10_GS-en.book Page 7 Wednesday, January 25, 2006 5:18 PM

Getting Started
8
1Table of Contents
1Setup
1.1 Using the Remote Control
1.1.1 Preparing the Remote Control
The remote control included with the BL-WV10 is required for most operations.
Insert the included batteries as shown below.
1.1.2 Basic Remote Control Operation
The remote control’s navigator
keys are used to navigate
through the BL-WV10’s
on-screen menus and to select
on-screen items. The RETURN
button is used to return to the
previous menu. The ENTER
button is used to select a menu
item or parameter.
When using the remote control
with the BL-WV10, make sure
you aim the remote control
toward the unit’s remote control
sensor.
Insert the batteries,
positioning the and
poles as indicated.
While pulling the cover
toward you, lift it up.
Align the cover and
press down until it
snaps into place.
RETURN
Navigator
keys
ENTER
Remote control sensor
BL-WV10_GS-en.book Page 8 Wednesday, January 25, 2006 5:18 PM
Getting Started
9
English
1.2 Setup Overview
The following steps briefly describe the setup procedure required before you can
use the BL-WV10 to view camera images. Detailed procedures can be found in this
document.
1. Insert the batteries in the remote control.
2. Connect the BL-WV10 to your TV.
3. Use the BL-WV10’s Easy Network Setup utility to configure the BL-WV10.
4. Connect the cameras to the BL-WV10 and/or router.
5. Use the BL-WV10’s Quick Setup utility to configure the cameras.
6. Confirm that camera images are viewable on the TV.
7. Place the cameras where you plan to use them.
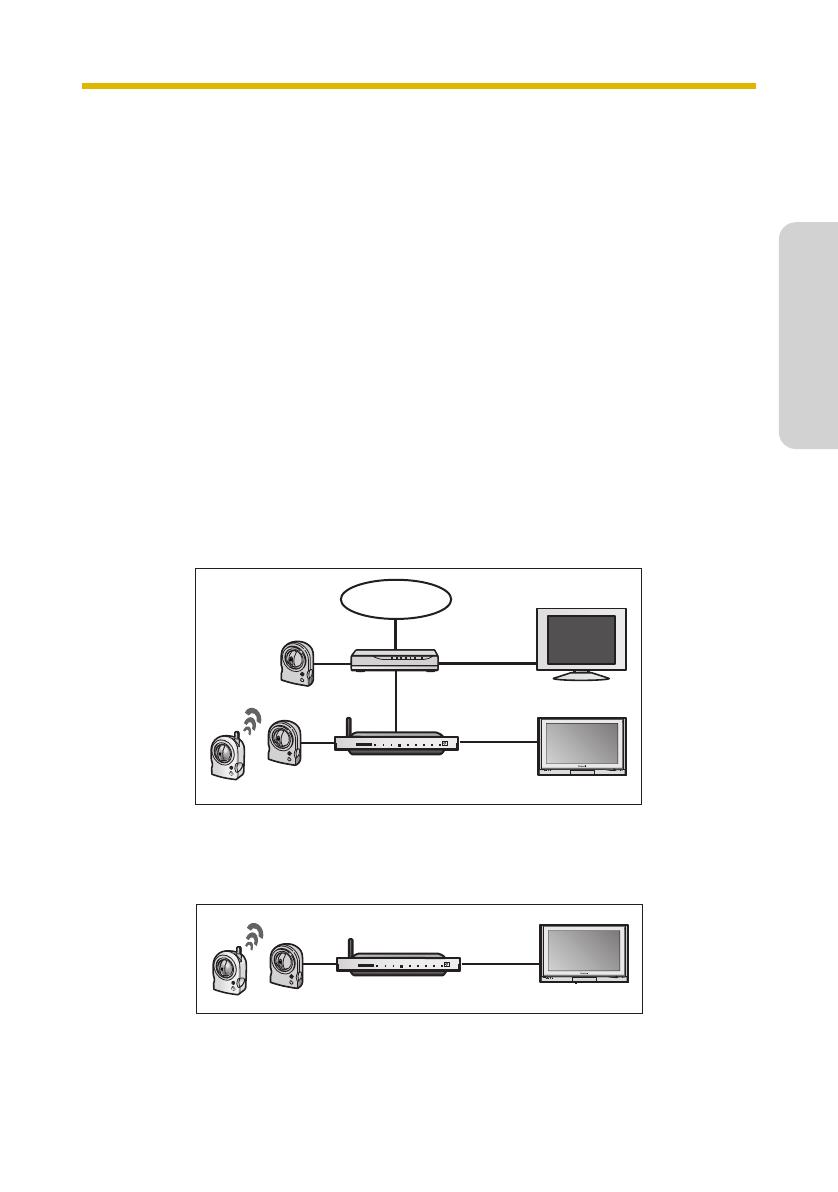
1.2.1 Connection Examples
There are 2 ways to connect your cameras to the BL-WV10. Determine which
method you will use, and refer to the pages listed below.
When using a router
If you will connect the BL-WV10 to a router, see page 10.
When not using a router
If you will not connect the BL-WV10 to a router, see page 15.
Internet
Router
PC
BL-WV10
TV
BL-WV10
TV
BL-WV10_GS-en.book Page 9 Wednesday, January 25, 2006 5:18 PM
Getting Started
10
1.3 When Using a Router
Before connecting your cameras to the BL-WV10, make sure that each camera’s
firmware version meets the requirements noted on page 6. If necessary, refer to
the operating instructions included with the camera and update the firmware.
Note
• Make sure your router’s DHCP feature is turned on. Refer to the operating
instructions included with your router for more information.
• If you are using a wireless router, connect the BL-WV10 to the router using an
Ethernet cable. Wireless connection to the router is not supported.
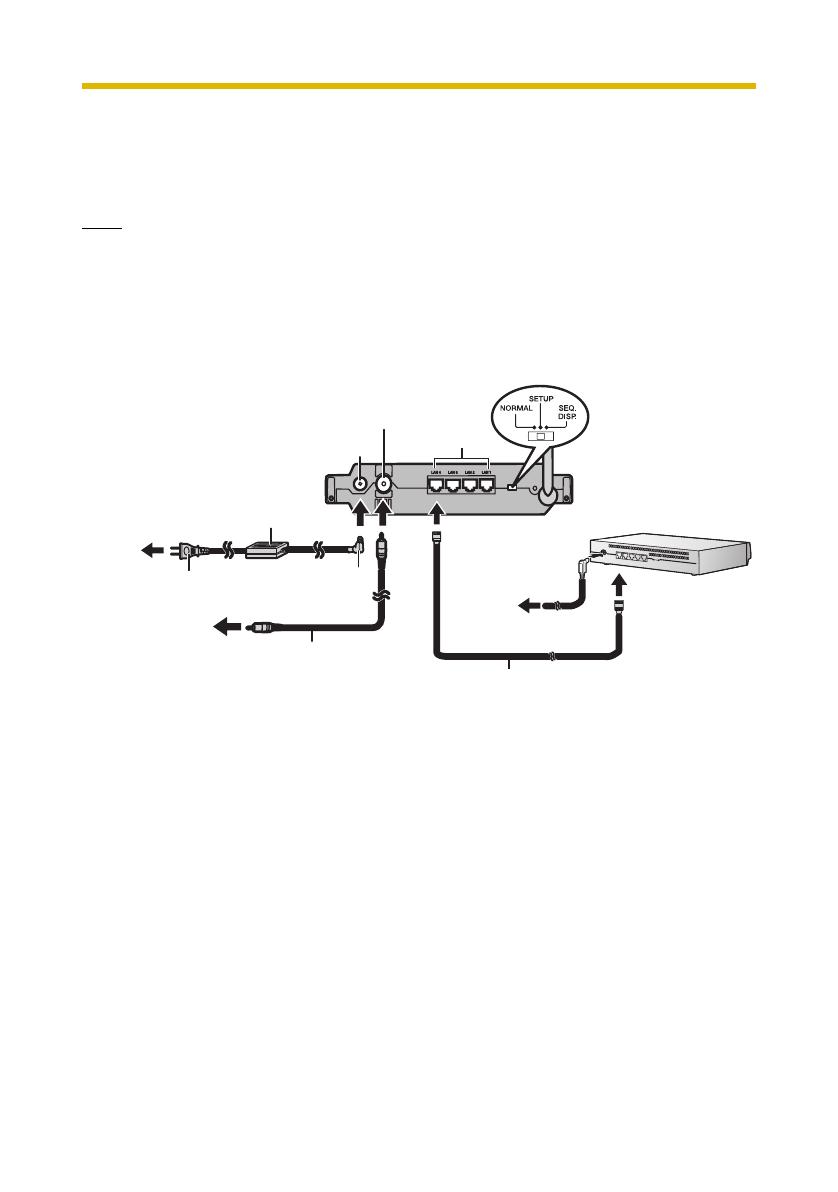
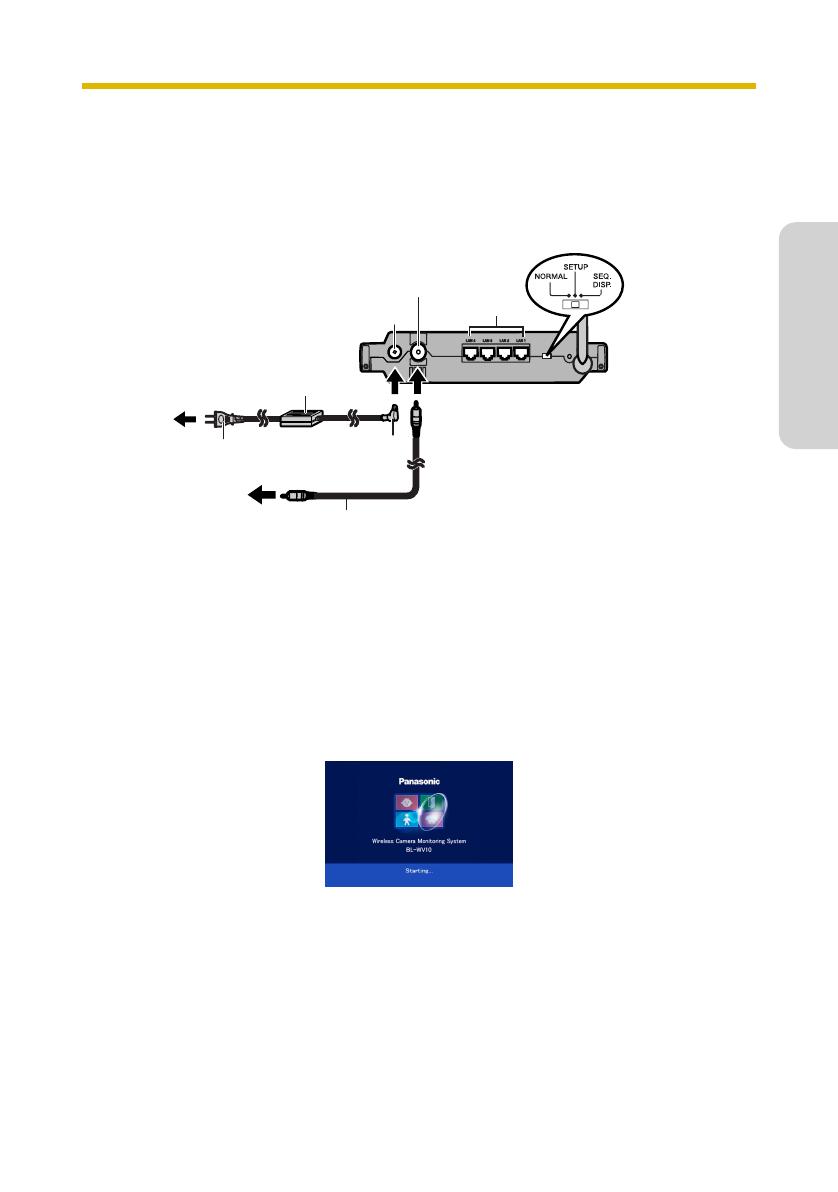
1.3.1 Initial Connections (When Using a Router)
1. Connect the BL-WV10 to your TV using the included video cable.
2. Turn on the TV and set the TV’s input switch to the external video input
(“VIDEO”, “EXT”, “INPUT 1”, etc.)
3. Set the mode switch on the rear of the BL-WV10 to SETUP.
4. Connect an Ethernet cable to one of the LAN jacks on the router and to one
of the LAN jacks on the BL-WV10.
5. Connect the router to the power outlet and turn it on.
6. Connect the AC cord to the AC adaptor and to the power outlet.
Ethernet cable
To
power
outlet
To LAN jack
Router
Rear panel of BL-WV10
To T V
Video cable
(included)
AC adaptor
(included)
AC cord
(included)
DC cord
LAN jacks
DC IN jack
Video output
terminal
To
power
outlet
BL-WV10_GS-en.book Page 10 Wednesday, January 25, 2006 5:18 PM

Getting Started
11
English
7. Turn on the BL-WV10 by connecting the DC cord to the unit.
• The startup screen appears on the TV screen.
You are now ready to use the BL-WV10’s Easy Network Setup utility to configure
the BL-WV10 (see page 11).
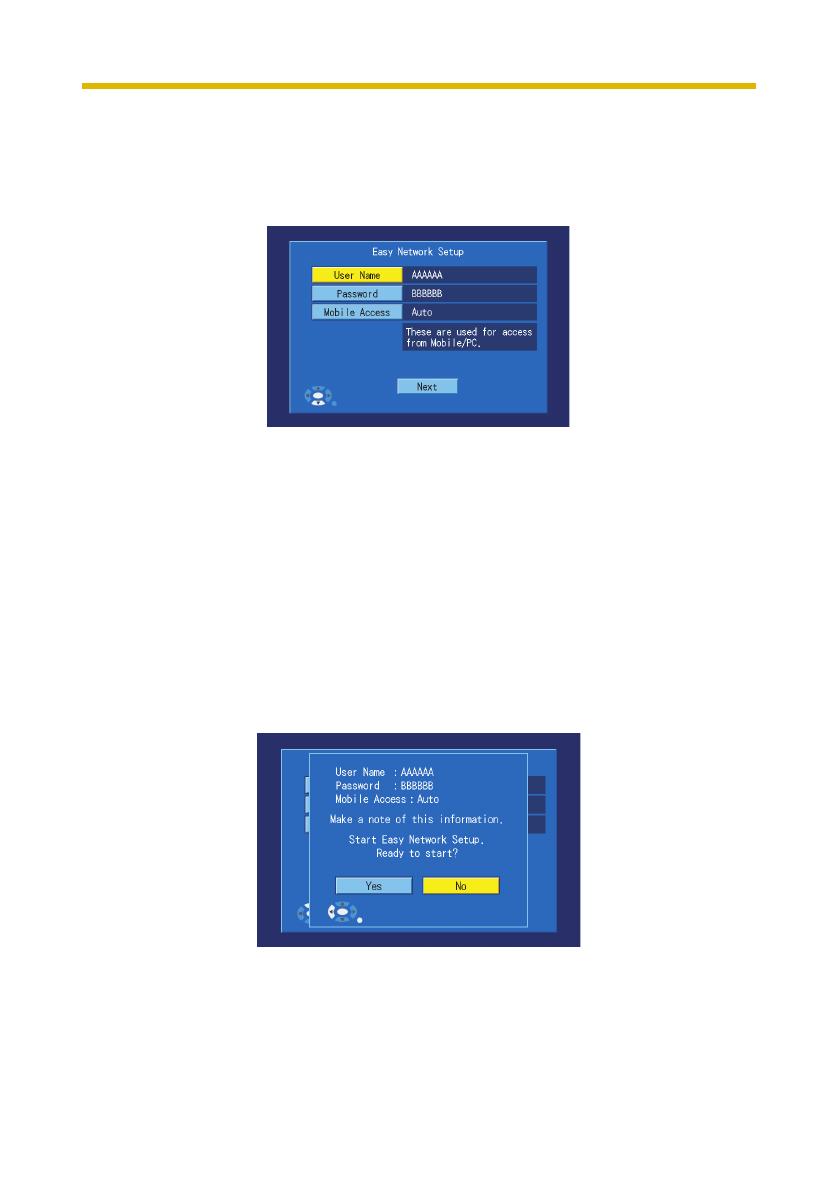
1.3.2 Easy Network Setup (When Using a Router)
After the BL-WV10 starts up for the first time, the [Easy Network Setup] screen is
displayed. Here you can set the administrator user name and password, and select
whether access from the Internet is configured automatically or manually.
1. Confirm that the [Easy Network Setup] screen is displayed.
2. Use the navigator keys to select [User Name], then press ENTER.
3. Enter the administrator user name (6 or more characters and/or digits), then
press STOP to save the setting.
• For instructions on entering characters, see page 21.
4. Select [Password], then press ENTER.
5. Enter an administrator password (6 or more characters and/or digits), then
press STOP to save the setting.
6. Select [Mobile Access], then press ENTER.
7. Select [Auto] or [Manual] as desired, then press ENTER.
• Select [Auto] only if you will connect the BL-WV10 to a router that supports
UPnP™. Refer to the operating instructions included with your router for
more information.
BL-WV10_GS-en.book Page 11 Wednesday, January 25, 2006 5:18 PM
Getting Started
12
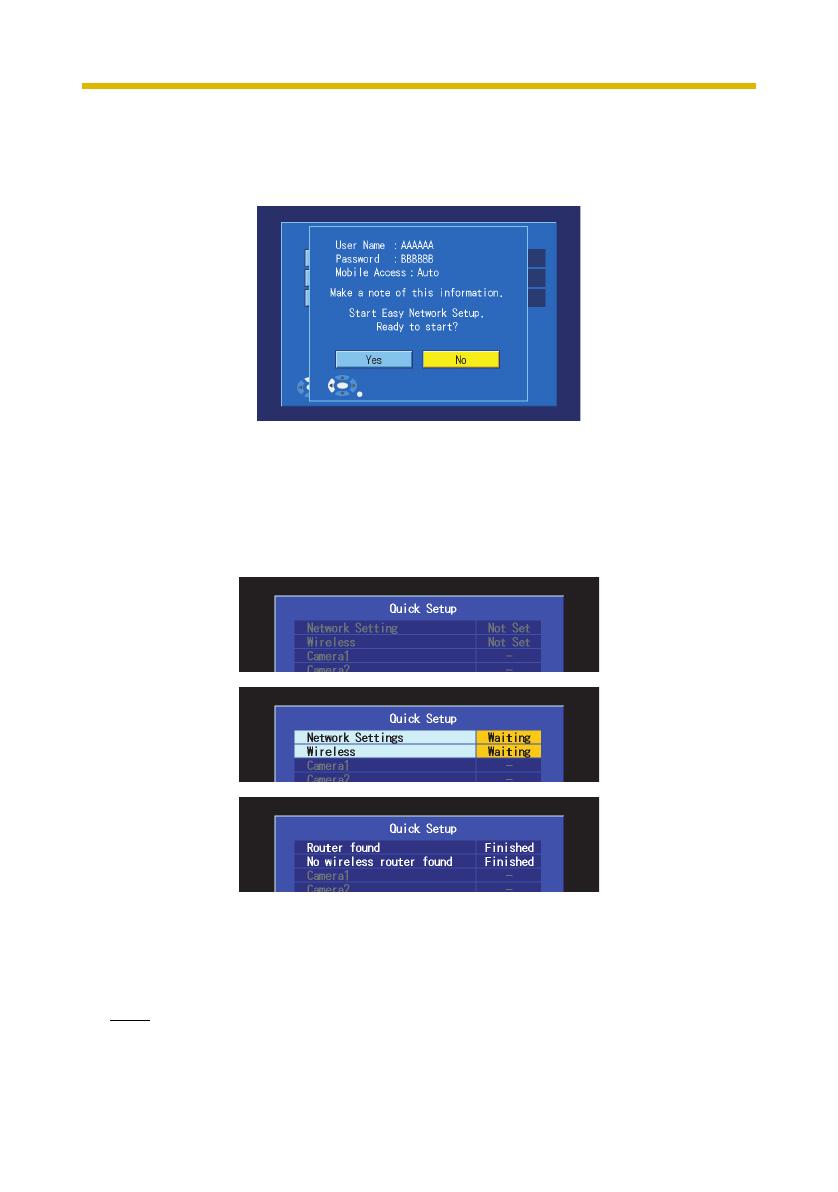
8. Select [Next], then press ENTER.
9. When the following screen is displayed, select [Yes], then press ENTER to
use the BL-WV10’s Quick Setup utility to configure the cameras (see
page 12).
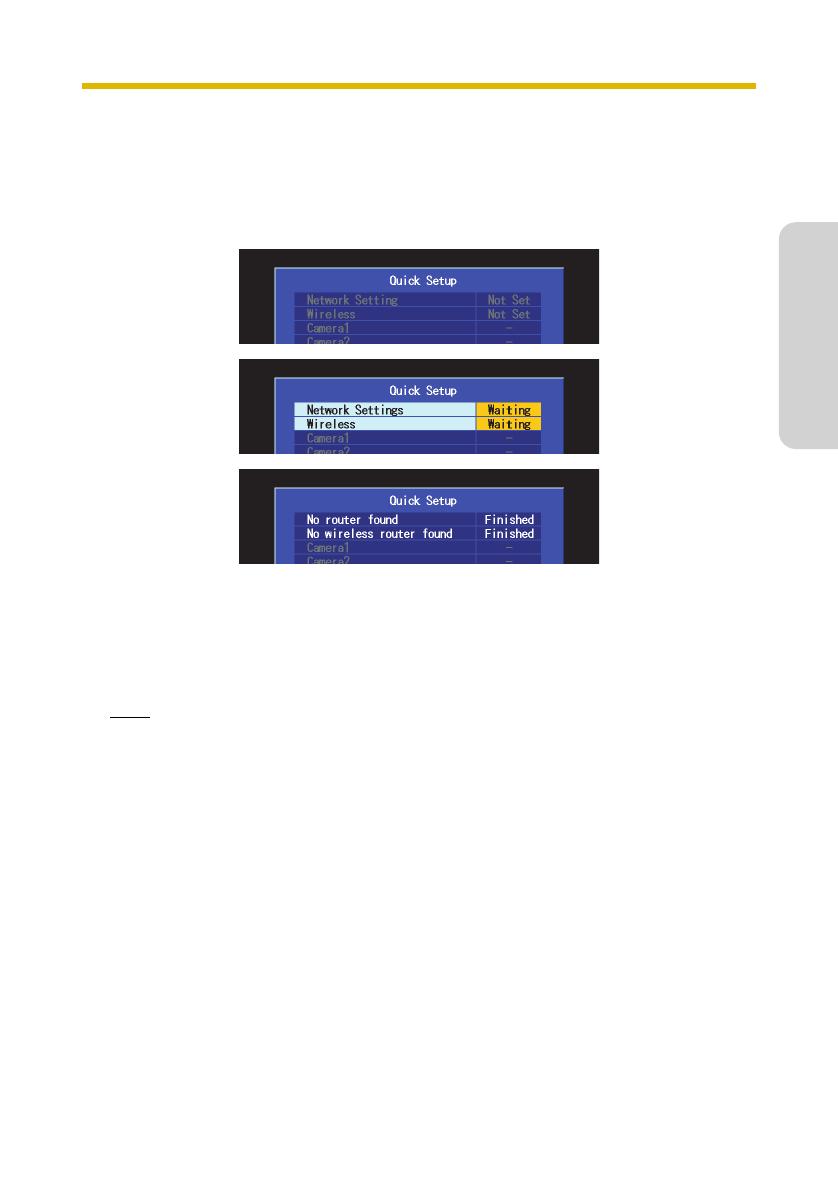
1.3.3 Quick Setup (When Using a Router)
To use the BL-WV10 with your cameras and a router, you will need to configure the
BL-WV10 and each device. The BL-WV10’s Quick Setup utility can help you
configure the devices easily.
1. Wait while the Quick Setup utility scans for network settings.
• When the BL-WV10 and router have been configured, [Finished] is
displayed and the buzzer sounds.
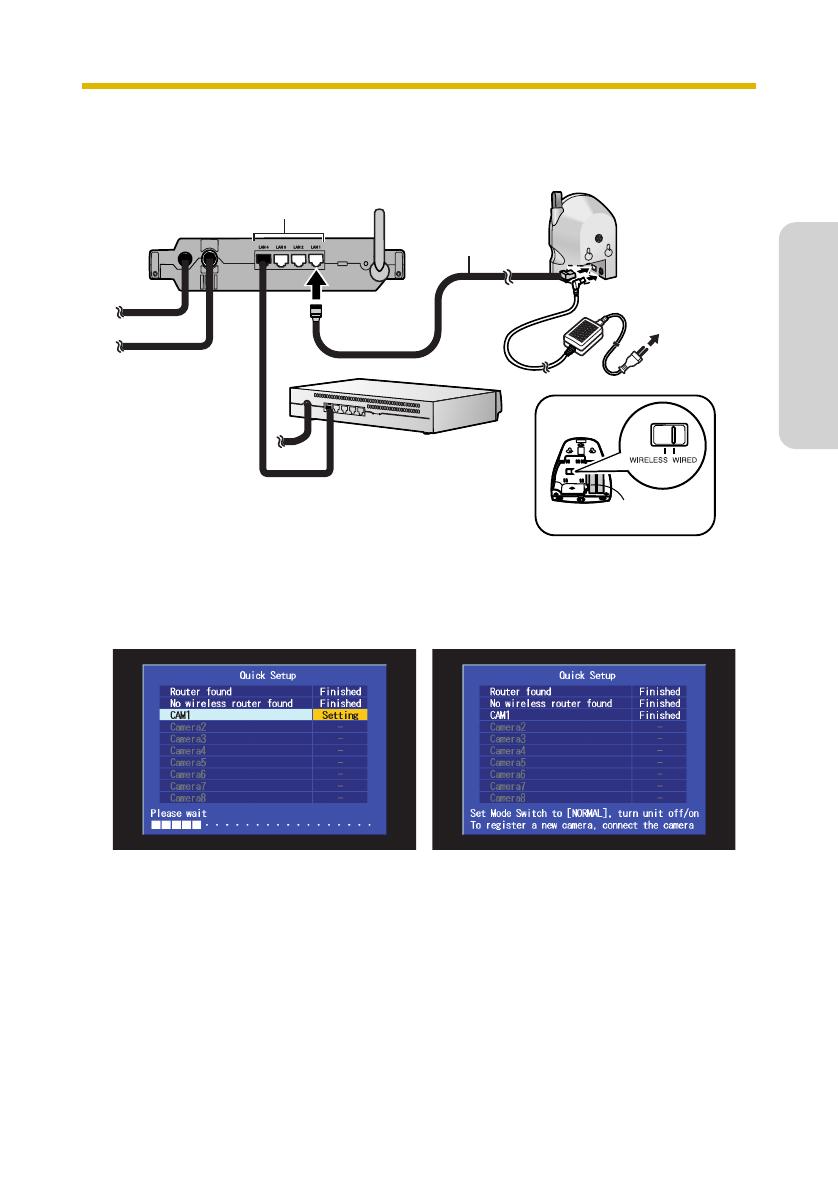
2. Use an Ethernet cable to connect a camera to one of the LAN jacks on the
BL-WV10 or to one of the LAN jacks on the router.
Note
• Connect a wireless camera to the BL-WV10 using an Ethernet cable during
Quick Setup.
BL-WV10_GS-en.book Page 12 Wednesday, January 25, 2006 5:18 PM
Getting Started
13
English
• To configure a wireless camera with a wired/wireless switch, such as the
BL-C30, set the switch to WIRED during Quick Setup.
3. Connect the camera to the power outlet.
4. Wait while the Quick Setup utility restarts, configures, and registers the
camera.
• When the camera has been configured and registered, [Finished] is
displayed next to the camera name ([CAM1], for example) and the buzzer
sounds.
• If [This camera’s firmware is out of date] is displayed, you must update the
camera’s firmware. Refer to the information on page 6. It is also
recommended that you erase the camera (see “Erasing a Camera” on
page 104 of the Operating Instructions) and then register it again.
Ethernet cable
LAN jacks
Rear panel of
BL-WV10
Router
Bottom of BL-C30
Rear panel
of camera
To
power
outlet
BL-WV10_GS-en.book Page 13 Wednesday, January 25, 2006 5:18 PM

Getting Started
14
5. To register another camera, connect the camera to one of the LAN jacks of
the BL-WV10 or the router, then turn the camera on by connecting it to the
power outlet.
6. When you have finished registering all cameras, set the BL-WV10’s mode
switch to NORMAL, disconnect the DC cord from the rear of the unit,
reconnect the DC cord, then continue from “Viewing Camera Images” on
page 19. If images can be viewed from all cameras, disconnect devices as
necessary and place them where you plan to use them.
BL-WV10_GS-en.book Page 14 Wednesday, January 25, 2006 5:18 PM
Getting Started
15
English
1.4 When Not Using a Router
Before connecting your cameras to the BL-WV10, make sure that each camera’s
firmware version meets the requirements noted on page 6. If necessary, refer to
the operating instructions included with the camera and update the firmware.
1.4.1 Initial Connections (When Not Using a Router)
1. Connect the BL-WV10 to your TV using the included video cable.
2. Turn on the TV and set the TV’s input switch to the external video input
(“VIDEO”, “EXT”, “INPUT 1”, etc.)
3. Set the mode switch on the rear of the BL-WV10 to SETUP.
4. Connect the AC cord to the AC adaptor and to the power outlet.
5. Turn on the BL-WV10 by connecting the DC cord to the unit.
• The startup screen appears on the TV screen.
You are now ready to use the BL-WV10’s Easy Network Setup utility to configure
the BL-WV10 (see page 16).
Rear panel of
BL-WV10
To T V
Video cable
(included)
AC adaptor
(included)
AC cord
(included)
DC cord
LAN jacks
DC IN jack
Video output
terminal
To
power
outlet
BL-WV10_GS-en.book Page 15 Wednesday, January 25, 2006 5:18 PM
Getting Started
16
1.4.2 Easy Network Setup (When Not Using a Router)
After the BL-WV10 starts up for the first time, the [Easy Network Setup] screen is
displayed. Here you can set the administrator user name and password.
1. Confirm that the [Easy Network Setup] screen is displayed.
2. Use the navigator keys to select [User Name], then press ENTER.
3. Enter the administrator user name (6 or more characters and/or digits), then
press STOP to save the setting.
• For instructions on entering characters, see page 21.
4. Select [Password], then press ENTER.
5. Enter an administrator password (6 or more characters and/or digits), then
press STOP to save the setting.
6. Select [Next], then press ENTER.
7. When the following screen is displayed, select [Yes], then press ENTER to
use the BL-WV10’s Quick Setup utility to configure the cameras (see
page 17).
BL-WV10_GS-en.book Page 16 Wednesday, January 25, 2006 5:18 PM
Getting Started
17
English
1.4.3 Quick Setup (When Not Using a Router)
To use the BL-WV10 with your cameras, you will need to configure the BL-WV10
and your cameras. The BL-WV10’s Quick Setup utility can help you configure the
devices easily.
1. Wait while the Quick Setup utility scans for network settings.
• When the BL-WV10 has been configured, [Finished] is displayed and the
buzzer sounds.
• With this connection setup, it is normal for no router to be found.
2. Use an Ethernet cable to connect a camera to one of the LAN jacks on the
BL-WV10.
Note
• Connect a wireless camera to the BL-WV10 using an Ethernet cable during
Quick Setup.
• To configure a wireless camera with a wired/wireless switch, such as the
BL-C30, set the switch to WIRED during Quick Setup.
BL-WV10_GS-en.book Page 17 Wednesday, January 25, 2006 5:18 PM

Getting Started
18
3. Connect the camera to the power outlet.
4. Wait while the Quick Setup utility restarts, configures, and registers the
camera.
• When the camera has been configured and registered, [Finished] is
displayed next to the camera name ([CAM1], for example) and the buzzer
sounds.
• If [This camera’s firmware is out of date] is displayed, you must update the
camera’s firmware. Refer to the information on page 6. It is also
recommended that you erase the camera (see “Erasing a Camera” on
page 104 of the Operating Instructions) and then register it again.
5. To register another camera, connect the camera to one of the LAN jacks of
the BL-WV10, then turn the camera on by connecting it to the power outlet.
6. When you have finished registering all cameras, set the BL-WV10’s mode
switch to NORMAL, disconnect the DC cord from the rear of the unit,
Ethernet cable
LAN jacks
Rear panel of
BL-WV10
Bottom of BL-C30
Rear panel
of camera
To
power
outlet
BL-WV10_GS-en.book Page 18 Wednesday, January 25, 2006 5:18 PM

Getting Started
19
English
reconnect the DC cord, then continue from “Viewing Camera Images” on
page 19. If images can be viewed from all cameras, disconnect devices as
necessary and place them where you plan to use them.
1.5 Viewing Camera Images
To start up the BL-WV10 to view camera images, make sure the mode switch on
the rear of the unit is set to NORMAL and turn on the BL-WV10. The startup screen
appears. If the [Date and Time] screen appears, set the date and time (including
Daylight Saving Time start and end dates, if needed), then press ENTER. The
camera image should then appear.
While viewing camera images, you
can aim the camera by panning and
tilting the lens using the navigator
keys.
Pressing DISPLAY repeatedly
displays different camera and image
information.
Pressing ENTER aims the camera at
the camera’s home position.
Pressing buttons 1—8 on the remote
control aims the camera at the
corresponding preset position (if
registered).
You can also zoom in or out by
pressing and holding the up or down
navigator keys.
For more information, see “Viewing
Camera Images” on page 35 of the
Operating Instructions.
DISPLAY
ENTER
Navigator keys
BL-WV10_GS-en.book Page 19 Wednesday, January 25, 2006 5:18 PM

Getting Started
20
Note
• If the camera’s color night view mode is turned on, the image refresh rate and
overall image quality may decrease. As a result, objects may not be displayed
properly. In low-light environments, images may be out of focus when using the
pan/tilt feature or when the subject is moving. We recommend brightening the
subject or disabling color night view mode.
1.5.1 If the Camera Image Does Not Appear
If the image from a camera that you registered using the Quick Setup utility does
not appear, confirm that the camera is turned on and that the Ethernet cable is
connected to the camera correctly. If the camera is a wireless camera with a
wired/wireless switch, such as the BL-C30, and is being used in wired mode, make
sure the camera’s switch is set to WIRED. If the camera is an HCM series wireless
camera being used in wired mode, make sure the Ethernet cable is connected to
the camera at the time the camera is turned on.
If the camera is a wireless camera with a wired/wireless switch and is being used
in wireless mode, make sure the camera’s switch is set to WIRELESS. If the
camera is an HCM series wireless camera being used in wireless mode, make sure
there is no Ethernet cable connected to the camera at the time the camera is
turned on. If the wireless signal from a wireless camera is too weak, motion images
may become disrupted. Confirm the strength of the signal by pressing DISPLAY
while viewing the camera.
Refer to the information on page 4 and relocate the camera if the signal is too
weak.
No signal Poor signal Weak signal Strong signal
BL-WV10_GS-en.book Page 20 Wednesday, January 25, 2006 5:18 PM
/