Haier AE09~212FCAKA User manual

Category
Split-system air conditioners
Type
User manual
AE182FCAKA
0010573331
H-MRV
Ceiling Concealed Type Room Air Conditioner
CEILING CONCEALED TYPE AIR CONDITIONER INDOOR UNIT
AE212FCAKA
AE122FCAKA
AE142FCAKA
AE072FCAKA
AE092FCAKA
AE242FCAKA
AE09~212FCAKA
AE072FCAKA
AE242FCAKA
Before Application
Cautions
Part Description
Important Points of Safety
Operating Instructions
AUTO,COOL, DRY,HEAT Operation
TIME Operation
Sleep Function
Health Function
Maintenance
Trouble Shooting
When Fault Occurs
Notice to Users
Indoor Unit Installation
Installation Precautions
Installation Procedure
Malfunction
Installation Check and Trial Run
1-2
3-8
9-11
12
13-14
15
16
17-18
19
20
21-22
23-33
34-35
36
Contents
Please read this manual carefully before use.
Please keep it attentively for future use.
INSTRUCTION
MANUAL
1
Cautions
2
Cooling
Heating
Indoor
outdoor
Rated Maximum Minimum
27 32 18
19 23 14
35 43 -5
24 26 --
20 27 15
14.5 -- --
7 24 -15
6 18 --
DB C
WB C
DB C
WB C
Indoor
outdoor
DB C
WB C
DB C
WB C
Cautions
3
AE092FCAKA , AE122FCAKA , AE142FCAKA , AE182FCAKA , AE212FCAKA have the Return air
box (see the following picture) when shipping from the factory and they are back-side return air. During
the installation, also can be changed to Down-side Return air according to the user's need.
AE09~212FCAKA
AE072FCAKA
AE242FCAKA
D
4
fig(1)
Left picture is a wired remote controller, which can be
used on AE072FCAKA(wired control), AE092FCAKA
(wired control), AE122FCAKA(wired control),
AE142FCAKA(wired control),AE182FCAKA(wired
control),AE212FCAKA(wired control), AE242FCAKA
(wired control). The remote controller can be purchased
extrally.
R
OFF
H
AUTO
io
n
Wired remote Controller using method:
1.Use one wired remote controller. See fig (1)
2.Also can buy a remote controller extrally, realize wired
remote control + remote control dual control modes.
The right figure is a remote controller, which can be used
on AE072FCAKA(remote control), AE092FCAKA(remote
control), AE122FCAKA(remote control), AE142FCAKA
(remote control),AE182FCAKA(remote control),
AE212FCAKA(remote control), AE242FCAKA(remote
control) and the matching remote control receiver
Remote control receiver using
method :
Use remote controller control
the remote control window of
the remote control receiver.
fig(2)
SWING
CODE
RESET
HEALTH
FAN
TEMP
MODE
LOCK
TIMER
ON
OFF
SWING
FRESH
SET
LOCK
RESET
HEALTH
FAN
TEMP
MODE SLEEP
CLOCK
TIMER
ON
OFF
LIGHT
SET
ROOM
MODE
FAN
TEMP
CLOCK SET
TIMER SLEEP
RESET
FILTER RESET
HEALTH
SWING
C
ON
OFF
*
AUTO
ON/OFF
Remote controlller (1)
Wire remote controlller
Remote controlller is an accessory, to be ordered extrally
Remote controlller (2)
Remote receiver (2)
D
B A
5
14.Network control display
Used to adjust the
time of timer and
clock
When the wire
controller appears
abnormal condition,
use a sharp-pointed
article to press this
button to make the
wire controller
resume normal
After cleaning the
air inlet, press this
button, the unit
can start to operate
12.Humidifying state display
Used to turn on/off unit
1.ON/OFF button
6.Air filter cleaning display
*
7.Super/Soft operation display
13.Sleep state display
2.Temperature display
24.Time Adjusting
button
23.Sleep button
Used to set Sleep
state
When there is too much dust
collected on the air inlet, the
wire controller will show
this display to remind the
user to clean the air inlet.
After cleaning and installation,
just press the air filter reset button.
8.Fan speed display
9.Auto Swing display
11.Fresh air state display
25.Reset button
26.Air Filter Reset
button
27.Timer button
Used to set the
mode of timer
28.Lock state display
4.Timer ON/OFF display
3.Clock display
17.Operation mode button
5.Humidity display
22.Setting button
Used to confirm
the time of timer
and clock
15.Working mode display
21.Clock button
Used to calibrate the time of
timer and clock
16.Electric heating display
Used to set working mode:
Auto, Cooling, Dehumidifying,
Heating, Fan
18.Fan speed button
Used to set fan speed: Low
Fan, Med Fan, High Fan, Auto
20.Temperature Setting button
SUR
1
2
3
4
5
6
7
8
9
11
12
13
14 15 16 17 18
20
21
22
23
24
25
26
27
28
AUTO
10.Health state display
Used to set temperature,
temperature range: 16 C~30 C
10
19
19.Swing button
Used to set Auto Swing or
Fixed air sending direction
Calibration of clock
When turning on the unit for the first time, the clock should be calibrated. The method
of calibration is:
1.Press ìClockî button, the Clock display ìAMî ìPMî will flash.
2.Press or to adjust time. For each press, the time will increase or decrease 1
*minute. If depressing the button, the time will increase or decrease rapidly.
3.After confirming the time, press ìSetî button, ìAMî or ìPMî will stop flashing,the
clock will begin to work.
Note:
1.This model does not have the following related
display and function
2.The outdoor unit no oxygen-bar function or no negative ion
unit no healthl function display.
Auto
Low Fan Med Fan High Fan Auto
Working
mode
Auto
operation
Cooling
operation
Dehumidifying
operation
Heating
operation
Fan
operation
Wire
controller
MODE
FAN SWING
TEMP
CLOCK
SET
TIMER
SLEEP
RESET
FILTER RESET
ON/OFF
SET
HEALTH
29
30
5 6 7 9
19
10
11
12
14
16
26
29.Health
Used to control the
generating oxygen
function and negative
ion-function
30.Remote control window
Used to receive the
remote control signal
D
1.This unit no the above function and display
2.The outdoor unit no oxygen-bar function ot no functions fo non-negative ion unit.
3.When using remote controller, first point it to the receiving window of wire controller, and then operate
remote controller.A ìtickî tone will be uttered to indicate a right acceptance.
4.All the buttons except the sleeping button is no effective after wire controller received lock signal from
remote controller.
6
Used to turn on/off unit
Note: Wired remote
controller his key have compl
cooling running function.
16.Fan speed display
19.Auto Swing display
26.Fresh air state display
15.Timer ON/OFF display
18.Clock display
23.Health state display
Auto
Low Fan Med Fan High Fan Auto
20.Humidifying state display
When the wire
controller appears
abnormal condition,
use a sharp-pointed
article to press this
button to make the
wire controller
resume normal
6.Time Adjusting button
11.Sleep button
7.Reset button
29.Lock state display
13.Setting button
Used to confirm
the time of timer
and clock
2.Operation mode button
4.Clock button
Used to calibrate the time
of timer and clock
24.Electric heating display
Used to set working mode:
Auto, Cooling,
Dehumidifying,
Heating, Fan
10.Fan speed button
Used to set fan speed: Low
Fan, Med Fan, High Fan, Auto
9.Temperature Setting button
8.Swing button
Used to set Auto Swing or
Fixed air sending direction
22.Working mode display
Working mode
Auto operation
Cooling operation
Dehumidifying
operation
Heating operation
Fan operation
Remote controller
5.Timer button
Used to set the
mode of timer
SWING
FRESH
SET
LOCK
RESET
LIGHT
HEALTH
FAN
TEMP
MODE SLEEP
CLOCK
TIMER
ON
OFF
1
2
3
4
5
6
7
8
9
10
11
12
13
14
15
16
17
18
19
29
28
27
25
24
26
20
21
22
23
30
31
Make sure that the remote controller is used within 7 meters from receiver window of the wire
controller and there are no obstructions in between.
The remote controller or wire controller should be handled with care.
When operating the remote controller in an area where electronically controlled lights are installed
or wireless handsets are used, move closer to the indoor unit as the function of the remote controller
might be affected by signals from this equipment.
Used to set temperature,
temperature range: 16 C~30 C
Remote LCD display contents and key name and each key function introduction
3.Health
Used to control the
generating oxygen function
and negative ion-function
1.ON/OFF button
12.Fresh air
Used to set fresh air function
14.Lock button
Used to lock the operating
key and LCD contents
17.Battery energy display
21.Sleep mode display
Display when the health
running
25.Comfort running display
23.Temperature display
Used to display the setting
temperature and room temp.
27.Signal launch display
31.Signal lauch head
30.Light button
Used to realize control board
VFD light stable,light weaker,
light shut off etc.
8 12 17 19 20 24 25 26 30
Remote controller
(Operation of remote controller)
3 23
Note:
SET
ROOM
MODE
FAN
TEMP
CLOCK SET
TIMER SLEEP
RESET
FILTER RESET
HEALTH
SWING
C
ON
OFF
*
AUTO
ON/OFF
D
7
TEMP
HEALTH
FAN
MODE
SWING
TIMER
ON
OFF
LOCK
RESET
Make sure that the remote controller is used within 7 meters from receiver window
of the wire controller and there are no obstructions in between.
The remote controller or wire controller should be handled with care.
When operating the remote controller in an area
where electronically controlled lights are
installed or wireless handsets are used, move
closer to the indoor unit as the function of the
remote controller might be affected by signals
from this equipment.
1.ON/OFF button
Used to turn on/off unit
2.Temperature Setting button
Used to set temperature,
temperature range: 16 C~30 C
4.Operation mode button
Used to set working mode:
Cooling, Dehumidifying,
Heating
5.Timer button
Used to set the
mode of timer
When the remote
controller appears
abnormal condition,
use a sharp-pointed
article to press this
button to make the
wire controller
resume normal
6.Reset button
7.Fan speed button
Used to set fan speed
8.Swing button
Used to set Auto Swing or
Fixed air sending direction
9.Time Adjusting button
11.Working mode display
12.Fan speed display
14.Timer ON/OFF display
18.Super/Soft operation display
Remote LCD display contents and key name and each key function introduction
3.Health
Used to control the
generating oxygen function
and negative ion-function
10.Lock button
Press on time lock all the
key sand press another time
concel the lock.
Used to display the fan
speed. After setting
"AUTO" function,air speed
can auto change according
to the temp. difference
between the room temp. and
setting temp.
20.Signal launch head
Use to send signal to the
indoor unit receive window.
19.Timing time display
Display timing open time
or timing close time
17.Lock display
Display the key have been
locked.
16.Temperature display
Display the setting temp.
value.
15.Signal display
Sending out signal to the
remote receiver.
13.Health running display
Used to display healthy
running.
R
Display Timing mode.
"Blank" No Timing
" " Timing off
" " Timing on
CODE
21.Code
Select remote control receive
code(H-MRV Remote cnotrol
type use A code)
OFF
ON
OFF
H
AUTO
ion
6
4
2
7
8
9
10
12
13
14
15
16
17
18
19
11
20
Note:
1.After change the battery, working condition resume as follows:
Working mode:cooling Temp. 26 C
Timming mode: normal Air speed: Auto
2.The units used in this manual no 8 18 functions. The health key can only control the
negative generator.
D
21
B A
8
R
Battery loading
Batteries are fitted as follows:
Note:
It is recommended that the batteries be removed from the compartment if the remote
controller is not used for an extended period.
The remote controller is programmed for automatic test of operation mode after the
batteries are replaced. When the test is conducted, all icons will appear on the screen
and then disappear if the batteries are properly fitted.
When the display become weak, this display no power in the battery, please change the
battery.
Loading the battery
Ensure that batteries are correctly placed in the compartment as required for positive and
negative terminals.
Replacing the battery compartment lid
The battery compartment lid is reinstalled in the reverse sequence.
Display review
Press the button to see if batteries are properly fitted. If no display appears, refit the batteries.
Remove the battery compartment lid
Slightly press and disengage the battery compartment lid marked with ì î and then hold
the remote controller by the upper section and then remove the battery compartment lid by
pressing in the direction of the arrow as shown in the figure above.
Caution:
If the remote controller does not operate as designed after fitting new batteries of the same
type, press the Reset button (marked ) with a pointed article.
Clock set
When unit is started for the first time, clock should be adjusted as follows:
Press CLOCK button, "AM"or "PM" flashes.
Press or to set correct time. Each press will increase or decrease 1min. If the
button is kept depressed, time will change quickly.
After time setting is confirmed, press SET, "AM "and "PM" stop flashing, while clock
starts working.
1 .Emergency switch
2 .Power lamp
After open the unit, this lamp bright when the
unite enter health running, the lamp change from
orange to blue lamp.
3 .Timing lamp
When the unit been setting Timing running, this
lamp bright.
4 .Running lamp
When the compressor working, this lamp bright.
5 .Indoor temp. sensor
Test the room temperature.
* *
* *
1
3
4
5
2
D
Important Points of Safety
The following four important points of safety and suggestions should be paid great attention:
Warning: Misuse may cause fatal result such as death or serious injury etc.
Attention: Misuse may cause human injury or damage of machine, in some case
fatal results.
: Content marked with this ìforbiddenî sign should be absolutely forbid-
den, otherwise may cause damage of machine and human injury of the
user.
: Content marked with this ìcompulsoryî sign should be executed comp-
ulsively, otherwise may cause damage of machine and human injury of
the user.
Comply with the following important points of safety.
Put these important points of attention and suggestions nearby and convenient for reference in need.
Hand over this instruction manual to new user if you resell this machine.
Warning for installation
Entrusted Installation
Installation of the machine should
be entrusted to certified person of
after service. Unauthorized install-
ation may cause water leakage,
electric shock or fire hazard for
improper operation.
To prevent leakage of refrigerant,
let certified person of after service
do it.
Leakage of refrigerant over certain
consistence may result in shortage
of oxygen. Enough precautions
MUST be done to avoid oxygen
shortage in case of refrigerant lea-
king if the room where the air-
conditioner is installed is small.
The power supply must be fitted with
earth line to ensure valid earthing of
the air-conditioner. No or incomplete
earthing connection may cause the
risk of electric shock.
!
!
!
!
!
Test run
After indoor units are installed,all
cassettes hinded models should be
tested.when the units are confirmed
to be normal,other fitments can be
installed.
!
!
9
Warning
!
Important Points of Safety
Warning
Avoid your body being blown
directly by cold wind for long
period, otherwise your health
may be affected.
Donít extend your fingers or
any other article into the inlet
or outlet during operation of
the machine for touching re-
volving fans may cause human
injury or damage of machine.
If something abnormal (e.g.: burnt
smell etc.) occurs, stop running the
machine, shut down the manual
power switch and contact after
service. Continuous operation in
disorder may cause fire hazard or
electric shock etc.
Warning for use
Warning for move and repair
When you have to disassemble
and reinstall the machine, entrust
it to after service. Improper inst-
allation may cause fire hazard,
electric shock or damage of ma-
chine.
Unauthorized alteration or repair
work is strictly forbidden. Impr-
oper alteration or maintenance
may cause fire hazard, electric
shock or water leakage. Repair
work should be entrusted to cert-
ified person of after service.
Attention
Attention points for installation
Ensure the drainage hose work
normally during installation.
Improper installation of drainage
can cause water leakage and
damp articles.
DO NOT install the machine in
place where flammable gas
releases easily to avoid fire
hazard.
Ensure electric leakage breaker
being installed. Electric leakage
breaker MUST be installed,
otherwise electric shock may be
caused.
If the power supply cord is
damaged, call a certified
electrician of the manufacturer
or other maintenance department
to replace it.
! !
!
!
10
!
!
11
Important Points of Safety
Attention
Attention points for use
* Ensure ventilation of the room
if the machine is used with
burning facilities. Deficient
ventilation can cause oxygen
shortage.
* Check whether installation
bench of the machine is
damaged after a long period
of use. Machine on damaged
bench may fall down and cause
human injury or other damage.
* In place where winds produced
by the machine can reach, donít
lay any animals or plants which
may be hurt otherwise.
* Donít put vases containing water
or other else on the unit assembly.
Otherwise, the machine may be
immersed internally and result in
bad electric insulation causing
electric shock.
* The is machine CANNOT be
used for the purpose of prese-
rving food, animals, plants,
precision instruments and
artwork etc., which may be
destroyed otherwise.
* DONíT replace fuse with ma-
terial other than fuse of proper
capacity. Replacing fuse with
metal wire or copper etc. can
cause fire hazard or other faults.
* DONíT lay any burning facilities
in place where winds produced by
the machine can reach. Incomplete
combustion of burning facility may
be caused otherwise.
* DONíT clean the machine with
water. Electric shock may occur
otherwise.
* DONíT put flammable spray
articles nearby or spray them to
the machine. Fire hazard may
occur otherwise.
* DONíT operate switch with wet
hand. Electric shock may occur
otherwise.
* Stop operation and shut down
manual power switch before
cleaning and maintenance.
* The power supply MUST be of
rated voltage and connected with
special electrical supply circuit.
!
Operating Instructions
12
*
AUTO
MODE
FAN
HEALTH
TEMP
CLOCK SET
TIMER SLEEP
RESET
FILTER RESET
ON/OFF
1
SET
SWING
FRESH
SET
LOCK
RESET
HEALTH
FAN
TEMP
MODE SLEEP
CLOCK
TIMER
ON
OFF
5
LOW
MID HIGH
AUTO
AUTO
LOW
MID
HIGH
A
U
T
O
AUTO
AUTO RUN, COOL,HEAT and DRY operation
Use COOL in summer.
Use HEAT in winter.
Use DRY in spring,autumn and in damp climate.
(1) Unit start
(2) Select operation mode
(3) Select temp. setting
Press ON/OFF button, unit starts.
Previous operation status appears on display
(Not Timer setting). Power indicator lights up.
Press MODE button. For each press, operation mode
changes as follows:
Unit will run in operation mode displayed on LCD.
Stop display at your desired mode.
Every time the button is pressed, temp. setting
increases 1 C.
If button is kept depressed, temp.setting will
increase quickly.
Every time the button is pressed, temp. setting
decreases 1 C.
If button is kept depressed, temp. setting will
decrease quickly.
Recommendations
Hints
Wire controller can memorize each operation status.
When starting it next time, just press ON/OFF button
and unit will run in previous status.
Press FAN button. For each press,
fan speed changes as follows:
(4) Fan speed selection
Unit runs at the speed displayed on LCD.In HEAT
mode, warm air will blow out after a short period
of time due to cold-draft prevention function.
In DRY mode, when room temp. becomes 2 C higher
than temp. setting, unit will run intermittently at
LOW speed regardless of FAN setting.
Unit will start running to reach the temp. setting
on LCD.
Press ON/OFF button.
Only time and room temp remains on LCD.
All indicators go out.
Vertical flap closes automatically.
(5) Unit stop
Press TEMP button
AUTO COOL DRY FANHEAT
AM
Wire controller
Remote controller
Auto running: During the Auto running mode, air conditioning running and can auto-select the cooling, heating, fan
mode according to the room temperature.
Fan running: The AC only have air supply running no cooling and heating running at the condition, AC can't have auto
air supply running, and can't display the setting temperature value on the LCD.
During the heating running, after start the AC, in order to prevent cooled air, AC can stop for a while before send heat
air.
During the dehumification running, when the room temp. setting temp. , not setting condition according to the air speed.
SWING
LIGHT
2
3
4
5
SWING
SET
LOCK
RESET
HEALTH
FAN
TEMP
MODE SLEEP
CLOCK
TIMER
ON
OFF
13
TIMER Operation
Hints:
Set Clock correctly before starting Timer operation.
You can let unit start or stop automatically at following time: Before
you wake up in the morning, or get back from outside or after you
fall asleep at night.
Operation mode will be displayed on LCD.
Power indicator lights up.
(2)TIMER mode selection
Press TIMER button to change TIMER mode.
Every time the button is pressed, display changes
as follows:
Select your desired TIMER mode (ON or OFF)
(3)Timer setting
Press TIME button.
Every time the button is pressed, time increases 10min.
If button is kept depressed, time will change quickly.
Every time the button is pressed, time decreases 10min.
If button is kept depressed, time will change quickly.
Time will be shown on LCD. It can be adjusted within
24hours.
(4)Confirming your setting
After setting correct time, press SET button to confirm
"ON" or "OFF" stops flashing.
Time displayed: Unit starts or stops at x hour x min (ON
or OFF).
Timer mode indicator lights up.
TIMER ON/OFF
To cancel TIMER mode
Just press TIMER button several times until TIMER mode disappears.
Wire controller possesses memory function, when use TIMER mode next time, just
press SET button after mode selecting if timer setting is the same as previous one.
(1)After unit start, select your desired
operation mode.
blank
ON
OFF
ON
OFF
*
ON
MODE
FAN
HEALTH
TEMP
CLOCK SET
TIMER SLEEP
RESET
FILTER RESET
ON/OFF
AM AM
1
SET
1
4
3
2
Please close health function first before setting Timer, then you can do the TIMER ON
operation.Please do not use the health function when in TIMER ON state.
According to the seting timing open, close sequence, can realize first open then colse the unit or
first close then open the unit.
Wire remote controller or remote controller can memorize each working condition. Next
time open the unit, only need to press the ON/OFF key, the AC can work according to
last time working condition.(Timing, Sleeping and Swing mode not included.)
From Timing close to timing open, can setting sleep mode.
Operating Instructions
FRESH
LIGHT
3
4
2
SWING
14
*
ON OFF
MODE
FAN
HEALTH
TEMP
CLOCK SET
TIMER SLEEP
RESET
FILTER RESET
ON/OFF
PM
AM
1
SET
blank
ON
OFF
ON
OFF
TIMER ON-OFF
Operation mode will be displayed on LCD.
Power indicator lights up.
Every time the button is pressed, display changes as follows:
Select .
(3)Time setting for TIMER ON
Press TIME button.
(5)Time setting for TIMER OFF
To cancel TIMER mode
Every time the button is pressed, time increases 10min.
If button is kept depressed, time will change quickly.
Every time the button is pressed, time decreases 10min.
If button is kept depressed, time will change quickly.
Time will be shown on LCD.
It can be adjusted within 24hours.
AM refers to morning and PM to afternoon.
Time displayed: Unit starts at Xhour X min.
After time setting, press TIMER button to confirm.
"ON" stops blinking, While "OFF" starts blinking.
(4) Time confirming for TIMER ON
Follow the same procedures in "Time setting for
TIMER ON".
(6)Time confirming for TIMER OFF
After time setting, press SET button to confirm
"OFF" stops flashing.
Time displayed: Unit stops at X hour X min.
Just press TIMER button several times until TIMER mode disappears.
According to the Time setting sequence of TIMER ON or TIMER OFF, either Start-Stop or Stop-Start can
be achieved.
(1)After unit start, select your desired
operation mode
(2) Press TIMER button to change TIMER
mode
ON
OFF
SWING
SET
LOCK
RESET
HEALTH
MODE SLEEP
CLOCK
TIMER
ON
OFF
4
2
5
6
TIMER Operation
Operating Instructions
SWING
FAN
TEMP
FRESH
LIGHT
6
3
2
4
5
3
1
about 6 hrs
1 hr
1 hr
increase 1
increase 1
At night, before going to bed you
can press down the SLEEP button
on the controller and the air-
conditioner will run by the
comfortable sleeping mode to
make you sleep more comfortable.
One hour after sleeping operation start, the temp. is 1 higher than the setting one. After another
hour the temp. rises 1 and then run continuously for another 6hrs' and then close. The actual temp.
is higher than the setting one which is to prevent from being too cool to your sleep.
In cooling, dehumidifying mode
One hour after start up, the temp. decrease 2 lower than the setting one. After another hour
decrease by more 2 .
The temperature will automatically rise by 1 after another 3hrs' operation, and then automatically
close after 3hrs' continuous operation. The actral temperature is lower than the setting one which
is to prevent from being too hot to your sleep.
In heating mode
SETTING T
SLEEP RUN BEGINS SLEEP RUN STOPS
1 hr
1 hr
3 hrs
about 3 hrs
decrease 2
decreases 2
increase1
SHUT DOWN
SLEEP RUN STOPS
Heat mode
SLEEP RUN BEGINS
SETTING T
SHUT DOWN
Cooling mode
Comfortable Sleep
Note:
In AUTO mode, unit will run in SLEEP function according to the operation mode.
After setting SLEEP function, it is forbidden to calibrate clock.
If the set sleep-time does not reach 8 hours, the unit will stop operation automatically after set
time is complete.
Set "TIMER-OFF" function first, then set SLEEP, and the sleep-set is performance; set TIMER-
ON function first, the sleep function can only be set before TIMER-ON; if set theSLEEP function
first, the TIMER function can not be set.
15
SWING
SET
LOCK
RESET
HEALTH
MODE SLEEP
CLOCK
TIMER
ON
OFF
*
MODE
FAN
HEALTH
TEMP
CLOCK SET
TIMER SLEEP
RESET
FILTER RESET
ON/OFF
AM
SET
OFF
AM
C
C
C
C
C
C
C
C
C
C
Note: Before using this function,
must adjust the clock, or the sleep
function will be disordered.
After setting sleep function, not allowed to adjust the clock. Can't use the remote controller
operate the AC. If so, please cancel the sleep function first.
After setting sleep function, can't set the timing function.
Operating Instructions
SWING
Sleep Function
FAN
TEMP
FRESH
LIGHT
Operating Instructions
16
SWING
SET
LOCK
RESET
HEALTH
FAN
MODE SLEEP
CLOCK
TIMER
ON
OFF
*
MODE
FAN
HEALTH
TEMP
CLOCK SET
TIMER SLEEP
RESET
FILTER RESET
ON/OFF
AM
SET
OFF
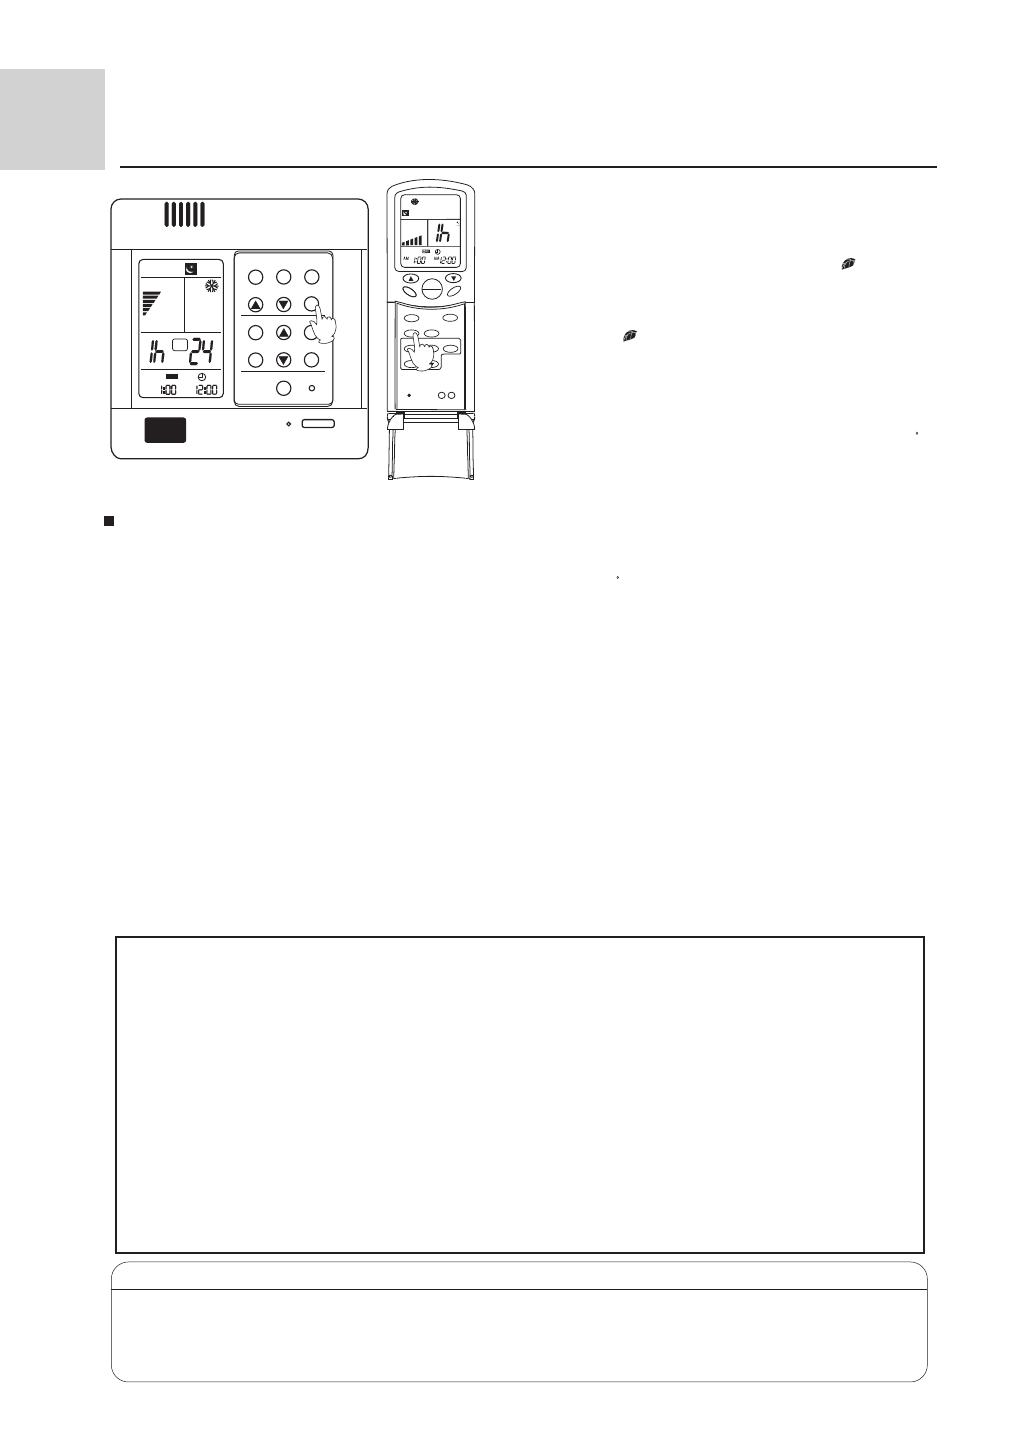
1.How to use the health function (only for units
with this function)
After set the right function mode, press health button,
remote controller or wire controller displays ì î,
oxygen pump or negative ion generator starts up to apply
oxygen or negative ion to indoor unit. Press the button
again,the sign ì î disappeared and negative ion generator
stops working. After all health function of the indoor unit
being fully canceled, oxygen pump stopped.
CAUTION:
When the temperature of the outdoor unit is lower than 4 ,
oxygen pump is automatically stopped, if press health button
just then, oxygen pump could not start up. But if the air
conditioner has the negative ion function simultaneous,
when press the health button, negative ion function could
still be operated. When the temperature of the outdoor unit
is higher than 6 , oxygen pump could automatically resume
to oxygen-make function.
AM
Power Failure Compensation (to be applied for a necessary situation)
:
Setting Method: When the remote controller is on (excluding timer mode and fan mode),
press the "Sleeping" button on the remote controller 10 times within 5 seconds, and after the buzzer rings 4 times,
the air conditioner will enter the state of power failure compensation.
Cancel Method: Press the "Sleeping" button on the remote controller 10 times within 5
seconds, and after the buzzer rings 2 timer, the power failure compensation mode will be cancelled.
Notes: When a power failure suddenly occurs during the air conditioner is working after the power failure
compensation is set, if the air conditioner will not be used for a long time, please cut off the power supply to prevent
its operation from being resumed after the power is supplied again, or press the "Switch On/Off" button after the
power comes again.If the controller no sleep key ,use the "swing" key instead the "sleeping" on setting the auto
restart function.
After the power failure compensation is set, if power failure suddenly occurs while the air conditioner is working, it
will resume the previous working state when the power is supplied again.
On the "Health" mode, if you want to setting
timing open mode, should close the health
first: On the timing open mode, please don't
use health function.
About the remote cnotrol operation, above only take wired remote controller and remote controller (1) as a
example about the remote controller (2) and remote receiver use method, it is the same remote controller (1) ,
please use refer to above method.
No sleep function when use remote (2) and remote receiver.
SWING
Health Function
C
C
User Caution
Concerning MRV Auto Restart function for H-MRV models
Haier Auto Restart function when the unit power drops down suddenly, the unit microprocessor will store the previous
working condition and when the power is on again, the unit will run as this memory.
Auto Restart function is designed basically on the MRV whole system, but it is suitable for each indoor unit individually.
If some of indoor units power cut down, but the outdoor unit and the other indoor units still work, maybe problems
will happen such as freezing at cooling mode and overload protection at heating mode on those indoor units without power.
Reason
When one or some indoor units power drops down and the other indoor units are still work, the indoor units without
the power, will keep the previous working condition before the power is off. And expansion valve keeps open at a kind of
opening rate condition as the previous requirement, so there is refrigerant flowing in the exchanger, but the indoor fan stops
working. If the units work at cooling mode, the indoor units without the power will maybe make freezing. If the unit works
at heating mode, maybe the outdoor unit compressor will stop because of the pressure or temperature protection. This is
our design basically on Auto Restart function currently.
Haier, Herewith, solemnly informs our customers, installers, distributors, etc. when making installation, please make sure
when the power is shut down whether artificially or accidentally, the whole system including outdoor unit and all the
indoor units must be off. If you do not make the installation as our indication, Haier will not be responsible for any problem
resulting from this.
TEMP
FRESH
LIGHT
Trouble Shooting
The following cases are not troubles.
During operation, the air conditioner may
sometimes exhibit a sound of "clatter" or
"rumble". This is the common sound of
refrigerant flow but not a trouble.
A sound of "Pi-Pa" is generated.
Smells are given off.
During operation, mist or steam are
blown out.
During COOL operation, it automatically
changes to FAN mode.
The system couldnt be re-started immediately
after turning off.The unit can't start?
This is caused by the thermal expansion
or cold shrinkage of plastics.
Sometimes there are smells in the air flow
from the indoor unit. This is caused by the
smell of cigarettes or paint coatings inside
the unit.
During COOL or DRY operation, the unit
may blow out a thin mist. This is the con-
densate water mist caused by sudden co-
oling of the indoor air blown out from the
indoor unit.
In order to prevent frost accumulation on
the heat exchanger in the indoor unit,
sometimes it will automatically transfers
to FAN mode, but soon will return to
COOL mode.
This is due to the systems self-protection
function, which prevents it from restarting
in 3 min after stops.
Please wait
for 3 min.
"Hua-Hua"
Water flow sound is heard.
18
Trouble Shooting
ON
OFF
During DRY operation, there is no air
sent out or fan speed cant be changed.
In HEAT mode, the outdoor unit
generates water or steam.
This occurs during removal of the frost
(in defrosting operation) on the radiator
of outdoor unit.
Defrost operation
In HEAT mode, the indoor fan still
keeps running even the unit operation
stops.
After the unit stops, the indoor fan will
continue to run for a while to eliminate
residual heat.
Before asking for after-service to an authorized service center,
please check your air
conditioner for the following items
The system couldnt start
Is power on/off switched on?
The power on/off switch is
not at position of "ON".
Is the power supply line
normal?
Is current leakage breaker
triggered?
Please do immediately
cut off power supply and
contact the authorized
service center.
Power
failure?
18
When Fault Occurs
Poor cooling or heating
Is the operation controller
adjusted as required?
Are there any obstructs
before the air inlet or outlet?
Is there any door or window
left open?
Poor cooling
Is there any other heat
source in the room?
Is there any direct sunlight
into the room?
Are there too many people
in the room?
If, after the above checks and the corresponding corrective actions, the system remains
abnormal operation, or the following facts appear, please turn off the air conditioner and
then contact the local authorized service center.
Frequent open of fuse or breaker.
There is water leakage during COOL or DRY operation.
The operation is abnormal or abnormal sound is heard.
19
  • Page 1 1
  • Page 2 2
  • Page 3 3
  • Page 4 4
  • Page 5 5
  • Page 6 6
  • Page 7 7
  • Page 8 8
  • Page 9 9
  • Page 10 10
  • Page 11 11
  • Page 12 12
  • Page 13 13
  • Page 14 14
  • Page 15 15
  • Page 16 16
  • Page 17 17
  • Page 18 18
  • Page 19 19
  • Page 20 20
  • Page 21 21
  • Page 22 22
  • Page 23 23
  • Page 24 24
  • Page 25 25
  • Page 26 26
  • Page 27 27
  • Page 28 28
  • Page 29 29
  • Page 30 30
  • Page 31 31
  • Page 32 32
  • Page 33 33
  • Page 34 34
  • Page 35 35
  • Page 36 36
  • Page 37 37

Haier AE09~212FCAKA User manual

Category
Split-system air conditioners
Type
User manual

Ask a question and I''ll find the answer in the document

Finding information in a document is now easier with AI