
HGA4K
ELDIG
AU
AU


ENGLISH 4
AU

ENGLISH 4
Safetyinformation 4
Productdescription 6
Dailyuse 6
Helpfulhintsandtips 7
Maintenanceandcleaning 7
Whattodoif 8
Injectortable 9
TechnicalData 10
Installation 10
Environmentalconcerns 15
IKEAGUARANTEE 16
Tableofcontents
Your safety and the safety of others are very
important.
This manual and the appliance itself provide
important safety messages, to be read and
observed at all times.
This is the safety alert symbol,
pertaining to safety, which alerts users
to potential hazards to themselves and
others.
All safety messages will follow the safety
alert symbol and either the terms:
DANGER Indicates a hazardous
situation which, if not avoided, will
cause serious injury.
WARNING Indicates a hazardous
situation which, if not avoided, could
cause serious injury.
All Safety messages will tell you what the
potential hazard is, tell you how to reduce
the chance of injury, and tell you what
can happen if the instructions are not
followed.
The appliance must be disconnected from
the power supply before carrying out any
installation work.
Installation and maintenance must be
carried out by a qualied technician, in
compliance with the manufacturer’s
instructions and local safety regulations to
the relevant gas standard. Only use original
spare parts. Do not repair or replace any
part of the appliance unless specically
stated in the user manual.
WARNING If the information in this
manual is not followed exactly, a re or
explosion may result causing property
damage or injury.
- Do not store or use gasoline or other
ammable vapors and liquids in the
vicinity of this appliance.
What to do if you smell gas:
- Do not try to light any appliance.
- Do not touch any electrical switch.
- Do not use any phone in your building.
- Immediately call your gas supplier from
a neighbor’s phone. Follow the gas
supplier’s instructions.
- If you cannot reach your gas supplier,
call the re department.
- Installation and service must be
performed by a qualied installer,
service agency or the gas supplier.
- Use appliance in well ventilated rooms
only.
- The electrical and gas connections must
comply with local regulations.
- When the hob is installed, provide a
multi-pole circuit breaker with a contact
separation of at least 3 mm, that
provides full disconnection.
- Regulations require that the appliance is
grounded.
- The power cable must be long enough
for connecting the appliance, once tted
in its housing, to the power supply
- Use only exible or rigid metal hose for
gas connection.
- If necessary, the electrical power
cable must be replaced exclusively
with a power cable having identical
characteristics to the original supplied
by manufacturer (type H05V2V2-F 90°C
SafetyInformation

ENGLISH 5
or H05RR-F). This operation must be
performed by a qualied electrician.
- The manufacturer cannot be held
responsible for any injury to persons
or animals or damage to property
arising from failure to comply with these
requirements.
- Do not use multiple plug adapters or
extension cords.
- Do not pull the power supply cord in
order to unplug the appliance.
- The electrical components must not be
accessible to the user after installation.
- Do not touch the appliance with any wet
part of the body and do not operate it
when barefoot.
- This hob (class 3) is designed solely
for private household use for cooking
food. Do not use this appliance as a
space heater to heat or warm the room.
Doing so may result in carbon monoxide
poisoning and overheating of the hob.
- The Manufacturer declines all
responsibility for inappropriate use or
incorrect setting of the controls.
- The appliance is not intended for use
by persons (including children) with
reduced physical, sensory or mental
capabilities, or with lack of experience
and knowledge of the appliance, unless
supervised or previously instructed in its
use by those responsible for their safety.
- Young children should be kept away
from the appliance and supervised to
ensure that they do not play with it.
- The use of a gas appliance produces
heat and humidity in the room. Make
sure the room is well-ventilated, or install
an extractor hood with exhaust duct.
- In case of prolonged use, additional
ventilation may be necessary (by
opening a window or increasing the
hood extraction speed).
- After use, make sure the knobs are in off
position and close the main gas supply
cock or the gas cylinder valve.
- Overheated oils and fats catch re
easily. Always remain vigilant when
cooking foods rich in fat, oil or alcohol
(e.g. rum, cognac, wine).
- Keep the packaging materials out of the
reach of children.
- Before cleaning or maintenance wait for
hob to cool down.
- Do not spray aerosols in the vicinity of
this appliance while it is in operation.
- Only appliances with safety device
burners can be installed in marine craft
or caravans.
- Where this appliance is installed in
marine craft or in caravans, it shall not
be used as a space heater.
- Servicing shall be carried out only by
authorised personnel.
- Do not modify this appliance.
- Do not store ammable materials in or
near this appliance.
Save these instructions

ENGLISH 6
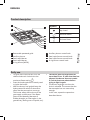
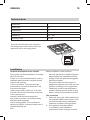
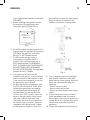
Productdescription
1
Removable panstand grids
2
Auxiliary burner
3
Semi-rapid burner
4
Semi-rapid burner
5
4 ring burner (WOK)
6
Auxiliary burner control knob
7
Semi-rapid burner control knob
8
Semi-rapid burner control knob
9
4 ring burner control knob
1
2
3
9
8
5
6
4
• To ignite one of the burners, turn the
relative knob anti-clockwise to the
maximum ame setting .
• Press the knob against the control panel
to ignite the burner.
• After the burner has ignited, keep the
knob pressed for about 5 seconds to
allow the thermocouple to warm up.
This burner safety device shuts off the
gas supply to the burner if the ame
goes out accidentally (because of
sudden draught, an interruption in the
gas delivery, boiling over of liquids, etc.).
• Thedevicemustnotbepressedfor
morethan15sec.If,afterthattimehas
elapsed,theburnerdoesnotremain
lit,waitatleastoneminutebefore
tryingtolightitagain.
• The burner might go out when the
knob is released. This means that the
thermocouple has not warmed up
enough.
In this case, repeat the operations
described above.
Dailyuse
Symbols
Tap closed
Maximum ame
Minimum ame
7

ENGLISH 7
For better burner performance, please stick
to the following rules:
- Use pots and pans that t the burners
(see table).
- Only use at-bottomed pots and pans.
- Use the correct amount of water
for cooking foods and keep the pot
covered.
- In the case of pans with convex bottoms
(WOK), use the support grille provided,
which should be positioned only on the
4 ring burner.
If the hob has a glass ceramic top, do not
use:
- Cast iron griddles, ollar stones,
terracotta pots and pans.
- Heat diffusers such as metal mesh, or
any other types.
- Two burners simultaneously for one
receptacle (e.g. sh kettle).
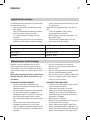
Regular care and maintenance ensures
correct operation and high performance.
To maintain your hob in perfect conditions,
clean it after every use, removing any food
spills.
Beforeanycleaningoperation,disconnect
thehobfromthemainsandwaitforitto
cooldown.
CLEANINGTHEHOBSURFACE
• All the enamelled and glass parts
should be cleaned with warm water and
neutral solution.
• Stainless steel surfaces may be stained
by calcareous water or aggressive
detergents if left in contact for too long.
Any food spills (water, sauce, coffee,
etc.) should be wiped away before they
dry.
Clean with warm water and neutral
detergent, and then dry with a soft
cloth or chamois. Remove baked-on dirt
with specic cleaners for stainless steel
surfaces.
• Do not use abrasive or corrosive
products, chlorine-based cleaners or
pan scourers.
• Do not use vapour cleaning appliances.
• Do not use ammable products.
• Do not leave acid or alkaline substances,
such as vinegar, mustard, salt, sugar or
lemon juice on the hob.
CLEANINGTHEHOBPARTS
• Grids, burner caps and burners can be
removed to be cleaned.
• Clean them by hand with warm
water and non-abrasive detergent,
carefully removing any food residues
and checking that none of the burner
openings is clogged.
• Rinse and dry carefully.
• Ret burners and burner caps correctly
in the respective housings.
• When replacing the grids, make sure
that the panstand area is aligned with
the burner and that the burner feet are
tted in the respective housings on the
Helpfulhintsandtips
Maintenanceandcleaning
Burner PotØ
4 ring burner from 24 to 26 cm
semi-rapid from 16 to 22 cm
auxiliary from 8 to 14 cm

ENGLISH 8
Problem Possiblecause Solution
The electric ignition does not
work
There is no electrical
supply
Check the unit is plugged in
and the electrical supply is
switched on.
The burner fails to ignite The gas tap could be
closed
Check that the gas tap is
open
The gas ring burns unevenly Burner crown may
be occluded by food
residues
Clean the burner crown
according to cleaning
instructions to make sure that
the burner crown is clear of
food residues.
Whattodoif...
hob surface. In the case of single grids,
make sure that they t on the burner cap
protuberance.
• Models equipped with electrical ignition
plugs and safety thermocouples require
thorough cleaning of the plug end in
order to ensure correct operation. Check
these items frequently, and if necessary,
clean them with a damp cloth. Any
baked-on food should be removed with
a toothpick or needle.
Note:toavoiddamagingtheelectric
ignitiondevice,donotuseitwhenthe
burnersarenotintheirhousing.
Ifitbecomesdifculttoopenorclose
valve,donotforceit,but,immediately,
requesttheassistanceoftechnicalService
Personnel
Serviceinstructions
Service and maintenance is only to be
carried out by an authorised person.
To replace parts such as burners, valve
and electric components, the hotplate
must be removed from the bench top by
releasing the attachment hooks, loosening
the attachment screws of each burner,
unscrewing the hotplate attachments nuts
which are visible at the bottom of the
surface, removing the hotplate top, taking
care to remove lid taps and screws under
them and nally replacing the defective
parts.
Note: If the valves must be replaced, rst
disassemble the chain of ignition switches.
It is recommended to replace the valve
gaskets each time the valve is replaced, thus
ensuring a perfect seal between the body
and the gas train.

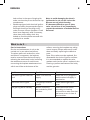
ENGLISH 9
Injectortable
ElectricSupply:230-240V~50Hz
BeforecallingtheAfter-SalesService:
1. Check “Troubleshooting guide” to see if
you can eliminate the problem yourself
2. Turn the hob on again to check if correct
operation has been restored.
3. If the problem persists, contact the After-
sales Service.
Give the following information:
• type of fault;
• hob model;
• service number (i.e. the number after the
word SERVICE on the dataplate under
the hob and on the warranty certicate);
• your full address;
• your telephone number.
If any repairs are required, contact an
authorised service centre, indicated in the
warranty.
In the unlikely event that an operation or
repair is carried out by an unauthorised
technician, always request certication
of the work carried out and insist on the use
of original spare parts.
Failure to comply with these instructions
may compromise the safety and quality of
the product.
BURNER NG ULPG
Pressure Injector Rate Pressure Injector Rate
(kPa (mm) MJ/h (kPa (mm) MJ/h
Front RHS (Auxiliary) 1.00 0.85 4.0 2.75 0.55 4.0
Rear RHS (Semi-rapid) 1.00 1.15 7.0 2.75 0.6 5.0
Rear LHS (Semi-rapid) 1.00 1.15 7.0 2.75 0.6 5.0
Front LHS (4 rings WOK) 1.00 1.75 14.8 2.75 1.00 15.1

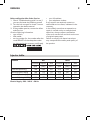
ENGLISH 10
Technicaldata
Dimensions
Width (mm) 510
Height (mm) 47
Length (mm) 580
Voltage (V) 230 - 240
Frequency (Hz) 50 - 60
The technical information are situated in
the rating plate on the bottom side of the
appliance and in the energy label.
Installation
Technicalinformationfortheinstaller
This product can be embedded in a worktop
20 to 50 mm thick.
If there is no oven beneath the hob, insert a
separator panel that has a surface at least
equal to the opening
in the work surface. This panel must be
positioned at a maximum distance of 150
mm below the upper
surface of the work surface but, in no case
less than 20 mm from the bottom of the hob.
In the case that you
intend to install an oven beneath the
hob, make sure that it is manufactured by
Whirlpool and equipped
with a cooling system. The manufacturer
declines all liability if another brand oven is
installed beneath the
hob.
Before installation, make sure that:
- the local gas delivery conditions (nature
and pressure) are compatible with the
settings of the hob (see the rating plate
and injector table).
- The outer surfaces of the furniture or
appliances adjacent to the hob are heat
resistant according to local regulations.
- Combustion products are discharged
outdoors through specic hoods or wall
and/or window mounted electrical fans.
Gasconnection
1. Check the “gas type” sticker attached to
the hotplate. Details of the injector sizes
used are recorded on the data plate
located on the base of the appliance.
2. This appliance shall be installed
in accordance with installation
requirements of the local gas authority

ENGLISH 11
of the appropriate installation code (AS/
NZS 5601).
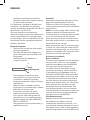
3. Before installing the hotplate consider
the location of the gas supply and
routing the gas line. (Refer Fig. 1).
ELECTRICAL
CONNECTION POINT
GAS CONNECTION
POINT
400
80
30
Fig. 1
4. For ULPG models the gas supply for the
hotplate must be regulated to a pressure
of 2.75kPa. The gas inlet connection
tting is ½” B.S.P female thread.
5. For NG models the gas supply is
connected to a regulator which is
supplied. The inlet connection has ½”
B.S.P female thread. IT IS ESSENTIAL
THAT THE ELBOW ON THE APPLIANCE
BE HELD FIRMLY WITH A SPANNER.
DO NOT OVER TIGHTEN. The regulated
pressure for NG is 1.00kPa.
6. A manual shut-off valve must be
installed in the gas line, in an accessible
position external to the hotplate, so that
in the event of an emergency or service,
the gas supply can be shutoff.
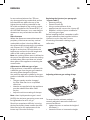
7. For gas inlet position of appliance refer
Fig. 2 for NG and g.3 for ULPG. After
installing the gas supply and making
all connections check thoroughly for
possible leaks. Turn all control knobs
on the unit to “OFF” position. Open the
valve on the gas supply. Using a soap
and water solution check each gas
connection one at a time, by brushing
the solution over connection. Presence
of bubbles will indicate a leak. Tighten
the tting and re-check for leaks. If it is
not possible to correct the leak, replace
tting. Under no circumstance use
matches or ame for checking leaks.
Fig. 2
Fig. 3
8. Turn on appliance gas cock and light
each burner. Check for a clear blue
ame without yellow tipping. If burners
shows any abnormalties check the
following:
- Burner cap on correctl
- Burner positioned correctl
- Burner vertically aligned with injector
nipple
9. In some cases the burners will fail to
ignite immediately and will seem to
blow’s lightly when they do ignite, this is
usually due to air in the gas pipe which
should clear itself within seconds of
operation.
10. If after following the instructions given,

ENGLISH 12
satisfactory performance cannot be
obtained, contact the local gas authority
for advice and assistance.
This appliance is suitable for exible hose
connection. The exible hose assembly
must be as Australian approved Class B or D
exible hose with 10mm I.D.
The hose should not be subjected to
abrasion, kinking or permanent deformation
and should be able to be inspected along
its entire length. Unions compatible with the
hose ttings must be used and connections
tested for gas leaks.
Electricalconnection
- The electrical connections must comply
with local regulations.
- The data relevant to the voltage and
power absorption are indicated on the
rating plate.
- The earthing of this appliance is
compulsory by law.
L
N
Earth
(yellow/green)
- The manufacturer cannot be held
responsible for any injury to persons
or animals or damage to property
arising from failure to comply with these
requirements.
- When the hob is installed, provide a
single-pole circuit breaker with a contact
separation of at least 3 mm.
- If necessary, the electrical power
cable must be replaced exclusively
with a power cable having identical
characteristics to the original supplied
by the manufacturer (type H05V2V2-F
T90°C or H05RR-F).
This operation must be performed by a
qualied electrician.
Assembly
After having cleaned the perimeter surface,
apply the supplied gasket to the hob.
Position the hob in the worktop opening
made respecting the dimensions indicated in
the Instruction.
NOTE: the power supply cable must be long
enough to permit its upward extraction.
To secure the hob, use the brackets provided
with it. Fit the brackets into the relevant
bores shown by the arrow and fasten them
by means of their screws in accordance with
the thickness of the worktop.
Make sure that the outlet is near the product
to install. So, if the cable that came with the
product is not long enough, you will need to
replace it with another one having the same
features but with the right length.
Provisionforventilation
Roomventilation
To ensure correct operation of the appliance,
the room size in which it is to be installed
shall be in accordance with AS/NZS 5601.
This room must also be continuously
ventilated, fresh air should ow through
permanent openings in walls to outside or
to an adjacent non-inhabitable room as
detailed is AS/NZS 5601. These permanent
openings must be made in such a way that
it cannot be obstructed from either side of
the wall, also they should be protected by
plastic grids, metallic mesh, etc., taking care
not to reduce the air vent effective area
mentioned above and located near oor
level and positioned so as not to interfere
with the operation of the exhaust system, the
minimum cross section of these permanent
openings is set by AS/NZS 5601.
Overheadclearance
Range hoods and exhaust fans shall
be installed in accordance with the
manufactures instructions. However, in no
case shall the clearance between the top of
the highest burner of the cooking appliance
and the range hood be less than 600 mm or,

ENGLISH 13
for an overhead exhaust fan, 750 mm.
Any downward facing combustible surface
less than 600 mm above the top of the
highest burner shall be protected for the
full width and depth of the cooking surface
area in accordance with Clauses 6.10.1.1 of
AS/NZS 5601 However, in no case shall this
clearance to any surface be less than 450
mm.
Sideclearance
Where the distance measured between the
periphery of the burner and any vertical
combustible surface is less than 200 mm,
the surface shall be protected in accordance
with Clause 6.10.1.1 of AS/NZS 5601 to a
height of not less than 150 mm above the
hotplate top surface for the full length and
width of the cooking surface area.
Note: the cooking surface area is dened as
the part of the appliance where the cooking
normally takes place and does not include
those parts of the appliance containing the
control knobs.
Adjustmenttodifferenttypeofgas
If the appliance is intended to operate with
a different gas from the gas type stated on
the rating plate change the injectors.
Use pressure regulators suitable for the gas
pressure indicated in the Product Description
Sheet.
• The gas nozzles must be changed
by After Sales Service or a qualied
technician.
• Nozzles not supplied with the appliance
must be ordered from After Sales
Service.
• Adjust the minimum setting of the taps.
Note: when liquid petroleum gas is used
(ULPG), the minimum gas setting screw must
be tightened as far as it will go.
Should you experience difculty in turning
the burners knobs, please contact the After
Sales Service for the replacement of the
burner tap if found to be faulty.
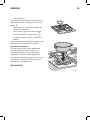
Replacingtheinjectors(seeparagraph
“injectortable”)
• Remove grids (A)
• Extract burners (B)
• Using a socket spanner of the
appropriate size unscrew the injector (C)
• Replace it with the injector suitable for
the new type of gas.
Before installing the hob, remember to afx
the gas calibration plate supplied with the
injectors in such a way that it covers
the existing information relating to gas
calibration.
Adjustingminimumgassettingoftaps
To ensure that the minimum setting is
correctly adjusted, remove the knob and
proceed as follows:
• tighten the screw to reduce the height of
the ame (-)
• loosen the screw to increase the height

ENGLISH 14
of the ame (+)
The adjustment must be performed with the
tap in minimum gas setting position (small
ame) .
• The primary air of the burners does not
need to be adjusted.
• At this stage, light up the burners and
turn the knobs from max
position
to minimum position to check ame
stability.
Upon completion of adjustment, reseal using
sealing wax or an equivalent material.
GasSafetyRegulations
The law requires that all gas appliances
are installed by competent persons in
accordance with the current gas safety
regulations. Failure to install appliances
correctly may lead to prosecution.It is in your
own interest, and that of safety, to ensure
that the law is complied with.
WOKADAPTER

ENGLISH 15
Packing
- The packing materials are 100%
recyclable and marked with the
recycling symbol ( ).
Products
This appliance is marked in compliance with
European Directive 2002/96/EC on Waste
Electrical and Electronic
Equipment (WEEE). By ensuring that this
appliance is correctly scrapped, the user
can help prevent potentially harmful
consequences for the environment and the
health of people.
The symbol on the product or
accompanying documentation indicates
that this product should not be treated as
domestic waste but must be taken to a
suitable centre for collection and recycling
of electrical and electronic equipment.
Disposal must be carried out in compliance
with local regulations on waste disposal.
For further information on the treatment,
recovery and recycling of this product,
contact your competent local ofce, the
household waste collection service or the
shop where you purchased the appliance.
DeclarationofConformity
- This cooking hob has been designed,
constructed and put on the market in
conformity with:
- safety requirements of “Gas”
Directive 2009/142/EEC;
- safety objectives of “Low Voltage”
Directive 2006/95/EC (which
replaces 73/23/EEC as amended).
- protection requirements of “EMC”
Directive 2004/108/EEC;
- This hob is suitable for contact with
foodstuffs and complies with (EC)
Regulation no. 1935/2004.
- This cooking hob (Class 3) has been
designed only for cooking food. Any
other use (such as heating a room) is
improper and dangerous.
Environmentalconcerns

ENGLISH 16
IKEAGUARANTEE
HowlongistheIKEAguaranteevalid?
This guarantee is valid for ve (5) years
from the original date of purchase of your
appliance at IKEA, unless the appliance is
named LAGAN in which case two (2) years
of guarantee apply. The original sales
receipt, is required as proof of purchase. If
service work is carried out under guarantee,
this will not extend the guarantee period for
the appliance.
Whichappliancesarenotcoveredbythe
IKEAve(5)yearsguarantee?
The range of appliances named LAGAN .
Whowillexecutetheservice?
IKEA has appointed Whirlpool (Australia)
Pty Ltd as the authorised service network
partner.
• If you encounter any trouble with the
appliance and wish to register a call
with Whirlpool, please call:
Australiacontactcentre:
1300363344.
Whatdoesthisguaranteecover?
The guarantee covers applicable faults
of the appliance, as per the terms and
conditions, from the date of purchase from
IKEA. This guarantee applies to domestic
use only. The exceptions are specied under
the headline “What is not covered under this
guarantee?” Within the guarantee period,
the costs to remedy the fault e.g. repairs,
parts, labour and travel will be covered,
provided that the appliance is accessible
for repair without special expenditure.
Replaced parts become the property of
IKEA.
The services will be in-home service for
domestic appliances, and must to be done
by ofcial Whirlpool service network.
Goods presented for repair may be
replaced by refurbished goods of the same
type rather than being repaired.
Refurbished parts may be used to repair the
goods.
If the authorized service agent requests
you to deliver the product directly to them,
please ensure that the appliance is suitably
packaged to prevent any damage during
transportation.
WhatwillIKEAdotocorrecttheproblem?
IKEA appointed service provider will
examine the product and decide, at its
sole discretion, if it is covered under this
guarantee. If considered covered, IKEA
service provider or its authorized service
partner through its own service operations,
will then, at its sole discretion, either repair
the defective product or replace it with the
same or a comparable product.
Whatisnotcoveredunderthisguarantee?
• Normal wear and tear.
• Deliberate or negligent damage,
damage caused by failure to observe
operating and maintenance instructions,
incorrect installation or by connection
to the wrong voltage, damage caused
by chemical or electrochemical reaction,
rust, abrasion or scratching, corrosion or
water damage including but not limited
to damage caused by excessive lime in
the water supply, damage caused by
abnormal environmental conditions.
• Damage caused from the use of the
appliance in a manner other than
the use for which it was specically
designed.
• Damage caused by power outages,
electrical power surge or improper
supply voltage via connection to Supply
Authority mains or alternative supply
systems.
• Consumable parts including batteries
and lamps, removable wire, glass and
plastic trays and other accessories.

ENGLISH 17
• Internal or external damage as a result
of excessive use of cleaning products or
cleaning agents.
• Non-functional and decorative parts
which do not affect normal use of the
appliance, including any scratches and
possible color differences.
• Accidental damage or blockages caused
by foreign objects, eg. coins, underwires,
nails, buttons or jewellery, or substances
and cleaning or unblocking of lters,
drainage systems or soap drawers
• Damage caused by vermin, insects or
pets.
• Note – internal or external cabinet
transport damage must be reported
within 7 days of purchase date.
• Damage to the following parts: ceramic
glass, accessories, crockery and cutlery
baskets, feed and drainage pipes, seals,
lamps and lamp covers, screens, knobs,
casings and parts of casings. Unless such
damages can be proved to have been
caused by production faults.
• Cases where no fault could be found
during a technician’s visit.
• Any consequential loss due to appliance
failure.
• Repairs not carried out by our
appointed service providers and/or an
authorized service contractual partner
or where non original parts have been
used.
• Repairs to parts or systems caused by
unauthorized modications made to
appliance.
• Repairs caused by installation which is
faulty or not according to specication.
• Problems caused by incorrect or
inadequate venting of the appliance.
• The use of the appliance in a non
domestic environment i.e. professional
use.
• Transportation damages. If a customer
transports the product to his home or
another address, IKEA is not liable for
any damage that may occur during
transport.
However, if IKEA delivers the product
to the customer’s delivery address, then
damage to the product that occurs
during this delivery will be covered by
IKEA.
• Cost for carrying out the initial
installation of the IKEA appliance.
However, if an IKEA appointed
service provider or its authorized
service partner repairs or replaces
the appliance under the terms of this
guarantee, the appointed service
provider or its authorized service
partner will reinstall the repaired
appliance or install the replacement, if
necessary.
• The benets conferred by this express
warranty are in addition to all other
conditions, warranties, guarantees,
rights and remedies expressed or
implied by the Trade Practices Act and
similar State and Territory laws and all
other obligations and liabilities on the
part of the manufacturer or supplier and
nothing contained herein shall restrict or
modify such rights, remedies, obligations
or liabilities.
Howcountrylawapplies?
Our goods come with guarantees that
cannot be excluded under the Australian
Consumer Law.
You are entitled to a replacement or refund
for a major failure and for compensation for
any other reasonably foreseeable loss or
damage.
You are also entitled to have the goods
repaired or replaced if the goods fail to be
of acceptable quality and the failure does
not amount to a major failure.
Areaofvalidity
The IKEA guarantee applies only to
products purchased and installed in
AUSTRALIA .

ENGLISH 18
ThededicatedAFTERSALESforIKEA
appliances
Please don’t hesitate to contact IKEA
appointed After Sales Service Provider to:
• make a service request under this
guarantee;
• ask for clarications on installation of the
IKEA appliance in the dedicated IKEA
kitchen furniture;
• ask for clarication on functions of IKEA
appliances.
• Call our authorized service network
partner Whirlpool on 1300363344
(Australia).
WARRANTYPROCEDURE
Please ensure that installation procedure
entailed in the user manual has been
adhered to and in case of any doubts
please refer to the trouble shooting guide
that has been supplied with the appliance.
• Please read the user guide to ensure
that you are aware of all the features &
benets of the appliance.
Howtoreachifyouneedourservice
The Whirlpool call centre team will assist
you on the phone with basic trouble
shooting for your appliance at the time of
warranty call registration.
1300363344
Pleasedescribetheproblemthatyouare
facingwiththeapplianceindetailalong
withyourproductmodelnumber,serial
number,dateofpurchaseatthetimeof
callregistration.
PleasealsoalwaysrefertotheIKEA
articlenumber(8digitcode)and12digit
servicenumberplacedontheratingplate
ofyourappliance.
SAVETHESALESRECEIPT!
Kindlykeepallthesedetailsand
originalinvoiceofpurchasehandy
duringtheservicetechnician’svisitto
enablehimtocarryoutthejob.
Whirlpoolreservestherightnotto
registerthecallunderwarrantyif
youfailtoprovidethesedetailsat
thetimeofcallregistration.
Doyouneedextrahelp?
For any additional questions not related
to After Sales of your appliances please
contact your nearest IKEA store call centre.
We recommend you read the appliance
documentation carefully before contacting
us.
For details on service agents locations, please
visit – www.whirlpool.com.au/services.


5019 619 01723
© Inter IKEA Systems B.V. 2011 AA-578231-1
19069
-
 1
1
-
 2
2
-
 3
3
-
 4
4
-
 5
5
-
 6
6
-
 7
7
-
 8
8
-
 9
9
-
 10
10
-
 11
11
-
 12
12
-
 13
13
-
 14
14
-
 15
15
-
 16
16
-
 17
17
-
 18
18
-
 19
19
-
 20
20


Ask a question and I''ll find the answer in the document
Finding information in a document is now easier with AI
Related papers
Other documents
-
Ariston AGS92SBKAUS User guide
-
Whirlpool GOWL628NBAUS User guide
-
-
-
-
-
Whirlpool GMWL628IXLAUS User guide
-
-
-