

2
Table of contents
1. Foreword ......................................................................................................................................... 3
2. Guarantee ........................................................................................................................................ 4
3. Safety Instructions ................................................................................................................... 5
4. Technical specifications ................................................................................................................... 7
5. Model .............................................................................................................................................. 8
6. General operations ........................................................................................................................ 10
6.1 Foldable footplate ................................................................................................................. 11
6.2 Mounting the wheels and drum brake .................................................................................. 12
6.3 Anti-tilting device .................................................................................................................. 14
6.4 Seat-unit tilting ...................................................................................................................... 15
6.5 Worktable (optional) ............................................................................................................. 17
7. Using of the wheelchair ................................................................................................................. 20
8. Transport ....................................................................................................................................... 25
9. Adjustment instructions ................................................................................................................ 28
9.1 Adjustment of seat depth, height of back and back ............................................................. 29
9.2 Adjustment of the seat height (length of lower leg), knee angle and ankle angle ............... 32
9.3 Adjustment of the balance .................................................................................................... 39
9.4 Adjusting the height of the pushing bar ................................................................................ 41
9.5 Adjusting the headrest (optional) ......................................................................................... 43
10. Defects and maintenance .......................................................................................................... 45
This manual has been compiled with all possible care and is based on the information known to Veldink4kids at the time of
writing. Veldink4kids accepts no liability for any errors in the text or their consequences.
The information in this manual applies to the standard model of the product. Veldink4kids accepts no liability for any
damage resulting from changes in or adaptations to the product after the first sale.
No right can be derived form this text. Subject to alteration.
Veldink4kids Team

3
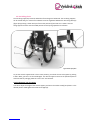
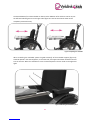
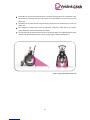
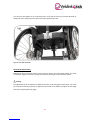
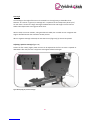
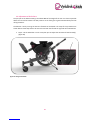
1. Foreword
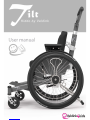
It is good you have chosen a Veldink4kids Kiddo Tilt wheelchair. This means you have chosen for
quality. Veldink4kids aims at supplying products of a very high quality and a modern design, that
meet all relevant requirements applicable tot the product and are safe for the intended use.
This Kiddo Tilt is custom made, build with
care and dedicated to the needs of the
user. Manufactured in Holland! Many
options and accessories available. The
wheelchair can grow with the user and is
easy to adjust.
The Kiddo Tilt is splash resistant and
suitable for both indoor and outdoor use.
The maximum occupant weight is 75kg.
The Kiddo Tilt has been manufactured in accordance with the
medical guideline 93/42/EEC. The wheelchair has been
successfully tested by TUV Rheinland for safe transportation of
children in motor vehicles according ISO7176-19 (crashtest).
Important: Before using the Kiddo Tilt read the user manual.
Important: Failing to follow the safety regulations, instructions, warnings and maintenance
recommendations, can negatively affect the operation of the Kiddo Tilt possibly result in physical
injury or damage to the wheelchair or the.
We at Veldink4kids are sure that your Kiddo Tilt will meet your expectations and we wish you much
success with it.
Explanation of the symbols on the Kiddo Tilt:
Read the manual and follow instructions
Maximum load is 75kg

4
2. Guarantee
The Veldink4kids products are made with passion and care and are carefully inspected before leaving
the factory. Should it emerge that a product does not meet expectations please contact the party
where you purchased the product.
Veldink4kids guarantees its Kiddo Tilt wheelchairs for frame faults for five years. The other parts
carry one year guarantee for manufacturing errors. Parts liable to wear and tear, such as upholstery,
tyres, colour coats etc. are not covered by the guarantee ( unless it appears to be a manufacturing
error and is reported to the factory within three months after delivery by the factory).
Conditions:
1. Repairs and replacement off parts shall be carried out by a dealer approved by Veldink4kids.
2. Guarantee is valid if with the claim the dealer receives information about the nature of the
problem and the circumstances under which the problem arose.
3. For repairs or replacement it is necessary the frame number is made known to the
manufacturer in view of the correct specification.
4. Within the guarantee period the part concerned will be repaired or replaced free of.
5. No responsibility for guarantee shall be taken, if the fault is due to:
a. the wheelchair has not been maintained in accordance with the instructions
supplied.
b. Failure to use original parts made available by the manufacturer. These are available
from stock and can be ordered from the parts manual or workshop manual which
will be supplied upon request.
c. Damages due to wrong use, negligence or accident.
d. Changes and/or adjustments to the wheelchair originally supplied by the factory,
carried out by third parties without the express written consent of the
manufacturer.
The wheelchair described in the manual is not necessarily the model which was delivered. Variations
have been implemented according to the personal wishes and/or adjustments. However, the
instructions apply to the general version.
The manufacturer reserves the right to carry out changes in model, measurements etc, which are
aimed at improvement of the product.

5
3. Safety Instructions
1. If you have to sit in the wheelchair for a long time, you should shift your position regularly.
Make sure there are no seams, folds or other irregular pressure spots on the back or the
seat. This is to prevent sores (decubitus).
2. In confined areas ensure you do not get stuck when manoeuvring. If you get stuck, try and go
back the same way you came, in reverse. Make sure assistance can be called.
3. A wheelchair has protruding parts, that may cause injuries or damage in case of a collision.
So avoid collisions.
4. Never reach too far out of your wheelchair, as you may fall over.
5. Never drive over a threshold or any other obstacle at an acute or obtuse angle, as you may
keel over or get stuck.
6. A speed exceeding 5 km per hour (3 mph) can be dangerous if you have not exercised it
sufficiently.
7. Never negotiate a bend at a high speed and do not make sudden, sharp turns as you may fall.
8. Do not negotiate obstacles if you are not a hundred percent sure you can complete the
manoeuvre safely.
9. Never hang heavy objects on your wheelchair; you upset the balance and you may even fall
over.
10. Use anti-tilt supports against falling over backward if you are not an experienced wheelchair
driver.
11. The maximum tyre pressure of the rear wheels amounts to 6 bar (87 PSI). If the pressure is
too high, the tyre may run beside the rim.
12. Never lift the wheelchair by movable or detachable parts.
13. Make sure the maintenance condition of the wheelchair is always perfect.
14. The maximum load of the Kiddo Tilt wheelchair is 75 kilos .
15. The wheelchair shall not be carry more than one person at the time.

6
16. If the width of the seat exceeds 420 mm at a camber angle of 7°, this may give problems
with the width of passageways.
17. The upholstery and the frame may get very hot if they are exposed to sunrays for a long
time.
18. You are strongly advised against sitting in the wheelchair while it is transported in a vehicle.
We recommend you use a properly approved seat in the vehicle and have the wheelchair
safely stored in the boot of the vehicle.
19. By travelling up a slope, the centre of gravity will move backwards, making it easier for the
wheelchair to tip over backwards.
20. By travelling down a slope, the centre of gravity will move forwards, making it easier for the
occupant to fall out of the wheelchair
21. In a wheelchair user you are vulnerable in traffic. Ensure that you are visible to other road
users. Observe the applicable traffic regulations.
The Kiddo Tilt has been successfully tested by TUV Rheinland to be a “crashtest safe” wheelchair, in
accordance with the ISO 7176-19 standard. It can therefore be transported with the occupant in it
(facing forward). Attach the wheelchair with its occupant in it in a taxibus with a four-point securing
system!
22. In addition, always use a 3-point safety belt to safely transport the occupant of the
wheelchair (forward facing position when used in motor vehicle).
The optional wheelchair seat belt is not suitable for use as a safe.
23. When transporting the wheelchair with the occupant in it, we recommends fitting the
wheelchair with a headrest


12
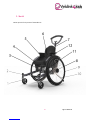
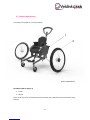
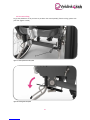
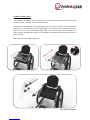
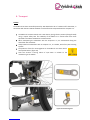
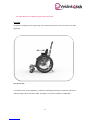
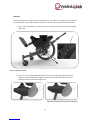
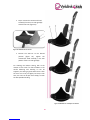
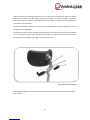
6.2 Mounting the wheels and drum brake
To mount a wheel with a quick-release axle (figure 4) you put the brake in neutral.* You lift the
wheelchair again by the arm rest with 1 hand. Take the wheel by the brake handle and press the
quick-release button(1). Move the axle(2) into the axle adapter(3) until the wheel locks completely in
the frame. Release the button, it will jump out and the axle will be locked in the guide..
Always make sure after mounting a wheel with a quick-release axle that the axle is locked in the
guide. You can do this by taking a mounted wheel by the hub through the spokes and try and move
it in a horizontal direction. If this proves to be impossible, the axle is locked.
* neutral = brake released
Figure 4: Mounting the rear wheel

13
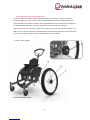
Drum brake
By moving the brake handle (figure 5) forward or backward (from a sitting position) the brake will be
put into the parking position with a noticeable click. This brake can also be used to brake during
travelling.
To carry out the following action it will be easier if something is placed under the anti-tilting device to
allow the wheel to turn freely or you can do the job with two people.
The brake drum can be adjusted and so optimal braking action is guaranteed. Below the brake
cover(2) a groove(3) is provided, allowing access to a setscrew (only in neutral*). With a 3 mm socket
screw key the setscrew can be adjusted. Allow the wheel to turn freely and at the same time turn the
setscrew inward (clockwise). At a certain moment the brake will start to rub. Then you turn the
setscrew back a quarter turn. Next check to ensure the brake no longer rubs.
* neutral = brake released
Figure 5: Wheel with brake handle (detail: Opening setscrew)

14
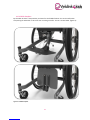
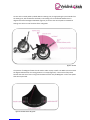
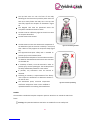
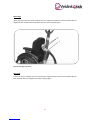
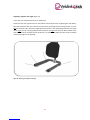
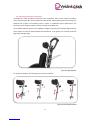
6.3 Anti-tilting device
The ant-tilting supports prevent the wheelchair from tilting over backwards. The ant-tilting supports
can be turned away, for instance if an obstacle has to be negotiated. Release the anti-tilting device(1)
(figure 6) by pushing it down with your foot on the pushrod (3) and next turn it inward. The ant-
tilting support will move into the locked position and will spring upwards in the fixation.
Figure 6: Anti-tip system
To put the anti-tilt supports back in their active position, you unlock the anti-tilt support by pushing
it down. Next, you turn it to the outside again. The anti-tilt support returns to the operative position
and locks itself by swinging inwards. A clear ‘click’ can be heard.
Lenght adjustment anti-tilt support
In order to adjust the lenght of the anti-tilt support just loosen the socket screw(2) and place it in the
desired position. Next tighten the socket screw again(2).


16
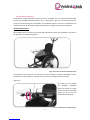
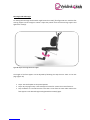
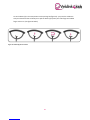
As soon as the control pedal is pushed down the seating-unit, through pushing the push handle from
the seating-unit, will tilt between the fenders. The seating-unit can be locked between the 10
degrees forward till 52 degrees backward. (figure 9) As soon as the control pedal is released the
seating-unit clicks in one of the holes of the side guards.
The position of 10 degrees forward can be used to make an easy transfer. The Kiddo Tilt can be tilted
52 degrees backwards for the resting positions in 11 steps (figure 10). There can be a fully tilted
because the seat-unit is free running from the bottom frame. Only at 68 degrees is still a interruption
that also may be used.
Figure 9: Tilt area
Figure 10: Positions of the side guards

17
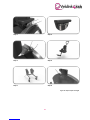
6.5 Worktable (optional)
The Kiddo Tilt is often provided in conjunction with a worktable. You can choose a fixed worktable
system and a foldable worktable system. Here, a description is given of the functioning and the
mounting and dismounting of the worktable. The worktable systems are shown in combination with
a Kiddo Classic. The functioning of the worktable systems is exactly the same for the Kiddo Tilt.
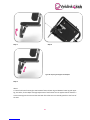
Fixed worktable system
When Kiddo Classic is ordered in conjunction with a worksheet system, the worktable is mounted on
the wheelchair as displayed in figure 11.
Figure 11: Kiddo Classic with fixed worktable system
The wheelchair can be best put on the brakes to set the worktable. To take the worktable from the
wheelchair or to set of distance, you have to unscrew the star knob(1) under the worktop.
(Figure 12)
By turning the star knob(1)
the worktable support(2)
(figure 13) clamps no longer
in the insert of the armrest(3)
(Figure 13). As a result, the
worktable can be moved.
Figure 12: Releasing the worktable support

18
The desired distance from the worktable in relation to the abdomen of the child can now be set, see
the left-hand side of figure 13. On the right side of figure 13 it can be seen that the sheet can be
completely removed this way.
When reinstalling the worktable system the guide section(2) of the worktable support (figure 14)
should be placed in the armrest(3) Also, on the other side, the support worksheet should be inserted
into the armrest. When the worktable is set to the desired position the star knob can be tightened
again.
Figure 13: Adjusting the worktable
Figure 14:Mounting the worktable systems

19
Foldable worktable system
If the foldable worktable system is fold away it can be adjusted and removed such as the fixed
worktable system. The action of this is described before.
To get the worktable folded the star knob(1) (figure 12) has to get turned loose. Then the worktable
system have to be pulled out of the armrest(3) (figure 14) so that the short worktable support (2)
(figure 15) is free. The long worktable support stays in the armrest. Now can the worktable can
rotate along the long worktable support. The worktable can hang next to the wheelchair so it will not
hang in the way.
These steps are shown below in figure 15.
Figuur 15:Fold away worktable

20
7. Use of the wheelchair
Water, sand, leftovers, street refuse etc.
When using your wheelchair you may encounter the above-mentioned pollutants which negatively
affects the operation of your wheelchair.
1. Prevent your wheelchair from being partly or wholly submerged in water. If your wheelchair
gets wet, or if you use water to clean the wheelchair, dry it again as well and as quickly as
you can.
2. Sand, leftovers, street refuse, hair etc. have a corroding, and therefore wearing effect on
moving parts. See chapter 10, directions for cleaning.
Support by escort
warning:
Ignoring the warnings given below may result in tilting or falling and cause injuries to the user and/or
the escort.
User:
Make sure you know your escort, be aware of what he/she can do. Make sure he/she is acquainted
with the warnings and safety and technical instructions regarding the use of your wheelchair.
Make sure the escort knows your wishes and realises what you expect.
Page is loading ...
Page is loading ...
Page is loading ...
Page is loading ...
Page is loading ...
Page is loading ...
Page is loading ...
Page is loading ...
Page is loading ...
Page is loading ...
Page is loading ...
Page is loading ...
Page is loading ...
Page is loading ...
Page is loading ...
Page is loading ...
Page is loading ...
Page is loading ...
Page is loading ...
Page is loading ...
Page is loading ...
Page is loading ...
Page is loading ...
Page is loading ...
Page is loading ...
Page is loading ...
Page is loading ...
Page is loading ...
-
 1
1
-
 2
2
-
 3
3
-
 4
4
-
 5
5
-
 6
6
-
 7
7
-
 8
8
-
 9
9
-
 10
10
-
 11
11
-
 12
12
-
 13
13
-
 14
14
-
 15
15
-
 16
16
-
 17
17
-
 18
18
-
 19
19
-
 20
20
-
 21
21
-
 22
22
-
 23
23
-
 24
24
-
 25
25
-
 26
26
-
 27
27
-
 28
28
-
 29
29
-
 30
30
-
 31
31
-
 32
32
-
 33
33
-
 34
34
-
 35
35
-
 36
36
-
 37
37
-
 38
38
-
 39
39
-
 40
40
-
 41
41
-
 42
42
-
 43
43
-
 44
44
-
 45
45
-
 46
46
-
 47
47
-
 48
48


Ask a question and I''ll find the answer in the document
Finding information in a document is now easier with AI
Other documents
-
R82 Neoprene User manual
-
Invacare Ben NG User manual
-
-
-
-
-
-
-
-