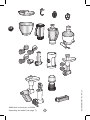
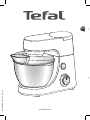
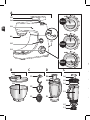
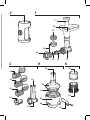
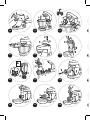
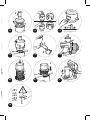
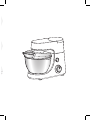
Tefal QB502140: Unleash your culinary creativity with a versatile kitchen companion. Effortlessly blend, chop, knead, whisk, and more with its powerful motor and range of accessories. Prepare delicious sauces, dips, and smoothies with the blender jug. Master bread baking, pastry making, and cake mixing with the stainless steel bowl, kneader, and mixer. Whip up airy meringues, velvety whipped cream, and fluffy egg whites using the balloon whisk. Safety features like the locking cover and overspeed protection ensure a secure and controlled cooking experience.
Tefal QB502140: Unleash your culinary creativity with a versatile kitchen companion. Effortlessly blend, chop, knead, whisk, and more with its powerful motor and range of accessories. Prepare delicious sauces, dips, and smoothies with the blender jug. Master bread baking, pastry making, and cake mixing with the stainless steel bowl, kneader, and mixer. Whip up airy meringues, velvety whipped cream, and fluffy egg whites using the balloon whisk. Safety features like the locking cover and overspeed protection ensure a secure and controlled cooking experience.


-
 1
1
-
 2
2
-
 3
3
-
 4
4
-
 5
5
-
 6
6
-
 7
7
-
 8
8
-
 9
9
-
 10
10
-
 11
11
-
 12
12
-
 13
13
-
 14
14
-
 15
15
-
 16
16
-
 17
17
-
 18
18
-
 19
19
-
 20
20
-
 21
21
-
 22
22
-
 23
23
-
 24
24


Tefal QB502140: Unleash your culinary creativity with a versatile kitchen companion. Effortlessly blend, chop, knead, whisk, and more with its powerful motor and range of accessories. Prepare delicious sauces, dips, and smoothies with the blender jug. Master bread baking, pastry making, and cake mixing with the stainless steel bowl, kneader, and mixer. Whip up airy meringues, velvety whipped cream, and fluffy egg whites using the balloon whisk. Safety features like the locking cover and overspeed protection ensure a secure and controlled cooking experience.
Ask a question and I''ll find the answer in the document
Finding information in a document is now easier with AI
Related papers
Other documents
-
Kenwood KHH326WH Owner's manual
-
Kenwood MULTI-ONE KHH321WH Owner's manual
-
 terim TERMBLG User manual
-
Philips HR7638 User manual
-
-
-
Moulinex LM436110 Owner's manual
-
Witt Premium Hand Blender Owner's manual
-
Sencor SCB 6150SS User manual
-
Sage the 3X Bluicer User manual
