Page is loading ...

LATHE NOT INCLUDED
FEATURES
REVISION 3 - JANUARY 13/11
© Copyright General® International 01/2011
Designed for rough bulk material
removal from wood blanks, to make
multiple matching spindles that follow the
profile of an original spindle or a shop
made template.
Extruded aluminum base and carriage.
Smooth hand wheel controlled rack &
pinion system.
High speed steel cutter.
Fits most 12” - 22” floor model lathes with
cast bedways.
SPECIFICA
TIONS
MAXIMUM DUPLICATING LENGTH
36” (914 mm)
MAXIMUM DUPLIC
ATING DIAMETER
2”~20” (51 ~ 508 mm)
Depending on lathe swing over bed
MAXIMUM DUPLICATING DEPTH
3” (76 mm)
MAXIMUM ORIGINAL SPINDLE DIAMETER
5” (127 mm)
MAXIMUM
WIDTH OF TEMPLATE
3” (76 mm)
DUPLIC
ATES FROM
ORIGINAL SPINDLE OR TEMPLATE
MAXIMUM DEPTH OF CUT PER P
ASS
1/4” (6.35 mm) -
1/8” recommended
* Some manual shaping of fine details and fin-
ish sanding will still be required.

THANK YOU
for choosing this General
®
International model 25-036 Wood Lathe
Duplicator. This duplicator has been carefully tested and inspected before shipment and if
properly used and maintained, will provide you with years of reliable service. For your safety,
as well as to ensure optimum performance and trouble-free operation, and to get the most
from your investment, please take the time to read this manual before assembling, installing
and operating the unit.
The manual’s purpose is to familiarize you with the safe operation, basic function, and features
of this duplicator as well as the set-up, maintenance and identification of its parts and com-
ponents. This manual is not intended as a substitute for formal woodworking instruction, nor to
offer the user instruction in the craft of woodworking. If you are not sure about the safety of
performing a certain operation or procedure, do not proceed until you can confirm, from
knowledgeable and qualified sources, that it is safe to do so.
Once you’ve read through these instructions, keep this manual handy for future reference.
Disclaimer:
The information and specifications in this
manual pertain to the unit as it was supplied from the
factory at the time of printing. Because we are commit-
ted to making constant improvements, General
®
International reserves the right to make changes to
components, parts or features of this unit as deemed
necessary, without prior notice and without obligation to
install any such changes on previously delivered units.
Reasonable care is taken at the factory to ensure that
the specifications and information in this manual corres-
ponds with that of the unit with which it was supplied.
However, special orders and “after factory” modifica-
tions may render some or all information in this manual
inapplicable to your machine. Further, as several gene-
rations of this model of duplicator and several versions
of this manual may be in circulation, if you own an ear-
lier or later version of this unit, this manual may not
depict your machine exactly. If you have any doubts or
questions contact your retailer or our support line with
the model and serial number of your unit for clarifica-
tion.
GENERAL® INTERNATIONAL
8360 Champ-d’Eau, Montreal (Quebec) Canada H1P 1Y3
Telephone (514) 326-1161 • Fax (514) 326-5555 • www.general.ca

All component parts of General®, General® International and Excalibur by General
International ® products are carefully inspected during all stages of production and each unit
is thoroughly inspected upon completion of assembly.
Limited Lifetime
Warranty
Because of our commitment to quality and customer satisfaction, General® and General®
International agree to repair or replace any part or component which upon examination,
proves to be defective in either workmanship or material to the original purchaser for the life
of the tool.
However, the Limited Lifetime Warranty does not cover any product used for pro-
fessional or commercial production purposes nor for industrial or educational applications.
Such cases are covered by our Standard 2-year Limited Warranty only. The Limited Lifetime
Warranty is also subject to the “Conditions and Exceptions” as listed below.
Standard 2-Year Limited Warranty
All products not covered by our lifetime warranty including products used in commercial,
industrial and educational applications are warranted for a period of 2 years (24 months) from
the date of purchase. General® and General® International agree to repair or replace any
part or component which upon examination, proves to be defective in either workmanship or
material to the original purchaser during this 2-year warranty period, subject to the “conditions
and exceptions” as listed below.
T
o file a Claim
To file a claim under our Standard 2-year Limited Warranty or under our Limited Lifetime
Warranty, all defective parts, components or machinery must be returned freight or postage
prepaid to General® International, or to a nearby distributor, repair center or other location
designated by General® International. For further details call our service department at 1-888-
949-1161 or your local distributor for assistance when filing your claim.
Along with the return of the product being claimed for warranty, a copy of the original proof
of purchase and a “letter of claim” must be included (a warranty claim form can also be used
and can be obtained, upon request, from General® International or an authorized distributor)
clearly stating the model and serial number of the unit (if applicable) and including an expla-
nation of the complaint or presumed defect in material or workmanship.
GENERAL
®
& GENERAL
®
INTERNATIONAL WARRANTY
CONDITIONS AND EXCEPTIONS:
This coverage is extended to the original purchaser only. Prior warranty registration is not
required but documented proof of purchase i.e. a copy of original sales invoice or receipt
showing the date and location of the purchase as well as the purchase price paid, must be
provided at the time of claim.
Warranty does not include failures, breakage or defects deemed after inspection by General®
or General® International to have been directly or indirectly caused by or resulting from;
improper use, or lack of or improper maintenance, misuse or abuse, negligence, accidents,
damage in handling or transport, or normal wear and tear of any generally considered con-
sumable parts or components.
Repairs made without the written consent of General® International
l
will void all warranty.

RULES FOR SAFE OPERATION
To help ensure safe operation, please take a moment to learn the machine’s applications and limitations, as well as poten-
tial hazards. General® International disclaims any real or implied warranty and holds itself harmless for any injury that
may result from improper use of its equipment.
1. Do not operate the wood lathe when tired, distrac-
ted, or under the effects of drugs, alcohol or any
medication that impairs reflexes or alertness.
2. The working area should be well lit, clean and free
of debris.
3. Keep children and visitors at a safe distance when
the wood lathe is in operation; do not permit them
to operate the wood lathe.
4. Childproof and tamper proof your shop and all
machinery with locks, master electrical switches
and switch keys, to prevent unauthorized or unsu-
pervised use.
5. Stay alert! Give your work your undivided atten-
tion. Even a momentary distraction can lead to seri-
ous injury.
6. Fine particulate dust is a carcinogen that can be
hazardous to health. Work in a well-ventilated area
and whenever possible use a dust collector and
wear eye, ear and respiratory protection devices.
7. Do not wear loose clothing, gloves, bracelets, neck-
laces or other jewelry while the wood lathe is in
operation. Wear protective hair covering to contain
long hair and wear non-slip footwear.
8. Be sure that adjusting wrenches, tools, drinks and
other clutter are removed from the machine before
operating.
9. Keep hands well away from the spindle, the spin
ning workpiece, and all moving parts. Use a brush,
not hands, to clear away chips and dust.
10. Do not use stock containing defects such as che-
cks, splits, cracks, knots or foreign objects. Before
starting, inspect stock and remove all foreign ob-
jects such as dirt, nails, staples or any object that
could damage a tool or become dislodged and
fly free and cause injury.
11. Select appropriate turning speed for the size and
type of workpiece being turned and use lowest
speed when starting a new workpiece.
12. Before turning on the wood lathe, make sure the
workpiece and duplicator are securely installed
between centers and that all locking levers and
moveable or removable parts are tightened down
and secured.
13. Adjust the cutting tool parallel and as close as pos-
sible to the workpiece and, before starting the
lathe, turn the workpiece by hand, at least one
full rotation to make sure that it does not come in
contact with the cutting tool.
14. Maintain turning tools with care. Keep turning tools
sharp and clean for best and safest performance.
15. Avoid working from awkward or off balance posi-
tions. Do not overreach and keep both feet on floor.
16. Keep guards in place and in working order. If a
guard must be removed for maintenance or clea-
ning be sure it is properly re-attached before using
the tool again.
17. Use of parts and accessories NOT recommended
by
GENERAL® INTERNATIONAL
may result in equip-
ment malfunction or risk of injury.
18. Never stand on machinery. Serious injury could
result if the tool is tipped over.
19. Always disconnect the tool from the power source
before servicing, changing accessories, perfor-
ming any maintenance or cleaning, or if the
machine will be left unattended.
20. Make sure that switch is in
the “OFF”
position before
plugging in the power cord.
21. Make sure the tool is properly grounded. If equip-
ped with a 3-prong plug it should be used with a
three-pole receptacle. Never remove the third
prong.
22. Do not use this wood lathe duplicator for other
than its intended use. If used for other purposes,
GENERAL®INTERNATIONAL
disclaims any real implied
warranty and holds itself harmless for any injury,
which may result from that use.
4

UNPACKING
Carefully unpack and remove the unit and its components from its shipping containers and check for missing or
damaged items as per the list of contents below.
Tip: It is recommended to group all of the parts in each plastic bag together and keep them separate from the other compo-
nents. This will make assembly much easier.
Note: Please report any damaged or missing items to your General International distributor immediately.
BASIC FUNCTIONS
This General International model 25-036 wood lathe duplicator is designed for use on wood lathes only. Installation
and/or use on Metalworking lathes or any other machinery can lead to serious personal injury, damage to the
machine, the duplicator and the workpiece.
This duplicator is designed to roughly remove bulk material from a wood blank to enable the user to make multi-
ple matching spindles that follow or replicate the profile of either an original spindle or a shop made template. This
unit is not designed to be a precision copying device, and as such some manual shaping of fine details will still be
required. As with normal manual turnings, finish sanding of the workpiece will also still be required. Having a maxi-
mum duplicating length of 36” the unit is designed to fit on most models of 12”-22” swing capacity wood lathes that
have cast bed ways and is an ideal time saver on projects that require multiple identical wood spindles such as
turned railings and turned chair or table legs.
Important Notice: If your wood lathe has a swing over bed of less than 12” or more than 22” and/or if your wood lathe has
tubular or any type other than cast bed ways, then this unit is not designed for use on your machine. Any attempts to mod-
ify or adapt the unit to fit machines other than as described above is not recommended or endorsed by General
International, and is done at the users own risk of personal injury, damage to the machine, the duplicator or the workpiece.
A
B
C
E
F G
HANDLE . . . . . . . . . . . . . . . . . . . . . . . . . . . . . . . . . . . . . . . . . .1
BACKUP SUPPORT . . . . . . . . . . . . . . . . . . . . . . . . . . . . . . . . . .1
— Hex head bolt M10 x 1.5 - L55 . . . . . . . . . . . . . . . . . . . . .1
— Square head bolt M10 x P1.5 - L30 . . . . . . . . . . . . . . . . .1
— Hex nut M10 x 1.5 - L30 . . . . . . . . . . . . . . . . . . . . . . . . . . .2
— Washer 10 x 20 - 2 . . . . . . . . . . . . . . . . . . . . . . . . . . . . . . .1
F- CLAMPING BRACKETS . . . . . . . . . . . . . . . . . . . . . . . . . . . . . .2
— Clamp screw . . . . . . . . . . . . . . . . . . . . . . . . . . . . . . . . . . .2
— Square head bolt M10 x P1.5 - L30 . . . . . . . . . . . . . . . . .2
— Hex head bolt M6 x P1.0 - L20 . . . . . . . . . . . . . . . . . . . . .4
— Washer P6 . . . . . . . . . . . . . . . . . . . . . . . . . . . . . . . . . . . . .4
— Washer P10 x 20-2 . . . . . . . . . . . . . . . . . . . . . . . . . . . . . . .2
— Hex nut M10 x P1.5 - L30 . . . . . . . . . . . . . . . . . . . . . . . . . .2
G- TOOLS
— 4 mm Allen wrench . . . . . . . . . . . . . . . . . . . . . . . . . . . . .1
— 8/10 mm Combination wrench . . . . . . . . . . . . . . . . . . .1
— 12/14 mm Combination wrench . . . . . . . . . . . . . . . . . .1
— 17/19 mm Combination wrench . . . . . . . . . . . . . . . . . .1
LIST OF CONTENTS Qty
A- DUPLICATOR ASSEMBLY WITH RAILS . . . . . . . . . . . . . . . . . . . .1
B- SUPPORT BRACKET . . . . . . . . . . . . . . . . . . . . . . . . . . . . . . . . .2
— Washer 10 x 20 - 2 . . . . . . . . . . . . . . . . . . . . . . . . . . . . . . .2
— Hex head bolt M10 x P1.5 - L30 . . . . . . . . . . . . . . . . . . . .2
C- SUPPORT BEAMS . . . . . . . . . . . . . . . . . . . . . . . . . . . . . . . . . .2
— Clamping plates . . . . . . . . . . . . . . . . . . . . . . . . . . . . . . . .2
— Set screw M12 x 1.75 - L65 . . . . . . . . . . . . . . . . . . . . . . . .2
— Hex nut M12 x 1.75 . . . . . . . . . . . . . . . . . . . . . . . . . . . . . .4
— Washer 12 x P26 - 2.5 . . . . . . . . . . . . . . . . . . . . . . . . . . . .2
— Hex head bolt M10 x 1.5 x L60 . . . . . . . . . . . . . . . . . . . .2
— Square head bolt M10 x P1.5 x L20 . . . . . . . . . . . . . . . .4
— Hex nut M10 x 1.5 - L30 . . . . . . . . . . . . . . . . . . . . . . . . . . .4
— Washer 10 x 20 - 2 . . . . . . . . . . . . . . . . . . . . . . . . . . . . . . .4
D- HANDWHEEL . . . . . . . . . . . . . . . . . . . . . . . . . . . . . . . . . . . . . .1
CHIP GUARD . . . . . . . . . . . . . . . . . . . . . . . . . . . . . . . . . . . . . .1
CUTTING TOOL WITH PLASTIC COVER . . . . . . . . . . . . . . . . . .1
E- FOLLOWER ARM . . . . . . . . . . . . . . . . . . . . . . . . . . . . . . . . . . .1
FOLLOWER ARM FINE POINT . . . . . . . . . . . . . . . . . . . . . . . . .1
ADDITIONAL REQUIREMENTS FOR ASSEMBLY/INSTALLATION
• Allen wrench 6 mm • Adjustable wrench
• Socket wrench kit • Phillips head screwdriver
5
• An extra person for
help with lifting
D

ASSEMBLING THE CL
AMPING PLATE HARDWARE
1. Lay one clamping plate A on a flat surface with the flat
side down
.
2. Thread one 12 mm set screw B into the threaded hole
in the clamping plate until it is flush with the flat surface.
3. Thread a M12 nut C onto the set screw until it touches
the clamping plate.
4. Using the 6 mm allen wrench, hold the set screw while
tightening the nut with the supplied 19 mm wrench as
shown.
5. Do this for both of the clamping plates.
A
B
C
ASSEMBLING THE CL
AMPING PLATES TO THE SUPPORT BEAMS
1. Fit the set screws on the clamping plates into the slot
D on the support beams and secure them to the
beams with a 12 x P26 washer E and M12 hex nut F,
leaving them loose for now G.
Note
: If your wood lathe swing diameter is 12”, then DO
NO
T install the alignment bolt
G
on the support beams.
2. For lathes with a swing of 14” or more, install a 12
mm x 65 mm long alignment bolt H and thread into
each support beam until it is flush with the other si-
de of the hole.
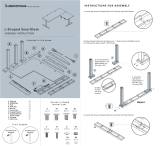
ASSEMBLING & INSTALLING THE DUPLICATOR ON A WOOD LATHE
TEMPLATE CLAMPING BRACKET ASSEMBLIES
1. Assemble the clamping bracket components A as shown in B. and set them aside for now.
A B
6
H
H
On lathes that have a swing of 14” or more:
Bolt
H
is used as an alignment stop to set the duplica-
tor parallel to the bed ways. It makes it much quicker
when re-mounting the duplicator by pre-setting the posi-
tion the duplicator was in before you removed it.
D
G
I
E
F

CORRECT INCORRECT
7
MOUNTING THE SUPPORT BEAMS
TURN OFF AND UNPLUG THE LATHE FROM THE POWER SOURCE BEFORE ASSEMBLING AND INSTALLING THE DUPLICA-
TOR ON A WOOD LATHE.
AA
BB
1. Remove the tailstock and the tool rest from the
lathe.
2. Mount the two support beams on the lathe bed by
sliding the clamping plate between the ways.
Note: Because the clamping plates are rectangular, they
may be clamped in two directions,
A
or
B
, depending on
the width of the lathe bed.
1”
C
D
Preliminary note
Before installing the duplicator on the lathe, it is a good practice to take a moment to make sure that the head-
stock and tailstock points on the lathe are aligned. Duplicating with headstock and tailstock points that are
misaligned will cause the finished duplication to be tapered from one end to the other in relation to your tem-
plate or original spindle.
Note
: To avoid chatter or excess vibration when duplicating, make sure to install the support beams as far as
reasonably possible from each other on the bed. Installing the two beams too close to each other, i.e. within
the same half of the lathe bed (as shown on right), may cause the duplicator to twist or shake, and the excess
vibration will affect the finish quality of the workpiece, requiring substantially more sanding.
3. a) For a typical installation when working with long-
er spindles
, position the left hand support beam
approximately 1” from the headstock
,
C.
The right hand support beam
,
D, should be spa-
ced roughly 2/3 to 3/4 of the length of the lathe
bed away from the left beam.
3. b) For a stable installation of the duplicator when
working with short workpieces, it is preferable to
first install the tailstock on the lathe, 1, and then
position the right hand support beam, 2, behind
it as shown.
4. At this time, lightly tighten the support beams to
secure them on the lathe bed.
Note: The final tightening of the support beam assemblies
will be done later, once the duplicator has been aligned
parallel to the lathe bed in section “ALIGNING DUPLICA-
TOR PARALLEL TO THE LATHE BED”.
1
2

MOUNTING THE SUPPORT BRACKETS
1. The two support brackets A are mounted vertically to the two support beams as shown in, B.
2. Each support bracket has 5 holes on the center line C. These 5 holes are used for adjusting the height of the sup-
port bracket to meet your lathe swing. (The holes are for swings of 14”, 16”, 18”, 20”, 22”).
Note: If your wood lathe swing diameter is 12”, then you DO NOT need to use the two support brackets. Skip ahead to
the next section “Mounting the duplicator rail”.
3. To mount the support brackets to the support beams, align the two holes on the right and left side of the support
brackets with the two pins, D, on the support beams.
4. Install the 10 x 20 mm washer and 10 x 1.5 mm bolt E and tighten to secure the support bracket.
Note: You do not need to install support brackets on a lathe with a 12” diameter swing.
Hint: Before you begin, have the four 10 x 20 -2 flat washers,
B
, and four M10 x 1.5 - L30 hex nuts,
C
, in hand and ready to
thread onto the bolts because you will not be able to let go
of the duplicator until it is fastened to the support brackets.
1. Install the (4) 10 mm square head bolts, A by sliding
them into the bottom t-slots, as shown in D. Locate
them about 2 inches in from the ends.
TO LIMIT THE POTENTIAL FOR INJURY, INCLUDING SE-
RIOUS LACERATION, ALWAYS MAKE SURE TO REMOVE
THE CUTTING TOOL FROM THE DUPLICATOR BEFORE
INSTALLING OR REMOVING THE DUPLICATOR FROM
THE LATHE.
MOUNTING THE DUPLICA
TOR RAIL
A
B
C
D
2. With helpers to assist in the lifting E, align the 4 square head bolts on the duplicator rail with the four holes on the
support beams (12” Lathe swing), F, or support brackets (swing larger than 12”), G, and lower the rail until it is rest-
ing on the support beams. Do not let go of the unit at this time.
BE SURE TO HAVE AT LEAST 2 HELPERS WHEN MOUNTING. BECAUSE OF THE CARRIAGE WEIGHT IN THE FRONT, THE
UNIT WILL NOT BALANCE ON THE SUPPORT BEAMS UNTIL THE MOUNTING BOLTS ARE SECURE. IT MAY FLIP FOR-
WARDS CAUSING SERIOUS INJURY.
8
A
E
14”
16”
18”
E
B
C
22”
20”
E F G
D

3. Install the four 10 x 20 -2 flat washers and four M10 x
1.5 - L30 hex nuts, B and C, onto the four square
head bolt threads and snug them up by hand.
4. Once the duplicator rail is in position on the support
brackets, H, or beams, I, use the supplied 14 mm
wrench to tighten the 10 mm nuts.
H
I
MOUNTING THE TEMPL
ATE CLAMPING BRACKETS
ASSEMBLING AND MOUNTING THE TEMPLA
TE BACKUP SUPPORT
The template backup support is used to support the middle section of longer templates or sample turnings to pre-
vent the template of sample turning from deflecting inwards when the duplicator stylus pushes against it.
It should be mounted to the carriage rail roughly centered on the template or sample turning and the stop bolt A
should be adjusted in inwards or outwards as needed to just touch against the back of the template or sample turn-
ing (as shown below on right).
1. Assemble the backup support as shown above, by threading a hex nut B onto the end of the longer M10
hex stop bolt A far enough to expose roughly 3/8”of the end of the bolt beyond the nut, and then threading the
exposed threads on the end of the bolt into the bottom hole in the support plate C.
2. Fit the shorter square head bolt D through the back of the support plate and secure it in place with a washer
E and hex nut F.
3. Slide the T-head bolt into the t-slot in the rail as shown, G, until the support is roughly centered on the rail and then
tighten the nut, H, to secure it in place.
G
A
F
E
D
B
C
H
A
The duplicator is supplied with two clamping brackets
that are used to hold the template or original spindle in
place at each end.
Hint: When installing the brackets, make sure to orient them so
that the points
A
are facing inwards.
To mount the clamping brackets:
1. From each end of the duplicator, slide the t-head bolt
of each of the brackets into the t-slot in the rail as
shown.
2. The final positioning of the brackets will depend on the
length of the template or original spindle being used to duplicate. Set the bracket positioning so that the dis-
tance between the points A is roughly 1/8” more than the length of template or original spindle. Once in posi-
tion tighten down the nut B to secure the brackets in place.
A
9
B

10
INST
ALLING THE SLIDE HANDLE
1. Screw the threaded end of the slide handle, A, into
the hole in either the top left B or right C of the fix-
ing block until it stops at the nut.
2. Tighten down the nut D to secure the handle to
the block.
C
D
B
INST
ALLING THE HANDWHEEL
1. Fit the handwheel hub onto the end of the shaft tak-
ing care to line up the bolt A with the hole in the
shaft B as shown.
2. Secure the handwheel to the shaft by tightening
the bolt using the supplied 10 mm wrench.
ATTACHING THE FOLLOWER ARM WITH STYLUS TO THE CARRIAGE ASSEMBLY
A
CC
1. Insert the stylus end of the follower arm into the
hole, A until it stops at the snap ring B.
2. Tighten the bolt C using the supplied 12 mm open
end wrench.
A
A
TTACHING THE CHIP GUARD
The chip guard will keep debris from getting onto the
duplicator and possibly hindering smooth movement of
the carriage assembly.
1. Slip the hole in the guard over the cutting tool arbor
until it is past the set screw as shown.
The built in pressure ring on the guard holds it in place. A
slight rotating action while sliding the guard forward or
backwards on the arbor shaft will aid in repositioning.
B
B
A

ALIGNING DUPLICATOR PARALLEL TO THE LATHE BED
Now that the duplicator is mounted to the lathe and all of
the components are assembled, it is time to fine tune the
alignment. These steps will ensure that the duplicator is
parallel to the bed of the lathe.
1. Disconnect the Lathe from the power source.
2. Mount the centers in the headstock and tailstock of
the lathe.
3. Align the “0” mark, A, on the support brackets to the
center of the lathe bed ways, B, and in line with the
headstock and tailstock center points.
This scale is used for rough alignment of the duplicator par-
allel to the bed ways. At the “0” mark you will be able to dupli-
cate up to 6 inches in diameter (for larger turnings, see page
15).
4. Set the retaining plate pin to the lowest setting on the
ratchet plate C.
5. Turn the micro adjustment knob D to its lowest setting
until the follower arm with the stylus hits the stop E.
6. Turn thumb screws F and G to lock the setting.
7. If the follower arm movement is not smooth, loosen the
spring tension adjustment nut H.
8. Using the handwheel, move the carriage to the left to-
wards the headstock until the point of the cutting tool
lines up with the point of the headstock center, I.
(Note how the 0 marks also lines up vertically with the
points), J.
MOUNTING THE CUTTING TOOL
THE CUTTING TOOL MUST BE SECURELY INSTALLED IN THE TOOL HOLDER. A LOOSE OR DISLOGDED CUTTING TOOL MAY
CAUSE SERIOUS INJURY TO THE USER AND/OR DAMAGE TO THE LATHE, DUPLICATOR OR THE WORKPIECE.
1. Loosen the tool lock screw A by using the supplied 4
mm Allen Wrench.
2. Insert the cutting tool into the tool holder. Make sure the
flat surface on the cutting tool is facing upward, B.
3. The cutting tool should protrude approximately 1” from
the end of the tool holder, C.
4. Tighten the cutting tool securely by using the 4 mm
wrench.
G
C
H
D
F
E
B
1”
A
C
A
J
I
11
B

9. Align the inside edge of the stylus with the center
point of the clamping bolt. The stylus is off center
(eccentric) and it may be necessary to rotate the
shaft to line it up, J.
10. Move the carriage of the duplicator towards the tail-
stock and bring the point of the cutting tool against
the point on the tailstock center as you did with the
headstock.
If the 2 points are not lined up, your turning will be
tapered. Simply loosen the mounting bolt on the sup-
port bracket where the 0 to 6 scale is located and
move the duplicator in or out until the points touch.
11. With the duplicator parallel to the lathe bed, firmly tighten the support beams using the supplied 19 mm
wrench.
LEFT SIDE VIEW RIGHT SIDE VIEW
J
DUPLICA
TING FROM A TURNING SAMPLE (ORIGINAL SPINDLE)
Now that the duplicator is mounted onto the machine and it is aligned parallel to the bed ways, you will need to
mount the part that you want to duplicate.
Note: Before you begin you must determine whether the turning has any sharp V cuts or angles. If so you will want
to use the fine point stylus attachment,
A,
as the round stylus will not fit into tight grooves,
B.
1. Attach the fine point stylus by slipping the hole in the
attachment over the round stylus, and tighten the
lock knob, C.
If you were to mount the fine point attachment at the
current settings, your turning would be 1/2” larger than
your template. This happens because the attachment
point is 1/2” longer than the round stylus that you ali-
gned the center points with during the initial setup
, D.
To correct this:
2. Unplug the lathe from the power source.
3. Set the retaining plate pin to the lowest setting on
the ratchet plate E.
4. Turn the micro adjustment knob F until the tip of the
fine point attachment installed on the follower arm
lines up with the center point of the clamping bolt.
(as shown in D).
5. Turn thumb screws G and H to lock the setting. If the
follower arm movement is not smooth, loosen the
spring tension adjustment nut I.
C
A B
12
1/2”
D
H
I
F
G
E

The cutting tool will now be 1/2 in away from the headstock center.
6. Loosen the cutting tool set screw J using the supplied 4 mm allen wrench and move it out of the cutting tool
arbor until it touches the center point of the headstock center, K. Tighten the set screw.
7. Using the handle, L, pull the cutting tool arbor as far back towards you as it will go, and lock it in position using
the thumbscrew, M.
13
J
K
L
M
P
Q
R
10. Mount your workpiece between the headstock and
tailstock centers and lock the tailstock into place on
the lathe bed ways. Position the stylus so that it is
against the largest diameter of the turning.
11. Set the ratchet plate to the upper (Highest) position, S.
Keeping tension on the handle, loosen the arbor lock
thumbscrew and slowly release the arbor until the pin
contacts the ratchet plate. Turn the micro adjustment
knob, T, in or out until the stylus is 1/8” away from the
largest part of the sample turning.
12. Turn the workpiece by hand to make sure it clears the
cutting tool.
S
T
NOTE: IF YOUR WORKPIECE STOCK MATERIAL IS SQUARE,YOU CAN SAVE TIME AND WEAR ON THE CUTTING TOOL BY BY CUTTING OFF THE
CORNERS. A BANDSAW OR TABLESAW CAN BE USED TO TURN THE SQUARE STOCK INTO AN OCTAGON BY MAKING A BEVEL CUT ALONG
THE LENGTH OF THE STOCK.
N
8. Mount the sample turning you want to duplicate between the center points on the clamping brackets, N. (do
not move the left hand bracket position or the turnings will be uneven) Adjust the right hand clamping bracket
to the length of the sample turning. Turn the knob, O, on each clamping bracket so that the center points insert
into the ends of the sample turning.
9. Position the template backup support at the location that provides the most effective support along the entire
length of the sample turning being used, P. Loosen the locking nut, Q, and turn the adjustment screw, R, so that
it just makes contact with the sample turning. Tighten the locking nut back up with the supplied 14 mm open end
wrench.
This will keep the sample turning from deflecting when the stylus puts pressure against it.
Note: The backup support must always be used regardless of whether a template or a sample turning is being used for
duplicating.
O

ADJUSTING DEPTH OF CUT
The depth of cut is controlled by the ratchet plate A, combined with the micro adjustment knob B. Each notch on
the ratchet plate represents a 3 mm (approx 1/8”) depth of cut increment.
When the ratchet plate is locked at the lowest notch, the stylus should just touch the template or sample turning at
its smallest point. Start the lathe up and move the carriage from the left to the right over the entire length of the work-
piece. Keep advancing the ratchet plate one notch at a time until the workpiece is round. Once the workpiece is
round you will start to cut the contours as the stylus contacts them on you sample piece.
When the workpiece approaches the sample turning diameter, use the micro-adjustment depth control knob B to
accurately control the final cutting diameter.
TIP: When turning a workpiece of varying diameters, al-
ways try to cut downhill instead of uphill, the bit will cut
better and have less tearout on the workpiece. See
example below.
MAKE SURE THE RATCHET PLATE IS SECURELY LOCKED IN PLACE. A LOOSE OR DISLOGDED RATCHET PLATE MAY
CAUSE SERIOUS INJURY TO THE USER AND/OR DAMAGE TO THE LATHE, DUPLICATOR OR THE WORKPIECE.
MAKE SURE ALL NUTS ARE FASTENED SECURELY BEFORE YOU START TURNING OPERATIONS.
DUPLICATING FROM A TEMPLATE
This process is the same as duplicating from a turning except you will be using a template instead of a sample turning.
Before you begin, mark a centerline on your template, A. This centerline represents the center points on the screws
of the template mounting brackets, the one that hold a sample turning. This centerline assures that the template is
parallel to the lathe bed. If it is not, your workpiece will be tapered.
1. Mount the template onto the 2 template mounting brackets using the (4) 6 mm hex head bolts and wash-
ers, B.
2. Line up the centerline on the template with the center of the template mounting bracket screws. Tighten the bolts
with the supplied 10 mm open end wrench
3. Position the template backup support at the location that provides the most effective support along the entire
length of the template being used, C.
3. Loosen the locking nut, D, and turn the adjustment screw, E, so that it just makes contact with the template. Tighten
the locking nut back up with a 14 mm open end wrench. This will keep the template from deflecting when the
stylus puts pressure against the template.
Note: The backup support must always be used regardless of whether a template or a sample turning is being used for
duplicating.
14
A
B
C
B
A
D
E
CUT FROM HIGHEST POINT
TO LOWEST POINT ALWAYS!

DUPLICATING L
ARGER THAN A 6 INCH DIAME
TER
Depending on the size and swing of your lathe, it may be possible to duplicate a turning larger than 6” in diam-
eter. This is achieved by moving the duplicator out away from the bed ways. Using the “0 - 6” Scale on the sup-
port brackets, A, set the number for the desired diameter. Each number adds an inch to the maximum diameter
that you can turn, B.
Use the lines that correspond to the number to rough align the duplicator parallel to the lathe bed ways. The align-
ment process will be the same as in the beginning of this manual, with the exception that the cutting tool will no
longer be able to reach the center points in the headstock and tailstock. This measurement must be set with a ruler
or vernier calipers , C.
Note: To duplicate a workpiece with a larger or smaller diameter than the original sample turning or template, move the
cutting tool in the cutting tool arbor IN for larger and OUT for smaller.
A
up to 6”
up to 7”
up to 8”
up to 9”
up to 10”
up to 11”
up to 12”
B
C
ADJUSTMENTS
CARRIAGE ASSEMBLY
The carriage assembly was aligned at the factory and should not require any further adjustment.
We do recommend that you periodically check the carriage assembly for side play. The carriage should travel
along the rail smoothly with a small amount of drag.
To check for play in the assembly grasp the carriage at opposite corners and try to wiggle it side to side, A. If no
side movement is detected, the carriage is ok.
To remove the side play:
1. Loosen the (2) 10 mm lock nuts B and turn the (2) 10 mm bolts clockwise 1/4 of a turn. Check for play again
and re-adjust if necessary. Be careful not to tighten the bolts too much or the handwheel will be hard to turn
and the carriage may not move smoothly.
2. Re-tighten the (2) 10 mm lock nuts with a 10 mm open end wrench.
A
B
B
15

16
ADJUSTING SPRING TENSION
The follower arm and stylus are kept against the tem-
plate or sample turning by spring pressure. If the move-
ment is not smooth you can adjust it.
Turn the wing nut:
- clockwise to increase spring tension.
- counter-clockwise to decrease spring tension.
MICRO ADJUST DEPTH CONTROL KNOB
As a turning approaches it’s finished size, a final light
pass of the cutting tool will give a smoother finish*. Turn
the micro adjust depth knob clockwise until final depth
is obtained.
* Note: Depending on the level of detail in your template
or original spindle, some manual shaping of fine details
and finish sanding will still be required.
FOLLOWER ARM AND STYLUS
The stylus is mounted onto the follower arm off center
(eccentric) so that it can be fine tuned.
To micro adjust the stylus loosen the follower arm locking
bolt using the supplied 12 mm open end wrench and
rotate the follower arm left or right. Re-tighten the locking
bolt when set.
TURNING THE HANDWHEEL FOR DUPLICA
TING
TO AVOID HAND INJURY WHEN TURNING THE HANDWHEEL,
PROPER TECHNIQUE SHOULD BE USED. HOLD THE HANDLES
ON THE HANDWHEEL ONLY - DO NOT HOLD AND TURN THE
HANDWHEEL BY ITS RIM.
CORRECT INCORRECT
OPERATION

17
PARTS DIAGRAM
10
09-1
01
02
06
05
04
03
07
15
16
17
11
01
13
29
18
19
20
09-2
21
31
40-1
32
37
38
36
22
35
14
23
44
45
43
53
54
55
56
57
36
28
37
41
42
26
12
36
08
49
51
52
50
48
46
47
49
51
52
52
61
62
52
51
64
51
63
58
59
60
68
27
12
24
27
67
40-2
66
66
30
38
09-2
46
36
62
65
25
31A
31B
49
39

PARTS LIST
25-036
PART N0. DESCRIPTION SPECIFICATION QTY
25036-35 HEX HEAD BOLT M8XP1.25-L1 1
25036-36 HEX NUT M8XP1.25 9
25036-37 HANDLE 7
25036-38 CAP SCREW M6XP1.0-L20 3
25036-39 SPRING ROD 1
25036-40-1 ADJUSTMENT ROD 1
25036-40-2 ADJUSTMENT KNOB 1
25036-41 GEAR PIVOT 1
25036-42 HANDWHEEL 1
25036-43 DUPLICATIOR RAIL 1
25036-44 RACK 1
25036-45 CAP SCREW M4XP0.7-L10 6
25036-46 HEX HEAD BOLT M6XP1.0-L20 5
25036-47 WASHER Ø6 4
25036-48 BOLT 2
25036-49 SQUARE HEAD BOLT M10XP1.5-L30 7
25036-50 CLAMPING BRACKETS 2
25036-51 WASHER Ø10X20-2 9
25036-52 HEX NUT M10XP1.5 8
25036-53 BOLT M12X1.75-L65 2
25036-54 WASHER Ø12XØ26-2.5 2
25036-55 SUPPORT BEAMS 2
25036-56 CLAMPING PLATES 2
25036-57 CUTING TOOL HSS 1
25036-58 OPEN WRENCH 10X8 1
25036-59 OPEN WRENCH 12X14 1
25036-60 OPEN WRENCH 17X19 1
25036-61 BACKUP SUPPORT 1
25036-62 HEX HD BOLT M10XP1.5-L55 3
25036-63 HEX HD BOLT M10XP1.5-L30 2
25036-64 SPRING PIN Ø6XL20 4
25036-65 ALLEN KEY 4MM 1
25036-66 HEX NUT M12X1.75 2
25036-67 SUPPORT BRACKET 2
25036-68 GUARD 1
PART N0. DESCRIPTION SPECIFICATION QTY
25036-01 PIVOT BUSHING 2
25036-02 HEX HD. BOLT M6XP1.0-L20 2
25036-03 HEX NUT M6XP1.0 3
25036-04 TENSION SPRING 1
25036-05 INDEX PIN 1
25036-06 RATCHET PLATE 1
25036-07 PIVOT PIN 1
25036-08 SPRING 1
25036-09-1 WING SCREW M6X1.0-L25-HOLE 1
25036-09-2 WING SCREW M6X1.0-L25 2
25036-10 LABEL 1
25036-11 CARRIAGE 1
25036-12 PIVOT BUSHING 4
25036-13 SET SCREW 8XP1.25-L16 1
25036-14 CUTTERHEAD 1
25036-15 ADJUSTING GUIDE 4
25036-16 WASHER Ø6 8
25036-17 HEX HEAD BOLT M6XP1.0-L25 8
25036-18 C-RING C-15 1
25036-19 GUIDE ROD 1
25036-20 SPRING PIN Ø6XL20 1
25036-21 ADJUSTING BLOCK 1
25036-22 C-RING C-9 1
25036-23 FIXING BLOCK 1
25036-24 GEAR 30T 1
25036-25 GEAR 28T 1
25036-26 SET SCREW M6XP1.0-L8 3
25036-27 C-RING C-18 4
25036-28 OVAL WHEEL AXLE 1
25036-29 C-RING C-14 1
25036-30 STYLUS AUXILIARY DEVICE 1
25036-31 STYLUS 1
25036-31A STYLUS FINE POINT 1
25036-31B WING SCREW 1
25036-32 WING NUT 1
18
NOTES

Notes
19

IMPORTANT
When ordering replacement parts, always give the model number, serial number of the machine and
part number. Also a brief description of each item and quantity desired.
8360 Champ-d’Eau, Montreal (Quebec) Canada H1P 1Y3
Tel.: (514) 326-1161
Fax: (514) 326-5565 - Parts & Service / Fax: (514) 326-5555 - Order Desk
www.general.ca
MODEL 25-036
/