Page is loading ...


Document ID: 39080000 Rev: C Technical Support: 1-800-626-6912 Page 2 of 26
EUROPEAN TOUCH - LIMITED CONDITIONAL* WARRANTY
European Touch Holdings, Inc. ("European Touch") conditionally warrants your whirlpool pedicure spa
(the "Pedicure Spa") in accordance with the terms and conditions set forth below for a period of one (1)
year commencing on the original date of shipment of the Pedicure Spa to you. The warranty only
applies to the Pedicure Spa's original end-user owner or customer (the "Customer"). This Conditional
Warranty is non-transferable and replaces any warranties previously published by European
Touch.
If examination of the Pedicure Spa by European Touch during the applicable warranty period shows it
to have a defect in material or workmanship, European Touch will, at its option, repair or replace the
defective component or part thereof. Further, European Touch may, at its discretion, replace a
defective component or part with a refurbished component or part, or may replace the Pedicure Spa
with a refurbished pedicure spa. If European Touch elects to replace the Pedicure Spa, the
replacement pedicure spa must be comparable in style and size to the Pedicure Spa. The Customer
shall bear all charges incurred for the shipment to it of replacement components or parts, or a
replacement pedicure spa, and the cost of all labor incurred in repairing defects in the Pedicure Spa or
repairing or replacing any of its defective components or parts.
The foregoing limited warranty does not apply:
• To the Pedicure Spa, or any components or parts thereof, if subjected to misuse or neglect or if
accidentally or intentionally damage.
• To the Pedicure Spa, or any components or part, if altered or modified in any way.
• To any expenses incurred by the Customer or any third party, including labor or material, during
investigation, removal or reinstallation of the Pedicure Spa or any defective components or parts.
• To any damage to or impairment of the Pedicure Spa, or any components or parts thereof,
caused by any casualty, including without limitation, accident, fire, wind, floods, acts of nature or
attempted theft.
• To any workmanship of a fabricator (other than European Touch) or installer of the Pedicure
Spa.
• If damage to pump parts and/or motor parts is due to obstructed plumbing.
• If the Pedicure Spa is removed from its place of initial installation.
• To staining, fading, or discoloration of any portion of the Pedicure Spa caused by water additives
or improper water treatment.
• To staining, fading or discoloration of the Pedicure Spa's upholstered seat, armrests or footrests.
• To malfunctions or damage caused by improper installation of the Pedicure Spa, including, but
not limited to, failure to meet local, state, or local plumbing, electrical and building codes.
• To damage resulting from a person standing in the Pedicure Spa's basin or other similar stress
to that basin.
• To freight damage.
• To damage incurred to the Pedicure Spa while in possession of any party other than European
Touch.
This forgoing conditional limited warranty is also conditional upon:
• The Pedicure Spa being installed by a licensed professional in accordance with European
Touch's installation instructions.
• The proper use of cleaning and sanitizing solutions in accordance with the manufacturer’s
instructions, or state board. It must be noted that repeated use of concentrated sodium
hypochlorite solutions (chlorine beach), concentrated ether solutions, or acetone will damage
chrome and plumbing components and will void the limited warranty on those parts. European
Touch recommends that you thoroughly read labels and use sanitizing products void of these
chemicals.

Document ID: 39080000 Rev: C Technical Support: 1-800-626-6912 Page 3 of 26
• Use of this pedicure spa for functions it was not created for, including, but not limited to, ionic
detox or any process that operates by reverse electroplating; this use will destroy plated parts
and void the warranty.
• Shipment, if requested, to European Touch of Pedicure Spa parts or components thought to be
defective. Parts or components may only be returned if authorized in advance by European
Touch. All returns must be freight prepaid.
• Determination by European Touch, in its reasonable discretion, that there exists a defect in
material or workmanship.
Repair or replacement of any part or component under this Limited Warranty, or furnishing a
replacement pedicure spa, shall not extend the duration of the warranty with respect to such repaired or
replaced part beyond the stated warranty period. When a part or component is replaced, it will be
under warranty for 90 days, or for the remaining life of original warranty, whichever period is greater.
Customer agrees by using the Pedicure Spa that
• THE OBLIGATION OF EUROPEAN TOUCH SHALL NOT EXTEND TO INDIRECT OR
CONSEQUENTIAL DAMAGES OR INJURY WHICH MAY RESULT FROM SUCH USE
• that the obligations of European Touch are limited to those set forth herein
• this warranty is limited to the original owner/end-user and is non-transferable
• European Touch shall not be liable for any other obligations or liabilities, including, but not
limited to: obligations or liabilities arising out of breach of contract or warranty, negligence, or
other tort or any theory of strict liability with respect to the Pedicure Spa or parts or components
thereof or any acts or omissions of European Touch
• Any assistance European Touch provides to the Customer outside of terms, limitations, or
exclusions of this limited warranty will not constitute a waiver of any of the foregoing terms,
limitations, or exclusions, nor will such assistance extend or revive the warranty.
THIS LIMITED WARRANTY IS IN LIEU OF ALL OTHER WARRANTIES, EITHER EXPRESS OR
IMPLIED, AND ALL SUCH OTHER WARRANTIES, INCLUDING WITHOUT LIMITATION, IMPLIED
WARRANTIES OF MERCHANTABILITY OR FITNESS FOR A PARTICULAR PURPOSE, ARE
HEREBY DISCLAIMED AND EXCLUDED FROM THIS LIMITED WARRANTY. NO DEALER OR
OTHER PERSON HAS ANY AUTHORITY TO BIND EUROPEAN TOUCH TO CHANGES OR
ADDITIONS TO THIS WARRANTY OR ITS PRODUCTS. ACCORDINGLY, EUROPEAN TOUCH IS
NOT RESPONSIBLE FOR ANY SUCH OUTSIDE WARRANTIES OR REPRESENTATIONS.
IN NO EVENT SHALL EUROPEAN TOUCH BE LIABLE IN ANY WAY FOR ANY CONSEQUENTIAL,
SPECIAL, OR INCIDENTAL DAMAGES OF ANY NATURE WHATSOEVER, OR FOR ANY
AMOUNTS IN EXCESS OF THE SELLING PRICE OF THE PEDICURE SPA OR ANY COMPONENTS
OR PARTS THEREOF FOUND TO BE DEFECTIVE. THIS LIMITED WARRANTY GIVES THE
CUSTOMER SPECIFIC LEGAL RIGHTS. THE CUSTOMER MAY ALSO HAVE OTHER RIGHTS
WHICH MAY VARY BY EACH JURISDICTION.
Should your Pedicure Spa require service due to a defect or malfunction, please contact:
European Touch – Technical Support
800.626.6912 | 414.357.7016 | f: 414.357.6360
email: service@europeantouch.com
website: www.europeantouch.com

Document ID: 39080000 Rev: C Technical Support: 1-800-626-6912 Page 4 of 26
OWNERS MANUAL For
Espresso® Spa
IMPORTANT INFORMATION
Serial Number:
Work Order Number:
Installed by:
Installation Date:
The serial number and work order number are located under the rear access panel.
Remove rear access panel
to locate the serial number
and work order number.

Document ID: 39080000 Rev: C Technical Support: 1-800-626-6912 Page 5 of 26
TABLE OF CONTENTS
EUROPEAN TOUCH - LIMITED CONDITIONAL* WARRANTY.................................................................2
IMPORTANT INFORMATION .............................................................................................................4
INTRODUCTION..............................................................................................................................6
IMPORTANT SAFETY INSTRUCTIONS................................................................................................6
DANGER.......................................................................................................................................7
WARNINGS ...................................................................................................................................7
IMPORTANT REQUIREMENTS ..........................................................................................................8
HEALTH RISK WARNING ................................................................................................................8
PEDICURE SPA SPECIFICATIONS ....................................................................................................9
INSTALLATION/ASSEMBLY INSTRUCTIONS .....................................................................................10
PEDICURE PRODUCT GUIDELINES ................................................................................................16
PIPE-FREE SPA CLEANING AND DISINFECTING PROCEDURES.........................................................17
DAILY CLEANING LOG .................................................................................................................18
REPLACEMENT PARTS ................................................................................................................21
Drain Assembly ..................................................................................................................21
Power Drain Pump Assembly ............................................................................................. 21
Full Assembly ..................................................................................................................... 22
High Capacity Power Drain Pump Assembly...................................................................... 24
Motor Assembly..................................................................................................................24
HISTORY AND NOTES ..................................................................................................................25

Document ID: 39080000 Rev: C Technical Support: 1-800-626-6912 Page 6 of 26
INTRODUCTION
Thank you for selecting EUROPEAN TOUCH, the leading designer, manufacturer, and marketer of
pedicure spas in North America. The Espresso Spa™ (herein referred to as pedicure spa) is an
innovative pedicure spa that has been designed to serve you dependably for many years. Please
take time to thoroughly read this entire manual before installation and use. If you have any problems
or have questions regarding your pedicure spa, please contact EUROPEAN TOUCH’s Technical
Support Department at 1-800-626-6912, Monday through Friday 8 AM to 5 PM CST. After hours calls
are recorded and attended to the next business day.
IMPORTANT SAFETY INSTRUCTIONS
Follow all of your state and local codes. Many require a vacuum breaker be added to the water
inlet lines, which is not supplied by European Touch.
When using an electrical appliance, basic precautions should always be followed, including the
following:
Read all instructions before using the Pedicure Spa.
WARNING – To reduce the risk of burns, fire, electric shock, or injury to persons:
1) Use the Pedicure Spa only for its intended use as described in this manual. Do not use
attachments not recommended by the manufacturer.
2) Never operate the Pedicure Spa if it has a damaged cord or plug, if it is not working properly, if
it has been dropped or damaged, or dropped into water.
3) Never drop or insert any object into any opening.
4) Do not use outdoors.
5) Do not operate where aerosol (spray) products are being used or where oxygen is being
administered.
6) Not designed to be picked up or carried as a complete assembled unit.
Save These Instructions

Document ID: 39080000 Rev: C Technical Support: 1-800-626-6912 Page 7 of 26
DANGER
1) Never use pins or other metallic fasteners with this appliance.
2) Carefully examine the covering before each use.
3) Discard the appliance if the covering shows any sign of deterioration, such as checking,
blistering, or cracking.
4) Keep Electrical Components Dry – Do not operate in a wet or moist condition.
WARNINGS
1) WARNING: RISK OF ELECTRIC SHOCK; do not permit electric appliances (such as a hair
dryer, lamp, telephone, radio, or television) within 1.5M of this hydro massage bathtub.
2) CAUTION: Test the ground fault circuit interrupter protecting this appliance periodically in
accordance with the manufacturer’s instructions.
3) Temperatures sufficiently high to cause burns may occur regardless of the control setting.
a. Do not use on…
• Infants
• Invalids
• Sleeping or unconscious person.
b. Do not use on…
• Insensitive skin
• Person with poor blood circulation.
Note: Check the skin in contact with the heated area of the appliance frequently to
reduce the risk of blistering.
4) Excessive water temperature is dangerous and should be checked before use. Maximum
operating water temperature should not exceed 105° F (41° C) and the maximum supply
water temperature should not exceed 120° F (49° C).
5) The spa has a heated surface in the seat bottom. Persons sensitive to heat must be careful
when using the spa.
6) Always enter and exit the pedicure spa slowly and carefully.
7) This pedicure spa has a weight capacity of 350 pounds.
8) Do Not Crush – Avoid sharp folds
9) Do not stand on or in appliance, use only while seated.
10) Connect this appliance to a properly grounded outlet only. See Grounding Instructions within
the install manual.
Note: Always verify maximum temperatures with your local & state codes.

Document ID: 39080000 Rev: C Technical Support: 1-800-626-6912 Page 8 of 26
IMPORTANT REQUIREMENTS
EUROPEAN TOUCH requires that you contact your local, licensed plumber and licensed electrician
to install your new pedicure spa. Installation must be in compliance with all your local and state
building codes. Your pedicure spa cannot operate efficiently or safely unless it is provided with
adequate electrical power, sufficient water pressure, proper water temperature, and required drainage
capabilities. Contact your local building inspector for information and local code compliance
procedures that need to be followed when having your pedicure spa installed. Subsequent
inspections and approvals that may be required are the responsibility of the purchaser. (See limited
warranty regarding incidental or consequential exclusions – page 2).
HEALTH RISK WARNING
Individuals whose feet or legs are inflamed or have open wounds should not be allowed to use the
pedicure spa at any time. Nail technicians should advise clients to consult their physician before
using the pedicure spa if there is any sign of fungal infection, swelling, fracture, or persistent pain. In
some cases diabetics may experience improved circulation in their feet, but should first consult their
physician prior to receiving a pedicure.
If the client experiences any pain or discomfort discontinue the use of the pedicure spa
immediately.
Your client’s massage and pedicure spa experience should be pleasant and comfortable.

Document ID: 39080000 Rev: C Technical Support: 1-800-626-6912 Page 9 of 26
PEDICURE SPA SPECIFICATIONS
Hot and cold water supply lines required (hot and cold shut offs may be installed under pedicure spa base)
SHIPPING INFORMATION
Dimensions: 48”L (165cm) x 40W (84cm) x 41”H (104cm) – includes Spa, carton, and pallet
Weight: 140 lbs. (117 kg) - includes spa, carton, pallet
SPA INFORMATION
Overall Dimensions: 66"L (152.4cm) x 27”W (68.6cm) x 49"H (125cm)
Minimum Area Required For Chair Movement:
66”L (168cm) x 40”W (101cm) x 49"H (125cm)
Empty Weight (Complete): 125lbs (57kg)
Water Fill Line Capacity: 4.5-5.5 U.S. gallons to accommodate 5’1” to 6’8” Clients
Whirlpool Pump Motor: 1/6 HP, 110V, 60Hz
Seat Upholstery: Polyurethane
Power Source: 110V AC, 2.75 Amps, 60 Hz (GFCI Protected)
X Caution: Pedicure spa must be installed by a licensed electrician and a licensed plumber,
conforming to all local and national electrical codes
Construction: Linear Low Density Polyethylene (LLDPE)
Pipe-Free® Technology: No closed loop circulating pipes, fully drained, easy to clean and sanitize.
Electrical Switches: On/Off switch for water movement motor. A single hand-held, low voltage
remote control of the massage motors. On/Off for drain is optional.
Compliances: Tested according to UL 1951:2008, CAN/CSA C22.8 No. 68-92:2006,
ASME/ANSI A112.19.7M:1995, ASTM D2564-84
Limited Warranty: One (1) year on parts from date of shipment. Labor is not included.
NOTE: Due to our policy of continuous improvements, all specifications are subject to change without notice.
All dimensions and weights are approximate

Document ID: 39080000 Rev: C Technical Support: 1-800-626-6912 Page 10 of 26
INSTALLATION/ASSEMBLY INSTRUCTIONS
(Two People Are Recommended For Safe Assembly)
Unpack all three boxes received. Be sure that you have received all components. The components
should include:
** If you do not have any of the above components please contact EUROPEAN TOUCH’s Technical
Support Department at 1-800-626-6912 immediately. ** (8:00 am – 5:00 pm CST, Monday–Friday)
Basin
Assembly
Extension
Assembly
Chair
Back
Rest
Chair
Seat
Armrests
Manual
Bag
Chair
Fasteners
Bag
Remote
and
Transformer

Document ID: 39080000 Rev: C Technical Support: 1-800-626-6912 Page 11 of 26
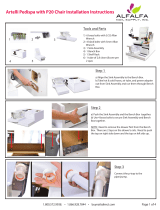
Tools that are needed for proper assembly:
7/16” Open End Wrench or Socket Wrench
Phillips Screw Driver or
Electric Screw Driver
3/16” or 5mm Allen Wrench
Crescent Wrench
Channel Locks Wrench
STEP 1
Begin by locating the spa in the appropriate place and position all components near.
STEP 2
Turn the Basin Assembly and the Extension Assembly on their side and attach the (3) Floor Brackets
to both the extension and basin using the supplied washers and screws.
Pick-up
Points
Rear Hole or
Metal Base
Pick-up Points
Metal Base
Pick-up Points

Document ID: 39080000 Rev: C Technical Support: 1-800-626-6912 Page 12 of 26
STEP 3
Flip the entire extension section over and position if behind the basin. Be sure the pump/handle of
the hydraulic lift lines up with the recess molded into the extension.
STEP 4
Take the power strip and peel off the outer layer of the double sided tape exposing the adhesive.
Place the power strip horizontally on the front of the base underneath the front opening of the
extension. Feed the power strip cord through the appropriate hole at the back of the extension.
STEP 5
Uncoil the hoses and cords coming from the basin and plug in the cords into the power strip.
STEP 6
Run the stainless steel (Hot and Cold) hoses underneath the extension towards the back of the
extension. Remove the brass nut, rubber o-ring and nylon ring from brass bulkhead fitting. Pass the
brass bulkhead fitting through the holes in the back of the extension. Put the fitting with the red o-ring
through the small right hole. Put the fitting with the blue o-ring in the small center hole. Place the
rubber o-ring, then the nylon o-ring onto the fitting and tighten brass nut using the Crescent or
Channel Locks Wrench and grasping the brass fitting through the access panel.

Document ID: 39080000 Rev: C Technical Support: 1-800-626-6912 Page 13 of 26
STEP 7a – Unit purchased without Power Drain Pump
Tighten a 1½” coupler to the end of the PVC pipe sticking out of the basin. Continue to route the
plumbing as needed using 1½” Schedule 40 PVC.
STEP 7b – Unit purchased with Power Drain Pump
Run the black hose underneath the extension towards the back of the extension. Remove the brass
nut, rubber o-ring and nylon ring from brass bulkhead fitting. Pass the bulkhead fitting through the
small left hole in the back of the extension. Place the rubber o-ring, then the nylon o-ring onto the
fitting and tighten brass nut using the Crescent or Channel Locks Wrench and grasping the brass
fitting through the access panel.
STEP 8
Push the basin towards the extension and find the (4) ¼-20 bolts and (4) washers. Attach the
extension to the rear of the basin using a 7/16” Wrench or Socket.
WARNING: Do not lift unit once extension is assembled to basin.

Document ID: 39080000 Rev: C Technical Support: 1-800-626-6912 Page 14 of 26
STEP 9
Attach water and drain connections at rear of assembled unit and test for leaks. Be sure to add a
vacuum breaker if required by your specific plumbing codes.
STEP 10
Take the transformer that is shipped with the chair and plug that into the power strip and run the cord
underneath the extension and out the top of the rear access hole.
STEP 11
Place both access covers over holes and tighten down using the (4) supplied screws and Phillips
Screw Driver.

Document ID: 39080000 Rev: C Technical Support: 1-800-626-6912 Page 15 of 26
STEP 12
Assemble the chair by setting the seat cushion onto the hydraulic pedestal. Locate both armrest and
find the (L) or (R) on them. This denotes left or right. Assemble armrests to the seat cushion using
the supplied screws and Phillips screw driver. Assemble back cushion to the armrests using the
supplied screws. Place supplied caps into holes of the armrests after assembly is complete.
STEP 13
Plug transformer cord into bottom of back cushion. Plug wire from back cushion into seat cushion.
WARNING: Do not let chair rotate a full 360 degrees. The power cord may disconnect from
the chair.
STEP 14
Unpack remote and plug it into the chair, where the sear cushion and back cushion come together.
STEP 15
Secure the entire unit to the floor using the appropriate fasteners with the floor brackets.
Right
Left

Document ID: 39080000 Rev: C Technical Support: 1-800-626-6912 Page 16 of 26
On/Off Button
Note: Pressing with finger nails, rather than the pads of fingers, will damage the on/off switch and will not be
covered under the warranty.
PEDICURE PRODUCT GUIDELINES
Because there are so many different products on the market, it is difficult to list all of the pedicure products that
are safe to use in our pedicure spas. However, the following guidelines can be used:
• It is your responsibility to understand and follow your state’s regulations regarding product cleaning and
disinfecting requirements.
• Do not use any products containing a foaming agent; this will cause excessive foam.
• It has been determined that products containing non-dissolving abrasives (such as sand and sea salts)
will not harm the internal component structure of your pedicure spa as long as the entire EUROPEAN
TOUCH cleaning requirements are followed without deviation.
• Oil based products may be used in your pedicure spa as long as the cleaning requirements are met.
• Please use pedicure products and cleaning solutions in accordance with each manufacturer's
directions.
EUROPEAN TOUCH pedicure spas will give you many years of service as long as proper precautions, precise
cleaning, and operating instructions are followed. It is the responsibility of the pedicure spa user to properly
clean and maintain the pedicure spa.
Water
Faucet Fill
Handle
Sprayer
Drain Plunger
Overfill Knob

Document ID: 39080000 Rev: C Technical Support: 1-800-626-6912 Page 17 of 26
PIPE-FREE SPA CLEANING AND DISINFECTING PROCEDURES
Always check with your state board for required cleaning and disinfecting procedures.
It is extremely important to clean and disinfect your pedicure spa after each pedicure, after the last pedicure of the day,
and once a week for overnight cleaning. Regular cleaning will help keep your pedicure spa in good working condition.
Proper and continuous cleaning will kill harmful bacteria and germs that can cause infection. To clean your pedicure spa
equipped with Pipe-Free technology, follow these easy steps.
Procedures for Cleaning and Disinfecting Pipe-Free Pedicure spas
After use upon each patron, each Pipe-Free Pedicure spa shall be cleaned and disinfected in the following sequential
manner:
(1) All water shall be drained from the spa basin.
(2) Remove Pipe-Free Cover by turning clockwise.
(3) Using handheld sprayer, rinse side walls of basin, pipe free jet and pipe free cover of all residue and debris.
(4) Scrub all visible residue from the Pipe-Free Cover, inside walls of the basin, and/or other components and the
areas behind or under each with a clean brush and liquid soap (labeled as such on soap product) and water.
Rinse with clean water.
(4) Reinsert the properly cleaned Pipe-Free Cover over jet.
Disinfecting with water filled basin directions:
(1) Refill the basin with clean water and circulate the correct amount (read the label for mixing instructions) of the
EPA-registered hospital-liquid disinfectant, which the label claims is a bactericide, fungicide, and virucide,
through the basin for at least 10 minutes.
(2) Drain, rinse and wipe the basin dry with a clean paper towel.
(3) Record this procedure in the pedicure-cleaning log. The log shall contain the date and time of each cleaning,
initials of the person who completed the procedure, and shall indicate that the cleaning was done after a client.
Disinfecting with Ready to Use (RTU) products and surface saturation directions:
(1) Spray to saturate inside of basin, all basin walls and area inside Pipe-Free Jet area with EPA registered
disinfectant and allow sitting for at least 10 minutes.
(2) Submerged Pipe-Free Cover in container of EPA registered disinfectant for at least 10 minutes OR spray Pipe-
Free Cover to saturate with EPA registered disinfectant and lay inside basin for a minimum of 10 minutes.
(3) Rinse and wipe the basin dry with a clean paper towel. Follow step (4) above.
At the end of every day and after performing the procedures provided in subsection (b) (1 through 6) and after the last
client, each pipe-free pedicure spa shall be cleaned and disinfected in the following sequential manner:
(1) Fill the basin with warm water and detergent (labeled as such on detergent product) and circulate the detergent
through the spa system for at least 10 minutes.
(2) Drain the detergent solution and rinse the basin.
(3) Refill the basin with clean water and circulate the correct amount (read the label for mixing instructions) of the
EPA-registered hospital-liquid disinfectant which the label claims is a bactericide, fungicide, and virucide,
through the basin for at least 10 minutes.
(4) Drain, rinse and wipe the basin dry with a clean paper towel.
(5) Allow the basin to dry completely.
(6) Record this procedure in the pedicure-cleaning log. The log shall contain the date and time of each cleaning,
initials of the person who completed the procedure, and shall indicate that the cleaning was done at the end of
the day.
At least once each week, after completing the procedures provided in subsection (c) (1 through 3), and the disinfectant
solution in each pipe-free pedicure spa shall not be drained and the following sequential procedures shall be followed:
(1) The unit shall be turned off and the disinfecting solution shall be left in the unit undisturbed for 6 to 10 hours.
(2) After the disinfectant solution has been sitting between 6 to 10 hours, rinse and wipe the basin dry with a clean
paper towel.
(3) Record this procedure in the pedicure-cleaning log. The log shall contain the date and time of each cleaning,
initials of the person who completed the procedure, and shall indicate that the cleaning was done weekly.
The pedicure-cleaning log shall be made available upon request by either a patron or a state board representative.
A violation of this section may result in an administrative fine and/or disciplinary action.
CAUTION: Cleaning products that contain abrasives can damage the pedicure spa. Use only non-abrasive products to
clean your spa.

Document ID: 39080000 Rev: C Technical Support: 1-800-626-6912 Page 18 of 26
DAILY CLEANING LOG
Pedicure Spa #
Date Time Initials After Client End of Day Weekly
For your convenience on pages 19-20; we are providing daily cleaning log sheets which you can
remove from the manual for your use. A daily cleaning log may be required by your state’s health
board.

Document ID: 39080000 Rev: C Technical Support: 1-800-626-6912 Page 19 of 26
DAILY CLEANING LOG
Pedicure Spa #
Date Time Initials After Client End of Day Weekly

Document ID: 39080000 Rev: C Technical Support: 1-800-626-6912 Page 20 of 26
DAILY CLEANING LOG
Pedicure Spa #
Date Time Initials After Client End of Day Weekly
/