Thomson CS1200VD Owner's manual
- Category
- DVD players
- Type
- Owner's manual

EN
3
Table of Content
EN
2
The Thomson Multimedia
Pack
Safety Information
Getting Started
Unpacking the DVD Receiver .4
Unpacking the Speakers . . . . .4
Inserting Batteries into Remote
Control . . . . . . . . . . . . . . . . . . . .5
Set Up and Maintenance of the
Receiver . . . . . . . . . . . . . . . . . . .5
Protect your Components from
Overheating . . . . . . . . . . . . . . . .6
Disc Information . . . . . . . . . . . .6
Setup and Connections
Speaker and Component
Connections . . . . . . . . . . . . . . . .7
Connections: DVD + TV . . . . . .8
Connections: DVD + TV + Audio
Receiver . . . . . . . . . . . . . . . . . . .8
Speakers . . . . . . . . . . . . . . . . . . .8
Main Unit
Main unit . . . . . . . . . . . . . . . .9
Remote Control
Remote control . . . . . . . .10-11
Using the remote to control
additional components . . . . .12
DVD Menu System
The Main Menu . . . . . . . . . .13
Playmode . . . . . . . . . . . . . . .13
Program Play . . . . . . . . . . . . .14
The Lock Menu . . . . . . . . . . .14
Locking your DVD player . . .14
Unlocking your DVD player
. . . . . . . . . . . . . . . . . . . . . . .15
Changing your password . . .15
Setting Rating Limits . . . . . . .16
The Display menu . . . . . . . . .17
The Sound menu . . . . . . . . . .18
Digital Output . . . . . . . . . . . .19
Language menu . . . . . . . . . .20
Player menu . . . . . . . . . . . . .20
Disc menu . . . . . . . . . . . . . . .20
Audio . . . . . . . . . . . . . . . . . .21
Subtitles . . . . . . . . . . . . . . . .21
Playing Discs (DVD)
To load and play a DVD . . . .22
Search options . . . . . . . . . . .22
Playback options . . . . . . . . . .22
Using the On-Screen Info Display
. . . . . . . . . . . . . . . . . . . . . . .23
Time Display . . . . . . . . . . . . .24
Selecting a Title . . . . . . . . . . .24
Selecting a Chapter . . . . . . . .24
Selecting Subtitles . . . . . . . . .25
Changing the Audio Language
. . . . . . . . . . . . . . . . . . . . . . .25
Using the Repeat Features . .26
Using the Bookmark Features
. . . . . . . . . . . . . . . . . . . . .27-28
Playing Discs (Audio CD)
Using the Time Display . . . . .29
Selecting a Specific Track . . .29
Using the Playmode Feature
. . . . . . . . . . . . . . . . . . . . . . .29
Bookmark . . . . . . . . . . . . . . .30
Introscan . . . . . . . . . . . . . . . .30
Video CD . . . . . . . . . . . . . . . .30
Playing Discs (mp3)
Playing mp3 discs . . . . . . . . .31
The mp3 display . . . . . . . . . .31
Selecting Folders and Songs
. . . . . . . . . . . . . . . . . . . . . . .31
Playing Discs (JPEG files)
Viewing JPEG files . . . . . . . . .32
Slide show . . . . . . . . . . . . . . .32
Activating the clock and
radio
Setting the clock . . . . . . . . . .33
Setting the timer . . . . . . . . . .33
Activating the clock . . . . . . .33
Sleep mode . . . . . . . . . . . . . .33
Manual tuning . . . . . . . . . . .34
Storing preset stations . . . . .34
Automatic presets programming
. . . . . . . . . . . . . . . . . . . . . . .34
Troubleshooting Tips . . . .
35-36
Care and Maintenance
. . . . . . . . . . . . . . . . . . .37
Language Codes . . . . .38
Safety Information
Thomson Information
CAUTION!
Invisible laser radiation when open. Avoid exposure to
beam. Class 1 laser product. This system must be
opened only by qualified technicians to prevent acci-
dents caused by the laser beam.
LASER λ= 780 nm, P max = 5 mW
Rating Information: At bottom of the unit
this unit comply with the existing requirements
In accordance with the rating plate of
the unit, this unit complies with current
standards concerning electrical safety
and electromagnetic compatibility.
Please respect the environment Before
throwing any batteries away, consult
your distributor who may be able to
take them back for specific recycling.
Have a Blast- Just Not in Your Eardrums
Make sure you turn down the volume
on the unit before you put on head-
phones. Increase the volume to the
desired level only after headphone are
in place.
ADVARSEL!
USYNLIG LASERSTRÅLNING VED ÅBNING NAR
SIKKERHEDSAFBRYDERE ER UDE AF FUNKTION.
UNGDÅ UDSAETTELSE FOR STRÅLNING.
VORSICHT!
UNSICHTBARE LASERSTRALUNG
WENN ABDECKUNG GEÖFFNET UND SICHERHEITS–
VERRIEGELUNG ÜBERBRÜCKT.
NICHT DEM LASERSTRAHL AUSSETZEN!
CLASS 1 LASER PRODUCT
LASER KLASSE 1
APPAREIL A LASER
DE CLASSE 1
LUOKAN 1 LASERLAITE
KLASS 1 LASERAPPARAT
CAUTION – INVISIBLE LASER RADIATION
WHEN OPEN AND INTERLOCKS FAILED OR
DEFEATED. AVOID EXPOSURE TO BEAM.
ATTENTION –
RAYONNEMENT LASER INVISIBLE
DANGEREUX EN CAS D'OUVERTURE ET LORSQUE
LA SECURITE EST NEUTRALISEE.
EXPOSITION DANGEREUSE AU FAISCEAU.
VARNING–
OSYNLIG LASERSTRÅLNING NÄR DENNA DEL
ÄR ÖPPNAD OCH SPÄRRAN ÄR URKOPPLADE.
BETRAKTA EJ STRÅLEN.
VARO!
AVAT T AESSA JA SOUJALUKITUS OHITETTAESSA
OLET ALTTIINA NÄKYMÄTTÖMÄLLE.
LASERSÄTEILYLLE ÄLÄ KATSO SÄTEESEEN.
For UK Only
CONNECT THE MAIN LEAD INTO A MAINS
POWER SOCKET
POWER SUPPLY 230V. It must not be connected to
D.C. mains.
Note; The mains lead of the set is fitted with a
molded plug. If the mains socket are not compatible
or if for any reason the plug is removed please fol-
low the directions below. The molded plug cannot
be rewired and if removed must be disposed of safe-
ly.
DO NOT under any circumstances plug the severed
plug into any mains socket as this could result in
electric shock.
Important: If the plug is removed, rewire the new
plug as follow:
The wires in the mains plug are colored in accor-
dance to the following code:
BLUE = NEUTRAL/BROWN = LIVE
If the colors of the wires in the mains lead of this
apparatus may not correspond with the colored
markings identifying the terminals in your plug, pro-
ceed as follows:
BLUE wire to the terminal coded N (Neutral) or col-
ored black.
BROWN wire to the terminal coded L (Live) or col-
ored red.
DO NOT make any connection to
the terminal in the plug which is
marked by the letter E or by the
earth symbol or colored green or
green and yellow.
A fused plug must be fitted with
a 3A fuse approved by ASTA or
BS1362 and fuse covers must be
always be securely replaced. If
you set does not work, the fuse
may be blown.
CS1200VD EN PART 1 5/20/03 11:12 AM Page 6

45
Getting Started Getting Started
EN EN
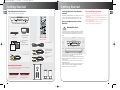
Unpacking the DVD Receiver
You should receive the following items:
One FM
antenna wire
One external AM
loop antenna
one video cable
(single wire) with
yellow connec-
tors;
• one instruction
book;
• one Quick
Connection Guide
R
L
SPEAKER
IMPEDANCE 6
0
PHASE
180
FROM MAIN UNIT
AC ~
ON/STANDBY
1 X red/black wire for
front right speaker
Unpacking The Speakers
• one set of speakers including 1 set of left and right
front speakers and 1 subwoofer.
Inserting Batteries into Remote
Control
Insert two AAA(R6) batteries according to the + and
- signs on the battery compartment. To use the
remote control, point it directly at your receiver.
Set up and Maintenance of the
Receiver
IMPORTANT NOTE
• Provide spaces for sufficient ventilation as indicat-
ed below. If the space is insufficient, the unit may
overheat resulting in malfunction and shorter life
time.
• Do not connect to the AC power cords until all
connections are completed.
• Do not use your set immediately after transferring
it from a cold place to a warm place: there is risk of
condensation.
• Do not expose your set to water and excessively
high temperatures.
• After having disconnected your set, clean the case
with a soft cloth, or with a slightly damp leather
chamois. Never use strong solvents.
Disc handling precaution:
• Do not touch the recorded surface.
• Do not use record cleaning sprays, solvent or anti-
static liquid.
• If the disc is dirty, clean it with a damp cloth and
wipe from the center out. Wipe in straight line and
not in circular motion.
• Do not attach stickers, label on the disc.
• Store the disc in its case after playing.
10cm/4”
5cm/2”
10cm/4”
10cm
/4”
10cm/
4”
Front
Rear
One DVD receiver unit
One Remote Control
(RCT311AAM1)
1 X red/black wire for
front left speaker
one subwoofer
cable
one audio cable
one SCART cable
CS1200VD EN PART 1 5/20/03 11:12 AM Page 8

67
Getting Started Setup and Connections
EN EN
Overheating
• Do not block ventilation holes in any component.
Arrange the components so that air can circulate
freely.
• Do not stack components directly on top of each
other.
• Allow adequate ventilation when placing your
components in a stand.
• Place the receiver near the top shelf of the stand
so heated air rising from it will not affect other com-
ponents.
Disc Information
About CDR, CDRW, Audio mp3,
Compact Disk Audio (CDA), DVD
Video, DVD Audio
This model is compatible to play CDR,
CDRW, Audio mp3, Compact Disk Audio
(CDA), Video Compact Disk (VCD), JPEG pic-
tures.
While your disc player is compatible with
the largest number of discs possible, it can-
not be guaranteed that you will be able to
play discs which might not be compatible
with audio CD, VCD and DVD standards.
NOTES ON CD-R/RW
DISC
This unit is compatible with CD-RW/
CD-R discs for playback.
• Do not affix any type of labels to
either side (recordable or labeled side)
of a CD-R/RW disc as this may result in
the unit malfunctioning.
• Do not load an unrecorded CD-R/RW
disc into the unit. This may take a
longer time to read the disc.
• Playback capability for CD-RW
discs may vary due to variations in
the quality of the CD-RW disc and
the recorder used to create the
disc.
Playback capability of CD-R, DVD-R
and rewritable discs, compatibility
with this player depends on the
recorder, the burning software
and the disc used
ATTENTION
This unit is incompatible with the fol-
lowing disc formats:
DVD-ROM, DVD-RW, DVD+RW, DVD
RAM, DVD-R, CDV, SACD, DVD Audio
(High resolution tracks). Kodack disc,
Divx video disc, photo CD, CD-G, S-VCD,
Data part of CD Extra, disc with non
standard shape (e.g. heart), disc with
region code different from the one
specified on the back of the unit.
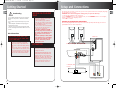
Receiver
TV
Subwoofer
R
L
SPEAKER
IMPEDANCE 6
0
PHASE
180
FROM MAIN UNIT
IMPED ANCE: 6Ohm
RATED POWER: 20W
IMPED ANCE: 6Ohm
RATED POWER: 20W
Front speaker right Front speaker left
AUDIO IN
RL
S-VIDEO IN VIDEO IN
OPTICAL IN
Speakers and components connections
The following diagram shows how you can connect the speaker, and the way you connect
your DVD receiver to other components.
5.1 CH, DTS, AC3
receiver
Front speaker right Front speaker left
Subwoofer
At the first time you turn on your unit, you can select your desired On Screen Display language,
the procedures are as follow:
ATENTION: You cannot change this setting once you open the disc tray.
1. Turn on the TV with the unit connected.
2. Press SOURCE button to enter CD/DVD mode, use the UP/DOWN button to select English,
French or Spanish in the language menu.
3. Press OK to confirm.
CS1200VD EN PART 1 5/20/03 11:12 AM Page 10

89
EN EN
Main Unit
Setup and Connections
Connection: DVD + TV
1. Connect the audio cables to the AUDIO OUT
jacks on the back of your DVD Player, and to the
corresponding Audio Input jacks on your TV.
2. Connect the video cable.
Basic video connection – Connect the video cable
(yellow) to the VIDEO OUT jack on the back of your
DVD receiver, and to the Video Input jack on your
TV.
S-Video (optional) – If your TV has an S-Video jack,
connect an S-Video cable (not provided) to the S-
VIDEO OUT jack on the back of your DVD Player
and to the S-VIDEO jack on your TV.
3. Connect the AC power cord into an AC outlet .
Dolby Digital Manufactured under license
from Dolby Laboratories. “Dolby”, “Pro
Logic” and the double-D symbol are
trademarks of Dolby Laboratories.
Copyright 1992-1997 Dolby Laboratories,
Inc. All Rights Reserved.
Manufactured under license
from Digital Theater Systems,
Inc. US Pat. No. 5,451,942,
5,956,674, 5,974,380,
5,978,762 and other world-
wide patents issued and pending. "DTS"
and "DTS Digital Surround" are regis-
tered trademarks of Digital Theater
Systems, Inc. Copyright 1996, 2000 Digital
Theater Systems, Inc. All Rights Reserved.
Connection: DVD + TV + Audio
Receiver
Both Dolby Digital and DTS are audio formats used
to record 5.1-channel audio signals onto the digital
track of film (while the film is being made). Both of
these formats provide up to six separate channels:
left, right, center, left rear, right rear, and common
subwoofer. The disc will play 5.1-channel sound only
if you’ve connected a DTS or Dolby Digital receiver
or decoder and if the disc is encoded in the Dolby
Digital or DTS format.
Please Read This Before Using the DIGITAL
AUDIO OUT Jack!
This player’s digital output jack is designed for a
connection to a Dolby Digital or DTS receiver or
decoder. Older digital equipment may not be
compatible with the Dolby Digital bitstream. Such a
connection can create a high level of noise that may
be harmful to your ears, and could damage head-
phones or speakers.
Basic connections are as follow:
1. Connect the left and right audio cables to your
audio/video receiver and to the AUDIO OUT jacks on
the back of your DVD receiver.
2. If you have a Dolby Digital or DTS receiver, use the
DIGITAL AUDIO OUT jacks to connect the receiver to
the DVD player. You must also set the Digital Output
setting in the Sound menu.
NOTE
Optical cables carry only the audio
portion of the signal. A video connec-
tion must also be established by con-
necting a video cable to the (SAT)
video input.
Speakers
There are 3 speakers
equipped with the
unit (2 front, 1 sub-
woofer). In order to
enjoy good surround
effects, all three
speakers need to be
connected to the unit.
If you want to enjoy
full range of sound
effects, it is a must to
use the subwoofer
with the speakers to
maintain adequate
bass signal.
Antenna and Speaker
Wire Connection
Push Speaker terminal tab
down to insert wire.
Release tab to lock wire in
the terminal.
NOTE: Make sure the insulation
is completely removed from the
ends of the Antenna and
speaker wires at all connection
points.
1. ON / ECO
• To turn the unit on/ off. When the system is turned on,
the unit will go to Standby mode (red led will lit), then
press again to power the unit up in the last mode used.
2. SOURCE
• To select input source. (DVD(CD), AUX 2 and TUNER)
3. BAND / APP
• In Tuner mode, press to select between radio BANDS
or press and hold to enter AUTO PROGRAM mode.
4. PROG. / SET
In TUNER mode:
• Enters program mode for tuner; applies new settings
for clock and timer mode.
5. CLOCK / TIMER /
• Adjusts clock time.
• Enter timers setting mode and turn this mode on/ off.
6. TUNING - / SKIP REVERSE
In DVD / CD / mp3 mode:
• To skip to the beginning/previous track in CD mode
and the beginning/previous chapter (only while play-
ing).
In tuner mode:
• To move back to the beginning/previous preset memo-
ry location (in preset mode).
• Search up radio frequencies (in tuning mode).
7. TUNING + / SKIP FORWARD
In DVD / CD / mp3 mode:
• To skip to the next track in CD mode and the next
chapter (only while playing).
In tuner mode:
• To go to the next preset memory location in tuner
mode. (in preset mode)
• Search up radio frequencies (in tuning mode).
8. STOP / TUNE / PRESET
In DVD / CD / mp3 mode:
• To stop DVD/CD playback.
In tuner mode:
• Toggles between tune and preset mode.
9. PLAY / RDS
• To start DVD/CD playback.
• Shows RDS information.
10. - VOLUME +
• Adjust volume level.
11. OPEN / CLOSE
• Press to open / close the disc door.
12. PHONES
Plug your headphones (not supplied) into it for your
private enjoyment. Speakers will be off when phones
are inserted.
13. STANDBY LED
• Lights when in STANDBY mode.
14. TIMER LED
• Lights when timer is set.
RDS
12610 114 5
38 9
7
12
14
13
CS1200VD EN PART 1 5/20/03 11:12 AM Page 12

10 11
EN EN
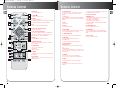
Remote Control
Remote Control
12. Arrow Buttons
• In all mode , use the arrow buttons to move
through the on-screen menu system and Info
diplay.
In TUNER mode:
• press TUNER to select band, and press LEFT and
RIGHT arrow keys to tune down or up the radio fre-
quency.
13. DSP
• No function.
14. BASS
• To select bass on oR off.
15. EQUALIZER
• Press to toggle between different preset quauliz-
er mode (only available in stereo mode).
16. .TITLE-GUIDE / PTY
• Press to go to the title menu at DVD mode.
17. INFO-RDS
• Press to display playback information.
In TUNER mode:
• Press to display RDS station information.
18. Number Buttons
In Tuner mode:
• To input the numeral of the desired preset sta-
tion.
In DVD/CD mode:
• Press to input information such as chapter num-
bers, track numbers, or to make selections on some
menu screens.
19. ANGLE
• Press to rotate the image in JPEG mode.
• Press to change angle selection in DVD mode.
20. INPUT
• In VCR and TV mode, press to select input.
21. AUDIO
• Press to select the audio channel you like. (e.g.
karaoke)
• In Tuner mode, press this button to switch from
ST to MONO mode and vice-versa.
22. Operation Buttons
In DVD/CD mode:
• press DVD to enable PLAY, STOP and PAUSE keys.
• press PLAY to start playback.
• press STOP to stop playback.
• press PAUSE to pause playback.
• press REV / FWD to search backward / forward
through the disc.
23. ZOOM (DVD only)
• Press to select the zoom ratio.
24. PLAYMODE
• Press to toggle between different playmode.
• Press to display playback information in DVD/CD
mode.
25. AUX 2 / VCR
• Press to select AUX2 mode.
1. DVD / CD
• To select DVD/CD mode.
2. ON-OFF
• To turn on or off the unit.
3. TUNER
• To select TUNER mode.
In TUNER mode, press to select band; press and hold
to activate Automatic Presets Programming.
4. TV
• Press to operate your TV (if available).
5. VOL+, VOL- (Volume Buttons)
• To adjust the volume.
6. PR+, PR- (Channel Buttons)
• To select programmed stations in TUNER mode.
• To skip to the next or previous chapter, track or
image in DVD, CD , mp3 and JPEG mode.
7. MUTE
• To mute / unmute all audio outputs.
8. RETURN / GO BACK
• Press to go back to previous menu or exit setup
menu completely.
9. CLEAR / SLEEP
• Press to enter SLEEP mode.
In DVD mode:
• Press to exit menu.
10. MENU
• In DVD mode, press for menu setup for DVD title
(if available).
11. OK / SAVE
• When a menu is on the screen, press to select the
highlighted items.
2
3
10
21
13
9
18
22
8
23
25
1
11
20
7
6
5
15 16
19
24
17
14
12
4
CS1200VD EN PART 1 5/20/03 11:12 AM Page 14

EN
12
Remote Control
EN
Using the Remote to Control
Additional Components
You can set your remote to control other compo-
nents (like TV, VCR, etc.). What you need is to encode
them in advance (not necessary for recent RCA &
Proscan models).
1. Turn on the component to be programmed.
2. Look up the brand and corresponding code num-
ber in the code list.
3. Press and hold the TV button, then enter the code
of your component by number keys.
4. Release the component
button, then press
ON•OFF to see if the
component will turn off.
5. If this does not work, repeat steps 3 and 4 by try-
ing to use the next code (if available) listed for the
brand of your component until the component
responds to the remote command.
HINT
This remote may not operate all models of
the brands shown.
If batteries are removed from the battery
compartment of the remote control, all mem-
ory will be lost. You need to re-enter all previ-
ously programmed codes again.
The buttons on the remote may not work
correspondingly with those on other brand
components. Experiment with the remote and
your components to see which buttons work.
If only a few functions operate, check to see if
another code set will work with more but-
tons.
NOTE
Once your remote is encoded, you can press
ON/OFF on the remote once to turn off the
component and then followed by the second
time quickly to turn off the receiver (i.e. this
unit). If you only want the receiver to be
turned off, select TUNER or DVD/CD while
the unit is ON before pressing ON/OFF.
DVD Menu System
The DVD Player Menu System
The DVD player menu system is not the same as the
disc menu or the Info Display. The DVD player menu
comes up when there is no disc playing. If you are
playing a disc, press STOP on the remote control to
stop playback and bring up the DVD player menu.
Path Items
A path menu item has an arrow on the right side to
let you know this item is a path to MORE options. To
see the path menu options, highlight the menu item
and press OK. The next set of menu choices appears
to the right of the menu item.
The Main Menu
The main menu contains the following submenus:
Play/Resume Play - starts playback
Play Mode - enables you to play chapters or tracks in
a different order than the way they were created on
the disc
Lock - enables you to set up rating limits and lock the
player so you can control which discs require a pass-
word in order to play them
Display – controls how the pictures looks
Sound – controls sound settings
Languages – contains settings for audio, menu and
subtitle languages
Use the arrow buttons on the remote to navigate
through the menu system. Press the right arrow or
OK button to select items. To return to the main
menu, press CLEAR.
Play Mode
Discs are formatted to play chapters (or tracks on
audio CDs) in a certain (standard) order. If you’d like
to play chapters in a different order, you can use the
Play Mode feature. You must have a disc in the player
with the disc tray closed in order to access all of the
Play Mode items.
Standard Play
The DVD Player’s default play mode is standard,
meaning the chapters and tracks on a disc play in the
order listed on the disc — starting with chapter
(track) 1.
Random Play
The Random option plays a disc’s chapters in random
order. If there is more than one title, the title with the
most chapters is selected. If there is more than one
title and all titles have an equal amount of chapters,
the first title is selected. If each title has only one
chapter each, the titles/chapters will be played in ran-
dom order.
1. If you’re playing a disc, press STOP to stop play-
back.
2. Press the down arrow button to highlight the
Play Mode menu.
3. Press the arrow down button to highlight
Random.
4. Press OK.
5. To stop Random playback, press STOP twice. To
resume normal playback, press PLAY.
Press play to resume playback.
13
CS1200VD EN PART 1 5/20/03 11:12 AM Page 16

EN
EN
DVD Menu System
Unlocking your DVD Player
1. If you’re playing a disc, press STOP (the DVD
Player’s main menu appears).
2. Press the down arrow button until Lock is high-
lighted, (the Enter Password screen appears).
3. Use the number buttons to enter the password
you created, and press OK (the Lock menu
items appear).
4. Press the down arrow button until Unlock play-
er is highlighted, and press OK. If asked, enter
your password to confirm that you want to
unlock the player (the screen goes back to the
Lock menu with the padlock icon unlocked to
indicate that the player is unlocked).
Changing Your Password
You can change your password, but the player must
be locked.
1. If a disc is playing, press STOP (the main menu
appears).
2. Press the down the arrow button until Lock is
highlighted, and press OK. If asked, enter your
current password if asked (the Lock menu
items appear).
3. Press the down arrow button to highlight
Change Password, and press OK (the Enter
New Password screen appears).
4. Use the number buttons on the remote to
enter the four-digit number that you want to
use as your new password, and press OK (you
will be prompted to enter your new password
again to confirm). Enter your password, and
press OK.
DVD Menu System
Program Play
You must create your program (playlist) in the Edit
Program menu before you can access the Program
Play menu. By selecting Program Play in the Play
Mode menu you’re telling the DVD Player to play
the disc in the order you created in the Edit
Program menu.
Edit Program
1. If you’re playing a disc, press STOP (the main
menu appears).
2. Press the down arrow button to highlight Play
Mode, and press OK.
3. Press the down arrow button until EDIT PRO-
GRAM is highlighted, and press OK..
4. Use the number buttons on the remote con-
trol to enter the chapter (or track) you want
to play first.
5. Repeat step 4 until you’ve programmed all of
the chapters you want to play.
6. Press OK to start programmed playback.
7. To stop Program Play, press STOP twice. To
resume normal playback, press PLAY.
AutoPlay
You can set up the DVD Player so a disc automati-
cally starts playing whenever the disc tray is closed.
1. If you’re playing a disc, press STOP (the main
menu appears).
2. Press the down arrow button to highlight Play
Mode, and press OK.
3. Press the down arrow button until AutoPlay is
highlighted. Press OK (On appears next to the
AutoPlay menu). To turn AutoPlay off, just
press OK again while AutoPlay is highlighted.
The Lock Menu
You can set up ratings limits and lock your player in
order to control the type of content people watch
on your DVD Player. The padlock icon on the Lock
menu indicates whether the player is locked or
unlocked.
Locked: You need to enter the password in
order to play discs that have a higher rating than
what you’ve allowed. When the player is locked,
nobody can access the Lock menu without entering
the password.
Unlocked: No password required to play discs.
Even if you’ve set ratings limits, they won’t be
enforced when the player is unlocked.
Locking your DVD Player
1. If you’re playing a disc, press STOP (the DVD
Player’s main menu appears).
2. Press the down arrow button until Lock is high-
lighted, and press OK (the Lock menu items
appear).
3. Since Lock Player is highlighted, just press the
OK button on the remote (the Enter Password
screen appears).
4. Use the number buttons on the remote control
to enter your password and press OK (Confirm
Password appears). Enter the same numbers you
entered before and press OK (you return to the
main menu with the lock icon locked to indicate
that the player is locked).
Once the player is locked, you’ll need to enter the
password everytime you access the Lock menu.
Note: The player is shipped without any. rating limits
set. You need to set Ratings Limits in order for the
player to prevent people from playing discs with cer-
tain ratings.
14 15
CS1200VD EN PART 1 5/20/03 11:12 AM Page 18
-
 1
1
-
 2
2
-
 3
3
-
 4
4
-
 5
5
-
 6
6
-
 7
7


Thomson CS1200VD Owner's manual
- Category
- DVD players
- Type
- Owner's manual
Ask a question and I''ll find the answer in the document
Finding information in a document is now easier with AI