Medeli A100S Owner's manual
- Category
- Musical Instruments
- Type
- Owner's manual

ELECTRONIC
KEYBOARD
C
M
Y
CM
MY
CY
CMY
K
AW_A100S_Manual_G02_181122.pdf 1 18/11/23 14:08
ELECTRONIC KE
MODE D’EMPLOI
CLAVIER NUMÉRIQUE
C
M
Y
CM
MY
CY
CMY
K
AW_A100S_Manual_G02_181122.pdf 1 18/11/23
14:08

02
INFORMATION FOR YOUR SAFETY!
THE FCC REGULATION WARNING (for USA)
This equipment has been tested and found to comply with
the limits for a Class B digital device, pursuant to Part 15 of
the FCC Rules.
These limits are designed to provide reasonable protection
against harmful interference in a residential installation. This
equipment generates, uses, and can radiate radio frequency
energy and, if not installed and used in accordance with the
instructions, may cause harmful interference to radio
communications. However, there is no guarantee that
interference will not occur in a particular installation.
If this equipment does cause harmful interference to radio or
television reception, which can be determined by turning the
equipment off and on, the user is encouraged to try to
correct the interference by one or more of the following
measures:
Reorient or relocate the receiving antenna.
Increase the separation between the equipment and
receiver.
Connect the equipment into an outlet on a circuit different
from that to which the receiver is connected.
Consult the dealer or an experienced radio/TV technician
for help.
Unauthorized changes or modification to this system can
void the user's authority to operate this equipment.
PRECAUTIONS
PLEASE READ CAREFULLY BEFORE PROCEEDING
Please keep this manual in a safe place for future reference.
Power Supply
Please connect the designated DC adaptor to an AC outlet
of the correct voltage.
Do not connect it to an AC outlet of voltage other than that
for which your instrument is intended.
Unplug the DC power adaptor when not using the instru-
ment, or during electrical storms.
Connections
Before connecting the instrument to other devices, turn off
the power to all units. This will help prevent malfunction and
/ or damage to other devices.
Location
Do not expose the instrument to the following conditions to
avoid deformation, discoloration, or more serious damage:
Direct sunlight
Extreme temperature or humidity
Excessive dusty or dirty location
Strong vibrations or shocks
Close to magnetic fields
Interference with other electrical devices
Radios and televisions placed nearby may experience
reception interference. Operate this unit at a suitable
distance from radios and televisions.
Cleaning
Clean only with a soft, dry cloth.
Do not use paint thinners, solvents, cleaning fluids, or
chemical-impregnated wiping cloths.
Handling
Do not apply excessive force to the switches or controls.
Do not let paper, metallic, or other objects into the instru-
ment. If this happens, remove the electric plug from the
outlet. Then have the instrument inspected by qualified
service personnel.
Disconnect all cables before moving the instrument.
CAUTION
The normal function of the product may be disturbed
by Strong Electro Magnetic Interference. If so, simply
reset the product to resume normal operation by
following the owner's manual. In case the function
could not resume, please use the product in other
location.
C
M
Y
CM
MY
CY
CMY
K
AW_A100S_Manual_G02_181122.pdf 2 18/11/23 14:08
02
LES INFORMATIONS POUR VOTRE SÉCURITÉ
L’avertissement sur le règlement FFC (pour les États-Unis)
Cet équipement a été testé et déclaré conforme aux limites
pour appareils numériques de classe B, selon la section 15 du
règlement de la FCC.
Ces limites sont désignées afin d’assurer une protection
raisonnable contre des interférences nuisibles dans une
installation résidentielle. Cet équipement génère, utilise et
peut émettre un rayonnement de fréquence radio et s’il n’est
pas utilisé et installé conformément aux instructions, il peut
causer des interférences nuisibles aux communications
radio. Cependant, il n’y a pas d
e garantie que l’interférence
ne peut avoir lieu dans une installation particulière.
Si l’équipement cause des interférences nuisibles à la
réception de radio ou de télévision, ce qui peut être
déterminé si on éteint et rallume le produit, l’utilisateur est
conseillé d’essayer de corriger les interférences grâce à une
ou plusieurs mesures indiquées ci-dessous :
Réorienter ou déplacer l’antenne réceptrice
Éloigner davantage l’appareil du répecteur.
Brancher l’appareil sur un circuit électrique différent de celui
où le récepteur est branché.
Contacter votre revendeur ou un technicien radio/TV qualifié
pour obtenir de l’aide.
Tout changement ou toute modification non-autorisés du
système peut annuler la capacité de l’acheteur à utiliser ledit
dispositif.
PRÉCAUTIONS
LISEZ ATTENTIVEMENT AVANT DE CONTINUER
Gardez ce manuel en lieu sûr pour vous y référer dans le futur.
Alimentation électrique
Veuillez brancher l’adaptateur courant continu (DC) désigné à
une prise de courant alternatif (AC) de voltage correct.
Ne pas le brancher à une prise AC dont le voltage ne
correspond pas à ce dont votre instrument a besoin.
Débranchez l’adaptateur secteur DC lorsque vous n’utilisez
pas l’instrument, ainsi que durant les orages électriques.
Connexions
Avant de connecter l’instrument à tout autre équipement,
éteignez tous les appareils. Cela aidera à éviter tout
dysfonctionnement et/ou dégât à ces derniers.
Localisation
Ne pas exposer l’instrument aux conditions suivantes afin
d’éviter toute déformation, décoloration ou des dégâts plus
graves :
En plein soleil
Températures extrêmes ou lieu humide
Lieu sale ou excessivement poussièreux
Fortes vibrations ou secousses
Près des champs magnétiques
Interférence avec d’autres appareils électriques
Utilisez cet appareil à une distance convenable de
récepteurs radios et télévisieurs afin d’éviter des
interférences.
Nettoyage
Nettoyez uniquement avec un chiffon doux et sec.
Ne jamais utiliser de diluants, de solvants, de liquides de
nettoyage ou de chiffons de nettoyage contenant des
produits chimiques.
Manipulation
Pour éviter d’endommager l’appareil, n’appuyez pas trop
fort sur les commandes, ni les boutons.
Ne laissez pas de papiers, d’objets métalliques ou autres
entrer dans l’instrument. Si cela se produit, retirez
l’adaptateur secteur de la prise électrique.
Puis, faites inspecter l’instrument par un personnel de
service qualifié.
Débranchez tous les câbles avant de déplacer l’instrument.
ATTENTION
Le bon fonctionnement du produit peut être perturbé par
de fortes interférences électro-magnétiques. Si c’est le
cas, réinitialisez-le tout simplement afin qu’il reprenne
son fonctionnement normal tout en suivant le mode
d’emploi. Si jamais, le bon fonctionnement n’a pas repris,
utilisez le produit dans un autre emplacement.
C
M
Y
CM
MY
CY
CMY
K
AW_A100S_Manual_G02_181122.pdf 2 18/11/23
14:08
02
INFORMATION FOR YOUR SAFETY!
THE FCC REGULATION WARNING (for USA)
This equipment has been tested and found to comply with
the limits for a Class B digital device, pursuant to Part 15 of
the FCC Rules.
These limits are designed to provide reasonable protection
against harmful interference in a residential installation. This
equipment generates, uses, and can radiate radio frequency
energy and, if not installed and used in accordance with the
instructions, may cause harmful interference to radio
communications. However, there is no guarantee that
interference will not occur in a particular installation.
If this equipment does cause harmful interference to radio or
television reception, which can be determined by turning the
equipment off and on, the user is encouraged to try to
correct the interference by one or more of the following
measures:
Reorient or relocate the receiving antenna.
Increase the separation between the equipment and
receiver.
Connect the equipment into an outlet on a circuit different
from that to which the receiver is connected.
Consult the dealer or an experienced radio/TV technician
for help.
Unauthorized changes or modification to this system can
void the user's authority to operate this equipment.
PRECAUTIONS
PLEASE READ CAREFULLY BEFORE PROCEEDING
Please keep this manual in a safe place for future reference.
Power Supply
Please connect the designated DC adaptor to an AC outlet
of the correct voltage.
Do not connect it to an AC outlet of voltage other than that
for which your instrument is intended.
Unplug the DC power adaptor when not using the instru-
ment, or during electrical storms.
Connections
Before connecting the instrument to other devices, turn off
the power to all units. This will help prevent malfunction and
/ or damage to other devices.
Location
Do not expose the instrument to the following conditions to
avoid deformation, discoloration, or more serious damage:
Direct sunlight
Extreme temperature or humidity
Excessive dusty or dirty location
Strong vibrations or shocks
Close to magnetic fields
Interference with other electrical devices
Radios and televisions placed nearby may experience
reception interference. Operate this unit at a suitable
distance from radios and televisions.
Cleaning
Clean only with a soft, dry cloth.
Do not use paint thinners, solvents, cleaning fluids, or
chemical-impregnated wiping cloths.
Handling
Do not apply excessive force to the switches or controls.
Do not let paper, metallic, or other objects into the instru-
ment. If this happens, remove the electric plug from the
outlet. Then have the instrument inspected by qualified
service personnel.
Disconnect all cables before moving the instrument.
CAUTION
The normal function of the product may be disturbed
by Strong Electro Magnetic Interference. If so, simply
reset the product to resume normal operation by
following the owner's manual. In case the function
could not resume, please use the product in other
location.
C
M
Y
CM
MY
CY
CMY
K
AW_A100S_Manual_G02_181122.pdf 2 18/11/23 14:08

03
Table of Contents
Panel & Display Description
Front Panel..................................................................4
Rear Panel...................................................................4
Display.........................................................................5
Setup
Power Supply...............................................................6
Setting the Music Stand...............................................6
Connections
Connecting a Pair of Headphones...............................7
Connecting a Sustain Pedal........................................7
Connecting a Computer...............................................7
Power Switch and Master Volume...........................8
Playing Demo Songs.................................................8
Playing Voices...........................................................9
Playing Styles............................................................9
Playing Songs..........................................................10
Recording.................................................................10
Playing the Voices
Selecting a Voice.......................................................11
Playing Two Voice Simultaneously.............................11
Playing Different Voices with Both Hands...................11
Auto Accompaniment
Play Auto Accompaniment (rhythm track only)..........12
Play Auto Accompaniment (all tracks)........................12
Accompaniment Sections..........................................12
Playing Different Accompaniment Sections...............13
Fade..........................................................................13
Accompaniment Volume Control...............................13
Chord Fingering.........................................................14
Tempo........................................................................15
Function Menu
Tune...........................................................................16
Split Point..................................................................16
Beat Type..................................................................17
Pedal Type.................................................................17
EQ Type.....................................................................17
Reverb Type..............................................................18
Reverb Level.............................................................18
Chorus Type..............................................................18
Chorus Level.............................................................18
Harmony Type...........................................................19
MIDI IN/ OUT.............................................................19
Auto Power Off..........................................................19
Mixer.........................................................................20
Effect Related Settings
Octave.......................................................................21
Touch.........................................................................21
Metronome................................................................21
Sustain.......................................................................21
Pitch Bend.................................................................22
Modulation.................................................................22
DSP............................................................................22
Transpose..................................................................22
Harmony....................................................................22
Register Memory
Registration Banks....................................................23
Registering the Panel Setting and Recalling the
Registered Panel Settings.........................................23
Registrable Parameters.............................................23
One Touch Setting...................................................23
Recording
Prepare Recording.....................................................24
Start Recording..........................................................24
Stop Recording..........................................................24
Playback Recording...................................................25
Delete User Song......................................................25
Playing the Demo Songs.........................................25
Piano Mode..............................................................26
Song
Listening to the Songs...............................................26
Song Control..............................................................26
Lesson Mode.............................................................27
Chord Dictionary
DICT 1 (Chord Learning Mode).................................28
DICT 2 (Chord Testing Mode).....................................28
Pedal Function
Multi-function Pedal...................................................29
MIDI
What's MIDI?.............................................................30
The Main Application of MIDI.....................................30
Troubleshooting......................................................31
Specifications..........................................................31
Appendices
Voice List...................................................................32
Style List....................................................................39
Song List....................................................................41
Demo List..................................................................42
MIDI Implementation Chart........................................43
C
M
Y
CM
MY
CY
CMY
K
AW_A100S_Manual_G02_181122.pdf 3 18/11/23 14:08
03
Sommaire
La description du panneau et de l’affichage
Le panneau avant
.............................................................
4
Le panneau arrière
...........................................................
4
L’affichage
...................................................................
5
La configuration
L’alimentation
...............................................................
6
Le réglage de pupitre
...............................................
6
Les connexions
Brancher des écouteurs
...............................
7
Brancher une pédale de sustain
........................................
7
Brancher à un ordinateur
...............................................
7
L’interrupteur et le volume principal
...........................
8
Jouer les démos
...............................
8
Jouer les sonorités
....................................................
9
Jouer les différents styles
........................................
9
Jouer les chansons
. ...............................................
10
L’enregistrements
......................................................
10
Jouer les sonorités
Sélectionner une sonorité
............................................
11
Jouer deux sonorités simultanément
........................
11
Jouer différentes sonorités avec les deux mains
........
11
L’accompagnement automatique (AA)
Jouer AA (uniquement la piste de rythme)
..........
12
Jouer AA (toutes les pistes)
................................
12
Les morceaux d’accompagnement
.........................
12
Jouer différents morceaux d’accompagnement
...............
13
L’estompement
..........................................................
13
L’accompagnement du contrôle du volume
13
Les accords de base ...........................................
........
14
Tempo
........................................................................
15
Le menu des fonctions
La syntonisation
..............................................................
16
Le point de séparation
...................................................
16
Les types de rythme
.........................................................
17
Les types de pédale
......................................................
17
Les types d’égaliseur
. ................................................
17
Les types de réverbération
. .........................................
18
Les niveaux de réverbéraion
............................................
18
Les types de chorus
.....................................................
18
Les niveaux de chorus
....................................................
18
Les types d’harmonies
...................................................
19
Le MIDI IN/ OUT
.............................................................
19
L’auto arrêt
..........................................................
19
L’ajustement de volumes
......................................
20
Les réglages liés aux effets sonores
L’octave
.......................................................................
21
La sensibilité des touches
...................................................
21
Le métronome
................................................................
21
Le soutien
.....................................................................
21
Le pitch bend
.................................................................
22
La modulation
.................................................................
22
Le processeur de signal numérique
... (DSP)...............
22
La transposition
...........................................................
22
L’harmonie
....................................................................
22
La mémoire interne
L’enregistrement des banques de mémoire
...............
23
L’enregistrement des réglages et rappel des réglages
pré-enregistrés du panneau de contrôle
............................
23
Les paramètres enregistrables
....................
...
.................
23
Les réglages à l’aide d’une seule touche
................................
23
Les enregistrements
Préparer l’enregistrement
..........................................
24
Commencer l’enregistrement
....................................
24
Arrêter l’enregistrement
...........................................
24
Lire l’enregistrement
...................................................
25
Effacer une chanson de l’utilisateur
.............................
25
Jouer les démos
. ....................................
25
Le Mode Piano
..............................................................
26
Les chansons
Écouter les chansons
...............................................
26
Le contrôle des chansons
.......................................
26
Le mode des leçons
............................................................
27
Le glossaire des accords
DICT 1 (Mode d’apprentissage des accords )
..............
28
DICT 2 (Mode d’évaluation des accords)
.......................
28
Les fonctions de la pédale
La pédale multi-fonctions
...................................................
29
Le MIDI
Qu’est-ce que le MIDI?
...................................................
30
L’usage principal de MIDI
.....................................
30
Les résolutions des problèmes
...................................
31
Les spécifications
..........................................................
31
Les appendices
La liste des sonorités
..............................................................
32
La liste des styles
......................................................
39
La liste des morceaux
. ...................................................
41
La liste des démos ................................................
42
Le tableau d’Implémentation MIDI ................................
43
C
M
Y
CM
MY
CY
CMY
K
AW_A100S_Manual_G02_181122.pdf 3 18/11/23
14:08
03
Table of Contents
Panel & Display Description
Front Panel..................................................................4
Rear Panel...................................................................4
Display.........................................................................5
Setup
Power Supply...............................................................6
Setting the Music Stand...............................................6
Connections
Connecting a Pair of Headphones...............................7
Connecting a Sustain Pedal........................................7
Connecting a Computer...............................................7
Power Switch and Master Volume...........................8
Playing Demo Songs.................................................8
Playing Voices...........................................................9
Playing Styles............................................................9
Playing Songs..........................................................10
Recording.................................................................10
Playing the Voices
Selecting a Voice.......................................................11
Playing Two Voice Simultaneously.............................11
Playing Different Voices with Both Hands...................11
Auto Accompaniment
Play Auto Accompaniment (rhythm track only)..........12
Play Auto Accompaniment (all tracks)........................12
Accompaniment Sections..........................................12
Playing Different Accompaniment Sections...............13
Fade..........................................................................13
Accompaniment Volume Control...............................13
Chord Fingering.........................................................14
Tempo........................................................................15
Function Menu
Tune...........................................................................16
Split Point..................................................................16
Beat Type..................................................................17
Pedal Type.................................................................17
EQ Type.....................................................................17
Reverb Type..............................................................18
Reverb Level.............................................................18
Chorus Type..............................................................18
Chorus Level.............................................................18
Harmony Type...........................................................19
MIDI IN/ OUT.............................................................19
Auto Power Off..........................................................19
Mixer.........................................................................20
Effect Related Settings
Octave.......................................................................21
Touch.........................................................................21
Metronome................................................................21
Sustain.......................................................................21
Pitch Bend.................................................................22
Modulation.................................................................22
DSP............................................................................22
Transpose..................................................................22
Harmony....................................................................22
Register Memory
Registration Banks....................................................23
Registering the Panel Setting and Recalling the
Registered Panel Settings.........................................23
Registrable Parameters.............................................23
One Touch Setting...................................................23
Recording
Prepare Recording.....................................................24
Start Recording..........................................................24
Stop Recording..........................................................24
Playback Recording...................................................25
Delete User Song......................................................25
Playing the Demo Songs.........................................25
Piano Mode..............................................................26
Song
Listening to the Songs...............................................26
Song Control..............................................................26
Lesson Mode.............................................................27
Chord Dictionary
DICT 1 (Chord Learning Mode).................................28
DICT 2 (Chord Testing Mode).....................................28
Pedal Function
Multi-function Pedal...................................................29
MIDI
What's MIDI?.............................................................30
The Main Application of MIDI.....................................30
Troubleshooting......................................................31
Specifications..........................................................31
Appendices
Voice List...................................................................32
Style List....................................................................39
Song List....................................................................41
Demo List..................................................................42
MIDI Implementation Chart........................................43
C
M
Y
CM
MY
CY
CMY
K
AW_A100S_Manual_G02_181122.pdf 3 18/11/23 14:08

Panel & Display Description
Front Panel
Rear Panel
1. POWER SWITCH
Turn the Power on or off.
2. Style Select buttons
Directly select a preset style.
3. [VOLUME] Slider
Adjust the master Volume.
4. [SHIFT] button
Press and hold it to access secondary
functions of other buttons.
In Style Mode
10. [START/ STOP] button
Start or Stop playing the style.
11. [SYNC START] button
Turn the Sync Start on or off.
12. [INTRO/ ENDING] button
Play the Intro or Ending.
13. [FILL A] button
Play the Fill-in pattern A.
14. [FILL B] button
Play the Fill-in pattern B.
In Song Mode
10. [ ] button
Start or Stop playing the song.
11. [ ] button
Pause or continue playing the song.
12. [ ] button
Set the beginning and the end for
a loop section of the current song.
13. [ ] button
Rewind the song.
14. [ ] button
Fast forward the song.
When the [SHIFT] button released
5~6. [TEMPO+/-] button
Adjust the current Tempo.
7. [METRONOME] button
Turn the metronome on or off.
8. [MIXER] button
Enter the Mixer menu.
9. [HARMONY] button
Turn the Harmony effect on or off.
15. [CHORD MODE] button
Enter the chord mode.
16. [BANK] button
Select a memory bank.
17. [STORE] button
Save current panel settings
to one of the memories.
When the [SHIFT] button pressed
5~6. [ACCOMP+/-] button
Adjust the ACCOMP volume.
7. [OCTAVE] button
Turn the Octave setting on or off.
8. [TRANSPOSE] button
Turn the Transpose setting on or off.
9. [SUSTAIN] button
Turn the Sustain function on or off.
15. [FADE] button
Turn the Fade In/Out function on or off.
16. [RECORD] button
Enter the Recording Mode.
17. [PLAY] button
Play back recordings.
35. PHONES jack
Connect a pair of headphones.
36. SUSTAIN jack
Connect a sustain pedal.
37. USB terminal
Connect to a computer.
38. DC 12V jack
Connect DC 12V power adaptor.
04
1
11 12 13
14
15 16
17
5
6
7
8
9
10
4
3
37
38
35 36
2
C
M
Y
CM
MY
CY
CMY
K
AW_A100S_Manual_G02_181122.pdf 4 18/11/23 14:08
Description du panneau et de l’affichage
Panneau avant
Panneau arrière
1. Interrupteur
Afin d’allumer et d’éteindre
l’appareil.
2. Boutons de sélection des styles
Afin de directement sélectioner
un style préréglé.
3. Curseur de [VOLUME]
Afin d’ajuster le volume
principal.
4. Bouton [SHIFT]
Appuyez et maintenez afin d’accéder aux
fonctions secondaires des autres boutons.
Dans le mode «style»
10. Bouton [START/ STOP]
Commencer/Arrêter à jouer le style.
11. Bouton [SYNC START]
Allumer/éteindre le début de synchronisation.
12. Bouton [INTRO/ ENDING]
Jouer l’introduction ou la fin d’un morceau.
13. Bouton [FILL A]
Jouer le modèle de remplissage A.
14. Bouton [FILL B]
Jouer le modèle de remplissage B.
Dans le mode «song»
10. Bouton [ ]
Commencer/Arrêter à jouer la chanson.
11. Bouton [ ]
Arrêter/continuer de jouer la chanson.
12. Bouton [ ]
Définir le début et la fin d’une
section à être joués en boucle de la
chanson en cours.
13. Bouton [ ]
Rembobiner la chanson.
14. Bouton [ ]
Avancer rapidement la chanson.
Lorsque le bouton [SHIFT] est relâché
5~6. bouton [TEMPO+/-]
Ajuster le tempo actuel.
7. Bouton [METRONOME]
Allumer/éteindre le métronome.
8. Bouton [MIXER]
Entrer dans le menu d’ajustement
de volume.
9. Bouton [HARMONY]
Allumer/éteindre l’effet d’harmonie.
15. Bouton [CHORD MODE]
Entrer dans le mode
des accords.
16. Bouton [BANK]
Sélectionner une banque de
mémoire.
17. Bouton [STORE]
Sauvegarder le réglage du panneau
dans l’une des mémoires.
Lorsque le bouton [SHIFT] est relâché
5~6. bouton [
ACCOMP
+/-]
Ajuster le volume de l’accompagnement.
7. Bouton [OCTAVE]
Allumer/éteindre les paramètres
des octaves.
8. Bouton [TRANSPOSE]
Allumer/éteindre les paramètres de
transposition.
9. Bouton [SUSTAIN]
Allumer/éteindre l’effet de soutien.
15. Bouton [FADE]
Allumer/éteindre la fonction de Fade In/Out.
16. Bouton [RECORD]
Entrer dans le mode d’enregistrement.
17. Bouton [PLAY]
Rejouer les enregistrements.
35. Prise PHONES
Connecter une paire d’écouteurs/un casque baladeur.
36. Prise SUSTAIN
Connecter une pédale de sustain.
37. Terminal USB
Connecter à un ordinateur.
38. Prise DC 12V
Brancher un adaptateur d’alimentation 12V DC.
04
1
1112131415
1617
5
6
7
8
9
10
4
3
35
36
2
C
M
Y
CM
MY
CY
CMY
K
AW_A100S_Manual_G02_181122.pdf 4 18/11/23
14:08
Panel & Display Description
Front Panel
Rear Panel
1. POWER SWITCH
Turn the Power on or off.
2. Style Select buttons
Directly select a preset style.
3. [VOLUME] Slider
Adjust the master Volume.
4. [SHIFT] button
Press and hold it to access secondary
functions of other buttons.
In Style Mode
10. [START/ STOP] button
Start or Stop playing the style.
11. [SYNC START] button
Turn the Sync Start on or off.
12. [INTRO/ ENDING] button
Play the Intro or Ending.
13. [FILL A] button
Play the Fill-in pattern A.
14. [FILL B] button
Play the Fill-in pattern B.
In Song Mode
10. [ ] button
Start or Stop playing the song.
11. [ ] button
Pause or continue playing the song.
12. [ ] button
Set the beginning and the end for
a loop section of the current song.
13. [ ] button
Rewind the song.
14. [ ] button
Fast forward the song.
When the [SHIFT] button released
5~6. [TEMPO+/-] button
Adjust the current Tempo.
7. [METRONOME] button
Turn the metronome on or off.
8. [MIXER] button
Enter the Mixer menu.
9. [HARMONY] button
Turn the Harmony effect on or off.
15. [CHORD MODE] button
Enter the chord mode.
16. [BANK] button
Select a memory bank.
17. [STORE] button
Save current panel settings
to one of the memories.
When the [SHIFT] button pressed
5~6. [ACCOMP+/-] button
Adjust the ACCOMP volume.
7. [OCTAVE] button
Turn the Octave setting on or off.
8. [TRANSPOSE] button
Turn the Transpose setting on or off.
9. [SUSTAIN] button
Turn the Sustain function on or off.
15. [FADE] button
Turn the Fade In/Out function on or off.
16. [RECORD] button
Enter the Recording Mode.
17. [PLAY] button
Play back recordings.
35. PHONES jack
Connect a pair of headphones.
36. SUSTAIN jack
Connect a sustain pedal.
37. USB terminal
Connect to a computer.
38. DC 12V jack
Connect DC 12V power adaptor.
04
1
11 12 13
14
15 16
17
5
6
7
8
9
10
4
3
37
38
35 36
2
C
M
Y
CM
MY
CY
CMY
K
AW_A100S_Manual_G02_181122.pdf 4 18/11/23 14:08
Description du panneau et de l’affichage
1. ENREGISTREMENT
2. MODULATION
3. SENSIBILITE DES
TOUCHES
4. SOUTIEN
5. SONORITE/STYLE/DEMO/
CHANSON
6. MESURE
7. RYTHME
8. TEMPO
9. M1-M4/ONE TOUCH SETTING
10. DOUBLE/ NIVEAU INFERIEUR/
HARMONIE/ DSP
11. MODE DE LECONS POUR MAIN
GAUCHE/DROITE
12. NOTATION MUSICALE DES NUMEROS
13. A.B.C. / FULL RANGE/ FADE/A/B
14. ACCORD
15. CLEF TRIPLE
16. CLEF DE BASSE
17. USB
05
L’écran LCD
HARMONY
1
2
5
6
4
8
9
10
13
14
15
11
3
7
12
16
17
20
1819
2122
23
33
34
23. Affichage de l’écran LCD
Afficher les informations importantes du
réglage.
24. Boutons de la sélection des sonorité
Directement sélectionner une sonorité
préréglée.
29. Bouton [DEMO]
Basculer en mode démo.
30 ~ 31. Bouton [+/YES]/[-/NO]
Ajuster les valeurs des paramètres.
32. Molette des données
Ajuster la valeur d’un
paramètres.
33. Bouton [MODULATION]
Appliquer un effet vibrato.
34. Roue [PITCH BEND]
Modifier vers le haut ou le bas la
hauteur tonale des notes
.
Lorsque le bouton [SHIFT] est relâché
18~21. Boutons [M1] ~ [M4]
Un appel instantané aux
différents réglages du panneau.
22. Bouton [O.T.S.]
Désactiver ou activer la
fonction «One Touch Setting»
25. Bouton [VOICE]
Basculer vers le mode
des sonorités.
26. Bouton [STYLE]
Basculer vers le mode des
styles.
27. Bouton [SONG]
Entrer dans le mode des
chansons.
28. Bouton [PIANO]
Entrer dans le mode
piano.
Lorsque le bouton [SHIFT] est
enfoncé
18. Bouton [DUAL]
Activer/désactiver la fonction double.
19. Bouton [LOWER]
Allumer/éteindre la fonction inférieure.
20. Bouton [DICT.]
Entrer dans le glossaire des accords.
21. Bouton [DSP]
Allumer/éteindre la fonction DSP.
22. Bouton [TOUCH]
Allumer/éteindre la fonction de la
sensibilité des touches.
25. Bouton [L]
Le choix de pratiquer la partie
du clavier de la main gauche.
26. Bouton [R]
Le choix de pratiquer la partie
du clavier de la main droite.
27. Bouton [LESSON]
Entrer dans le mode des leçons.
28. Bouton [FUNCTION]
Entrer dans le menu des fonctions.
27
26
28
30
31
32
25
29
RECORD
MODULATION
TOUCH
SUSTAIN
24
C
M
Y
CM
MY
CY
CMY
K
AW_A100S_Manual_G02_181122.pdf 5 18/11/23
14:08

Panel & Display Description
1. RECORD
2. MODULATION
3. TOUCH
4. SUSTAIN
5. VOICE/STYLE/DEMO/SONG
6. MEASURE
7. BEAT
8. TEMPO
9. M1-M4/ONE TOUCH SETTING
10. DUAL/ LOWER/ HARMONY/ DSP
11. LEFT/RIGHT HAND LESSON MODE
12. NUMBER MUSCIAL NOTATION
13. A.B.C. / FULL RANGE/ FADE/A/B
14. CHORD
15. TREBLE CLEF
16. BASS CLEF
17. USB
05
LCD
HARMONY
1
2
5
6
4
8
9
10
13
14
15
11
3
7
12
16
17
20
18
19
21
22
23
33
34
23. LCD display
Display important setting information.
24. Voice Select buttons
Directly select a preset voice.
29. [DEMO] button
Switch to Demo Mode.
30 ~ 31. [+/YES]/[-/NO] button
Adjust parameter value.
32. DATA DIAL
Adjust the parameter value.
33. [MODULATION] button
Apply a vibrato effect.
34. [PITCH BEND] wheel
Bend notes up or down.
When the [SHIFT] button Released
18~21. [M1] ~ [M4] buttons
Instantly call up a panel setting.
22. [O.T.S.] button
Turn the One Touch Setting
function on or off.
25. [VOICE] button
Switch to Voice Mode.
26. [STYLE] button
Switch to Style Mode.
27. [SONG] button
Enter the Song Mode.
28. [PIANO] button
Enter the Piano Mode.
When the [SHIFT] button Pressed
18. [DUAL] button
Turn the Dual function on or off.
19. [LOWER] button
Turn the Lower function on or off.
20. [DICT.] button
Enter the Chord Dictionary.
21. [DSP] button
Turn the DSP function on or off.
22. [TOUCH] button
Turn the Touch Response on or off.
25. [L] button
Choose to practice the left hand part.
26. [R] button
Choose to practice the right hand part.
27. [LESSON] button
Enter the Lesson Mode.
28. [FUNCTION] button
Enter the Function Menu.
27
26
28 30 31
32
25
29
RECORD
MODULATION
TOUCH
SUSTAIN
24
C
M
Y
CM
MY
CY
CMY
K
AW_A100S_Manual_G02_181122.pdf 5 18/11/23 14:08
Description du panneau et de l’affichage
1. ENREGISTREMENT
2. MODULATION
3. SENSIBILITE DES
TOUCHES
4. SOUTIEN
5. SONORITE/STYLE/DEMO/
CHANSON
6. MESURE
7. RYTHME
8. TEMPO
9. M1-M4/ONE TOUCH SETTING
10. DOUBLE/ NIVEAU INFERIEUR/
HARMONIE/ DSP
11. MODE DE LECONS POUR MAIN
GAUCHE/DROITE
12. NOTATION MUSICALE DES NUMEROS
13. A.B.C. / FULL RANGE/ FADE/A/B
14. ACCORD
15. CLEF TRIPLE
16. CLEF DE BASSE
17. USB
05
L’écran LCD
HARMONY
1
2
5
6
4
8
9
10
13
14
15
11
3
7
12
16
17
20
1819
2122
23
33
34
23. Affichage de l’écran LCD
Afficher les informations importantes du
réglage.
24. Boutons de la sélection des sonorité
Directement sélectionner une sonorité
préréglée.
29. Bouton [DEMO]
Basculer en mode démo.
30 ~ 31. Bouton [+/YES]/[-/NO]
Ajuster les valeurs des paramètres.
32. Molette des données
Ajuster la valeur d’un
paramètres.
33. Bouton [MODULATION]
Appliquer un effet vibrato.
34. Roue [PITCH BEND]
Modifier vers le haut ou le bas la
hauteur tonale des notes
.
Lorsque le bouton [SHIFT] est relâché
18~21. Boutons [M1] ~ [M4]
Un appel instantané aux
différents réglages du panneau.
22. Bouton [O.T.S.]
Désactiver ou activer la
fonction «One Touch Setting»
25. Bouton [VOICE]
Basculer vers le mode
des sonorités.
26. Bouton [STYLE]
Basculer vers le mode des
styles.
27. Bouton [SONG]
Entrer dans le mode des
chansons.
28. Bouton [PIANO]
Entrer dans le mode
piano.
Lorsque le bouton [SHIFT] est
enfoncé
18. Bouton [DUAL]
Activer/désactiver la fonction double.
19. Bouton [LOWER]
Allumer/éteindre la fonction inférieure.
20. Bouton [DICT.]
Entrer dans le glossaire des accords.
21. Bouton [DSP]
Allumer/éteindre la fonction DSP.
22. Bouton [TOUCH]
Allumer/éteindre la fonction de la
sensibilité des touches.
25. Bouton [L]
Le choix de pratiquer la partie
du clavier de la main gauche.
26. Bouton [R]
Le choix de pratiquer la partie
du clavier de la main droite.
27. Bouton [LESSON]
Entrer dans le mode des leçons.
28. Bouton [FUNCTION]
Entrer dans le menu des fonctions.
27
26
28
30
31
32
25
29
RECORD
MODULATION
TOUCH
SUSTAIN
24
C
M
Y
CM
MY
CY
CMY
K
AW_A100S_Manual_G02_181122.pdf 5 18/11/23
14:08
Description du panneau et de l’affichage
Panneau avant
Panneau arrière
1. Interrupteur
Afin d’allumer et d’éteindre
l’appareil.
2. Boutons de sélection des styles
Afin de directement sélectioner
un style préréglé.
3. Curseur de [VOLUME]
Afin d’ajuster le volume
principal.
4. Bouton [SHIFT]
Appuyez et maintenez afin d’accéder aux
fonctions secondaires des autres boutons.
Dans le mode «style»
10. Bouton [START/ STOP]
Commencer/Arrêter à jouer le style.
11. Bouton [SYNC START]
Allumer/éteindre le début de synchronisation.
12. Bouton [INTRO/ ENDING]
Jouer l’introduction ou la fin d’un morceau.
13. Bouton [FILL A]
Jouer le modèle de remplissage A.
14. Bouton [FILL B]
Jouer le modèle de remplissage B.
Dans le mode «song»
10. Bouton [ ]
Commencer/Arrêter à jouer la chanson.
11. Bouton [ ]
Arrêter/continuer de jouer la chanson.
12. Bouton [ ]
Définir le début et la fin d’une
section à être joués en boucle de la
chanson en cours.
13. Bouton [ ]
Rembobiner la chanson.
14. Bouton [ ]
Avancer rapidement la chanson.
Lorsque le bouton [SHIFT] est relâché
5~6. bouton [TEMPO+/-]
Ajuster le tempo actuel.
7. Bouton [METRONOME]
Allumer/éteindre le métronome.
8. Bouton [MIXER]
Entrer dans le menu d’ajustement
de volume.
9. Bouton [HARMONY]
Allumer/éteindre l’effet d’harmonie.
15. Bouton [CHORD MODE]
Entrer dans le mode
des accords.
16. Bouton [BANK]
Sélectionner une banque de
mémoire.
17. Bouton [STORE]
Sauvegarder le réglage du panneau
dans l’une des mémoires.
Lorsque le bouton [SHIFT] est relâché
5~6. bouton [
ACCOMP
+/-]
Ajuster le volume de l’accompagnement.
7. Bouton [OCTAVE]
Allumer/éteindre les paramètres
des octaves.
8. Bouton [TRANSPOSE]
Allumer/éteindre les paramètres de
transposition.
9. Bouton [SUSTAIN]
Allumer/éteindre l’effet de soutien.
15. Bouton [FADE]
Allumer/éteindre la fonction de Fade In/Out.
16. Bouton [RECORD]
Entrer dans le mode d’enregistrement.
17. Bouton [PLAY]
Rejouer les enregistrements.
35. Prise PHONES
Connecter une paire d’écouteurs/un casque baladeur.
36. Prise SUSTAIN
Connecter une pédale de sustain.
37. Terminal USB
Connecter à un ordinateur.
38. Prise DC 12V
Brancher un adaptateur d’alimentation 12V DC.
04
1
1112131415
1617
5
6
7
8
9
10
4
3
35
36
2
C
M
Y
CM
MY
CY
CMY
K
AW_A100S_Manual_G02_181122.pdf 4 18/11/23
14:08
Panel & Display Description
1. RECORD
2. MODULATION
3. TOUCH
4. SUSTAIN
5. VOICE/STYLE/DEMO/SONG
6. MEASURE
7. BEAT
8. TEMPO
9. M1-M4/ONE TOUCH SETTING
10. DUAL/ LOWER/ HARMONY/ DSP
11. LEFT/RIGHT HAND LESSON MODE
12. NUMBER MUSCIAL NOTATION
13. A.B.C. / FULL RANGE/ FADE/A/B
14. CHORD
15. TREBLE CLEF
16. BASS CLEF
17. USB
05
LCD
HARMONY
1
2
5
6
4
8
9
10
13
14
15
11
3
7
12
16
17
20
18
19
21
22
23
33
34
23. LCD display
Display important setting information.
24. Voice Select buttons
Directly select a preset voice.
29. [DEMO] button
Switch to Demo Mode.
30 ~ 31. [+/YES]/[-/NO] button
Adjust parameter value.
32. DATA DIAL
Adjust the parameter value.
33. [MODULATION] button
Apply a vibrato effect.
34. [PITCH BEND] wheel
Bend notes up or down.
When the [SHIFT] button Released
18~21. [M1] ~ [M4] buttons
Instantly call up a panel setting.
22. [O.T.S.] button
Turn the One Touch Setting
function on or off.
25. [VOICE] button
Switch to Voice Mode.
26. [STYLE] button
Switch to Style Mode.
27. [SONG] button
Enter the Song Mode.
28. [PIANO] button
Enter the Piano Mode.
When the [SHIFT] button Pressed
18. [DUAL] button
Turn the Dual function on or off.
19. [LOWER] button
Turn the Lower function on or off.
20. [DICT.] button
Enter the Chord Dictionary.
21. [DSP] button
Turn the DSP function on or off.
22. [TOUCH] button
Turn the Touch Response on or off.
25. [L] button
Choose to practice the left hand part.
26. [R] button
Choose to practice the right hand part.
27. [LESSON] button
Enter the Lesson Mode.
28. [FUNCTION] button
Enter the Function Menu.
27
26
28 30 31
32
25
29
RECORD
MODULATION
TOUCH
SUSTAIN
24
C
M
Y
CM
MY
CY
CMY
K
AW_A100S_Manual_G02_181122.pdf 5 18/11/23 14:08
Description du panneau et de l’affichage
1. ENREGISTREMENT
2. MODULATION
3. SENSIBILITE DES
TOUCHES
4. SOUTIEN
5. SONORITE/STYLE/DEMO/
CHANSON
6. MESURE
7. RYTHME
8. TEMPO
9. M1-M4/ONE TOUCH SETTING
10. DOUBLE/ NIVEAU INFERIEUR/
HARMONIE/ DSP
11. MODE DE LECONS POUR MAIN
GAUCHE/DROITE
12. NOTATION MUSICALE DES NUMEROS
13. A.B.C. / FULL RANGE/ FADE/A/B
14. ACCORD
15. CLEF TRIPLE
16. CLEF DE BASSE
17. USB
05
L’écran LCD
HARMONY
1
2
5
6
4
8
9
10
13
14
15
11
3
7
12
16
17
20
1819
2122
23
33
34
23. Affichage de l’écran LCD
Afficher les informations importantes du
réglage.
24. Boutons de la sélection des sonorité
Directement sélectionner une sonorité
préréglée.
29. Bouton [DEMO]
Basculer en mode démo.
30 ~ 31. Bouton [+/YES]/[-/NO]
Ajuster les valeurs des paramètres.
32. Molette des données
Ajuster la valeur d’un
paramètres.
33. Bouton [MODULATION]
Appliquer un effet vibrato.
34. Roue [PITCH BEND]
Modifier vers le haut ou le bas la
hauteur tonale des notes
.
Lorsque le bouton [SHIFT] est relâché
18~21. Boutons [M1] ~ [M4]
Un appel instantané aux
différents réglages du panneau.
22. Bouton [O.T.S.]
Désactiver ou activer la
fonction «One Touch Setting»
25. Bouton [VOICE]
Basculer vers le mode
des sonorités.
26. Bouton [STYLE]
Basculer vers le mode des
styles.
27. Bouton [SONG]
Entrer dans le mode des
chansons.
28. Bouton [PIANO]
Entrer dans le mode
piano.
Lorsque le bouton [SHIFT] est
enfoncé
18. Bouton [DUAL]
Activer/désactiver la fonction double.
19. Bouton [LOWER]
Allumer/éteindre la fonction inférieure.
20. Bouton [DICT.]
Entrer dans le glossaire des accords.
21. Bouton [DSP]
Allumer/éteindre la fonction DSP.
22. Bouton [TOUCH]
Allumer/éteindre la fonction de la
sensibilité des touches.
25. Bouton [L]
Le choix de pratiquer la partie
du clavier de la main gauche.
26. Bouton [R]
Le choix de pratiquer la partie
du clavier de la main droite.
27. Bouton [LESSON]
Entrer dans le mode des leçons.
28. Bouton [FUNCTION]
Entrer dans le menu des fonctions.
27
26
28
30
31
32
25
29
RECORD
MODULATION
TOUCH
SUSTAIN
24
C
M
Y
CM
MY
CY
CMY
K
AW_A100S_Manual_G02_181122.pdf 5 18/11/23
14:08
Description du panneau et de l’affichage
1. ENREGISTREMENT
2. MODULATION
3. SENSIBILITE DES
TOUCHES
4. SOUTIEN
5. SONORITE/STYLE/DEMO/
CHANSON
6. MESURE
7. RYTHME
8. TEMPO
9. M1-M4/ONE TOUCH SETTING
10. DOUBLE/ NIVEAU INFERIEUR/
HARMONIE/ DSP
11. MODE DE LECONS POUR MAIN
GAUCHE/DROITE
12. NOTATION MUSICALE DES NUMEROS
13. A.B.C. / FULL RANGE/ FADE/A/B
14. ACCORD
15. CLEF TRIPLE
16. CLEF DE BASSE
17. USB
05
L’écran LCD
HARMONY
1
2
5
6
4
8
9
10
13
14
15
11
3
7
12
16
17
20
1819
2122
23
33
34
23. Affichage de l’écran LCD
Afficher les informations importantes du
réglage.
24. Boutons de la sélection des sonorité
Directement sélectionner une sonorité
préréglée.
29. Bouton [DEMO]
Basculer en mode démo.
30 ~ 31. Bouton [+/YES]/[-/NO]
Ajuster les valeurs des paramètres.
32. Molette des données
Ajuster la valeur d’un
paramètres.
33. Bouton [MODULATION]
Appliquer un effet vibrato.
34. Roue [PITCH BEND]
Modifier vers le haut ou le bas la
hauteur tonale des notes
.
Lorsque le bouton [SHIFT] est relâché
18~21. Boutons [M1] ~ [M4]
Un appel instantané aux
différents réglages du panneau.
22. Bouton [O.T.S.]
Désactiver ou activer la
fonction «One Touch Setting»
25. Bouton [VOICE]
Basculer vers le mode
des sonorités.
26. Bouton [STYLE]
Basculer vers le mode des
styles.
27. Bouton [SONG]
Entrer dans le mode des
chansons.
28. Bouton [PIANO]
Entrer dans le mode
piano.
Lorsque le bouton [SHIFT] est
enfoncé
18. Bouton [DUAL]
Activer/désactiver la fonction double.
19. Bouton [LOWER]
Allumer/éteindre la fonction inférieure.
20. Bouton [DICT.]
Entrer dans le glossaire des accords.
21. Bouton [DSP]
Allumer/éteindre la fonction DSP.
22. Bouton [TOUCH]
Allumer/éteindre la fonction de la
sensibilité des touches.
25. Bouton [L]
Le choix de pratiquer la partie
du clavier de la main gauche.
26. Bouton [R]
Le choix de pratiquer la partie
du clavier de la main droite.
27. Bouton [LESSON]
Entrer dans le mode des leçons.
28. Bouton [FUNCTION]
Entrer dans le menu des fonctions.
27
26
28
30
31
32
25
29
RECORD
MODULATION
TOUCH
SUSTAIN
24
C
M
Y
CM
MY
CY
CMY
K
AW_A100S_Manual_G02_181122.pdf 5 18/11/23
14:08

Setup
This section contains information about setting up your instrument
and preparing to play. Please go through this section carefully before
turning the power on.
Power Supply
You can power the instrument either by batteries or by power adaptor.
Before you switch your instrument on, turn down the volume of
instrument and the connected audio equipment first.
Using Batteries
The instrument requires six AA size or equivalent alkaline batteries for
power supply.
1. Open the battery cabinet cover located on the bottom of the
instrument.
2. Insert the batteries, carefully following the polarity markings on the
cabinet.
3. Replace the cabinet cover. Make sure it locks firmly in place.
Notes:
1. Do not mix used and new batteries.
2. Always use the same types of batteries.
3. Remove the batteries when the instrument is not in use for a long
period of time.
Using Power Adaptor
1. Before connecting to power supply, please set the [POWER]
switch to OFF and set the master volume to minimum level.
2. Connect the power adaptor to the DC IN jack on the rear panel.
3. Plug the power adaptor into an appropriate AC outlet.
Notes:
1. In order to save energy, the instrument will automatically shut down
after 30 minutes if it is not used. (Please refer to Auto Power Off).
2. For your safety, please unplug the instrument when it is not in use
or during a thunderstorm.
Setting the Music Stand
A music stand is supplied with the keyboard. You can easily attach it
to the instrument by inserting it into the slots at the rear of the panel.
06
Open
C
M
Y
CM
MY
CY
CMY
K
AW_A100S_Manual_G02_181122.pdf 6 18/11/23 14:08
Réglages
Cette section contient des informations sur l’installation de votre
instrument et la préparation à la pratique. Veuillez lire attentivement cette
section avant d’allumer l’appareil.
Alimentation
Vous pouvez alimenter l’instrument soit par des piles, soit par une
alimentation électrique. Avant de mettre votre instrument en marche,
baissez le volume de l’instrument et de l’équipement audio connecté.
Lorsque vous utilisez les batteries
L’instrument nécessite six batteries AA ou des batteries alcalines
équivalentes en alimentation.
1. Ouvrez le couvercle du boîtier des piles situé en dessous de
l’instrument.
2. Insérez les piles en suivant attentivement les indications de polarité sur
le boîtier.
3.
Remettez le couvercle du boîtier en place et assurez-vous qu’il
est bien fermé.
Notes :
1. Ne mélangez pas les pilles neuves et les pilles usagées.
2.
Utilisez toujours les mêmes types de piles.
3. Retirez les piles lorsque l’instrument n’est pas utilisé pendant une
longue période.
Lorsque vous utilisez une alimentation électrique
1. Avant de connecter l’instrument à l’alimentation électrique,
veuillez mettre l’interrupteur [POWER] sur OFF et réglez le volume
principal au niveau minimum.
2. Branchez l’adaptateur d’alimentation à la prise DC IN sur le panneau
arrière.
3. Branchez l’adaptateur électrique dans une prise de
courant appropriée.
Notes :
1. Afin d’économiser de l’énergie, l’instrument s’éteindra automatiquement
après 30 minutes s’il n’est pas utilisé (Veuillez vous référer à la section
«Arrêt automatique»).
2. Pour votre sécurité, veuillez débrancher l’instrument lors d’un orage ou
lorsqu’il n’est pas utilisé.
Mettre en place le pupitre
Un pupitre est fourni avec le clavier. Vous pouvez l’attacher à l’instrument
avec facilité en l’insérant dans les fentes à l’arrière du panneau.
06
C
M
Y
CM
MY
CY
CMY
K
AW_A100S_Manual_G02_181122.pdf 6 18/11/23
14:08
Open
Setup
This section contains information about setting up your instrument
and preparing to play. Please go through this section carefully before
turning the power on.
Power Supply
You can power the instrument either by batteries or by power adaptor.
Before you switch your instrument on, turn down the volume of
instrument and the connected audio equipment first.
Using Batteries
The instrument requires six AA size or equivalent alkaline batteries for
power supply.
1. Open the battery cabinet cover located on the bottom of the
instrument.
2. Insert the batteries, carefully following the polarity markings on the
cabinet.
3. Replace the cabinet cover. Make sure it locks firmly in place.
Notes:
1. Do not mix used and new batteries.
2. Always use the same types of batteries.
3. Remove the batteries when the instrument is not in use for a long
period of time.
Using Power Adaptor
1. Before connecting to power supply, please set the [POWER]
switch to OFF and set the master volume to minimum level.
2. Connect the power adaptor to the DC IN jack on the rear panel.
3. Plug the power adaptor into an appropriate AC outlet.
Notes:
1. In order to save energy, the instrument will automatically shut down
after 30 minutes if it is not used. (Please refer to Auto Power Off).
2. For your safety, please unplug the instrument when it is not in use
or during a thunderstorm.
Setting the Music Stand
A music stand is supplied with the keyboard. You can easily attach it
to the instrument by inserting it into the slots at the rear of the panel.
06
Open
C
M
Y
CM
MY
CY
CMY
K
AW_A100S_Manual_G02_181122.pdf 6 18/11/23 14:08
Réglages
Cette section contient des informations sur l’installation de votre
instrument et la préparation à la pratique. Veuillez lire attentivement cette
section avant d’allumer l’appareil.
Alimentation
Vous pouvez alimenter l’instrument soit par des piles, soit par une
alimentation électrique. Avant de mettre votre instrument en marche,
baissez le volume de l’instrument et de l’équipement audio connecté.
Lorsque vous utilisez les batteries
L’instrument nécessite six batteries AA ou des batteries alcalines
équivalentes en alimentation.
1. Ouvrez le couvercle du boîtier des piles situé en dessous de
l’instrument.
2. Insérez les piles en suivant attentivement les indications de polarité sur
le boîtier.
3.
Remettez le couvercle du boîtier en place et assurez-vous qu’il
est bien fermé.
Notes :
1. Ne mélangez pas les pilles neuves et les pilles usagées.
2. Utilisez toujours les mêmes types de piles.
3. Retirez les piles lorsque l’instrument n’est pas utilisé pendant une
longue période.
Lorsque vous utilisez une alimentation électrique
1. Avant de connecter l’instrument à l’alimentation électrique,
veuillez mettre l’interrupteur [POWER] sur OFF et réglez le volume
principal au niveau minimum.
2. Branchez l’adaptateur d’alimentation à la prise DC IN sur le panneau
arrière.
3. Branchez l’adaptateur électrique dans une prise de
courant appropriée.
Notes :
1. Afin d’économiser de l’énergie, l’instrument s’éteindra automatiquement
après 30 minutes s’il n’est pas utilisé (Veuillez vous référer à la section
«Arrêt automatique»).
2. Pour votre sécurité, veuillez débrancher l’instrument lors d’un orage ou
lorsqu’il n’est pas utilisé.
Mettre en place le pupitre
Un pupitre est fourni avec le clavier. Vous pouvez l’attacher à l’instrument
avec facilité en l’insérant dans les fentes à l’arrière du panneau.
06
C
M
Y
CM
MY
CY
CMY
K
AW_A100S_Manual_G02_181122.pdf 6 18/11/23
14:08
Open

Connecting a Pair of Headphones
A standard pair of stereo headphones can be connected to the
PHONES jack for private practice or late-night playing.
When a pair of headphones is plugged in, the internal speakers will
be automatically shut off, sound can only be heard from the
headphones.
Note:
To avoid the risk of hearing loss, do not use headphones at high
volume levels for a long period of time
Connecting a Sustain Pedal
A pedal can be plugged into the sustain jack and be used to switch
sustain on or off. You can assign different functions to the connect-
ed pedal in the Function Menu. Please refer to the Function Menu
for details.
Connecting a Computer
Use a standard USB cable to connect the USB jack of the instru-
ment to the USB port of a computer. With USB, you can save a
keyboard performance to the computer or use the instrument to
play back music played on the computer.
Note:
In case the instrument does not correctly transmit messages with
the computer via a USB3.0 interface, please use a USB2.0
interface.
Connections
07
C
M
Y
CM
MY
CY
CMY
K
AW_A100S_Manual_G02_181122.pdf 7 18/11/23 14:08
Brancher des écouteurs
Une paire de casques stéréo standards peut être connectée à la
prise PHONES pour les entraînements privés ou les entraînements
nocturnes.
Lorsqu’une paire d’écouteurs est branchée, les haut-parleurs internes
sont automatiquement coupés, puisque le son ne peut être entendu qu’à
travers les écouteurs.
Note :
Afin d’éviter tout risque de perte auditive, il est déconseillé d’utiliser le
casque à haut volume pendant une longue période.
Brancher une pédale de sustain
Une pédale peut être branchée sur la prise pour pédale de sustain et
être utilisée pour activer ou désactiver le sustain. Vous pouvez attribuer
différentes fonctions à la pédale connectée dans le menu des fonctions.
Veuillez vous référer à ce dernier pour plus de détails.
Brancher un ordinateur
Utilisez un câble USB standard pour connecter la prise USB de
l’instrument au port USB d’un ordinateur. Grâce à l’USB, vous
pouvez enregistrer une performance de clavier sur l’ordinateur ou
utiliser l’instrument pour rejouer de la musique jouée sur l’ordinateur.
Note :
Si jamais il y a un problème de transmission d’informations
entre l’instrument et l’ordinateur par clé USB d’interface
3.0, utilisez une clé USB d’interface 2.0.
Connexions
07
C
M
Y
CM
MY
CY
CMY
K
AW_A100S_Manual_G02_181122.pdf 7 18/11/23
14:08

Power Switch
Before connecting the power supply, please set the [POWER] switch
to “OFF” and set the master volume level to minimum.
1. Make sure the instrument is properly connected to power supply.
2. Press the POWER switch, the LCD screen will be lit and display
parameters, indicating the instrument is powered on.
Note:
If the LCD display does not light up after you turned on the instrument,
please check the power connection.
Adjust the Master Volume
Move the [VOLUME] slider upwards to increase the volume level, or
move the slider downwards to decrease the volume level.
Note:
If the speakers do not produce sound, please check if the master
volume is set too low or if headphones are plugged into the PHONES
jack.
Power Switch and Master Volume
08
The instrument features several beautiful demos.
Please refer to Demo List.
1. Press the [DEMO] button to enter the demo mode and start playing
all demo songs in a loop.
2. Use the data dial or the [+/Yes]/ [-/No] button to select a demo
song.
3. Press the [DEMO] or [START/STOP] button to stop playing, and
exit demo mode.
Playing Demo Songs
C
M
Y
CM
MY
CY
CMY
K
AW_A100S_Manual_G02_181122.pdf 8 18/11/23 14:08
Interrupteur
Avant de connecter l’instrument à l’alimentation électrique, veuillez
mettre l’interrupteur [POWER] sur OFF et régler le volume principal au
niveau minimum.
1. Assurez-vous que l’instrument est correctement connecté à
l’alimentation électrique.
2. Appuyez sur l’interrupteur POWER, l’écran LCD s’allume et affiche
les paramètres, ce qui indique que l’instrument est allumé.
Note :
Si l’écran LCD ne s’éclaire pas, une fois que vous avez allumé l’instrument,
veuillez vérifier l’alimentation.
Ajuster le volume principal
Déplacez le curseur [VOLUME] vers le haut pour augmenter le volume
ou déplacez le curseur vers le bas pour diminuer le volume.
Note :
Si les haut-parleurs ne produisent aucun son, veuillez vérifier si le volume
principal n’est pas réglé trop bas ou si les écouteurs sont branchés à la
prise PHONES.
Interrupteur et volume principal
08
Cet instrument comporte plusieurs magnifiques démos. Veuillez
vous référer à la liste des démonstrations.
1.
Appuyez sur le bouton [DEMO] afin d’entrer en mode démo et
commencer à jouer toutes les démos en boucle.
2.
Utilisez la molette de données ou bien les boutons [+/YES]/ [-/NO]
pour sélectionner une démo.
3.
Appuyez sur le bouton [DEMO] ou [START/STOP] pour arrêter la
lecture et quitter le mode démo.
Jouer des démos
C
M
Y
CM
MY
CY
CMY
K
AW_A100S_Manual_G02_181122.pdf 8 18/11/23
14:08
Power Switch
Before connecting the power supply, please set the [POWER] switch
to “OFF” and set the master volume level to minimum.
1. Make sure the instrument is properly connected to power supply.
2. Press the POWER switch, the LCD screen will be lit and display
parameters, indicating the instrument is powered on.
Note:
If the LCD display does not light up after you turned on the instrument,
please check the power connection.
Adjust the Master Volume
Move the [VOLUME] slider upwards to increase the volume level, or
move the slider downwards to decrease the volume level.
Note:
If the speakers do not produce sound, please check if the master
volume is set too low or if headphones are plugged into the PHONES
jack.
Power Switch and Master Volume
08
The instrument features several beautiful demos.
Please refer to Demo List.
1. Press the [DEMO] button to enter the demo mode and start playing
all demo songs in a loop.
2. Use the data dial or the [+/Yes]/ [-/No] button to select a demo
song.
3. Press the [DEMO] or [START/STOP] button to stop playing, and
exit demo mode.
Playing Demo Songs
C
M
Y
CM
MY
CY
CMY
K
AW_A100S_Manual_G02_181122.pdf 8 18/11/23 14:08

1. Press the [VOICE] button.
Enter the Voice Mode. The LCD displays the current default voice
name and number.
2. Select a Voice.
Use the data dial or [+/Yes]/[-/No] button to select a desired voice.
You can also use the Voice select buttons to select a voice. Each
button has two preset voices. Press it repeatedly to switch between
the first and the second preset voice.
3. Play the Voice.
Play the keyboard to use the selected voice for performance.
Note:
Each voice select button has two preset voices. Press the button
repeatedly to switch between the upper and lower preset voice. If you
select the upper voice of a button, pressing another button will also
select the upper voice of that button. In the same way, if you select the
lower voice of a button, pressing another button will select the lower
voice of that button.
Playing Voices
09
1. Press the [STYLE] button.
Enter the Style Mode. The LCD displays the current default style
name and number.
2. Select a Style.
Use the data dial or [+/Yes]/[-/No] button to select a desired style.
You can also use the Style select buttons to select a style. Each
button has two preset styles. Press it repeatedly to switch between
the first and the second preset style.
3. Play the Style.
Press the [START/STOP] button to start playing a rhythm.
Or you can press the [SYNC START] button, and press any keys to
start the rhythm playing.
Note:
Each style select button has two preset styles. Press the button
repeatedly to switch between the upper and lower preset style. If you
select the upper style of a button, pressing another button will also
select the upper style of that button. In the same way, if you select the
lower style of a button, pressing another button will select the lower
style of that button.
Playing Styles
C
M
Y
CM
MY
CY
CMY
K
AW_A100S_Manual_G02_181122.pdf 9 18/11/23 14:08
1.
Appuyez sur le bouton [VOICE]. Passer en mode vocal. L’écran
LCD affiche le nom et le numéro par défaut de chaque sonorité.
2.
Sélectionnez une sonorité. Utilisez le bouton de composition de
données ou les boutons [+/YES]/ [-/NO] pour sélectionner la sonorité
souhaitée. Vous pouvez également utiliser les boutons de sélection de
sonorités pour choisir une d’entre elles. Chaque bouton a deux sonorités
préréglées. Appuyez plusieurs fois sur cette touche pour passer de la
première à la deuxième sonorité préréglée.
3.
Jouez la sonorité, puis jouer au clavier par-dessus pour
votre représentation.
Note :
Chaque bouton de sélection a deux sonorités préréglées. Appuyez
plusieurs fois sur le bouton afin de passer de la sonorité préréglée
supérieure à la sonorité préréglée inférieure. Si vous sélectionnez la
sonorité supérieure sur un bouton, ce sera cette sonorité également pour
tous les autres boutons. De la même manière, si vous sélectionnez une
sonorité inférieure sur une touche, le fait d’appuyer sur une autre touche
sélectionnera la sonorité inférieure dessus égale
ment.
Jouer les sonorités
09
1. Appuyez sur le bouton [STYLE] afin d’entrer dans le mode du
même nom. L’écran LCD affiche le nom et le numéro du style
actuel par défaut.
2. Sélectionnez un style. Utilisez le bouton de composition de
données ou les boutons [+/YES]/ [-/NO] pour sélectionner le style
souhaité. Vous pouvez également utiliser les boutons de
sélection des styles. Chaque bouton a deux styles prédéfinis.
Appuyez plusieurs fois pour passer du premier au deuxième.
3. Jouez un style. Appuyez sur le bouton [START/STOP]
pour commencer à jouer un rythme. Vous pouvez également
appuyer sur le bouton [SYNC START] ou bien n’importe
quelle touche pour lancer le rythme.
Note :
Chaque bouton de sélection de styles a deux styles prédéfinis. Appuyez
plusieurs fois sur un bouton pour passer du style de préréglage supérieur
au style de préréglage inférieur. Si vous sélectionnez le style supérieur
d’un bouton, le fait d’appuyer sur un autre bouton sélectionnera
également le style supérieur dessus. De la même manière, si vous
sélectionnez le style inférieur d’un bouton, le fait d’appuyer sur un autre
bouton sélectionnera le style inférieur dessus.
Jouer les différents styles
C
M
Y
CM
MY
CY
CMY
K
AW_A100S_Manual_G02_181122.pdf 9 18/11/23
14:08
1. Press the [VOICE] button.
Enter the Voice Mode. The LCD displays the current default voice
name and number.
2. Select a Voice.
Use the data dial or [+/Yes]/[-/No] button to select a desired voice.
You can also use the Voice select buttons to select a voice. Each
button has two preset voices. Press it repeatedly to switch between
the first and the second preset voice.
3. Play the Voice.
Play the keyboard to use the selected voice for performance.
Note:
Each voice select button has two preset voices. Press the button
repeatedly to switch between the upper and lower preset voice. If you
select the upper voice of a button, pressing another button will also
select the upper voice of that button. In the same way, if you select the
lower voice of a button, pressing another button will select the lower
voice of that button.
Playing Voices
09
1. Press the [STYLE] button.
Enter the Style Mode. The LCD displays the current default style
name and number.
2. Select a Style.
Use the data dial or [+/Yes]/[-/No] button to select a desired style.
You can also use the Style select buttons to select a style. Each
button has two preset styles. Press it repeatedly to switch between
the first and the second preset style.
3. Play the Style.
Press the [START/STOP] button to start playing a rhythm.
Or you can press the [SYNC START] button, and press any keys to
start the rhythm playing.
Note:
Each style select button has two preset styles. Press the button
repeatedly to switch between the upper and lower preset style. If you
select the upper style of a button, pressing another button will also
select the upper style of that button. In the same way, if you select the
lower style of a button, pressing another button will select the lower
style of that button.
Playing Styles
C
M
Y
CM
MY
CY
CMY
K
AW_A100S_Manual_G02_181122.pdf 9 18/11/23 14:08
1.
Appuyez sur le bouton [VOICE]. Passer en mode vocal. L’écran
LCD affiche le nom et le numéro par défaut de chaque sonorité.
2.
Sélectionnez une sonorité. Utilisez le bouton de composition de
données ou les boutons [+/YES]/ [-/NO] pour sélectionner la sonorité
souhaitée. Vous pouvez également utiliser les boutons de sélection de
sonorités pour choisir une d’entre elles. Chaque bouton a deux sonorités
préréglées. Appuyez plusieurs fois sur cette touche pour passer de la
p
remière à la deuxième sonorité préréglée.
3.
Jouez la sonorité, puis jouer au clavier par-dessus pour
votre représentation.
Note :
Chaque bouton de sélection a deux sonorités préréglées. Appuyez
plusieurs fois sur le bouton afin de passer de la sonorité préréglée
supérieure à la sonorité préréglée inférieure. Si vous sélectionnez la
sonorité supérieure sur un bouton, ce sera cette sonorité également pour
tous les autres boutons. De la même manière, si vous sélectionnez une
sonorité inférieure sur une touche, le fait d’appuyer sur une autre touche
sélectionnera la sonorité inférieure dessus égale
ment.
Jouer les sonorités
09
1. Appuyez sur le bouton [STYLE] afin d’entrer dans le mode du
même nom. L’écran LCD affiche le nom et le numéro du style
actuel par défaut.
2.
Sélectionnez un style. Utilisez le bouton de composition de
données ou les boutons [+/YES]/ [-/NO] pour sélectionner le style
souhaité. Vous pouvez également utiliser les boutons de
sélection des styles. Chaque bouton a deux styles prédéfinis.
Appuyez plusieurs fois pour passer du premier au deuxième.
3. Jouez un style. Appuyez sur le bouton [START/STOP]
pour commencer à jouer un rythme. Vous pouvez également
appuyer sur le bouton [SYNC START] ou bien n’importe
quelle
touche pour lancer le rythme.
Note :
Chaque bouton de sélection de styles a deux styles prédéfinis. Appuyez
plusieurs fois sur un bouton pour passer du style de préréglage supérieur
au style de préréglage inférieur. Si vous sélectionnez le style supérieur
d’un bouton, le fait d’appuyer sur un autre bouton sélectionnera
également le style supérieur dessus. De la même manière, si vous
sélectionnez le style inférieur d’un bouton, le fait d’appuyer sur un autre
bouton sélectionnera le style inférieur dessus.
Jouer les différents styles
C
M
Y
CM
MY
CY
CMY
K
AW_A100S_Manual_G02_181122.pdf 9 18/11/23
14:08

This instrument features a variety of preset songs, and each song
can be practiced in Lesson Mode.
1. Press the [SONG] button.
Enter the song mode. It will play all songs circularly.
2. Select a song.
Use the data dial or the [+/YES]/ [-/NO] button to select the song
you want to play.
3. Press the [START/STOP] button.
It will stop song playback. Press it again, it will play the current
song repeatedly.
4. When song playback is stopped, press the [STYLE] or [VOICE]
button to exit the song mode.
Playing Songs
10
You can record your performance and save it to a user song.
1. Press and hold [SHIFT], then press the [RECORD] button to enter
the user song menu. Then use the data dial or the [+/YES]/[-/NO]
button to select a user song to which your recording will be saved.
2. Press and hold [SHIFT], then press the [RECORD] button to enter
recording standby mode. You can select the desired voice, style etc.
for recording.
3. Press the [START/STOP] button or play the keyboard to start
recording.
4. During recording, press and hold [SHIFT], then press the [RECORD]
button to exit recording.
5. When exit recording, press and hold [SHIFT], then press the [PLAY]
button to enter the play menu. Use the data dial or the [+/YES]/[-/NO]
button to select a user song. Again press and hold [SHIFT], then
press the [PLAY] button to play back the selected user song.
6. During playback, press and hold [SHIFT], then press the [PLAY]
button to exit the playback.
7. In the play menu, press and hold [SHIFT], then press the [RECORD]
button, it will prompt “Delete?”. You can press [+/YES] to delete the
current user song, or press [-/NO] to cancel and go back to the play
menu.
Recording
C
M
Y
CM
MY
CY
CMY
K
AW_A100S_Manual_G02_181122.pdf 10 18/11/23 14:08
Cet instrument comporte une variété de chansons préréglées et
chacune d’entre elles peut être pratiquée en mode leçon.
1. Appuyez sur le bouton [SONG] afin d’entrer dans le mode des
chansons. Il enclenchera la lecture de toutes les chansons en
boucle.
2. Sélectionnez une chanson. Utilisez la molette des données
ou les boutons [+/YES]/ [-/NO] afin de choisir la chanson que
vous voulez jouer.
3.
Appuyez sur le bouton [START/STOP]. Cela arrêtera la lecture de la
chanson. Appuyez dessus à nouveau et le morceau sera joué en boucle.
4.
Lorsque la lecture d’une chanson est arrêtée, appuyez sur le bouton
[STYLE] ou [VOICE] pour quitter le mode de chansons.
Jouer les chansons
10
Vous pouvez enregistrer vos performances et les sauvegarder,
en tant que chansons d’utilisateur.
1.
Appuyez et maintenez le bouton [SHIFT], puis appuyez sur le bouton
[RECORD] pour entrer dans le menu des chansons de l’utilisateur. Puis,
utilisez la molette de données ou le bouton [+/YES]/[-/NO] pour
sélectionner une chanson d’utilisateur sur laquelle votre enregistrement
sera sauvegardé.
2. Appuyez et maintenez le bouton [SHIFT], puis appuyez sur le bouton
[RECORD] pour passer en mode de veille d’enregistrement. Vous pouvez
sélectionner la sonorité, le style ou autre shouhaité(e) pour l’enregistrement.
3. Appuyez sur le bouton [START/STOP] ou jouez sur le clavier pour
commencer l’enregistrement.
4.
Pendant l’enregistrement, appuyez et maintenez le bouton [SHIFT], puis
appuyez sur le bouton [RECORD] pour quitter l’enregistrement.
5. Lorsque vous quittez l’enregistrement, appuyez et maintenez le bouton
[SHIFT], puis appuyez sur le bouton [PLAY] pour entrer dans le menu de
lecture. Utilisez la molette de données ou le bouton [+/YES]/[-/NO] pour
sélectionner une chanson de l’utilisateur. Appuyez et maintenez le bouton
[SHIFT] à nouveau, puis appuyez sur la touche [PLAY] pour lire le morceau
d’utilisateur sélectionné.
6. Pendant la lecture, maintenez le bouton [SHIFT], puis
appuyez sur le bouton [PLAY] pour quitter la lecture.
7. Dans le menu de lecture, maintenez le bouton [SHIFT], puis
appuyez sur [RECORD]. Vous verrez apparaître le message
«Delete?». Vous pouvez appuyer [+/YES] pour supprimer la
chanson d’utilisateur ou sur [-/NO] pour annuler et revenir au
menu de lecture.
Enregistrements
C
M
Y
CM
MY
CY
CMY
K
AW_A100S_Manual_G02_181122.pdf 10 18/11/23
14:08
This instrument features a variety of preset songs, and each song
can be practiced in Lesson Mode.
1. Press the [SONG] button.
Enter the song mode. It will play all songs circularly.
2. Select a song.
Use the data dial or the [+/YES]/ [-/NO] button to select the song
you want to play.
3. Press the [START/STOP] button.
It will stop song playback. Press it again, it will play the current
song repeatedly.
4. When song playback is stopped, press the [STYLE] or [VOICE]
button to exit the song mode.
Playing Songs
10
You can record your performance and save it to a user song.
1. Press and hold [SHIFT], then press the [RECORD] button to enter
the user song menu. Then use the data dial or the [+/YES]/[-/NO]
button to select a user song to which your recording will be saved.
2. Press and hold [SHIFT], then press the [RECORD] button to enter
recording standby mode. You can select the desired voice, style etc.
for recording.
3. Press the [START/STOP] button or play the keyboard to start
recording.
4. During recording, press and hold [SHIFT], then press the [RECORD]
button to exit recording.
5. When exit recording, press and hold [SHIFT], then press the [PLAY]
button to enter the play menu. Use the data dial or the [+/YES]/[-/NO]
button to select a user song. Again press and hold [SHIFT], then
press the [PLAY] button to play back the selected user song.
6. During playback, press and hold [SHIFT], then press the [PLAY]
button to exit the playback.
7. In the play menu, press and hold [SHIFT], then press the [RECORD]
button, it will prompt “Delete?”. You can press [+/YES] to delete the
current user song, or press [-/NO] to cancel and go back to the play
menu.
Recording
C
M
Y
CM
MY
CY
CMY
K
AW_A100S_Manual_G02_181122.pdf 10 18/11/23 14:08
Cet instrument comporte une variété de chansons préréglées et
chacune d’entre elles peut être pratiquée en mode leçon.
1. Appuyez sur le bouton [SONG] afin d’entrer dans le mode des
chansons. Il enclenchera la lecture de toutes les chansons en
boucle.
2. Sélectionnez une chanson. Utilisez la molette des données
ou les boutons [+/YES]/ [-/NO] afin de choisir la chanson que
vous voulez jouer.
3.
Appuyez sur le bouton [START/STOP]. Cela arrêtera la lecture de la
chanson. Appuyez dessus à nouveau et le morceau sera joué en boucle.
4.
Lorsque la lecture d’une chanson est arrêtée, appuyez sur le bouton
[STYLE] ou [VOICE] pour quitter le mode de chansons.
Jouer les chansons
10
Vous pouvez enregistrer vos performances et les sauvegarder,
en tant que chansons d’utilisateur.
1.
Appuyez et maintenez le bouton [SHIFT], puis appuyez sur le bouton
[RECORD] pour entrer dans le menu des chansons de l’utilisateur. Puis,
utilisez la molette de données ou le bouton [+/YES]/[-/NO] pour
sélectionner une chanson d’utilisateur sur laquelle votre enregistrement
sera sauvegardé.
2. Appuyez et maintenez le bouton [SHIFT], puis appuyez sur le bouton
[RECORD] pour passer en mode de veille d’enregistrement. Vous pouvez
sélectionner la sonorité, le style ou autre shouhaité(e) pour l’enregistrement.
3. Appuyez sur le bouton [START/STOP] ou jouez sur le clavier pour
commencer l’enregistrement.
4.
Pendant l’enregistrement, appuyez et maintenez le bouton [SHIFT], puis
appuyez sur le bouton [RECORD] pour quitter l’enregistrement.
5. Lorsque vous quittez l’enregistrement, appuyez et maintenez le bouton
[SHIFT], puis appuyez sur le bouton [PLAY] pour entrer dans le menu de
lecture. Utilisez la molette de données ou le bouton [+/YES]/[-/NO] pour
sélectionner une chanson de l’utilisateur. Appuyez et maintenez le bouton
[SHIFT] à nouveau, puis appuyez sur la touche [PLAY] pour lire le morceau
d’utilisateur sélectionné.
6. Pendant la lecture, maintenez le bouton [SHIFT], puis
appuyez sur le bouton [PLAY] pour quitter la lecture.
7. Dans le menu de lecture, maintenez le bouton [SHIFT], puis
appuyez sur [RECORD]. Vous verrez apparaître le message
«Delete?». Vous pouvez appuyer [+/YES] pour supprimer la
chanson d’utilisateur ou sur [-/NO] pour annuler et revenir au
menu de lecture.
Enregistrements
C
M
Y
CM
MY
CY
CMY
K
AW_A100S_Manual_G02_181122.pdf 10 18/11/23
14:08
Cet instrument comporte une variété de chansons préréglées et
chacune d’entre elles peut être pratiquée en mode leçon.
1. Appuyez sur le bouton [SONG] afin d’entrer dans le mode des
chansons. Il enclenchera la lecture de toutes les chansons en
boucle.
2. Sélectionnez une chanson. Utilisez la molette des données
ou les boutons [+/YES]/ [-/NO] afin de choisir la chanson que
vous voulez jouer.
3.
Appuyez sur le bouton [START/STOP]. Cela arrêtera la lecture de la
chanson. Appuyez dessus à nouveau et le morceau sera joué en boucle.
4.
Lorsque la lecture d’une chanson est arrêtée, appuyez sur le bouton
[STYLE] ou [VOICE] pour quitter le mode de chansons.
Jouer les chansons
10
Vous pouvez enregistrer vos performances et les sauvegarder,
en tant que chansons d’utilisateur.
1.
Appuyez et maintenez le bouton [SHIFT], puis appuyez sur le bouton
[RECORD] pour entrer dans le menu des chansons de l’utilisateur. Puis,
utilisez la molette de données ou le bouton [+/YES]/[-/NO] pour
sélectionner une chanson d’utilisateur sur laquelle votre enregistrement
sera sauvegardé.
2.
Appuyez et maintenez le bouton [SHIFT], puis appuyez sur le bouton
[RECORD] pour passer en mode de veille d’enregistrement. Vous pouvez
sélectionner la sonorité, le style ou autre shouhaité(e) pour l’enregistrement.
3. Appuyez sur le bouton [START/STOP] ou jouez sur le clavier pour
commencer l’enregistrement.
4.
Pendant l’enregistrement, appuyez et maintenez le bouton [SHIFT], puis
appuyez sur le bouton [RECORD] pour quitter l’enregistrement.
5. Lorsque vous quittez l’enregistrement, appuyez et maintenez le bouton
[SHIFT], puis appuyez sur le bouton [PLAY] pour entrer dans le menu de
lecture. Utilisez la molette de données ou le bouton [+/YES]/[-/NO] pour
sélectionner une chanson de l’utilisateur. Appuyez et maintenez le bouton
[SHIFT] à nouveau, puis appuyez sur la touche [PLAY] pour lire le morceau
d’utilisateur sélectionné.
6.
Pendant la lecture, maintenez le bouton [SHIFT], puis
appuyez sur le bouton [PLAY] pour quitter la lecture.
7. Dans le menu de lecture, maintenez le bouton [SHIFT], puis
appuyez sur [RECORD]. Vous verrez apparaître le message
«Delete?». Vous pouvez appuyer [+/YES] pour supprimer la
chanson d’utilisateur ou sur [-/NO] pour annuler et revenir au
menu de lecture.
Enregistrements
C
M
Y
CM
MY
CY
CMY
K
AW_A100S_Manual_G02_181122.pdf 10 18/11/23
14:08

The instrument features a variety of exceptionally realistic voices. Please
refer to the Voice List.
Selecting a Voice
When power on, the “VOICE R1” icon will be lit and the LCD will display
the current voice name and number.
Use the data dial or [+/YES]/ [-/NO] button to select a desired voice. You
can also use the Voice select buttons to select a preset voice.
Note:
when the dual and lower function are in use, you can press the [VOICE]
button repeatedly to switch between Voice R1, R2 and L.
Playing Two Voice Simultaneously
The dual function allows two different voices to be layered together,
creating a much richer sound. Turn the function on, you can select a voice
for the dual voice "R2".
1. Press and hold [SHIFT], then press the [DUAL] button to turn on the
dual function. The “DUAL” and “VOICE R2” icons light up and the LCD
shows the current dual voice number and name.
Use the data dial or [+/Yes]/[-/No] button to select a dual voice. Or
press one of the Voice select buttons to select a preset voice.
2. In dual mode, press and hold [SHIFT], then press the [DUAL] button
to turn off the dual function. The “DUAL” and “VOICE R2” icons
become unlit.
Note:
When the lower and dual functions are in use, only the right hand area will
play the dual voice.
Playing Different Voices with Both Hands
The lower function splits the keyboard into the left and the right hand
areas, each playing a different voice. The left hand voice is the lower
voice “L”.
The default split point is F#3 (19) , however you can assign it to any other
key. Please refer to the Function Menu.
1. Press and hold [SHIFT], then press the [LOWER] button to turn on the
Lower function. The “LOWER” and “L” icons light up and the LCD
shows the current lower voice number and name.
2. Use the data dial or [+/Yes]/[-/No] button to select a lower voice. Or
press one of the Voice select buttons to select a preset voice.
3. In lower mode, press and hold [SHIFT], then press the [LOWER] button
to turn off the lower function. The “LOWER” and “VOICE L” icons
become unlit.
Playing the Voices
11
C
M
Y
CM
MY
CY
CMY
K
AW_A100S_Manual_G02_181122.pdf 11 18/11/23 14:08
L’instrument comporte une variété de sonorités d’un réalisme exceptionnel.
Veuillez vous référer à la liste des sonorités.
Sélectionner une sonorité
Lorsque le mode est activé, l’icône «VOICE R1» est allumée et l’écran
LCD affiche le nom et le numéro de la sonorité actuelle. Utilisez la
molette de données ou les boutons [+/YES]/ [-/NO] pour sélectionner la
sonorité souhaitée. Vous pouvez aussi utiliser les boutons de sélection
des sonorités pour choisir une sonorité préréglée.
Note :
Lorsque la fonction double et la fonction intérieure sont utilisées, vous
pouvez appuyer plusieurs fois sur le bouton [VOICE] pour alterner entre la
sonorité R1, R2 et L.
Jouer deux sonorités simultanément
La double fonction permet de superposer deux sonorités différentes et ainsi de
créer un son bien plus riche. Afin d’activer cette fonction, vous pouvez
sélectionner une sonorité pour la double sonorité «R2».
1. Appuyez et maintenez le bouton [SHIFT], puis appuyez sur le bouton
[DUAL] afin d’activer la double fonction. Les icônes «DUAL» et «VOICE R2»
s’allument et l’écran LCD affiche le numéro et le nom actuels de la double
sonorité.
Utilisez la molette de données ou le bouton [+/Yes]/[-/No] pour sélectionner
une double sonorité. Ou appuyez sur l’un des boutons de sélection des
sonorités pour sélectionner une sonorité préréglée.
2. En mode double, appuyez et maintenez le bouto
n [SHIFT],
puis appuyez sur le bouton [DUAL] pour désactiver la double
fonction. Les icônes «DUAL» et «VOICE R2» disparaissent.
Note :
Lorsque la fonction inférieure et la fonction double sont utilisées, seule la
zone de la main droite permet de jouer la double sonorité.
Jouer différentes sonorités avec les deux mains
La fonction inférieure divise le clavier en deux zones, l’une pour la main
gauche et l’autre pour la main droite, ce qui permet de jouer une sonorité
différente sur chacune d’entre elles. La sonorité de la main gauche est la
sonorité inférieure «L».
Le point de division par défaut est Fa 3
e
(19). Cependant, vous pouvez
l’attribuer à n’importe quelle autre touche. Veuillez vous référer au menu
des fonctions.
1.
Appuyez et maintenez le bouton [SHIFT], puis appuyez sur le bouton
[LOWER] afin d’activer la fonction «LOWER». Les icônes «LOWER» et «L»
s’allument et l’écran LCD affiche le numéro et le nom de la sonorité inférieure
actuelle.
3. Utilisez la molette de données ou le bouton [+/Yes]/[-/No] pour
sélectionner une sonorité plus grave. Ou appuyez sur l’un des boutons de
sélection de sonorité pour sélectionner une sonorité préréglée.
3. En mode inférieur, appuyez et maintenez le bouton [SHIFT], puis appuyez
sur le bouton [LOWER] pour désactiver la fonction inférieure. Les icônes
«LOWER» et «VOICE L» disparaîtront.
Jouer les sonorités
11
C
M
Y
CM
MY
CY
CMY
K
AW_A100S_Manual_G02_181122.pdf 11 18/11/23
14:08
The instrument features a variety of exceptionally realistic voices. Please
refer to the Voice List.
Selecting a Voice
When power on, the “VOICE R1” icon will be lit and the LCD will display
the current voice name and number.
Use the data dial or [+/YES]/ [-/NO] button to select a desired voice. You
can also use the Voice select buttons to select a preset voice.
Note:
when the dual and lower function are in use, you can press the [VOICE]
button repeatedly to switch between Voice R1, R2 and L.
Playing Two Voice Simultaneously
The dual function allows two different voices to be layered together,
creating a much richer sound. Turn the function on, you can select a voice
for the dual voice "R2".
1. Press and hold [SHIFT], then press the [DUAL] button to turn on the
dual function. The “DUAL” and “VOICE R2” icons light up and the LCD
shows the current dual voice number and name.
Use the data dial or [+/Yes]/[-/No] button to select a dual voice. Or
press one of the Voice select buttons to select a preset voice.
2. In dual mode, press and hold [SHIFT], then press the [DUAL] button
to turn off the dual function. The “DUAL” and “VOICE R2” icons
become unlit.
Note:
When the lower and dual functions are in use, only the right hand area will
play the dual voice.
Playing Different Voices with Both Hands
The lower function splits the keyboard into the left and the right hand
areas, each playing a different voice. The left hand voice is the lower
voice “L”.
The default split point is F#3 (19) , however you can assign it to any other
key. Please refer to the Function Menu.
1. Press and hold [SHIFT], then press the [LOWER] button to turn on the
Lower function. The “LOWER” and “L” icons light up and the LCD
shows the current lower voice number and name.
2. Use the data dial or [+/Yes]/[-/No] button to select a lower voice. Or
press one of the Voice select buttons to select a preset voice.
3. In lower mode, press and hold [SHIFT], then press the [LOWER] button
to turn off the lower function. The “LOWER” and “VOICE L” icons
become unlit.
Playing the Voices
11
C
M
Y
CM
MY
CY
CMY
K
AW_A100S_Manual_G02_181122.pdf 11 18/11/23 14:08

The auto accompaniment feature puts a full backing band at your
fingertips. To use it, all you have to do is to play the chords with your
left hand using your selected accompaniment style, and then the
accompaniment will automatically play along, instantly following the
chords you play. With auto accompaniment, even a solo performer can
enjoy playing with the backing of an entire band or orchestra. The
instrument features a variety of styles, please refer to the Style List. Try
selecting the different styles and enjoy the auto accompaniment.
Play Auto Accompaniment (rhythm track
only)
1. Press [STYLE] button.
Enter the style mode. The “STYLE” icon will light up. The LCD
displays the name and number of the current style.
2. Select a style.
Use the data dial or [+/Yes]/[-/No] button to select a desired style.
Or press one of the Style select buttons to select a preset style.
3. Start playing a style.
Press the [START/STOP] button to start the rhythm tracks of the
auto accompaniment. Also you can press [SYNC START] and then
play any key to start the rhythm tracks of the auto accompaniment.
Play Auto Accompaniment (all tracks)
1. Turn on the auto accompaniment function.
Press the [CHORD MODE] button to turn on the A.B.C. function.
The “A.B.C” indicator will be lit. The keyboard is split and the left
hand area is the chord section. You can play different chords in the
chord section.
Press the [CHORD MODE] button again to enter full range mode.
The “FULL RANGE” indicator will be lit. You can play chords over
the entire keyboard in multi-fingering.
2. Play auto accompaniment of all tracks.
Press the [SYNC START] button, then play a chord in the chord
area to start the auto accompaniment. When you play a different
chord, the accompaniment will change along.
Alternatively, press the [START/STOP] button to start the rhythm
part. Then play a chord in the chord section, the chord part will start
as well.
Accompaniment Sections
Specially created sections can be added into the accompaniment,
making your performance more professional and personalized.
INTRO Section
The Intro is an opening section of the song. When the intro pattern
finished, the system will automatically shift to the main section.
MAIN Section
The Main is the principal section of a song. It will play and repeat the
Main pattern until another section's button is pressed.
Auto Accompaniment
12
C
M
Y
CM
MY
CY
CMY
K
AW_A100S_Manual_G02_181122.pdf 12 18/11/23 14:08
La fonction d’accompagnement automatique vous permet d’avoir un
accompagnement complet au bout des doigts. Pour l’utiliser, il vous suffit de
jouer les accords de la main gauche et d’utiliser le style d’accompagnement
choisi. L’accompagnement jouera alors automatiquement et suivra les
accords que vous jouez.
Avec l’accompagnement automatique, même un soliste peut profiter de jouer
avec le soutien de tout un groupe, voire de tout un orchestre. L’instrument a
une var
iété de styles. Veuillez vous référer à la liste des styles et
amusez-vous avec l’accompagnement automatique.
Jouer AA (uniquement la piste de rythme)
1.
Appuyez sur le bouton [STYLE], afin d’entrer dans le mode des
styles. L’icône «STYLE» s’allumera. L’écran LCD affiche le nom et le
numéro du style en cours.
2.
Pour sélectionner un style, utilisez la molette de données ou le
bouton [+/Yes]/[-/No] pour sélectionner le style souhaité. Ou
appuyez sur l’un des boutons de sélection de styles pour choisir
un style préréglé.
3.
Pour commencer à jouer un style, appuyez sur le bouton [START/STOP]
pour lancer les pistes rythmiques de l’accompagnement automatique. Vous
pouvez également appuyer sur [SYNC START] et ensuite jouer sur n’importe
quelle touche pour lancer les pistes rythmiques d’accompagnement
automatique.
Jouer AA (toutes les pistes)
1.
Activez la fonction d’accompagnement automatique. Appuyez sur
le bouton [CHORD MODE] afin d’activer le mode A/B/C et l’indicateur
« A.B.C. » s’allume. Le clavier est divisé et la zone de la main gauche
est la section des accords. Vous pouvez jouer différents accords dans
la section de ces derniers. Appuyez à nouveau sur le bouton [CHORD
MODE] pour passer dans le mode de toute la gamme. L’indicateur
«FULL RANGE» s’allume. Vous pouvez jouer des accords sur tout le
clavier.
2.
Jouez l’accompagnement automatique de tous les morceaux.
Appuyez sur le bouton [SYNC START], puis jouez un accord dans la
zone des accords pour lancer l’accompagnement automatique.
Lorsque vous jouez un accord différent, l’accompagnement change en
même temps. Vous pouvez également appuyer sur le bouton
[START/STOP] pour démarrer la partie rythmique. Jouez ensuite un
accord dans la section des accords, la partie des accords commencera
également.
Morceaux d’accompagnement
Des sections spécialement créées peuvent être ajoutées à
l’accompagnement, ce qui rend votre prestation plus professionnelle et
personnalisée.
Section INTRO
L’introduction est une section d’ouverture de la chanson. Lorsque le
modèle d’introduction est terminé, le système passe automatiquement
à la section principale.
Section PRINCIPALE
La section principale est la section principale d’une chanson. Le motif
principal sera joué et répété jusqu’à ce que le bouton d’une autre section
soit appuyé.
Accompagnement automatique (AA)
12
C
M
Y
CM
MY
CY
CMY
K
AW_A100S_Manual_G02_181122.pdf 12 18/11/23
14:08
The auto accompaniment feature puts a full backing band at your
fingertips. To use it, all you have to do is to play the chords with your
left hand using your selected accompaniment style, and then the
accompaniment will automatically play along, instantly following the
chords you play. With auto accompaniment, even a solo performer can
enjoy playing with the backing of an entire band or orchestra. The
instrument features a variety of styles, please refer to the Style List. Try
selecting the different styles and enjoy the auto accompaniment.
Play Auto Accompaniment (rhythm track
only)
1. Press [STYLE] button.
Enter the style mode. The “STYLE” icon will light up. The LCD
displays the name and number of the current style.
2. Select a style.
Use the data dial or [+/Yes]/[-/No] button to select a desired style.
Or press one of the Style select buttons to select a preset style.
3. Start playing a style.
Press the [START/STOP] button to start the rhythm tracks of the
auto accompaniment. Also you can press [SYNC START] and then
play any key to start the rhythm tracks of the auto accompaniment.
Play Auto Accompaniment (all tracks)
1. Turn on the auto accompaniment function.
Press the [CHORD MODE] button to turn on the A.B.C. function.
The “A.B.C” indicator will be lit. The keyboard is split and the left
hand area is the chord section. You can play different chords in the
chord section.
Press the [CHORD MODE] button again to enter full range mode.
The “FULL RANGE” indicator will be lit. You can play chords over
the entire keyboard in multi-fingering.
2. Play auto accompaniment of all tracks.
Press the [SYNC START] button, then play a chord in the chord
area to start the auto accompaniment. When you play a different
chord, the accompaniment will change along.
Alternatively, press the [START/STOP] button to start the rhythm
part. Then play a chord in the chord section, the chord part will start
as well.
Accompaniment Sections
Specially created sections can be added into the accompaniment,
making your performance more professional and personalized.
INTRO Section
The Intro is an opening section of the song. When the intro pattern
finished, the system will automatically shift to the main section.
MAIN Section
The Main is the principal section of a song. It will play and repeat the
Main pattern until another section's button is pressed.
Auto Accompaniment
12
C
M
Y
CM
MY
CY
CMY
K
AW_A100S_Manual_G02_181122.pdf 12 18/11/23 14:08

FILL IN Section
Auto fill in function automatically adds a fill to your performance. When
the fill-in is finished,accompaniment shifts to the Main section.
ENDING Section
The Ending is the ending section of a song. When the ending is finished,
accompaniment automatically stops.The length of the ending differs
depending on the selected style.
Playing Different Accompaniment Sections
1. Press the [STYLE] button.
2. Press a Style select button, data dial or [+/YES]/ [-/NO] button to
select a style.
3. Press [CHORD MODE] button to enter A.B.C. mode.
4. Press [SYNC START] button.
5. Press the [FILL A] button, select the Main A section.
6. Press the [INTRO/ENDING] button. Now the “A” indicator flashes on
LCD, and the style is ready to play.
7. It will start the accompaniment as soon as you start playing in Chord
section. When the playback of the intro is finished, it automatically
leads into Main A section.
8. Press the [FILL B] button. A fill-in plays, automatically followed by
the Main B section.
9. Press the [INTRO/ENDING] button to play an ending. When the
ending is finished, the auto accompaniment automatically stops.
Fade
1. Fade In
When style is stopped, press and hold [SHIFT], then press the
[FADE] button to turn on the fade-in function. When style starts
playing, the volume will increase from low to high and the “◢FADE”
icon will flash along.
2. Fade Out
During style playback, press and hold [SHIFT], then press the
[FADE] button to turn on the fade-out function. The volume will
decrease from high to low and the “FADE◣” icon will flash along
until the style is stopped.
3. Fade In/ Out Time
The default time value is 10 seconds.
Accompaniment Volume Control
The function will adjust the accompaniment volume, so as to keep an
appropriate balance between the accompaniment volume and the voice
volume.
1. Press and hold [SHIFT], then press the [ACCOMP +]/[ACCOMP -]
button to set accompaniment volume over the range of 0~32. The
LCD displays the current volume level.
2. Press and hold [SHIFT], then hold down the [ACCOMP +]/
[ACCOMP -] to make a quick change in the value.
3. When LCD displays the volume level, press and hold [SHIFT], then
press the [ACCOMP +] and [ACCOMP -] buttons simultaneously to
mute the accompaniment part. The LCD displays “OFF Accomp”. Do
the operation again to turn on the accompaniment volume.
Note:
It will automatically exit the setting if there is no operation in 5 seconds.
Auto Accompaniment
13
C
M
Y
CM
MY
CY
CMY
K
AW_A100S_Manual_G02_181122.pdf 13 18/11/23 14:08
Section FILL-IN
La fonction de FILL-IN ajoute automatiquement un remplissage à votre
performance. Lorsque le remplacement est terminé, l’accompagnement
change pour celui de la section principale.
Section ENDING
Le ENDING est la section de fin d’une chanson. Lorsque la fin est terminée, l’accompagnement
s’arrête automatiquement. La longueur de la fin diffère selon le style choisi.
Jouer différents morceaux d’accompagnement
1. Appuyez sur le bouton [STYLE].
2. Appuyez sur un bouton de sélection de styles, une molette de données ou les
boutons [+/YES]/ [-/NO] pour sélectionner un style.
3. Appuyez sur le bouton [CHORD MODE] pour passer en mode A. B. C.
4. Appuyez sur le bouton [SYNC START].
5. Appuyez sur le bouton [FILL IN], puis sélectionnez la section principale A.
6. Appuyez sur le bouton [INTRO/ENDING]. L’indicateur «A» clignote sur
l’écran LCD et le style est prêt à être joué.
7. L’accompagnement débutera dès que vous aurez commencé à jouer
dans la section des accords. Lorsque la lecture de l’intro est terminée, elle
changera automatiquement pour la section principale.
8. Appuyez sur le bouton [FILL B]. Un remplissage joue, puis est suivi
automatiquement par la section principale B.
9. Appuyez sur le bouton [INTRO/ENDING] pour jouer une fin. Lorsque la
fin est terminée, l’accompagnement s’arrête automatiquement.
Fade
1. Fade In
Lorsque le style est arrêté, appuyez et maintenez la
touche [SHIFT], puis appuyez sur la touche [FADE] pour
activer la fonction d’estompement de début. Lorsque le
style recommencera à jouer, le volume augmentera et
l’icône «◢FADE» clignotera.
2. Fade Out
Pendant la lecture de style, appuyez et maintenez le bouton
[SHIFT], puis appuyez sur le bouton [FADE] pour activer la
fonction d’estompement de fin. Le volume diminuera et
l’icône «FADE◣» clignotera jusqu’à c
e que le style soit
arrêté.
3.
Fade In/ Out Time
La valeur du temps par défaut d’estompement est de 10
secondes.
Accompagnement du contrôle du volume
Cette fonction permet de régler le volume de l’accompagnement de manière à maintenir
un équilibre approprié entre le volume de l’accompagnement et celui de la sonorité.
1.
Appuyez et maintenez [SHIFT], puis appuyez sur le bouton [ACCOMP +]/[ACCOMP -]
pour régler le volume de l’accompagnement sur une étendue de 0 à 32. L’écran LCD affiche
le niveau du volume actuel.
2.
Appuyez et maintenez le bouton [SHIFT], puis maintenez [ACCOMP +]/[ACCOMP -] enfoncé
pour modifier rapid
ement le volume.
3. Lorsque l’écran LCD affiche le niveau du volume, appuyez et maintenez
enfoncé le bouton [SHIFT], puis appuyez simultanément sur les boutons
[ACCOMP +] et [ACCOMP -] pour arrêter la partie d’accompagnement.
L’écran LCD affiche «OFF Accomp». Refaites l’opération pour allumer le
volume d’accompagnement.
Note :
Le réglage sera automatiquement quitté si aucune opération n’est effectuée dans les 5 secondes.
Accompagnement Automatique
13
C
M
Y
CM
MY
CY
CMY
K
AW_A100S_Manual_G02_181122.pdf 13 18/11/23
14:08
FILL IN Section
Auto fill in function automatically adds a fill to your performance. When
the fill-in is finished,accompaniment shifts to the Main section.
ENDING Section
The Ending is the ending section of a song. When the ending is finished,
accompaniment automatically stops.The length of the ending differs
depending on the selected style.
Playing Different Accompaniment Sections
1. Press the [STYLE] button.
2. Press a Style select button, data dial or [+/YES]/ [-/NO] button to
select a style.
3. Press [CHORD MODE] button to enter A.B.C. mode.
4. Press [SYNC START] button.
5. Press the [FILL A] button, select the Main A section.
6. Press the [INTRO/ENDING] button. Now the “A” indicator flashes on
LCD, and the style is ready to play.
7. It will start the accompaniment as soon as you start playing in Chord
section. When the playback of the intro is finished, it automatically
leads into Main A section.
8. Press the [FILL B] button. A fill-in plays, automatically followed by
the Main B section.
9. Press the [INTRO/ENDING] button to play an ending. When the
ending is finished, the auto accompaniment automatically stops.
Fade
1. Fade In
When style is stopped, press and hold [SHIFT], then press the
[FADE] button to turn on the fade-in function. When style starts
playing, the volume will increase from low to high and the “◢FADE”
icon will flash along.
2. Fade Out
During style playback, press and hold [SHIFT], then press the
[FADE] button to turn on the fade-out function. The volume will
decrease from high to low and the “FADE◣” icon will flash along
until the style is stopped.
3. Fade In/ Out Time
The default time value is 10 seconds.
Accompaniment Volume Control
The function will adjust the accompaniment volume, so as to keep an
appropriate balance between the accompaniment volume and the voice
volume.
1. Press and hold [SHIFT], then press the [ACCOMP +]/[ACCOMP -]
button to set accompaniment volume over the range of 0~32. The
LCD displays the current volume level.
2. Press and hold [SHIFT], then hold down the [ACCOMP +]/
[ACCOMP -] to make a quick change in the value.
3. When LCD displays the volume level, press and hold [SHIFT], then
press the [ACCOMP +] and [ACCOMP -] buttons simultaneously to
mute the accompaniment part. The LCD displays “OFF Accomp”. Do
the operation again to turn on the accompaniment volume.
Note:
It will automatically exit the setting if there is no operation in 5 seconds.
Auto Accompaniment
13
C
M
Y
CM
MY
CY
CMY
K
AW_A100S_Manual_G02_181122.pdf 13 18/11/23 14:08

Auto Accompaniment
14
Chord Basics
A chord, in music, is a harmonic set of three or more notes that are
heard simultaneously. The most common type of chord is a triad. A
triad is a set of three notes that can be stacked in thirds. When
arranged this way, the triad's notes, from lowest pitched to highest, are
called: the Root, the Third, and the Fifth.
Triad Type
The basic triad types are as follows:
Chord Inversion
When a chord’s root is not the lowest note in the triad, it is called an
inversion chord. When the root note is the lowest note, it is called a
root-position chord. If we put the Third and Fifth in the root position, it
forms an “Inversion”, so it is called an “Inverted Chord”. A major triad
and its inversion are illustrated on the right.
Chord Name
The chord name consists of two parts: Chord root and Chord type.
Major Triad
Minor Triad
Augmented
Triad
Diminished
Triad
A root with a major third added above and a perfect fifth
constitutes a “Major Triad”.
A root with a minor third added above and a perfect fifth
constitutes a “Minor Triad”.
A root with a major third added above and an augment-
ed fifth constitutes an “Augmented Triad”.
A root with a minor third added above and a diminished
fifth constitutes a “Diminished Triad”.
Single Finger
Single-finger makes it easy to produce major, seventh, minor and minor
seventh chords by pressing a minimum number of keys on the
auto accompaniment section.
Multi-finger
Multi-finger allows you to play chords in normal fingering. Try playing
the 32 types of C chords listed on the right.
Full Range
In Full Range mode, it detects chords played in normal fingering
(Multi-finger) over the entire keyboard range.
C
M
Y
CM
MY
CY
CMY
K
AW_A100S_Manual_G02_181122.pdf 14 18/11/23 14:08
Accompagnement automatique
14
Les accords de base
En musique, un accord est un ensemble harmonique de trois notes ou plus, que
l’on entend simultanément. Le type d’accord le plus courant est la triade. Une
triade est un ensemble de trois notes qui peuvent être un empilement de tierces.
Lorsque les notes de la triade sont disposées, de la note la plus grave à la note la
plus aiguë, elles sont appelées : une fondamentale, une tierce et une quinte.
Types de triade
Les types de triade de base sont les suivants :
Accord altéré
Lorsque la note de base est la note la plus basse, on parle d’un accord de quinte.
Lorsque la fondamentale d’un accord n’est pas la note la plus basse de la triade, on
parle d’un accord altéré. Si nous mettons la tierce et la quinte en position de base,
cela forme une «altération», c’est-à-dire un «accord altéré».
Une triade de quinte majeure et de son altération sont illustrées sur la droite.
Nom des accords
Le nom d’un accord se compose de deux choses: la fondamentale de
l’accord et le type d’accord.
Un accord
parfait majeur
Un accord
parfait mineur
Un accord de
quinte augmentée
Un accord de
quinte diminuée
Une fondamentale avec une tierce majeure et une quinte
juste constituent un «accord parfait majeur».
Une fondamentale avec une tierce mineure et une quinte
juste constituent un «accord parfait mineur».
Une fondamentale, une tierce majeure avec une quinte
augmentée constituent un «accord de quinte augmentée».
Une fondamentale, avec une tierce mineure et une quinte
diminuée constituent un «accord de quinte diminuée».
Un seul doigt
Ce mode permet de produire facilement des accords de majeur, de septième,
de mineur et de septième mineure, grâce à un minimum de touches de la
section d’accompagnement automatique.
Multi-doigts
Ce mode vous permet de jouer des accords avec un doigté normal.
Essayez de jouer les 32 types d’accords en Do énumérés à droite.
Toute la gamme
Le mode de toute la gamme détecte les accords joués en doigté
normal (multi-doigts) sur tout le clavier.
C
M
Y
CM
MY
CY
CMY
K
AW_A100S_Manual_G02_181122.pdf 14 18/11/23
14:08
Auto Accompaniment
14
Chord Basics
A chord, in music, is a harmonic set of three or more notes that are
heard simultaneously. The most common type of chord is a triad. A
triad is a set of three notes that can be stacked in thirds. When
arranged this way, the triad's notes, from lowest pitched to highest, are
called: the Root, the Third, and the Fifth.
Triad Type
The basic triad types are as follows:
Chord Inversion
When a chord’s root is not the lowest note in the triad, it is called an
inversion chord. When the root note is the lowest note, it is called a
root-position chord. If we put the Third and Fifth in the root position, it
forms an “Inversion”, so it is called an “Inverted Chord”. A major triad
and its inversion are illustrated on the right.
Chord Name
The chord name consists of two parts: Chord root and Chord type.
Major Triad
Minor Triad
Augmented
Triad
Diminished
Triad
A root with a major third added above and a perfect fifth
constitutes a “Major Triad”.
A root with a minor third added above and a perfect fifth
constitutes a “Minor Triad”.
A root with a major third added above and an augment-
ed fifth constitutes an “Augmented Triad”.
A root with a minor third added above and a diminished
fifth constitutes a “Diminished Triad”.
Single Finger
Single-finger makes it easy to produce major, seventh, minor and minor
seventh chords by pressing a minimum number of keys on the
auto accompaniment section.
Multi-finger
Multi-finger allows you to play chords in normal fingering. Try playing
the 32 types of C chords listed on the right.
Full Range
In Full Range mode, it detects chords played in normal fingering
(Multi-finger) over the entire keyboard range.
C
M
Y
CM
MY
CY
CMY
K
AW_A100S_Manual_G02_181122.pdf 14 18/11/23 14:08

Auto Accompaniment
15
Tempo
Each style is preset with a default or standard tempo, however, you
can change it as needed.
1. Press the [TEMPO+]/ [TEMPO-] button to change the current
tempo. Alternatively, when the tempo is flashing on LCD, use the
data dial to make a quick change in the value.
2. Press the [TEMPO+] and [TEMPO-] buttons simultaneously to reset
the tempo to the default value.
Note:
When style stops, changing the style will automatically reset the tempo.
However, changing the style during style playback will not result in
tempo change
C
M
Y
CM
MY
CY
CMY
K
AW_A100S_Manual_G02_181122.pdf 15 18/11/23 14:08
Accompagnement automatique
15
Tempo
Chaque style est préréglé avec un tempo par défaut ou standard.
Cependant, vous pouvez le modifier selon vos besoins.
1.
Appuyez sur le bouton [TEMPO+]/ [TEMPO-] pour modifier le tempo actuel.
Sinon, lorsque le tempo clignote sur l’écran LCD, utilisez la molette de données
pour modifier rapidement la valeur rythmique.
2. Appuyez simultanément sur les boutons [TEMPO+] et [TEMPO-] afin de
réinitialiser le tempo à la valeur par défaut.
Note :
Lorsque le style s’arrête et que vous le changez, cela remet
automatiquement le tempo à zéro. Cependant, le changement de style
pendant la lecture n’entraînera pas de changement de tempo.
C
M
Y
CM
MY
CY
CMY
K
AW_A100S_Manual_G02_181122.pdf 15 18/11/23
14:08
Auto Accompaniment
15
Tempo
Each style is preset with a default or standard tempo, however, you
can change it as needed.
1. Press the [TEMPO+]/ [TEMPO-] button to change the current
tempo. Alternatively, when the tempo is flashing on LCD, use the
data dial to make a quick change in the value.
2. Press the [TEMPO+] and [TEMPO-] buttons simultaneously to reset
the tempo to the default value.
Note:
When style stops, changing the style will automatically reset the tempo.
However, changing the style during style playback will not result in
tempo change
C
M
Y
CM
MY
CY
CMY
K
AW_A100S_Manual_G02_181122.pdf 15 18/11/23 14:08

Press and hold the [SHIFT] button and then press the [FUNCTION]
button to enter function menu. The LCD displays the current function
menu option. Use [+/YES]/ [-/NO] button to set parameter of the
current option.
Detailed parameters and their ranges:
Note:
It will exit the function menu if there is no operation in 5 seconds.
Tune
This function sets the pitch of entire keyboard by steps of cents.
1. Press and hold the [SHIFT] button and then repeatedly press the
[FUNCTION] button to select the tune menu. The LCD displays
“xxx Tune”.
Use [+/YES]/ [-/NO] button or data dial to change tune value. Its
range is from -50 to 50 cents.
2. Press [+/YES] and [-/NO] buttons simultaneously to set the tune
value to its default setting: 0.
3. The setting is applied to both accompaniment and the voice.
Split Point
This function assigns a key to split the entire keyboard into two areas.
1. Press and hold the [SHIFT] button and then repeatedly press the
[FUNCTION] button to select split point menu. The LCD displays
“xxx Split Pt”. Use [+/YES]/ [-/NO] button or data dial to change
Split Point.
2. Press [+] and [-] buttons simultaneously to set the split point value
to its default setting.
Note:
The Split point belongs to the left hand area.
Function Menu
16
Parameter
Tune
Split Point
Beat Type
Pedal Type
EQ Type
Reverb Type
Reverb Level
Chorus Type
Chorus Level
Harmony Type
MIDI In
MIDI Out
Auto Power Off
No.
1
2
3
4
5
6
7
8
9
10
11
12
13
LCD display
XXX Tune
XXX Split Pt
XXX Beat
XXX Ped XXX
XXX EQ XXX
XXX RevHall1
XXX Rev Lev
XXX ChrGMCr2
XXX Chr Lev
XXX HrmDuet
XXX Midi In
XXX Midi Out
XXX PowerOff
Range
-50 ~ +50
1 - 61
0, 2 - 9
Ped Sust, Ped Soft, Ped Mem, Ped St/S
EQ Pop, EQ Rock, EQ Class, EQ Jazz,
EQ Dance, EQ Reset
RevRoom1, RevRoom2, RevRoom3,
RevHall1, RevHall2, RevHall3, RevChrh1,
RevChrh2, RevDelay, RevPnDly
0 - 32
ChrChrs1, ChrChrs2, ChrGMCr1, ChrGMCr2,
ChrFlgr1, ChrFlgr2, ChrRtry1, ChrRtry2
0 - 32
HrmDuet, HrmStdTri, HrmFulCd, HrmRkDut,
HrmCtDut, HrmCtTri, HrmBlock, Hrm4Cls1,
Hrm4Cls2, Hrm4Open, Hrm1+5, HrmOctv1,
HrmOctv2, HrmStrum
01 - 16, ALL
01 - 16
30, 60, OFF
Default
0
19
4
Ped Sust
EQ Reset
RevHall1
23
ChrGMCr2
0
HrmDuet
ALL
01
30
C
M
Y
CM
MY
CY
CMY
K
AW_A100S_Manual_G02_181122.pdf 16 18/11/23 14:08
Maintenez le bouton [SHIFT] enfoncé, puis appuyez sur le bouton
[FUNCTION] pour accéder au menu des fonctions. L’écran LCD affiche
l’option de menu de la fonction utilisée. Utilisez les boutons [+/YES]/
[-/NO] pour paramètrer l’option en cours.
Paramètres détaillés et leurs variantes :
Note :
Le menu des fonctions sera quitté automatiquement, si aucune
opération n’est effectuée dans les 5 secondes.
Syntonisation
Cette fonction permet de régler la tonalité de l’ensemble du clavier par petite mesure.
1. Appuyez et maintenez le bouton [SHIFT], puis appuyez plusieurs fois sur le bouton
[FUNCTION] pour sélectionner le menu de syntonisation.
Utilisez les boutons [+/YES]/ [-/NO] ou la molette de données pour changer la valeur
de la fréquence de la mélodie. Sa fourchette est entre -50 et 50 cents.
2.
Appuyez simultanément sur les boutons [+/YES] et [-/NO] pour
régler la valeur de la mélodi
e sur sa valeur par défaut : 0.
3.
Le réglage concerne à la fois l’accompagnement et les sonorités.
Point de séparation
Cette fonction attribue une touche, qui permet de diviser l’ensemble du clavier en deux zones.
1. Maintenez le bouton [SHIFT] enfoncé, puis appuyez plusieurs fois sur le bouton
[FUNCTION] pour sélectionner le menu de point de séparation. L’écran LCD affiche
«xxx Split Pt». Utilisez les boutons [+/YES]/ [-/NO] ou la molette des données pour
modifier le point de séparation.
2. Appuyez simultanément sur les boutons [+] et [-] pour ramener la valeur du point
de séparation à sa
valeur par défaut.
Note :
Le point de séparation appartient à la zone de gauche.
Le menu des fonctions
16
Paramètre
Syntonisation
Point de
séparation
Types de rythme
Types de pédale
Types d’égaliseur
Types de
réverbération
Niveaux de
réverbération
Types de chorus
Niveaux de chorus
Types d’harmonie
MIDI In
MIDI Out
Arrêt automatique
N°
1
2
3
4
5
6
7
8
9
10
11
12
13
L’écran LCD
XXX Tune
XXX Split Pt
XXX Beat
XXX Ped XXX
XXX EQ XXX
XXX RevHall1
XXX Rev Lev
XXX ChrGMCr2
XXX Chr Lev
XXX HrmDuet
XXX Midi In
XXX Midi Out
XXX PowerOff
Variantes
-50 ~ +50
1 - 61
0, 2 - 9
Ped Sust, Ped Soft, Ped Mem, Ped St/S
EQ Pop, EQ Rock, EQ Class, EQ Jazz,
EQ Dance, EQ Reset
RevRoom1, RevRoom2, RevRoom3,
RevHall1, RevHall2, RevHall3, RevChrh1,
RevChrh2, RevDelay, RevPnDly
0 - 32
ChrChrs1, ChrChrs2, ChrGMCr1, ChrGMCr2,
ChrFlgr1, ChrFlgr2, ChrRtry1, ChrRtry2
0 - 32
HrmDuet, HrmStdTri, HrmFulCd, HrmRkDut,
HrmCtDut, HrmCtTri, HrmBlock, Hrm4Cls1,
Hrm4Cls2, Hrm4Open, Hrm1+5, HrmOctv1,
HrmOctv2, HrmStrum
01 - 16, ALL
01 - 16
30, 60, OFF
Par défaut
0
19
4
Ped Sust
EQ Reset
RevHall1
23
ChrGMCr2
0
HrmDuet
ALL
01
30
C
M
Y
CM
MY
CY
CMY
K
AW_A100S_Manual_G02_181122.pdf 16 18/11/23
14:08
Press and hold the [SHIFT] button and then press the [FUNCTION]
button to enter function menu. The LCD displays the current function
menu option. Use [+/YES]/ [-/NO] button to set parameter of the
current option.
Detailed parameters and their ranges:
Note:
It will exit the function menu if there is no operation in 5 seconds.
Tune
This function sets the pitch of entire keyboard by steps of cents.
1. Press and hold the [SHIFT] button and then repeatedly press the
[FUNCTION] button to select the tune menu. The LCD displays
“xxx Tune”.
Use [+/YES]/ [-/NO] button or data dial to change tune value. Its
range is from -50 to 50 cents.
2. Press [+/YES] and [-/NO] buttons simultaneously to set the tune
value to its default setting: 0.
3. The setting is applied to both accompaniment and the voice.
Split Point
This function assigns a key to split the entire keyboard into two areas.
1. Press and hold the [SHIFT] button and then repeatedly press the
[FUNCTION] button to select split point menu. The LCD displays
“xxx Split Pt”. Use [+/YES]/ [-/NO] button or data dial to change
Split Point.
2. Press [+] and [-] buttons simultaneously to set the split point value
to its default setting.
Note:
The Split point belongs to the left hand area.
Function Menu
16
Parameter
Tune
Split Point
Beat Type
Pedal Type
EQ Type
Reverb Type
Reverb Level
Chorus Type
Chorus Level
Harmony Type
MIDI In
MIDI Out
Auto Power Off
No.
1
2
3
4
5
6
7
8
9
10
11
12
13
LCD display
XXX Tune
XXX Split Pt
XXX Beat
XXX Ped XXX
XXX EQ XXX
XXX RevHall1
XXX Rev Lev
XXX ChrGMCr2
XXX Chr Lev
XXX HrmDuet
XXX Midi In
XXX Midi Out
XXX PowerOff
Range
-50 ~ +50
1 - 61
0, 2 - 9
Ped Sust, Ped Soft, Ped Mem, Ped St/S
EQ Pop, EQ Rock, EQ Class, EQ Jazz,
EQ Dance, EQ Reset
RevRoom1, RevRoom2, RevRoom3,
RevHall1, RevHall2, RevHall3, RevChrh1,
RevChrh2, RevDelay, RevPnDly
0 - 32
ChrChrs1, ChrChrs2, ChrGMCr1, ChrGMCr2,
ChrFlgr1, ChrFlgr2, ChrRtry1, ChrRtry2
0 - 32
HrmDuet, HrmStdTri, HrmFulCd, HrmRkDut,
HrmCtDut, HrmCtTri, HrmBlock, Hrm4Cls1,
Hrm4Cls2, Hrm4Open, Hrm1+5, HrmOctv1,
HrmOctv2, HrmStrum
01 - 16, ALL
01 - 16
30, 60, OFF
Default
0
19
4
Ped Sust
EQ Reset
RevHall1
23
ChrGMCr2
0
HrmDuet
ALL
01
30
C
M
Y
CM
MY
CY
CMY
K
AW_A100S_Manual_G02_181122.pdf 16 18/11/23 14:08
Maintenez le bouton [SHIFT] enfoncé, puis appuyez sur le bouton
[FUNCTION] pour accéder au menu des fonctions. L’écran LCD affiche
l’option de menu de la fonction utilisée. Utilisez les boutons [+/YES]/
[-/NO] pour paramètrer l’option en cours.
Paramètres détaillés et leurs variantes :
Note :
Le menu des fonctions sera quitté automatiquement, si aucune
opération n’est effectuée dans les 5 secondes.
Syntonisation
Cette fonction permet de régler la tonalité de l’ensemble du clavier par petite mesure.
1. Appuyez et maintenez le bouton [SHIFT], puis appuyez plusieurs fois sur le bouton
[FUNCTION] pour sélectionner le menu de syntonisation.
Utilisez les boutons [+/YES]/ [-/NO] ou la molette de données pour changer la valeur
de la fréquence de la mélodie. Sa fourchette est entre -50 et 50 cents.
2.
Appuyez simultanément sur les boutons [+/YES] et [-/NO] pour
régler la valeur de la mélodie sur sa valeur par défaut : 0.
3. Le réglage concerne à la fois l’accompagnement et les sonorités.
Point de séparation
Cette fonction attribue une touche, qui permet de diviser l’ensemble du clavier en deux zones.
1. Maintenez le bouton [SHIFT] enfoncé, puis appuyez plusieurs fois sur le bouton
[FUNCTION] pour sélectionner le menu de point de séparation. L’écran LCD affiche
«xxx Split Pt». Utilisez les boutons [+/YES]/ [-/NO] ou la molette des données pour
modifier le point de séparation.
2. Appuyez simultanément sur les boutons [+] et [-] pour ramener la valeur du point
de séparation à sa valeur par défaut.
Note :
Le point de séparation appartient à la zone de gauche.
Le menu des fonctions
16
Paramètre
Syntonisation
Point de
séparation
Types de rythme
Types de pédale
Types d’égaliseur
Types de
réverbération
Niveaux de
réverbération
Types de chorus
Niveaux de chorus
Types d’harmonie
MIDI In
MIDI Out
Arrêt automatique
N°
1
2
3
4
5
6
7
8
9
10
11
12
13
L’écran LCD
XXX Tune
XXX Split Pt
XXX Beat
XXX Ped XXX
XXX EQ XXX
XXX RevHall1
XXX Rev Lev
XXX ChrGMCr2
XXX Chr Lev
XXX HrmDuet
XXX Midi In
XXX Midi Out
XXX PowerOff
Variantes
-50 ~ +50
1 - 61
0, 2 - 9
Ped Sust, Ped Soft, Ped Mem, Ped St/S
EQ Pop, EQ Rock, EQ Class, EQ Jazz,
EQ Dance, EQ Reset
RevRoom1, RevRoom2, RevRoom3,
RevHall1, RevHall2, RevHall3, RevChrh1,
RevChrh2, RevDelay, RevPnDly
0 - 32
ChrChrs1, ChrChrs2, ChrGMCr1, ChrGMCr2,
ChrFlgr1, ChrFlgr2, ChrRtry1, ChrRtry2
0 - 32
HrmDuet, HrmStdTri, HrmFulCd, HrmRkDut,
HrmCtDut, HrmCtTri, HrmBlock, Hrm4Cls1,
Hrm4Cls2, Hrm4Open, Hrm1+5, HrmOctv1,
HrmOctv2, HrmStrum
01 - 16, ALL
01 - 16
30, 60, OFF
Par défaut
0
19
4
Ped Sust
EQ Reset
RevHall1
23
ChrGMCr2
0
HrmDuet
ALL
01
30
C
M
Y
CM
MY
CY
CMY
K
AW_A100S_Manual_G02_181122.pdf 16 18/11/23
14:08

Beat Type
1. Press and hold the [SHIFT] button and then repeatedly press the
[FUNCTION] button to select beat type menu. The LCD displays
“xxx Beat”.
Use [+/YES]/ [-/NO] button or data dial to change beat type. The
range of beat type: 0, 2~9.
2. Press [+/YES] and [-/NO] buttons simultaneously will set the beat
type value to its default setting: 4.
Pedal Type
1. Press and hold the [SHIFT] button and then repeatedly press the
[FUNCTION] button to select pedal type menu. The LCD displays
“001 Ped Sust”.
Use [+/YES]/ [-/NO] button or data dial to change pedal type.
2. There are 4 types of pedal functions available. Default is Ped Sust.
EQ Type
Press and hold the [SHIFT] button and then repeatedly press the
[FUNCTION] button to select the EQ type menu. The LCD displays
“006 EQ Reset”.
Use [+/YES]/ [-/NO] button or data dial to change EQ type.
There are 6 EQ types available.
Function Menu
17
No.
1
2
3
4
LCD Display
Ped Sust
Ped Soft
Ped Mem
Ped St/S
Pedal Function
Sustain Pedal
Soft Pedal
Memory Switch Pedal
Start/Stop Pedal
No.
1
2
3
4
5
6
LCD Display
EQ Pop
EQ Rock
EQ Class
EQ Jazz
EQ Dance
EQ Reset
EQ Type
Pop
Rock
Classical
Jazz
Dance
Reset
Notes:
1. This instrument will automatically detect the type of the pedal
when power on.
2. Do not press the pedal when turning the instrument on, other
wise, the pedal function will be inverted.
C
M
Y
CM
MY
CY
CMY
K
AW_A100S_Manual_G02_181122.pdf 17 18/11/23 14:08
Types de rythme
1.
Maintenez le bouton [SHIFT] enfoncé, puis appuyez plusieurs fois sur le bouton
[FUNCTION] pour sélectionner le menu des différents types de rythme. L’écran LCD
affiche «xxxBeat». Utilisez les boutons [+/YES] et [-/NO] ou la molette de données
pour changer le type de rythme. L’étendue des types de rythme est de : 0 à 2~9.
2.
Appuyez simultanément sur les boutons [+/YES] et [-/NO] pour
régler la valeur rythmique à sa valeur par défaut : 4.
Types de pédale
1. Maintenez le bouton [SHIFT] enfoncé, puis appuyez plusieurs fois
sur le bouton [FUNCTION] pour sélectionner le menu des différents
types de pédale. L’écran LCD affiche «001PedSust». Utilisez les
boutons [+/YES]/ [-/NO] ou la molette de données pour changer le type
de pédale.
2.
Il existe 4 types de fonctions de pédale disponibles. La valeur par défaut est Ped Sust.
Types d’égaliseur
Maintenez le bouton [SHIFT] enfoncé, puis appuyez plusieurs fois sur
le bouton [FUNCTION] pour sélectionner le menu des types
d’égalisateur. L’écran LCD affiche «006 EQ Reset». Utilisez les
boutons [+/YES]/ [-/NO] ou la molette de données pour changer de
type d’égaliseur.
Il y a 6 types disponibles d’égaliseur :
Menu des fonctions
17
N°
1
2
3
4
Écran LCD
Ped Sust
Ped Soft
Ped Mem
Ped St/S
Fonction de la pédale
Pédale de sustain
Pédale douce
Commutateur de la carte mémoire de la pédale
Marche/Arrêt de la pédale
N°
1
2
3
4
5
6
LCD Display
EQ Pop
EQ Rock
EQ Class
EQ Jazz
EQ Dance
EQ Reset
Types d’égaliseur
Pop
Rock
Classique
Jazz
Danse
Réinitialiser
Notes
:
1. Cet instrument détectera automatiquement le type de pédale lors de la mise sous
tension.
2. N’appuyez pas sur la pédale lorsque vous allumez l’instrument, sinon la fonction de la pédale
sera inversée.
C
M
Y
CM
MY
CY
CMY
K
AW_A100S_Manual_G02_181122.pdf 17 18/11/23
14:08
Beat Type
1. Press and hold the [SHIFT] button and then repeatedly press the
[FUNCTION] button to select beat type menu. The LCD displays
“xxx Beat”.
Use [+/YES]/ [-/NO] button or data dial to change beat type. The
range of beat type: 0, 2~9.
2. Press [+/YES] and [-/NO] buttons simultaneously will set the beat
type value to its default setting: 4.
Pedal Type
1. Press and hold the [SHIFT] button and then repeatedly press the
[FUNCTION] button to select pedal type menu. The LCD displays
“001 Ped Sust”.
Use [+/YES]/ [-/NO] button or data dial to change pedal type.
2. There are 4 types of pedal functions available. Default is Ped Sust.
EQ Type
Press and hold the [SHIFT] button and then repeatedly press the
[FUNCTION] button to select the EQ type menu. The LCD displays
“006 EQ Reset”.
Use [+/YES]/ [-/NO] button or data dial to change EQ type.
There are 6 EQ types available.
Function Menu
17
No.
1
2
3
4
LCD Display
Ped Sust
Ped Soft
Ped Mem
Ped St/S
Pedal Function
Sustain Pedal
Soft Pedal
Memory Switch Pedal
Start/Stop Pedal
No.
1
2
3
4
5
6
LCD Display
EQ Pop
EQ Rock
EQ Class
EQ Jazz
EQ Dance
EQ Reset
EQ Type
Pop
Rock
Classical
Jazz
Dance
Reset
Notes:
1. This instrument will automatically detect the type of the pedal
when power on.
2. Do not press the pedal when turning the instrument on, other
wise, the pedal function will be inverted.
C
M
Y
CM
MY
CY
CMY
K
AW_A100S_Manual_G02_181122.pdf 17 18/11/23 14:08
Types de rythme
1. Maintenez le bouton [SHIFT] enfoncé, puis appuyez plusieurs fois sur le bouton
[FUNCTION] pour sélectionner le menu des différents types de rythme. L’écran LCD
affiche «xxxBeat». Utilisez les boutons [+/YES] et [-/NO] ou la molette de données
pour changer le type de rythme. L’étendue des types de rythme est de : 0 à 2~9.
2. Appuyez simultanément sur les boutons [+/YES] et [-/NO] pour
régler la valeur rythmique à sa valeur par défaut : 4.
Types de pédale
1. Maintenez le bouton [SHIFT] enfoncé, puis appuyez plusieurs fois
sur le bouton [FUNCTION] pour sélectionner le menu des différents
types de pédale. L’écran LCD affiche «001PedSust». Utilisez les
boutons [+/YES]/ [-/NO] ou la molette de données pour changer le type
de pédale.
2. Il existe 4 types de fonctions de pédale disponibles. La valeur par défaut est Ped Sust.
Types d’égaliseur
Maintenez le bouton [SHIFT] enfoncé, puis appuyez plusieurs fois sur
le bouton [FUNCTION] pour sélectionner le menu des types
d’égalisateur. L’écran LCD affiche «006 EQ Reset». Utilisez les
boutons [+/YES]/ [-/NO] ou la molette de données pour changer de
type d’égaliseur.
Il y a 6 types disponibles d’égaliseur :
Menu des fonctions
17
N°
1
2
3
4
Écran LCD
Ped Sust
Ped Soft
Ped Mem
Ped St/S
Fonction de la pédale
Pédale de sustain
Pédale douce
Commutateur de la carte mémoire de la pédale
Marche/Arrêt de la pédale
N°
1
2
3
4
5
6
LCD Display
EQ Pop
EQ Rock
EQ Class
EQ Jazz
EQ Dance
EQ Reset
Types d’égaliseur
Pop
Rock
Classique
Jazz
Danse
Réinitialiser
Notes
:
1.
Cet instrument détectera automatiquement le type de pédale lors de la mise sous
tension.
2. N’appuyez pas sur la pédale lorsque vous allumez l’instrument, sinon la fonction de la pédale
sera inversée.
C
M
Y
CM
MY
CY
CMY
K
AW_A100S_Manual_G02_181122.pdf 17 18/11/23
14:08
Beat Type
1. Press and hold the [SHIFT] button and then repeatedly press the
[FUNCTION] button to select beat type menu. The LCD displays
“xxx Beat”.
Use [+/YES]/ [-/NO] button or data dial to change beat type. The
range of beat type: 0, 2~9.
2. Press [+/YES] and [-/NO] buttons simultaneously will set the beat
type value to its default setting: 4.
Pedal Type
1. Press and hold the [SHIFT] button and then repeatedly press the
[FUNCTION] button to select pedal type menu. The LCD displays
“001 Ped Sust”.
Use [+/YES]/ [-/NO] button or data dial to change pedal type.
2. There are 4 types of pedal functions available. Default is Ped Sust.
EQ Type
Press and hold the [SHIFT] button and then repeatedly press the
[FUNCTION] button to select the EQ type menu. The LCD displays
“006 EQ Reset”.
Use [+/YES]/ [-/NO] button or data dial to change EQ type.
There are 6 EQ types available.
Function Menu
17
No.
1
2
3
4
LCD Display
Ped Sust
Ped Soft
Ped Mem
Ped St/S
Pedal Function
Sustain Pedal
Soft Pedal
Memory Switch Pedal
Start/Stop Pedal
No.
1
2
3
4
5
6
LCD Display
EQ Pop
EQ Rock
EQ Class
EQ Jazz
EQ Dance
EQ Reset
EQ Type
Pop
Rock
Classical
Jazz
Dance
Reset
Notes:
1. This instrument will automatically detect the type of the pedal
when power on.
2. Do not press the pedal when turning the instrument on, other
wise, the pedal function will be inverted.
C
M
Y
CM
MY
CY
CMY
K
AW_A100S_Manual_G02_181122.pdf 17 18/11/23 14:08

Chorus Level
Press and hold the [SHIFT] button and then repeatedly press the
[FUNCTION] button to select chorus level menu. The LCD displays
“xxx Chr Lev”, adjustable range: 0-32.
Use the [+/YES]/ [-/NO] button or data dial to change chorus level.
Press the [+/YES] and [-/NO] buttons simultaneously to restore its
default setting: 0.
Reverb Type
Press and hold the [SHIFT] button and then repeatedly press the
[FUNCTION] button to select reverb type menu. The LCD displays
“004 RevHall1”.
Use [+/YES]/ [-/NO] button or data dial to change reverb type. The
default setting is Hall 1.
Reverb Level
Press and hold the [SHIFT] button and then repeatedly press the
[FUNCTION] button to select reverb level. The LCD displays “xxx Rev
Lev”, adjustable range is: 0-32.
Use the [+/YES]/ [-/NO] button or data dial to change reverb level,
press the [+/YES] and [-/NO] buttons simultaneously to restore its
default setting: 23.
Chorus Type
Press and hold the [SHIFT] button and then repeatedly press the
[FUNCTION] button to select chorus type menu. The LCD displays
“004 ChrGMCr2”, Use the [+/YES]/ [-/NO] button or data dial to
change chorus type, the default setting is GM Chorus 2.
Function Menu
18
No.
1
2
3
4
5
6
7
8
9
10
LCD Display
RevRoom1
RevRoom2
RevRoom3
RevHall1
RevHall2
RevHall3
RevChrh1
RevChrh2
RevDelay
RevPnDly
Reverb Type
Room 1
Room 2
Room 3
Hall 1
Hall 2
Hall 3
Church 1
Church 2
Delay
Pan Delay
NO.
1
2
3
4
5
6
7
8
LCD Display
ChrChrs1
ChrChrs2
ChrGMCr1
ChrGMCr2
ChrFlgr1
ChrFlgr2
ChrRtry1
ChrRtry2
Chorus Type
Chorus 1
Chorus 2
GM Chorus 1
GM Chorus 2
Flanger 1
Flanger 2
Rotary 1
Rotary 2
C
M
Y
CM
MY
CY
CMY
K
AW_A100S_Manual_G02_181122.pdf 18 18/11/23 14:08
Niveaux de chorus
Maintenez le bouton [SHIFT] enfoncé, puis appuyez plusieurs fois sur le
bouton [FUNCTION] pour sélectionner le menu de niveaux de chorus.
L’écran LCD affiche «xxx Chr Lev», l’étendue réglable : 0-32.
Utilisez les boutons [+/YES]/ [-/NO] ou la molette de données pour
changer le niveau du chorus. Appuyer simultanément sur les boutons
[+/YES] et [-/NO] pour rétablir le réglage par défaut.
Types de réverbération
Maintenez le bouton [SHIFT] enfoncé, puis appuyez plusieurs fois sur le bouton
[FUNCTION] pour sélectionner le menu des types de réverbération. L’écran LCD
affiche «004 RevHall1». Utilisez les boutons [+/YES]/ [-/NO] ou la molette de
données pour changer de types de réverbération. Le réglage par défaut est le
Hall 1.
Niveaux de réverbération
Maintenez le bouton [SHIFT] enfoncé, puis appuyez plusieurs fois sur le
bouton [FUNCTION] pour sélectionner le niveau de réverbération. L’écran
LCD affiche «xxx Rev Lev», l’étendue réglable est de 0-32.
Utilisez le bouton [+/YES] et [-/NO] ou la molette de données pour
modifier le niveau de réverbération. Appuyez simultanément sur les
boutons [+/YES] et [-/NO] pour rétablir le réglage par défaut : 23.
Types de chorus
Maintenez le bouton [SHIFT] enfoncé, puis appuyez plusieurs fois sur le bouton
[FUNCTION] pour sélectionner le menu des types de chorus. L’écran LCD affiche
«004 ChrGMCr2». Utilisez les boutons [+/YES]/ [-/NO] ou la molette de données pour
changer le type de chorus. Le réglage par défaut est : GM Chorus 2.
Menu des fonctions
18
N°
1
2
3
4
5
6
7
8
9
10
Écran LCD
RevRoom1
RevRoom2
RevRoom3
RevHall1
RevHall2
RevHall3
RevChrh1
RevChrh2
RevDelay
RevPnDly
Types de réverbération
Chambre 1
Chambre 2
Chambre 3
Hall 1
Hall 2
Hall 3
église 1
église 2
Delay
Pan Delay
N°
1
2
3
4
5
6
7
8
Écran LCD
ChrChrs1
ChrChrs2
ChrGMCr1
ChrGMCr2
ChrFlgr1
ChrFlgr2
ChrRtry1
ChrRtry2
Types de chorus
chorus 1
chorus 2
GM chorus 1
GM chorus 2
Flanger 1
Flanger 2
Rotary 1
Rotary 2
C
M
Y
CM
MY
CY
CMY
K
AW_A100S_Manual_G02_181122.pdf 18 18/11/23
14:08
Chorus Level
Press and hold the [SHIFT] button and then repeatedly press the
[FUNCTION] button to select chorus level menu. The LCD displays
“xxx Chr Lev”, adjustable range: 0-32.
Use the [+/YES]/ [-/NO] button or data dial to change chorus level.
Press the [+/YES] and [-/NO] buttons simultaneously to restore its
default setting: 0.
Reverb Type
Press and hold the [SHIFT] button and then repeatedly press the
[FUNCTION] button to select reverb type menu. The LCD displays
“004 RevHall1”.
Use [+/YES]/ [-/NO] button or data dial to change reverb type. The
default setting is Hall 1.
Reverb Level
Press and hold the [SHIFT] button and then repeatedly press the
[FUNCTION] button to select reverb level. The LCD displays “xxx Rev
Lev”, adjustable range is: 0-32.
Use the [+/YES]/ [-/NO] button or data dial to change reverb level,
press the [+/YES] and [-/NO] buttons simultaneously to restore its
default setting: 23.
Chorus Type
Press and hold the [SHIFT] button and then repeatedly press the
[FUNCTION] button to select chorus type menu. The LCD displays
“004 ChrGMCr2”, Use the [+/YES]/ [-/NO] button or data dial to
change chorus type, the default setting is GM Chorus 2.
Function Menu
18
No.
1
2
3
4
5
6
7
8
9
10
LCD Display
RevRoom1
RevRoom2
RevRoom3
RevHall1
RevHall2
RevHall3
RevChrh1
RevChrh2
RevDelay
RevPnDly
Reverb Type
Room 1
Room 2
Room 3
Hall 1
Hall 2
Hall 3
Church 1
Church 2
Delay
Pan Delay
NO.
1
2
3
4
5
6
7
8
LCD Display
ChrChrs1
ChrChrs2
ChrGMCr1
ChrGMCr2
ChrFlgr1
ChrFlgr2
ChrRtry1
ChrRtry2
Chorus Type
Chorus 1
Chorus 2
GM Chorus 1
GM Chorus 2
Flanger 1
Flanger 2
Rotary 1
Rotary 2
C
M
Y
CM
MY
CY
CMY
K
AW_A100S_Manual_G02_181122.pdf 18 18/11/23 14:08
Niveaux de chorus
Maintenez le bouton [SHIFT] enfoncé, puis appuyez plusieurs fois sur le
bouton [FUNCTION] pour sélectionner le menu de niveaux de chorus.
L’écran LCD affiche «xxx Chr Lev», l’étendue réglable : 0-32.
Utilisez les boutons [+/YES]/ [-/NO] ou la molette de données pour
changer le niveau du chorus. Appuyer simultanément sur les boutons
[+/YES] et [-/NO] pour rétablir le réglage par défaut.
Types de réverbération
Maintenez le bouton [SHIFT] enfoncé, puis appuyez plusieurs fois sur le bouton
[FUNCTION] pour sélectionner le menu des types de réverbération. L’écran LCD
affiche «004 RevHall1». Utilisez les boutons [+/YES]/ [-/NO] ou la molette de
données pour changer de types de réverbération. Le réglage par défaut est le
Hall 1.
Niveaux de réverbération
Maintenez le bouton [SHIFT] enfoncé, puis appuyez plusieurs fois sur le
bouton [FUNCTION] pour sélectionner le niveau de réverbération. L’écran
LCD affiche «xxx Rev Lev», l’étendue réglable est de 0-32.
Utilisez le bouton [+/YES] et [-/NO] ou la molette de données pour
modifier le niveau de réverbération. Appuyez simultanément sur les
boutons [+/YES] et [-/NO] pour rétablir le réglage par défaut : 23.
Types de chorus
Maintenez le bouton [SHIFT] enfoncé, puis appuyez plusieurs fois sur le bouton
[FUNCTION] pour sélectionner le menu des types de chorus. L’écran LCD affiche
«004 ChrGMCr2». Utilisez les boutons [+/YES]/ [-/NO] ou la molette de données pour
changer le type de chorus. Le réglage par défaut est : GM Chorus 2.
Menu des fonctions
18
N°
1
2
3
4
5
6
7
8
9
10
Écran LCD
RevRoom1
RevRoom2
RevRoom3
RevHall1
RevHall2
RevHall3
RevChrh1
RevChrh2
RevDelay
RevPnDly
Types de réverbération
Chambre 1
Chambre 2
Chambre 3
Hall 1
Hall 2
Hall 3
église 1
église 2
Delay
Pan Delay
N°
1
2
3
4
5
6
7
8
Écran LCD
ChrChrs1
ChrChrs2
ChrGMCr1
ChrGMCr2
ChrFlgr1
ChrFlgr2
ChrRtry1
ChrRtry2
Types de chorus
chorus 1
chorus 2
GM chorus 1
GM chorus 2
Flanger 1
Flanger 2
Rotary 1
Rotary 2
C
M
Y
CM
MY
CY
CMY
K
AW_A100S_Manual_G02_181122.pdf 18 18/11/23
14:08

Harmony Type
Press and hold the [SHIFT] button and then repeatedly press the
[FUNCTION] button to select harmony type menu. The LCD displays
“001 HrmDuet”.
Use [+/YES]/ [-/NO] button or data dial to change harmony type.
The harmony types are as follows:
Press [+/YES] and [-/NO] buttons simultaneously to restore its default
setting: Hrm Duet.
MIDI IN/ OUT
Press and hold the [SHIFT] button and then repeatedly press the
[FUNCTION] button to select MIDI in/ out menu. The LCD displays
“xxx Midi In”/ “xxx Midi Out”.
1. Use [+/YES]/ [-/NO] button or data dial to change MIDI in channel:
1~16, ALL. Press [+/YES] and [-/NO] buttons simultaneously to
restore MIDI in channel to its default setting: ALL.
2. Use [+/YES]/ [-/NO] button or data dial to change MIDI out channel:
1~16. Press [+/YES] and [-/NO] buttons simultaneously to restore
MIDI out channel to its default setting: 1.
Auto Power Off
Press and hold the [SHIFT] button and then repeatedly press the
[FUNCTION] button to select auto power off menu. The LCD displays
“xxx PowerOff”.
Use [+/YES]/ [-/NO] button or data dial to change the time setting: 30
minutes, 60 minutes or OFF. The default setting is: 30 minutes.
19
Function Menu
No.
1
2
3
4
5
6
7
8
9
10
11
12
13
14
LCD Display
HrmDuet
HrmStdTri
HrmFulCd
HrmRkDut
HrmCtDut
HrmCtTri
HrmBlock
Hrm4Cls1
Hrm4Cls2
Hrm4Open
Hrm1+5
HrmOctv1
HrmOctv2
HrmStrum
Harmony Type
Duet
StandardTrio
Full Chord
Rock Duet
Country Duet
Country Trio
Block
4 Close 1
4 Close 2
4 Open
1+5
Octave 1
Octave 2
Strum
C
M
Y
CM
MY
CY
CMY
K
AW_A100S_Manual_G02_181122.pdf 19 18/11/23 14:08
Types d’harmonie
Maintenez le bouton [SHIFT] enfoncé, puis appuyez plusieurs
fois sur le bouton [FUNCTION] pour sélectionner le menu des
types d’harmonie. L’écran LCD affiche «001 HrmDuet».
Utilisez les boutons [+/YES]/ [-/NO] ou la molette des données
pour changer le type d’harmonie. Les types d’harmonie sont les
suivants :
Appuyez simultanément sur les boutons [+/YES] et [-/NO] pour restaurer
le réglage par défaut : Hrm Duet.
MIDI IN/ OUT
Maintenez le bouton [SHIFT] enfoncé, puis appuyez plusieurs fois
sur [FUNCTION] afin de sélectionner le menu de MIDI In/Out.
L’écran LCD affiche «xxx Midi In”/ “xxx Midi Out».
1. Utilisez les boutons [+/YES]/ [-/NO] ou la molette des données pour
changer le canal de MIDI : 1~16. Appuyez simultanément sur les boutons
[+/YES]/ [-/NO] pour restaurer le canal MIDI à son réglage par défaut :
ALL.
2. Utilisez les boutons [+/YES]/ [-/NO] ou la molette de données pour
changer le canal de sortie de MIDI : 1~16. Appuyez simultanément sur les
boutons [+/YES]/ [-/NO] afin de restaurer le canal de sortie de MIDI à son
réglage par défaut : 1.
Arrêt Automatique
Appuyez et maintenez le bouton [SHIFT], puis appuyez plusieurs fois
sur le bouton [FUNCTION] afin de sélectionner le menu d’arrêt
automatique. L’écran LCD affiche «xxxPowerOff».
Utilisez les boutons
[+/YES]/ [-/NO] ou la molette des données pour
changer le réglage du temps : 30 minutes, 60 minutes ou OFF. Le réglage
par défaut est de : 30 minutes.
19
Menu des fonctions
N°
1
2
3
4
5
6
7
8
9
10
11
12
13
14
Écran LCD
HrmDuet
HrmStdTri
HrmFulCd
HrmRkDut
HrmCtDut
HrmCtTri
HrmBlock
Hrm4Cls1
Hrm4Cls2
Hrm4Open
Hrm1+5
HrmOctv1
HrmOctv2
HrmStrum
Types d’harmonie
Duo
Trio Standard
Full Chord
Duo Rock
Duo Country
Trio Country
Bloc
4 Close 1
4 Close 2
4 Open
1+5
Octave 1
Octave 2
Battement
C
M
Y
CM
MY
CY
CMY
K
AW_A100S_Manual_G02_181122.pdf 19 18/11/23
14:08
Harmony Type
Press and hold the [SHIFT] button and then repeatedly press the
[FUNCTION] button to select harmony type menu. The LCD displays
“001 HrmDuet”.
Use [+/YES]/ [-/NO] button or data dial to change harmony type.
The harmony types are as follows:
Press [+/YES] and [-/NO] buttons simultaneously to restore its default
setting: Hrm Duet.
MIDI IN/ OUT
Press and hold the [SHIFT] button and then repeatedly press the
[FUNCTION] button to select MIDI in/ out menu. The LCD displays
“xxx Midi In”/ “xxx Midi Out”.
1. Use [+/YES]/ [-/NO] button or data dial to change MIDI in channel:
1~16, ALL. Press [+/YES] and [-/NO] buttons simultaneously to
restore MIDI in channel to its default setting: ALL.
2. Use [+/YES]/ [-/NO] button or data dial to change MIDI out channel:
1~16. Press [+/YES] and [-/NO] buttons simultaneously to restore
MIDI out channel to its default setting: 1.
Auto Power Off
Press and hold the [SHIFT] button and then repeatedly press the
[FUNCTION] button to select auto power off menu. The LCD displays
“xxx PowerOff”.
Use [+/YES]/ [-/NO] button or data dial to change the time setting: 30
minutes, 60 minutes or OFF. The default setting is: 30 minutes.
19
Function Menu
No.
1
2
3
4
5
6
7
8
9
10
11
12
13
14
LCD Display
HrmDuet
HrmStdTri
HrmFulCd
HrmRkDut
HrmCtDut
HrmCtTri
HrmBlock
Hrm4Cls1
Hrm4Cls2
Hrm4Open
Hrm1+5
HrmOctv1
HrmOctv2
HrmStrum
Harmony Type
Duet
StandardTrio
Full Chord
Rock Duet
Country Duet
Country Trio
Block
4 Close 1
4 Close 2
4 Open
1+5
Octave 1
Octave 2
Strum
C
M
Y
CM
MY
CY
CMY
K
AW_A100S_Manual_G02_181122.pdf 19 18/11/23 14:08
Harmony Type
Press and hold the [SHIFT] button and then repeatedly press the
[FUNCTION] button to select harmony type menu. The LCD displays
“001 HrmDuet”.
Use [+/YES]/ [-/NO] button or data dial to change harmony type.
The harmony types are as follows:
Press [+/YES] and [-/NO] buttons simultaneously to restore its default
setting: Hrm Duet.
MIDI IN/ OUT
Press and hold the [SHIFT] button and then repeatedly press the
[FUNCTION] button to select MIDI in/ out menu. The LCD displays
“xxx Midi In”/ “xxx Midi Out”.
1. Use [+/YES]/ [-/NO] button or data dial to change MIDI in channel:
1~16, ALL. Press [+/YES] and [-/NO] buttons simultaneously to
restore MIDI in channel to its default setting: ALL.
2. Use [+/YES]/ [-/NO] button or data dial to change MIDI out channel:
1~16. Press [+/YES] and [-/NO] buttons simultaneously to restore
MIDI out channel to its default setting: 1.
Auto Power Off
Press and hold the [SHIFT] button and then repeatedly press the
[FUNCTION] button to select auto power off menu. The LCD displays
“xxx PowerOff”.
Use [+/YES]/ [-/NO] button or data dial to change the time setting: 30
minutes, 60 minutes or OFF. The default setting is: 30 minutes.
19
Function Menu
No.
1
2
3
4
5
6
7
8
9
10
11
12
13
14
LCD Display
HrmDuet
HrmStdTri
HrmFulCd
HrmRkDut
HrmCtDut
HrmCtTri
HrmBlock
Hrm4Cls1
Hrm4Cls2
Hrm4Open
Hrm1+5
HrmOctv1
HrmOctv2
HrmStrum
Harmony Type
Duet
StandardTrio
Full Chord
Rock Duet
Country Duet
Country Trio
Block
4 Close 1
4 Close 2
4 Open
1+5
Octave 1
Octave 2
Strum
C
M
Y
CM
MY
CY
CMY
K
AW_A100S_Manual_G02_181122.pdf 19 18/11/23 14:08
Types d’harmonie
Maintenez le bouton [SHIFT] enfoncé, puis appuyez plusieurs
fois sur le bouton [FUNCTION] pour sélectionner le menu des
types d’harmonie. L’écran LCD affiche «001 HrmDuet».
Utilisez les boutons [+/YES]/ [-/NO] ou la molette des données
pour changer le type d’harmonie. Les types d’harmonie sont les
suivants :
Appuyez simultanément sur les boutons [+/YES] et [-/NO] pour restaurer
le réglage par défaut : Hrm Duet.
MIDI IN/ OUT
Maintenez le bouton [SHIFT] enfoncé, puis appuyez plusieurs fois
sur [FUNCTION] afin de sélectionner le menu de MIDI In/Out.
L’écran LCD affiche «xxx Midi In”/ “xxx Midi Out».
1. Utilisez les boutons [+/YES]/ [-/NO] ou la molette des données pour
changer le canal de MIDI : 1~16. Appuyez simultanément sur les boutons
[+/YES]/ [-/NO] pour restaurer le canal MIDI à son réglage par défaut :
ALL.
2. Utilisez les boutons [+/YES]/ [-/NO] ou la molette de données pour
changer le canal de sortie de MIDI : 1~16. Appuyez simultanément sur les
boutons [+/YES]/ [-/NO] afin de restaurer le canal de sortie de MIDI à son
réglage par défaut : 1.
Arrêt Automatique
Appuyez et maintenez le bouton [SHIFT], puis appuyez plusieurs fois
sur le bouton [FUNCTION] afin de sélectionner le menu d’arrêt
automatique. L’écran LCD affiche «xxxPowerOff».
Utilisez les boutons
[+/YES]/ [-/NO] ou la molette des données pour
changer le réglage du temps : 30 minutes, 60 minutes ou OFF. Le réglage
par défaut est de : 30 minutes.
19
Menu des fonctions
N°
1
2
3
4
5
6
7
8
9
10
11
12
13
14
Écran LCD
HrmDuet
HrmStdTri
HrmFulCd
HrmRkDut
HrmCtDut
HrmCtTri
HrmBlock
Hrm4Cls1
Hrm4Cls2
Hrm4Open
Hrm1+5
HrmOctv1
HrmOctv2
HrmStrum
Types d’harmonie
Duo
Trio Standard
Full Chord
Duo Rock
Duo Country
Trio Country
Bloc
4 Close 1
4 Close 2
4 Open
1+5
Octave 1
Octave 2
Battement
C
M
Y
CM
MY
CY
CMY
K
AW_A100S_Manual_G02_181122.pdf 19 18/11/23
14:08

Mixer function adjusts separately the volume of different tracks.
1. Press the [MIXER] button to enter the mixer menu. The LCD displays
“030 Rhythm_s” for the initial time when power on. Next time when
you enter the mixer menu, it will show the same option of your last
operation.
2. Repeatedly press the [MIXER] button to select an option. Use
[+/YES]/ [-/NO] button or data dial to change the value.
Detailed parameters and their volume ranges:
Note:
It will exit the mixer menu if there is no operation in 5 seconds.
20
Mixer
Content
Adjust the Rhythm track volume.
Adjust the Percussion track volume.
Adjust the Bass track volume.
Adjust the Chord 1 track volume.
Adjust the Chord 2 track volume.
Adjust the Chord 3 track volume.
Adjust the Phrase 1 track volume.
Adjust the Phrase 2 track volume.
Adjust the Upper 1 track volume.
Adjust the Upper 2 track volume.
Adjust the Lower track volume.
LCD Display
XXX Rhythm_s
XXX Rhythm_m
XXX Bass
XXX Chord1
XXX Chord2
XXX Chord3
XXX Phrase1
XXX Phrase2
XXX Upper 1
XXX Upper 2
XXX Lower
Range
0-32
0-32
0-32
0-32
0-32
0-32
0-32
0-32
0-32
0-32
0-32
Default
Value
30
30
27
30
30
30
30
30
30
22
20
C
M
Y
CM
MY
CY
CMY
K
AW_A100S_Manual_G02_181122.pdf 20 18/11/23 14:08
La fonction de mixage permet de régler séparément le volume de différentes pistes.
1. Appuyez sur le bouton [MIXER] pour entrer dans le menu d’ajustement de
volumes. L’écran LCD affiche «030 Rhythm_s» lors de la première mise sous
tension. Par la suite, lorsque vous entrerez dans ce menu, l’option affichée sera
celle de votre dernière utilisation.
2. Appuyez plusieurs fois sur le bouton [MIXER] afin de sélectionner une option.
Utilisez les boutons [+/YES]/ [-/NO] ou la mo
lette de données pour changer la
valeur de l’ajustement de volume.
Les paramètres détaillés et leur étendue de volume :
Note :
Le menu d’ajustement de volumes sera automatiquement quitté,
si aucune action est effectuée dans les 5 secondes.
20
Ajustement de volumes
Contenu
Ajustement de volume d’une piste de rythme
Ajustement de volume d’une piste de percussion.
Ajustement de volume d’une piste de basse
Ajustement de volume d’une piste d’accords 1
Ajustement de volume d’une piste d’accords 2
Ajustement de volume d’une piste d’accords 3
Ajustement de volume d’une piste de phrases 1
Ajustement de volume d’une piste de phrases 2
Ajustement de volume d’une piste supérieure 1
Ajustement de volume d’une piste supérieure 2
Ajustement de volume d’une piste inférieure.
Écran LCD
XXX Rhythm_s
XXX Rhythm_m
XXX Bass
XXX Chord1
XXX Chord2
XXX Chord3
XXX Phrase1
XXX Phrase2
XXX Upper 1
XXX Upper 2
XXX Lower
Étendue
0-32
0-32
0-32
0-32
0-32
0-32
0-32
0-32
0-32
0-32
0-32
Valeur par
défaut
30
30
27
30
30
30
30
30
30
22
20
C
M
Y
CM
MY
CY
CMY
K
AW_A100S_Manual_G02_181122.pdf 20 18/11/23
14:08
Mixer function adjusts separately the volume of different tracks.
1. Press the [MIXER] button to enter the mixer menu. The LCD displays
“030 Rhythm_s” for the initial time when power on. Next time when
you enter the mixer menu, it will show the same option of your last
operation.
2. Repeatedly press the [MIXER] button to select an option. Use
[+/YES]/ [-/NO] button or data dial to change the value.
Detailed parameters and their volume ranges:
Note:
It will exit the mixer menu if there is no operation in 5 seconds.
20
Mixer
Content
Adjust the Rhythm track volume.
Adjust the Percussion track volume.
Adjust the Bass track volume.
Adjust the Chord 1 track volume.
Adjust the Chord 2 track volume.
Adjust the Chord 3 track volume.
Adjust the Phrase 1 track volume.
Adjust the Phrase 2 track volume.
Adjust the Upper 1 track volume.
Adjust the Upper 2 track volume.
Adjust the Lower track volume.
LCD Display
XXX Rhythm_s
XXX Rhythm_m
XXX Bass
XXX Chord1
XXX Chord2
XXX Chord3
XXX Phrase1
XXX Phrase2
XXX Upper 1
XXX Upper 2
XXX Lower
Range
0-32
0-32
0-32
0-32
0-32
0-32
0-32
0-32
0-32
0-32
0-32
Default
Value
30
30
27
30
30
30
30
30
30
22
20
C
M
Y
CM
MY
CY
CMY
K
AW_A100S_Manual_G02_181122.pdf 20 18/11/23 14:08
La fonction de mixage permet de régler séparément le volume de différentes pistes.
1. Appuyez sur le bouton [MIXER] pour entrer dans le menu d’ajustement de
volumes. L’écran LCD affiche «030 Rhythm_s» lors de la première mise sous
tension. Par la suite, lorsque vous entrerez dans ce menu, l’option affichée sera
celle de votre dernière utilisation.
2. Appuyez plusieurs fois sur le bouton [MIXER] afin de sélectionner une option.
Utilisez les boutons [+/YES]/ [-/NO] ou la molette de données pour changer la
valeur de l’ajustement de volume.
Les paramètres détaillés et leur étendue de volume :
Note :
Le menu d’ajustement de volumes sera automatiquement quitté,
si aucune action est effectuée dans les 5 secondes.
20
Ajustement de volumes
Contenu
Ajustement de volume d’une piste de rythme
Ajustement de volume d’une piste de percussion.
Ajustement de volume d’une piste de basse
Ajustement de volume d’une piste d’accords 1
Ajustement de volume d’une piste d’accords 2
Ajustement de volume d’une piste d’accords 3
Ajustement de volume d’une piste de phrases 1
Ajustement de volume d’une piste de phrases 2
Ajustement de volume d’une piste supérieure 1
Ajustement de volume d’une piste supérieure 2
Ajustement de volume d’une piste inférieure.
Écran LCD
XXX Rhythm_s
XXX Rhythm_m
XXX Bass
XXX Chord1
XXX Chord2
XXX Chord3
XXX Phrase1
XXX Phrase2
XXX Upper 1
XXX Upper 2
XXX Lower
Étendue
0-32
0-32
0-32
0-32
0-32
0-32
0-32
0-32
0-32
0-32
0-32
Valeur par
défaut
30
30
27
30
30
30
30
30
30
22
20
C
M
Y
CM
MY
CY
CMY
K
AW_A100S_Manual_G02_181122.pdf 20 18/11/23
14:08
Page is loading ...
Page is loading ...
Page is loading ...
Page is loading ...
Page is loading ...
Page is loading ...
Page is loading ...
Page is loading ...
Page is loading ...
Page is loading ...
Page is loading ...
Page is loading ...
Page is loading ...
Page is loading ...
Page is loading ...
Page is loading ...
Page is loading ...
Page is loading ...
Page is loading ...
Page is loading ...
Page is loading ...
Page is loading ...
Page is loading ...
Page is loading ...
-
 1
1
-
 2
2
-
 3
3
-
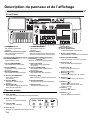 4
4
-
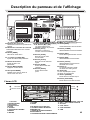 5
5
-
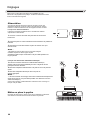 6
6
-
 7
7
-
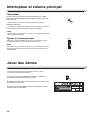 8
8
-
 9
9
-
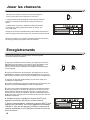 10
10
-
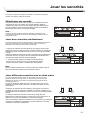 11
11
-
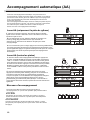 12
12
-
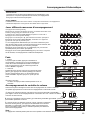 13
13
-
 14
14
-
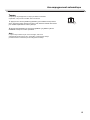 15
15
-
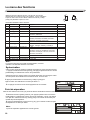 16
16
-
 17
17
-
 18
18
-
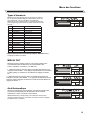 19
19
-
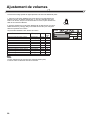 20
20
-
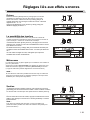 21
21
-
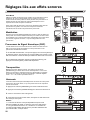 22
22
-
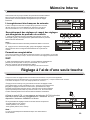 23
23
-
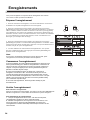 24
24
-
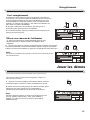 25
25
-
 26
26
-
 27
27
-
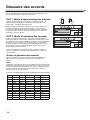 28
28
-
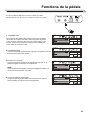 29
29
-
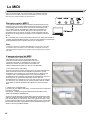 30
30
-
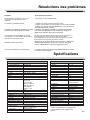 31
31
-
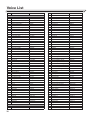 32
32
-
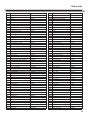 33
33
-
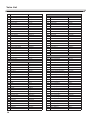 34
34
-
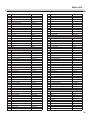 35
35
-
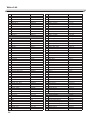 36
36
-
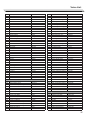 37
37
-
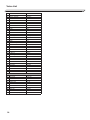 38
38
-
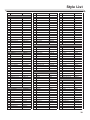 39
39
-
 40
40
-
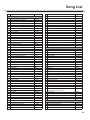 41
41
-
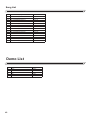 42
42
-
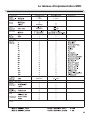 43
43
-
 44
44


Medeli A100S Owner's manual
- Category
- Musical Instruments
- Type
- Owner's manual
Ask a question and I''ll find the answer in the document
Finding information in a document is now easier with AI
in other languages
- français: Medeli A100S Le manuel du propriétaire
Related papers
Other documents
-
Roland E-X30 Owner's manual
-
-
Startone MK-200 User manual
-
Kurzweil KP300X Portable Keyboard User manual
-
Classic Cantabile SP-15 User manual
-
Suzuki Duality Owner's manual
-
-
-
Alesis AHP-1 User guide
-
Artesia AG-50 Owner's manual