Page is loading ...

Star®
FMV
installation
instructions

Determining OnStar
FMV
Mirror
compatibility
...
The
OnStar
FMV
Mirror
is
NOT
designed
for
motorcycles,
RVs,
boats,
ATVs,
snowmobiles,
tractors,
go-karts,
etc.
The
vehicle
must
be/have:
•
newer
than
model
year
1981
• a
passenger
vehicle
no
larger
than
a
light-duty
truck
under
85001bs
(gross
weight)
• a
windshield
angle
20-50
degrees
(for
mirror
adjustability
and
proper
crash
detection)
•
no
cracks
anywhere
in
the
windshield
and/or
chips
near
the
mirror
mount
• a
proper
mirror
mount
("big
foot")
and/or
a
mount
adaptor
as
listed
in
Section
A
Removing
the
OEM
Rear
View
Mirror.
•
clearance
to
allow
the
top
of
the
OnStar
FMV
Mirror
transmittal
access
to
the
sky
through
the
windshield
when
mounted
(if
not,
an
external
GPS
antenna
must
be
used).
•
no
metallic
tint
on
the
front
windshield,
remove
metallic
based
tint
before
install.
•
able
to
be
fully
adjusted
for
all
drivers
(e.g.
not
interfere
with
visors,
console,
etc.)
IMPORTANT:
Remote
start/keyless
entry
antennas,
road
quick-pass
devices
or
other
similar
transmit/receive
units
WILL
interfere
with
the
ability
to
acquire
a GPS signal.
Relocate
such
devices
at
least
one
(1)
foot
away
from
the
OnStar
FMV
Mirror.
Before you begin ...
First,
consult
the
compatability
requirements
listed above. Once
compatability
is
confirmed,
request
the
following
information
from
the
customer
BEFORE
proceeding
with
installation
of
the
OnStar
FMV Mirror*:
•
vehicle
make/model/year
and
VIN
•
customer
name,
address
&
phone
number
of
designated
OnStar
account
holder
+
OnStar
phone
number
will
be
provisioned
based
on
customer
phone
number
provided.
•
OnStar
Station
ID
(STID)
+
Capture
ALL
information
on
the
bottom
of
the
OnStar
FMV
Mirror
box,
including
STID.
+ IMPORTANT:
DO
NOT
confuse
STIDs
if
performing
multiple
installs.
*These
items
are
required
for
the
installer
to
perform
the
online
registration
of
the
OnStar
FMV
Mirror.
IMPORTANT: Read these instructions completely
BEFORE
beginning installation
of
the OnStar FMV Mirror!

llilllll
llllilllillllllll-1"
3"
2"
,..
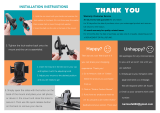
What
is
the
Ford®
Type
2
OEM
mirror
removal tool?
Pictured
here
is
the
special
tool
that
MUST
be
used
to
remove
the
Ford®
Type
2 OEM
mirror
in
order
to
prevent
creating
pressure
points
that
will
shatter
the
windshield.
Although
the
tool
can
be
machined
using
the
measurements
shown,
it
is
available
for
purchase
online
or
at
specialty
automotive
tool
suppliers.
l
IMPORTANT!
-
)
The
Ford
®
mirror
removal
tool
should
be
wrapped
in
electrical
tape
(particularly
at
its
curve)
to
protect
the
windshield
from
the
metal
surface
during
the
removal
process. Be sure
to
leave
at
least
3/8"
exposed
at
each
end
(for
insertion
into
the
mount).
2"
3"

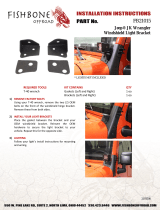
Types
of
mounts ...
Below
are
the
three
types
of
mounts
you
will
see
once
the
OEM
mirror
is
removed,
as
well
as
the
adaptor
that
may
be
necessary in
order
to
proceed
with
installation.
BIGFOOT
MOUNT
An
adaptor
IS
NOT
required.
SMALLFOOT
MOUNT
An
adaptor
IS
required.
CAM
LOCK
MOUNT
An adaptor
IS
required.
Because
it
has
enough
surface area
to
support
the
weight,
the
OnStar
FMV
Mirror
can
simply
be
slid
onto
this
mount.
Because
of
its
limited
surface
area, a
smallfoot
mount
adaptor
IS
required
before
installing
the
OnStar
FMV
Mirror.
Because
of
its
unique
shape, a
cam
lock
mount
adaptor
IS
required
before
installing
the
OnStar
FMV
Mirror.
Glossary
...
VBATT
orB+
(Yellow
Wire)
A
direct
positive
12-volt
power
from
the
battery,
this
line
is
ALWAYS active.
Gnd
(Black
Wire)
The
GROUND
side
of
the
battery.
The
metal
chassis
of
the
vehicle
is
used
as
ground
in
most
cases;
however
there
may
be
ground
lines
present
in
the
vehicle.
Accessory or
ACC
(Red
Wire)
A
positive
12-volt
power
line
that
is
ONLY
active
when
the
ignition
of
the
vehicle
is
in
ON/RUN
or
ACC
(if
available)
and
is
inactive
when
the
ignition
is
in
CRANK
or
OFF
positions.
DTC (Diagnostic
Trouble
Code)
See
the
trouble-shooting
guide;
there
is
an issue
with
the
OnStar
System,
device
or
components.
UAC (User Access
Controls)
A
menu
used
to
access
diagnostic
information
as
well
as
to
configure
the
OnStar
device.
See
User
Accessed
Controls
(UAC)
section.
BUB
(Back-Up Battery)
In
the
event
of
vehicle
power
loss
after
a
collision,
the
device
would
be
able
to
place
an
emergency
call
to
the
OnStar
Call
Center;
audio
components
(speakers,
microphone,
etc.)
and/or
any
lighting
(icons,
backlighting,
etc.) are
NOT
powered.

0 Removing
the
existing OEM rearview mirror ...
There are
primarily
three
different
mounting
options
used
by
vehicle
manufacturers.
Once
you
identify
which
type
of
mount
is
used
in
the
vehicle,
carefully
proceed
with
removal
of
the
existing
mirror
as
follows:
1.
Screw
wedge
mount
•
Using
a
screwdriver
or
Torx bit,
loosen
the
screw
in
the
base
of
the
mirror
mount.
•
After
loosening
the
screw,
gently
lift
upward
to
slide
the
mirror
off
of
the
mirror
mount.
2. Screwless
wedge
mount
(Ford® vehicles ONLY):
FORD
®
OEM
TYPE
1
• Using a small
1/8"
flat-head
screwdriver,
insert
the
flat
end
into
the
opening
at
the
bottom
of
the
mirror
mount.
•
Staying
flush
with
the
windshield,
slide
the
screwdriver
into
the
center
of
the
mirror
mount
until
resistance is felt.
•
Gently
apply
a small
amount
of
additional
upward
force
to
lift
away
the
locking
spring
in
the
mount.
•
While
still
applying
upward
pressure
with
the
screwdriver,
grasp
the
mirror
bracket
and
wiggle
side
to
side.
•
Lift
mirror
up
toward
the
headliner
and
off
of
the
mirror
mount
button.
• IMPORTANT:
BE
VERY
CAREFUL!
TOO
MUCH FORCE
CAN
CAUSE DAMAGE
TO
THE
WINDSHIELD.
FORD®
OEM
TYPE
2
• Insert
the
CURVED
end
of
the
Ford
®
mirror
removal
tool
(see
above)
into
the
bottom
of
the
mirror
channel
mount.
•
GENTLY
pry
the
tool
to
release
the
spring
clip.
• IMPORTANT: Ensure
the
clip
is
fully
disengaged
from
the
mirror
mount
before
attempting
to
remove
the
mirror.
• Use a small
rubber
mallet
to
gently
tap
the
base
of
the
mirror
channel
mount
upwards
towards
the
headliner.
• IMPORTANT: BE
VERY
CAREFUL!
TOO
MUCH FORCE
CAN
CAUSE DAMAGE
TO
THE
WINDSHIELD.
3. Cam lock
mount
(no
tools required)
• Grasp
the
base
of
the
mirror.
•
Rotate
90
degrees
counterclockwise.
• Slide
the
mirror
down
toward
the
dash
to
remove.

0
Affixing
the
mount
adaptors
...
Skip
to
section
C
if
vehicle
has a
bigfoot
mount.
If
it
does
not
have a
mount
of
any
sort,
refer
to
the
section
on
the
back
of
this
page
detailing
how
to
install
the
bigfoot
mount.
DO
NOT
USE EXPIRED
PRODUCT.
Check
the
expiration
date
on
both
the
adhesive,
primer
(Day.Month.Year
format)
and
the
alcohol
wipe.
If
the
product
has
expired,
do
not
use
it.
PROTECT THE
VEHICLE'S
INTERIOR!
The
5500SA
primer
will
DRIP
AND
STAIN!
Completely
cover
the
work
area
in
the
vehicle.
Catch
ALL
drips
with
paper
towel
in
your
free
hand.
The
primer
will
instantly
soak
through
layers
of
paper
towel/fabric/etc.
,
so
you
MUST
properly
protect
the
vehicle
interior.
Using
plastic
sheeting
underneath
an
absorbent
material
is
highly
recommended
to
protect
the
vehicle
interior.
WEAR
SAFETY
EQUIPMENT!
Wear
nitrile
chemical
resistant
gloves
(the
SSOOSA
primer
will
stain
your
hands),
safety
glasses,
work
apron,
or
other
protection
required
or
provided
by
your
company.
Work
in a
WELL
ventilated
area
(leave
doors
and
win-
dows
of
the
vehicle
open)
between
60°F
and
85°F.
1.
Cleaning
and
prepping
windshield
and
mount
adaptor.
Scrape
the
windshield
with
a
razor
blade
to
remove
any
residue
or
contaminates
(may be
clear
and
not
visible
by
the naked eye)
•
Mask
off
the
area
Slide
the appropriate mount adapter onto the existing mirror mount
on
the
windshield
+
For
the
bigfoot
service
mount
application,
see
instructions
on
reverse
Use
blue
painter tape
or
standard masking tape
+
Tape
around the adapter,
so
when the
black
primer
is
applied,
the tape masking will help
maintain a
clean
professional
look
to the
black
primer that
will
be applied
in
later
steps
Remove adapter after tape
is
applied
+
Make
sure the masking
has
a
clean straight edge
Clean
the
glass
and
mount
adapter
With provided
alcohol
wipe: (others may contain additives that may affect the bonding, only
use
the provided wipe)
+
Thoroughly clean
the
glass
inside the masked
area,
let flash
off
(1
minute)
+
Thoroughly clean
the
channels
of
the adapter or the back
of
the
bigfoot
mount,
let flash
off
(1
minute)
DO
NOT
TOUCH
glass
or the adapter/mount once they are
cleaned
Prime
glass
surface
(CAREFUL:
The
primer
will
drip
and
stain)
Cover
the
dashboard
to
avoid
damage
from
drips
Shake
BETAPRIME'"
SSOOSA
Glass/Frit Primer for at
least
one
(1)
minute before application
Open BETAPRIME'"
SSOOSA
by screwing the
tip/felt
applicator
in
clockwise.
use
a paper
towel
to catch drips
(it
will
stain
anything
it
contacts)
Apply
the primer to the inside
of
the taped/masked
off
square
on
the
windshield
+
If
the
pnmer
runs outside
of
the masked
area,
the primer run can be
sc
raped
off
with
a razor
blade once
it
has
dried
Allow
a
minimum
of
six
(6)
minutes
for primer to dry before
applying
the adhesive
2.
Attach
the
appropriate
mount
adapter.
SMALLFOOT
MOUNT
ADAPTOR
Slide
the
smallfoot
mount
adapter
DOWN
onto
the
smallfoot
mount
on
the
windshield
of
the
vehicle.
Ensure
the
adapter
is
seated
all
the
way
down
onto
the
mount.
IMPORTANT:
If
there
is a
1/8"
or
large
gap
between
the
adapter
and
the
windshield,
use
a
folded
piece
of
electrical
tape
to
wedge
between
the
windshield
and
the
top
center
of
the
adapter
(as
shown
below);
use
enough
layers
of
tape
to
ensure
a
snug
fit.
This
will
prevent
the
adhesive
from
flowing
into
this
area
so
there
is
enough
adhesive
to
fill
both
channels.
IMPORTANT:
Apply
electrical
tape
along
the
sides
and
top
of
the
mount
adaptor;
use
a
flat
edged
tool
to
make
a
tight
seal
between
the
tape
and
windshield
to
keep
adhesive
from
squeezing
out
when
injecting
the
adhesive
(reverse
angle
above
right).
CAM
LOCK
MOUNT
ADAPTOR
Slide
the
cam
lock
adapter
UP
into
the
cam
lock
mount
on
the
windshield
of
the
vehicle.
Ensure
the
adapter
is
seated
all
the
way
up
into
the
mount.
Tighten
the
set
screw
hand
tight
using
a
1/64"
Allen
wrench.
IMPORTANT:
If
the
adapter
starts
to
push
way
from
the
windshield,
it
is
too
tight.
IMPORTANT:
Apply
electrical
tape
along
the
sides
and
top
of
the
mount
adaptor;
use
a
flat
edged
tool
to
make
a
tight
seal
between
the
tape
and
windshield
(as
shown
below
right)
to
keep
adhesive
from
squeezing
out
when
injecting
the
adhesive.
3.
Apply
the
adhesive.
IMPORTANT:
The
adhesive
starts
to
set
within
5-10
minutes
of
application.
Cover
the
dashboard
to
avoid
damage
from
drips.
Using
ONLY
the
adhesive
provided
(3M-DP604NS),
insert
the
syringe
into
the
fill holes
at
the
top
of
the
adapter
and
SLOWLY
depress
the
plunger
until
approximately
1/2
of
adhesive remains in
the
syringe.
IMPORTANT:
The
cam
lock
mount
adaptor
uses
TWO syringes;
depress
each
plunger
until
approximately
1/4
of
adhesive remains in
the
syringe.
Make sure
both
channels
are
filled
entirely
by
using
half
of
the
adhesive in each
channel (small
foot
adapter)
or
3/4
of
the
adhesive
from
each
syringe
in each channel
(cam
lock
ada
pater).
You
must
make
sure
the
adapter
is
properly
masked
off;
if
there
is
too
much
squeeze
out
of
adhesive
you
will
not
have
enough
to
fill
both
channels.
After
10
minutes,
remove
the
tape
and
use a
razor
blade
to
remove
any
adhesive
that
may
have escaped.
IMPORTANT:
Though
the
original
mount
will
hold
the
weight
of
the
adapter
and
the
OnStar
FMV
Mirror
while
the
adhesive sets,
allow
at
least
20
minutes
for
the
adhesive
to
fully
cure
at
room
temperature
before
driving
the
vehicle.

G
Plugging-in
the
Back-Up
Battery
(BUB)
...
1.
Remove
Allen
screw
(2.5mm)
from
speaker
door
on
the
back
of
the
mirror
and
remove
door
2.
Plug in
the
Green
Battery
Pack
into
the
circuit
board
(make
sure
it
locks
into
place).
3.
Re-install
the
door,
ensuring
the
wires are safely
tucked
into
the
cavity
under
the
plastic
between
housing
and
circuit
board.
4. Hand
Tighten
the
Allen
screw
till
snug
(do
not
over
tighten).
IMPORTANT: Be careful
not
to
strip
the
hole.
If
you
do, use a
slightly
larger
screw,
but
NOT
longer
than
the
screw
provided.
G
Attaching
the
OnStar
FMV
Mirror
&
connecting
power
...
Slide
the
mirror
onto
the
mount
or
fully
cured
mount
adaptor,
being
certain
to
FULLY
seat
the
mirror
on
mount
and
tighten
the
Torx
(T20)
set
screw. Be sure
the
screw
is
snug
(1.8N-m/16
lb-in).
• If
mirror
or
adapter
will
not
slide
onto
the
wedge
mount
on
the
windshield,
check
for
any
oxidation
on
the
mount
and
remove
the
oxidation;
apply
a small
amount
of
white
lithium
grease
to
aid in
mounting.
To
connect
power
to
the
OnStar
FMV
Mirror, follow these steps:
1.
Locate
the
appropriate
vehicle
power
wires in
the
vehicle
(B+
[Battery
12V].
ACC[Accessory/switched
12V].
Gnd[Ground]).
Ensure
that
the
VBATT
and
Gnd
Wires are
actually
a
constant
connection
and
do
not
change
when
cranking,
dome
lights
on/off,
doors
open/closed,
changing
gears,
park/reverse/drive.
(Note:
Power
lines
to
dome
lights
in
most
vehicles
turn
off
after
a
period
of
time
of
the
vehicle
being
off;
do
NOT
connect
to
such
lines.)
2.
Route
the
wire
harness
(B+
[yellow],
ACC
[red]
and
Gnd
[black])
from
the
mirror
to
the
power
source
either
along
the
headliner
and
down
the
A-pillar
or
into
the
headliner.
• Secure all wires
along
the
entire
length
of
the
harness
avoiding
any
audio
or
antenna
wires/cables
while
making
sure
to
avoid
sharp
metal
and
not
to
interfere
with
any
moving
parts
or
heat
sources such
as
steering,
braking,
lighting
or
safety
equipment
(i.e. airbags,
seatbelts)
3.
Find
and
use an OEM
ground
connection
or
create
a
SECURE
ground
connection
by
screwing
into
the
vehicle's
metal
chassis
(verify
the
metal
is
a
low
resistance
ground
point),
removing
any
paint/coating
for
good
connectivity.
IMPORTANT:
Do
not
tamper
with
or
hinder any safety
equipment
such
as
Side Curtain Airbags
(i.e.
zip-tie
and secure all wires near an airbag and NEVER route wires over
the
path
of
the
airbag).
4.
Disconnect
the
negative
terminal
of
the
vehicle's
battery.
5.
Make
the
appropriated
wire
splices
and
connect
the
B+
and
ACC wires:
• Use an inline splice.
• Spread
the
wire
strands.
• Insert
the
OnStar
FMV
Mirror
wire
and
twist
together.
•
Solder
the
connection.
•
Zip-tie
the
lines
together
to
provide
strain relief.
•
Thoroughly
wrap
electrical
tape
around
the
connection.
•
If
the
provided
harness
is
too
long,
bundle
the
wiring
and
make
sure
it
does
not
entangle
other
wires
or
cause a
rattle
-OR-
cut
to
the
appropriate
length
and
sever
the
in line
fuse(s)
from
the
end
and
splice
them
(an inline fuse
MUST
be
used).

Q
Mounting
the
external
microphone ...
Mount
the
mic
in
one
of
the
locations
indicated
in
the
User
Access
Controls
section
on
reverse.
OnStar
recommends
adhering
the
microphone
to
a
plastic
trim
piece
if
possible;
however
it
can
be
applied
to
a
headliner
surface
if
necessary.
For
plastic
surfaces,
thoroughly
clean
the
area
with
an
alcohol
wipe
and
dry;
to
mount,
remove
the
adhesive
tape
backing,
then
press
and
hold
the
mic
firm
to
the
surface
for
20
seconds.
IMPORTANT:
The adhesive on
the
external microphone
is
meant
for only
ONE
application.
Be
careful.
SECTION
0
Registering
the
OnStar
FMV
Mirror ...
1.
Reconnect
the
negative
terminal
of
the
vehicle's
battery.
•
For
warranty
part
replacement
or
vehicle
transfer
information,
see
the
Troubleshooting
section.
2.
After
all
power
is
connected
(POWER
CONNECTIONS
MUST
BE CHECKED):
• Turn
the
vehicle
on
and
press
the
WHITE
phone
button;
"OnStar
Ready"
should
be
heard.
•
Press
the
phone
button
again
and
"Thank
you,
Goodbye"
will
be
heard.
•
With
vehicle
OFF,
repeat
last
two
steps. The
unit
should
be
in
stand-by
and
"wake
up"
if
constant
power
is
connected
correctly.
•
Ensure
when
the
vehicle
is
turned
ON
and
OFF
the
OnStar
FMV
Mirror
does
the
same;
then
Leave
the
vehicle
ON.
•
If
the
external
microphone
is
not
plugged
in
(see
below),
a
Diagnostic
Trouble
Code
(DTC)
will
be
set,
(red
telltale).
•
A
solid
yellow
Alert
(triangle)
Icon
indicates
the
unit
has
not
been
registered,
proceed
to
step
3.
•
If
the
unit
does
NOT
have an
illuminated
Alert
Icon,
this
means
it
has
been
registered
before
(i.e.
returned
unit
or
vehicle
transfer);
skip
step
3
and
press
the
BLUE
OnStar
button
to
register
the
mirror
to
the
new
customer.
IMPORTANT:
The
OnStar
Mirror MUST
be
ON
for
the
registration
to
be
successful.
3.
Leave
the
Vehicle/OnStar
FMV
Mirror
ON
and
THEN
complete
the
Web
Registration:
• Go
to
www.OnStar.com/web/portal/fmv/registration.
•
Enter
information
collected
earlier; ensure
correct
STID
is
attached
to
the
appropriate
vehicle/customer.
4.
After
the
Web
Registration
is
submitted,
leave
the
vehicle
ON
until
the
Alert
Icon
extinguishes;
this
should
turn
off
in less
than
15
minutes.
If
the
Alert
Icon
does
not
go
off
after
20
Minutes, press
the
BLUE
OnStar
button
TWICE
to
complete
the
registration.
(Note:
The
unit/vehicle
must
be
in a
Cellular
Data
coverage
area
for
the
automated
web
registration
to
be
successful.)
SECTION
G
Final steps ...
1.
Reinstall all
removed
panels
and
ensure
vehicle
is
back
to
its
original
condition
or
better
2.
Set
Audio
Tuning
Parameters:
•
Press
and
hold
the
Phone
button
for
5
seconds
to
enter
User
Access
Controls.
• Say
NO
to
all
the
prompts
until
you
hear
"Your
current
hands
free
tuning
is
set
to
#.
Would
you
like
to
change
this
setting?"
• Say
YES
and
choose
the
appropriate
tuning
parameter
(see
chart
on
reverse in
User
Access
Controls
section).
•
Once
complete,
press
the
WHITE
phone
button
again
to
exit.
3.
Check
to
ensure
the
vehicle
can
receive
a GPS
signal:
•
Move
the
vehicle
into
an
open-sky
environment;
let
the
vehicle
sit
for
1-2
minutes.
•
Press
and
hold
the
PHONE
button
for
five
(5)
seconds
to
the
enter
the
User
Access
Controls
(see reverse).
•
Under
Diagnostics>GPS,
ensure
the
unit
has a
"Current"
location
(if
not,
see
Troubleshooting
Guide
on
reverse).
4.
Install
the
provided
OnStar
FMV
window
clings/stickers
of
front-side
windows
IMPORTANT: Inform
the
customer
that
they
MUST
press
the
BLUE
OnStar
button
to
complete
the
enrollment
of
their account
and choose their
OnStar
Services Package.
Without
doing so,
OnStar
cannot guaranty any services
will
be provided.
Congratulations!
Installation
of
the
OnStar
FMV
Mirror
is
now
complete.
Star"FMV

User Accessed Controls
(UAC)
...
This
menu
is
used
to
access
diagnostic
information
as
well
as
to
configure
the
OnStar
device.
1.
Press
and
hold
the
"Phone
Button"
for
5
seconds.
2.
You
will
hear
"Welcome
to
OnStar
9.0.
Continuing
will
change
your
settings
of
your
OnStar
system
...
".
3.
There
will
be
a
list
of
options
that
you
can
choose
from
by
saying
"Yes"
or
"No":
CHANGE
YOUR
LANGUAGE
changes
your
Language
for
all
menus
VERIFY
HANDS-FREE
CALLING
DATA
information
related
to
the
OnStar
Hands-Free
calling
phone
REPROGRAM
YOUR
HANDS
FREE
CALLING
DATA
use
ONLY
if
requested
by
OnStar
Technical
Assistance
HANDS-FREE
TUNING
SETTINGS
changes
setting
for
different
mic
positions:
TUNING
ROW
EXTERNAL
MIC
LOCATION
0
DO
NOT
USE
1 (default setting) BEST: mic
is
near driver to the side
of
overhead center console
2
BETTER: mic
is
near the front
of
headliner near windshield
3
CONVERTIBLE: with mic near
top
of
A-Pillar
4
CONVERTIBLE: with mic near the front
of
headliner near windshield
5
DO
NOT
USE
DIAGNOSTICS
diagnostic
info
for
the
OnStar
unit
(with
sub-categories):
•
TROUBLE
CODES
(SAY "1")
+
Some
trouble
codes
are
provided
in
the
Trooubleshooting
section
below;
for
other
codes
not
listed,
please
contact
technical
support
at
1.877.733.6770.
• CELLULAR (SAY
"2")
+
Signal
Strength
(Scale:
51Dbm
to
-103Dbm,
the
lower
the
number
the
better
the
signal)
+
System
ID
+
Preferred
Roaming
List
(PRL):
used
for
roaming
purposes
+
Mobile
Device
Number
(MDN):
phone
number
for
the
OnStar
Hands
Free
Calling
+
Mobile
Identification
Number
(MIN):
10-digit
unique
number
used
to
identify
a
mobile
phone
+
Packet
Data
(available
or
unavailable):
based
on
the
cellular
coverage
area
you
are
currently
in;
must
be
available
to
be
able
to
download
turn-by-turn
route
or
perform
Web
registration.
•
BLUETOOTH
(SAY
"3")
+
Enabled/Disabled
+
Link
Quality
of
Currently
Paired
Device
(Scale: 0
to
255;
Higher
the
number
the
better
the
link
quality)
• GPS
(SAY
"4")
+
Aged/Current:
if
aged
there
is
no
GPS signal;
this
will
be
true
if
the
vehicle
is
inside
+
Latitude/Longitude:
the
devices
current
or
last
known
location
+
Time
Stamp:
YEAR/MONTH/DAY/HOURS(24hr
scale)/MINUTES/SECONDS
Note:
it
will
read
only
numbers
back
with
no
pause
(example:
Feb
21,
2011
4:42
PM
=
20110221284200).

Alert
Icon Legend ...
TELLTALE
STATUS
ALERT
ICON
STATE
CONDITION
Green
Telltale
Red Telltale
NONE
STEADY
FLASHING
STEADY
Troubleshooting Guide ...
CONDITION/PROBLEM
No
power
Only
turns
ON
when
button
is pressed
Green
T
elltale
with
Solid
Alert
Icon
Red Telltale
with
Flas
hing
Alert
Icon
No
or
low
audio
No
backlighting
No
GPS
signal
Speec
h
r
ecog
niti
on
does
not
hear
spoken
commands
or
audio
cannot
be
heard
from
other
end
of
phone
calls
Replacing
the
OnStar
FMV
Mirror
(warranty,
etc.)
Movin
g
the
OnStar
FMV
Mi
rror
to
a
new
vehicle
Unst
ab
le/vibrating
image
in
th
e
mirror
Trouble
Cod
e
944603
Trouble
Code
944704
O
ther
Tr
oub
le C
odes
system
funct
i
oning
and
enrolled
/ regi
stered
with
OnStar
system
functioning
but
NOT
enrolled
/
registered
with
OnStar
DTC
Set•
-
trouble
with
the
mirror
DTC
Set•
-
trouble
with
the
mirror
and
NOT
enrolled/registered
with
On
Star
•see
UAC
section.
•
•
Check
the
in line fuses
of
the
wiring
harness;
replace
if
fuse
is
blown
(a
blown
fuse
ind
ica
tes
a
short
in
the
wiring);
inspect
the
entire
length
of
wiring
for
cuts
or
abrasions.
Using
a
digital
multi-meter,
check
both
VBATT
and
ACC
for
+1
2V
power.
Check
the
ground
connection
and
ensure
that
it
is
secure
and
has a
good
connection
(i.e.
no
paint
on
the
metal,
etc.).
If
no
wiring
issues
are
found,
there
is a
remote
possibility
of
a l
ocked-up
unit.
Remove
power
from
the
mirror
,
wait
20
seconds
and
reconnect
power.
If
there
is
still
no
power,
replace
the
On
Star
FMV
Mirror
with
a
new
one.
If
the
old
OnStar
FMV
Mirror
was
enrolled
,
tr
ansfer
the
account
to
t
he
new
device
.
This
indicates
that
the
accessory
line
is
not
functioning,
Check
the
inline
fuses
of
the
wiring
harness;
replace
if
fuse
is
blown
(a
blown
fuse
ind
icates
a
short
in
th
e
wiring);
inspect
th
e
entire
length
of
wiring
for
cu
ts
or
abrasions.
Using
a
digital
multi-m
ete
r,
ch
ec
k ACC
for
+12V
power
when
the
vehicle
is
in
the
ON
or
RUN
state
.
The
OnStar
Unit
is
NOT
configured.
Complete
the
online
registration
in
the
Installation
Guide.
If
that
was
already
performed,
wait
2S
minutes
after
it
was
submitted
with
the
OnStar
FMV
Mirror
in
the
ON
mode.
(Failure
of
the
Web
registration
may
be
an
indication
that
the
vehicle
is
not
in a
ce
l
lular
data
coverage
area;
some
metal
structures/buildings
can
also
block
cellular
signals.)
If
the
Alert
Icon
is
sti
ll on, press
the
OnStar
Blue
B
utton
twice
and
it
will
connect
you
to
an
advisor
who
will
comp
let
e
the
r
eg
i
strat
ion.
There is a
trouble
code
ac
tiv
e
(e
.g.
ther
e is a
problem
with
the
unit)
. Tro
ubl
e
codes
can
be
pulled
from
th
e
uni
t.
See
the
User
Accessed
Controls
(UAC)
sect
i
on
for
more
details.
Turn
up
the
sound
using
volume
up
button.
If
there
is
st
ill
no
so
und
;
remove
the
speaker
cover
and
c
he
ck
t
hat
the
speaker
connected/plugged
into
to
the
circuit
board
(red
and
black
twisted
wires).
Increase
the
backlighting
using
the
l
ig
ht
bulb
button.
(When
at
the
lowe
st
l
eve
l,
the
backlighting
goes
off
comp
letely.)
Ensure
ther
e is a
clear
view
of
the
sky
through
the
windshi
eld f
rom
the
top
of
the
mi
rr
o
r.
Metallic-lined
window
tint
will
block
GPS
reception;
if
present
,
remove
from
windshield.
RF
interference
from
some
devices
can
block/jam
the
GPS
ch
i
pset
of
the
OnStar
FMV
Mirr
or;
check
for
devices
near
the
On
Star
FMV
Mirror
that
may
cause
this
kind
of
interference,
such as
(b
ut
not
limited
to)
remote
s
tart/keyle
ss/a
larm
antennas,
toll
pass
devices
,
or
a
nything
that
can
create
an RF signal.
If
sa
id
devices
are present,
relocate
away
from
the
OnStar
FMV
Mi
rror
and
re-te
st
for
GPS
signal.
Indicates
microphone
is
not
working
.
C
he
ck
the
length
of
the
mi
cr
op
h
one
wiring
for
any c
ut
s
or
pinches.
Ensure
inlin
e
co
nne
cto
r a
nd
th
e
co
nn
ecto
r on
th
e
back
of
the
mirror
are
co
nn
ected
and
fully
seated
.
Verify
microphone
is
working
by
using speech
recognition
(press
PHONE
button
and
speak a
command)
.
In
sta
ll
th
e
new
OnStar
F
MV
Mirro
r.
.
Press
the
OnStar
Blue
Button
twice
.
(DO
NOT
USE
WEB
REGISTRATIO
N)
.
Tell
the
advisor
this
is a
"
part
rep
l
ace
me
nt
."
.
Give
the
advisor
the
OnStar
S
tati
on
ID
(STID)
from
the
old
mirror
(located
on
n
eck)
.
.
The
advisor
will
tr
an
sfer
all
ac
c
ou
nt
inf
or
m
at
ion
and
c
onf
ig
ur
e
the
new
mirr
or
.
In
sta
ll
the
OnStar
FMV
Mirror
in
the
new
vehicle.
Press
th
e
OnS
tar
Blu
e
Button.
(DO
NOT
U
SE
WEB
REGISTRATIO
N)
Tell
the
adv
i
sor
this
is a
"vehicle
transfer."
Give
the
advisor
the
new
vehicle
information.
The
advisor
will
tr
an
sfe
r all
account
inf
o
rmation
.
This
indicates
the
mirror
is
not
fully
seated
onto
the
mount.
Loo
sen
th
e set sc
rew
on
the
base
of
the
OnStar
FMV
Mirror
and
wiggle
the
mirror
ba
se
to
ensure
it
is
FULLY
s
eated
onto
th
e
mount;
re-tighten
the
set
scr
ew
.
Backup
Power
Sourc
e
-
Voltage
Below
Threshold
Thi
s
means
the
Back-Up
Ba
ttery
(BUB)
has
gone
b
ad;
r
ep
l
ace
the
BUB
.
When
the
new
battery
is
installed
,
it
can
tak
e
up
to
30
minu
te
s
with
the
vehicle
ON
to
clear
the
DTC.
If
the
problem
persists
with
th
e n
ew
batt
e
ry
,
co
nt
ac
t T
echn
ical
Support
at
1.877.733.6
77
0.
Backup
Power
Source-
Open
Circuit
Check
th
at t
he
OnS
t
ar
FMV
Mirror
back-up
battery
is
plugged
in.
If
battery
is
plugged
in
and
code
944
7
s
till
prese
nt,
repla
ce
BUB
.
Please
Contac
t
Te
c
hni
cal su
pport
at 1.
877
.733.
677
0.

Affixing
a
bigfoot
mount
...
IMPORTANT:
If
the
windshield
is
equipped
with
a
blackout
area
around
the
mirror
base
bracket,
care
must
be
used
not
to
cut
or
scrape
the
blackout.
1.
Determine
the
location
of
the
mirror
mounting
base
by
marking
the
outside/inside
of
the
windshield
with
a
wax
pencil
where
the
base
was
previously
located.
If
it
is
not
clear
where
the
base
was
located,
or
if
there
was
not
a
mount
previously
there,
use
the
following
steps
to
determine
where
the
base
should
be
installed:
1.1.
Using
a
measuring
tape,
measure
the
distance
between
the
windshield
pillars
at
the
windshield
blackout
line.
1.2
Using
a
marking
pencil,
halfway
between
the
windshield
pillars,
draw
a
centerline
(1)
on
the
windshield
from
the
roof
panel
to
the
windshield
base.
1.3
Draw
a
perpendicular
line
intersecting
the
centerline
(2)
at
that
location.
This
location
can
be
determined
by
holding
the
mirror
inside
the
vehicle
at
the
proper
location
.
NOTE:
The
bottom
center
of
the
bigfoot
mount
will
be
at
the
intersection
of
these
lines.
2.
Clean
the
inside
windshield
glass
thoroughly
with
a
razor
blade
to
remove
any
old
adhesive.
3.
Mask
off
the
area,
using
blue
painter's
tape
or
standard
masking
tape
to
mask
off
a 2
inch
square
for
where
the
black
primer
will
go.
/
IMPORTANT:
Clean
the
inside
windshield
glass
and
the
mounting
surface
of
the
mirror
mounting
base
thoroughly
with
the
provided
alcohol
wipes.
DO
NOT
touch
the
mounting
surface
of
the
mirror
mounting
base
or
the
glass.
4.
Cover
dash
and
other
areas
to
prevent
primer
or
adhesive
spills
on
those
surfaces.
5.
Prime
glass
surface
(CAREFUL:
The
primer
will
drip
and
stain)
Cover
the
dashboard
to
avoid
damage
from
drips.
Shake
BETAPRIMEr
,.,
5500SA
Glass/Frit
Pri
mer
for
at
least
one
(1)
minute
before
application
Open
BETAPRIME™ SSOOSA
by
screwing
the
tip/felt
applicator
in
clockwise,
use a
paper
towel
to
catch
drips
(it
will
stain
anything
it
contacts)
Apply
the
primer
to
the
inside
of
the
taped/masked
off
square
on
the
windshield
+
If
the
primer
runs
outside
of
the
masked
area,
the
primer
run
can
be
scraped
off
with
a
razor
blade
once
it
has
dried
Allow
a
minimum
of
six
(6)
minutes
for
primer
to
dry
before
applying
the
adhesive
IMPORTANT:
DO
NOT
touch
the
mounting
surface
of
the
mirror
mounting
base
or
the
glass.
6.
Using
the
syringe,
apply
the
adhesive
to
the
back
side
of
the
bigfoot
mount
in a
back
and
forth
zigzag
pattern.
7.
Apply
the
bigfoot
mount
to
the
windshield,
ensuring
that
the
mount
aligns
correctly
to
the
area
that
was
primed
with
the
black
primer.
8.
Hold
the
mounting
base
firmly
in
place
for
one
(1)
minute.
8.
Affix
the
mount
to
the
glass
using
a
few
strips
of
electrical
tape
or
masking
tape.
9.
Clean
the
wax
pencil
lines
from
the
exterior
surface
of
the
glass.
10.
Wait
thirty
(30)
minutes
and
remove
the
tape
and
scrape
away
the
excess
adhesive/primer
with
a
razor
blade.
1
IMPORTANT:
Install
the
OnStar
FMV
Mirror
after
60
minutes
(one
hour)
onto
the
bigfoot
mirror
mount.
Refer
to
Section
D
to
attach
the
OnStar
FMV
Mirror.
For
installation
technical support, call
1.877.733.6770.
2
TTY
is
available
for
the
hearing impaired via a
dedicated
toll-free
line
at
1.877.248.2080.
For
general
information
about
the
OnStar
FMV
Mirror,
call1.855.
ONSTAR3
(1.855.667.8273)
or
visit
onstar.com/web/portal/onstarfmv.

This
document
was
carefully
designed
to
explain
and
help
simplify
the
installation
process
for
the
revolutionary
OnStar
For
My
Vehicle
(FMV)
Mirror.
Please
pay
close
attention
to
the
tools
specified
and
steps
outlined
in
order
to
ensure
proper
Installation
and
activation,
as well
as
to
avoid
windshield
damage.
On Star'FMV
HAZARD
WARNING
INFORMATION
BETAPRIME
5500
SA
The
Dow
Chem1cal
Company
2030
Willard
H.
Dow
Center
M1dland. Ml
48674
KEEP
OUT
OF
REACH
OF
CHILDREN
DANGERI EXTREMELY
FLAMMABLE
LIQUID
AND
VAPOR. CAUSES
EYE IRRITATION. MAY
CAUSE
ALLERGIC
SKIN
REACTION
OR
IRRITATION. MAY BE
HARMFUL
IF
INHALED.
MAY CAUSE
RESPIRATORY
TRACT
ALLERGIC
REACTION
OR IRRITATION. MAY
CAUSE
CENTRAL
NERVOUS
SYSTEM EFFECTS. MAY
BE
HARMFUL
IF
SWALLOWED.
ELIMINATE
IGNITION
SOURCES
DO
NOT USE IN A
CONFINED
SPACE; USE
WITH
ADEQUATE
VENTILATION.
May
cause
moderate
eye
irritation.
May
cause
moderate
corneal
injury
Vapor
may
cause
eye
irritation.
Prolonged
skin
contact
may
cause
moderate
skin
irritation.
Skin
contact
with
isocyanates
may
play
a
role
in
respiratory
tract
allergic
reaction.
A
component
in
this
mixture
may
cause
an
allergic
respiratory
reaction.
Vapor
concentrations
could
be
hazardous
on
a
single
exposure.
Avoid
inhaling
vapor.
Open
veh1cle
doors
and
if
necessary,
also
use
other
means
to
ensure
fresh
air
entry
during
application
and
drying.
If eye
irritation,
headaches.
or
dizziness
are
experienced.
increase
fresh
air
or
leave
the
area
INGREDIENTS:
METHYL
ETHYL
KETONE
(78-93-3).
CARBON
BLACK
(1333-86-4),
ISOPHORONE
DIISOCYANATE
(4098-71-9)
Before
using
this
product,
consult
your
employer.
if
applicable,
and
read
the
Material
Safety
Data
Sheet
(MSDS)
for
additional
mformation.
Scotch-Weld
' '
Urethane
Adhes1ve
DP604
NS.
Black
(Part
A
and
Part
B)
3M -
Industrial
Adhesives
and
Tapes
Division
3M
Center
St. Paul. MN
55144-1000
KEEP
OUT
OF
REACH OF CHILDREN.
DANGERI MAY CAUSE
AN
ALLERGIC
SKIN
AND
RESPIJ:.<ATORY
REACTION. MAY CAUSE SEVERE EYE. SKIN NOSE
AND
THROAT
IRRITATION.
Persons prev1ously
sensitized
to
isocyanates
should
avoid
product
use.
Do
not
inhale
vapor.
Vapors
released
during
curing
may
cause
eye
irritation.
Do
n·ot
inhale
dust
from
cutting,
grinding
or
sanding
of
cured
product
Use
only
with
adequate
ventilation
by
opening
vehicle
doors.
and
if
necessary,
also
use
other
means
to
ensure
fresh
air
entry
during
application
and
drying.
If
ventilation
is
not
adequate,
use
appropriate
respiratory
protection.
Do
not
get
in eyes.
on
skin
or
clothing.
Avoid
eye
and
skin
contact
with
dusts
from
cutting.
grinding
or
sandmg
of
cured
product
Keep
container
closed
when
not
in use.
Wash
thoroughly
after
handling.
Do
not
ingest
INGREDIENTS:
Polyether
Polyol
(9082-00-2);
polyurethane
prepolymer
(67837-35-8);
dicyclohexylmethane-4,4'-diisocyanate
(5124-30-1);
diethyltoluenediamine
(68479-98-1);
propoxylated
trimethylolpropane
(25723-16-4);
4,4'-
diphenylmethane
diisocyanate
(101-68-8); 1,1'-
diphenylmethane
diisocyanate
polymer
(39310-05-9);
and
m-xylene-alpha.
alpha'-diamine
(1477-55-0).
Before
using
this
product,
consult
your
employer.
if
applicable.
and
read
the
Material
Safety
Data
Sheet
(MSDS)
for
additional
information.
WEBCOL/CURITY
" 70%
Alcohol
Prep
Pads
Tyco
Healthcare/Kendall
15
Hampshire
Street
Mansfield.
MA
02048
KEEP
OUT
OF
REACH OF
CHILDREN
DANGER
1
FLAMMABLE
Liquid,
mist
or
vapor
will
cause
eye
Irritation
and
possible
corneal
damage.
Prolonged
or
repeated
contact
may
cause
skin
irritation
or
dermatitis.
Exposure
to
vapor
may
cause
irritation
to
nose.
throat.
respiratory
tract,
and
central
nervous
system
depression
INGREDIENTS:
Isopropyl
alcohol
(67-63-0)
Before
using
this
product.
consult
your
employer.
if
applicable.
and
read
the
Material
Safety
Data
Sheet
(MSDS)
for
additional
information.
FIRST
AID
Eye
Contact:
Immediately
flush
eyes
with
large
amounts
of
water;
if
present,
remove
contact
lenses
after
the
first
five
minutes,
then
continue
flushing
eyes
for
at
least
fifteen
(15)
minutes.
Obtain
medical
attention
without
delay,
preferably
from
an
ophthalmologist.
Skin
Contact:
Remove
material
from
skin
immediately
by
washing
with
soap
and
plenty
of
water.
Seek
medical
attention
if
irritation
persists.
Inhalation:
Move
person
to
fresh
air.
If
not
breathing,
give
artificial
respiration.
If
breathing
difficulty
is
experienced,
contact
physician
immediately.
Ingestion:
If
swallowed,
seek
medical
attention.
Do
not
induce
vomiting
unless
directed
to
do
so
by
medical
personnel.
See MSDS
for
emergency
contact
information.
v.3
/