Candy CMXG20DR User manual

Category
Microwaves
Type
User manual

This manual is also suitable for

GB
MICROWAVE OVENS
IT
FORNI A MICROONDE
MANUALE DI ISTRUZIONI
USER INSTRUCTIONS
CMXG20DR
CMXG20DS
CMXG20DW
INSTRUCTION MANUAL
MODEL:
Microwave Oven
SAVE THESE INSTRUCTIONS CAREFULLY
Read these instructions carefully before using your
microwave oven, and keep it carefully.
If you follow the instructions, your oven will provide you with
many years of good service.
GB
1
this product ,
we declare ,on
our own responsibility,
compliance
to all of European
safety ,health and
environmental
requirements stated
in the legislation for
this product
By placing the CE
marking on
.
( )
CMXG20DR
CMXG20DS
CMXG20DW
GB
2
CLOCK/PRE-SET
DEFROST BY WEIGHT
DEFROST BY TIME
MICRO/GRILL/COMBI
STOP/CLEAR/
/CHILD LOCK
START/EXPRESS
ECO FUNCTION
AUTO MENU/TIME/WEIGHT
GB
(a) Do not attempt to operate this oven with the door
open since this canresult in harmful exposure to
microwave energy. It is important not to break or tamper
with the safety interlocks.
(b) Do not place any object between the oven front face
and the door or allow soil or cleaner residue to accumulate
on sealing surfaces.
(c) WARNING: If the door or door seals are damaged, the
oven must not be operated until it has been repaired by
a competent person.
ADDENDUM
If the apparatus is not maintained in a good state of
cleanliness, its surface could be degraded and affect the
lifespan of the apparatus and lead to a dangerous situation.
PRECAUTIONS TO AVOID POSSIBLE EXPOSURE
TO EXCESSIVE MICROWAVE ENERGY
3
Specifications
Model:
Rated Voltage:
Rated Input Power(Microwave):
Rated Output Power(Microwave):
Rated Input Power(Grill):
Oven Capacity:
Turntable Diameter:
External Dimensions(LxWxH):
Net Weight:
1000 W
2
230V~50Hz
mm
4 x 3
255
1050W
11.0 kg
700 W
0 L
40 57.5x 259 mm
CMXG20DR
/CMXG20DS
/CMXG20DW
To reduce the risk of fire, electric shock, injury to
personsor exposure to excessive microwave oven
energy whenusing your appliance, follow basic
precautions, including he following:
1. Warning: Liquids and other foods must not be heated
in sealed containers since they are liable to explode.
2. Warning: It is hazardous for anyone other than a
competent person to carry out any service or repair
operation that involves the removal of a cover which
gives protection against exposure to microwave energy.
3. This appliance can be used by children aged from 8
years and above and persons with reduced physical,
sensory or mental capabilities or lack of experience
and knowledge if they have been givensupervision or
instruction concerning useof the appliance in a safe way
andunderstand the hazards involved.Children shall not
play with the appliance.Cleaning and user maintenance
shallnot be made by children unless they are older than
8 and supervised.
4. Keep the appliance and its cord out of reach of
children less than 8 years.
5. Only use utensils suitable for use in microwave ovens.
6. The oven should be cleaned regularly and any food
deposits should be removed.
7. Read and follow the specific:"PRECAU- TIONS TO
AVOID POSSIBLE EXPOSURE TO EXCESSIVE
MICROWAVE ENERGY".
8. When heating food in plastic or paper containers,
keep an eye on the oven due to the possibility of ignition.
IMPORTANT SAFETY INSTRUCTIONS
WARNING
GB
4
9. If smoke is emitted, switch off or unplug the appliance
and keep the door closed in order to stifle any flames.
10. Do not overcook food.
11. Do not use the oven cavity for storage purposes.
Do not store items, such as bread, cookies, etc. inside
the oven.
12. Remove wire twist-ties and metal handles from
paper or plastic containers/bags before placing them in
the oven.
13. Install or locate this oven only in accordance with the
installation instructions provided.
14. Eggs in the shell and whole hard-boiled eggs should
not be heated in microwave ovens since they may
explode, even after microwave heating has ended.
15.This appliance is intended to be used in household
and similar applications such as:
-staff kitchen areas in shops, offices and other working
environments;
-by clients in hotels, motels and other residential type
environments;
-farm houses;
-bed and breakfast type environments.
16. If the supply cord is damaged, it must be replaced by
the manufacturer, its service agent or similarly qualified
persons in order to avoid a hazard.
17. Do not store or use this appliance outdoors.
18. Do not use this oven near water, in a wet basement
or near a swimming pool.
19. The temperature of accessible surfaces may be high
when the appliance is operating. The surfaces are liable
to get hot during use.Keep cord away from heated
surface, and do not cover any vents on the oven.
GB
5
20. Do not let cord hang over edge of table or counter.
21. Failure to maintain the oven in a clean condition
could lead to deterioration of the surface that could
adversely affect the life of the appliance and possibly
result in a hazardous situation.
22.The contents of feeding bottles and baby food jars
shall be stirred or shaken and the temperature checked
before consumption, in order to avoid burns.
23. Microwave heating of beverages can result in
delayed eruptive boiling, therefore care must be taken
when handling the container.
24.The appliance is not intended for use by persons
(including children) with reduced physical , sensory or
mental capabilities, or lack of experience and knowledge,
unless they have been given supervision or instruction
concerning use of the appliance by a person responsible
for their safety.
25.Children should be supervised to ensure that they do
not play with the appliance.
26.The appliances are not intended to be operated by
means of an external timer or separate remote-control
system.
27.Accessible parts may become hot during use. Young
children should be kept away.
28.Steam cleaner is not to be used.
29.During use the appliance becomes hot. Care should
be taken to avoid touching heating elements inside the
oven.
30.Only use the temperature probe recommended for
this oven.(for ovens provided with a facility to use a
temperature-sensing probe.)
GB
6
31. WARNING: The appliance and its accessible parts
become hot during use.Care should be taken to avoid
touching heating elements. Children less than 8 years
of age shall be kept away unless continuously
supervised.
32.The microwave oven must be operated with the
decorative door open.(for ovens with a decorative door.)
33.The rear surface of appliance shall be placed against
a wall.
34.The microwave oven shall not be placed in a cabinet
unless it has been tested in a cabinet.
READ CAREFULLY AND KEEP FOR FUTURE
REFERENCE
GB
7
To Reduce the Risk of Injury to Persons
Grounding Installation
DANGER
Electric Shock Hazard
Touching some of the
internal componentscan
cause serious personal
injury or death.Do not
disassemble this
appliance.
WARNING
Electric Shock HazardImproper
use of the grounding can
result inelectric shock.
Do not plug into an outlet
untilappliance is properly
installed and grounded.
This appliance must be
grounded. In theevent of
an electrical short circuit,
grounding reduces the
risk of electricshock by
providing an escape wire
forthe electric current.
This appliance isequipped
with a cord having a
groundingwire with
a grounding plug. The
plug mustbe plugged into
an outlet that is properly
installed and grounded.
Consult a qualified
electrician orserviceman
if the grounding instructio
nsare not completely
understood or if doubtexists
as to whether the appliance
isproperly grounded.
If it is necessary touse an
extension cord , use only
a 3-wire
1. A short power-supply cord
is provided to reduce the risks
resulting from becoming
entangled in or tripping over a
longer cord.2. If a long cord set
or extension cord isused:
1)The marked electrical rating
of the cordset or extension cord
should be at least asgreat as
the electrical rating of the
appliance.
2)The extension cord must be
a grounding-type 3-wire cord.
3)The long cord should be
arranged so thatit will not drape
over the counter top ortabletop
where it can be pulled on
bychildren or tripped over
unintentionally.
GB
8
CLEANING
Be sure to unplug the
appliance from thepower
supply.
1. Clean the cavity of the oven after using with a slightly damp
cloth.
2. Clean the accessories in the usual way in soapy water.
3. The door frame and seal and neighbouring parts must be
cleaned carefully with a damp cloth when they are dirty.
4. Do not use harsh abrasive cleaners or sharp metal scrapers
to clean the oven door glass since they can scratch the surface,
which may result in shattering of the glass.
5. Cleaning Tip---For easier cleaning of the cavity walls that the
food cooked can touch: Place half a lemon in a bowl, add 300ml
(1/2 pint) water and heat on 100% microwave power for 10
minutes. Wipe the oven clean using a soft, dry cloth.
Utensil Test:
1. Fill a microwave-safe container with 1 cup of cold
water (250ml) along with the utensil in question.
2. Cook on maximum power for 1 minute.
3. Carefully feel the utensil. If the empty utensil is
warm, do not use it for microwave cooking.
4. Do not exceed 1 minute cooking time.
See the instructions on "Materials you can use in
microwave oven or to be avoided in microwave oven."
There may be certain non-metallic utensils that are not
safe to use for microwaving. If in doubt, you can test the
utensil in question following the procedure below.
UTENSILS
CAUTION
Personal Injury Hazard
It is hazardous for
anyone other than a
compentent personto
carry out any service
or repairo peration that
involves the removalof
a cover which gives
protection against
exposure to microwave
energy.
GB
9
Materials you can use in microwave oven
Utensils Remarks
Aluminum foil Shielding only. Small smooth pieces can be used to cover thin parts of
meat or poultry to prevent overcooking. Arcing can occur if foil is too
close to oven walls. The foil should be at least 1 inch (2.5cm) away from
oven walls.
Follow manufacturer’s instructions. The bottom of browning dish must be
at least 3/16 inch (5mm) above the turntable. Incorrect usage may cause
the turntable to break.
Microwave-safe only. Follow manufacturer's instructions. Do not use
cracked or chipped dishes.
Always remove lid. Use only to heat food until just warm. Most glass jars
are not heat resistant and may break.
Heat-resistant oven glassware only. Make sure there is no metallic trim.
Do not use cracked or chipped dishes.
Follow manufacturer’s instructions. Do not close with metal tie. Make
slits to allow steam to escape.
Use for short–term cooking/warming only. Do not leave oven unattended
while cooking.
Use to cover food for reheating and absorbing fat. Use with supervision
for a short-term cooking only.
Use as a cover to prevent splattering or a wrap for steaming.
Microwave-safe only. Follow the manufacturer’s instructions. Should be
labeled "Microwave Safe". Some plastic containers soften, as the food
inside gets hot. "Boiling bags" and tightly closed plastic bags should be
slit, pierced or vented as directed by package.
Microwave-safe only. Use to cover food during cooking to retain
moisture. Do not allow plastic wrap to touch food.
Thermometers Microwave-safe only (meat and candy thermometers).
Wax paper Use as a cover to prevent splattering and retain moisture.
Browning dish
Glass jars
Glassware
Oven cooking
bags
Paper plates
and cups
Paper towels
Parchment
paper
Plastic
Plastic wrap
Dinnerware
GB
Materials to be avoided in microwave oven
Utensils Remarks
Aluminum tray
Food carton with
metal handle
Metal or metal-
trimmed utensils
Metal twist ties
Paper bags
Plastic foam
Wood
Metal shields the food from microwave energy. Metal trim may
cause arcing.
May cause a fire in the oven.
Plastic foam may melt or contaminate the liquid inside when exposed
to high temperature.
Wood will dry out when used in the microwave oven and may split
or crack.
May cause arcing. Transfer food into microwave-safe dish.
May cause arcing and could cause a fire in the oven.
10
A) Control panel
B) Turntable shaft
C) Turntable ring assembly
D) Glass tray
E) Observation window
F) Door assembly
G) Safety interlock system
F
G
A
CB
E
D
SETTING UP YOUR OVEN
Names of Oven Parts and Accessories
Remove the oven and all materials from the carton and oven cavity.
Your oven comes with the following accessories:
Glass tray 1
Turntable ring assembly 1
Instruction Manual 1
Grill Rack ( Only for Grill series )
Warning: Do not use grill
rack in microwave mode!
Always take it out when
using the microwave!
GB
Shut off oven power if the door is opened during operation.
Hub (underside)
Glass tray
Turntable ring assembly
a. Never place the
glass tray
upside down. The glass
tray should never be restricted.
b. Both
glass tray
and
turntable ring assembly
must
always be used during cooking.
c. All food and containers of food are always placed
on the
glass tray
for cooking.
d. If
glass tray
or
turntable ring assembly
cracks or
breaks, contact your nearest authorized service
center.
Turntable Installation
Turntable shaft
11
Remove all packing material and accessories.
Examine the oven for any damage such as
dents or broken door. Do not install if oven is
damaged.
Countertop Installation
Cabinet: Remove any protective film found
on the microwave oven cabinet surface.
Do not remove the light brown Mica cover
that is attached to the oven cavity to
protect the magnetron.
GB
Installation
1.Select a level surface that
provideenough open space
for the intakeand/or outlet
vents.
(1) The minimum installation
height is 85cm.
(2) The rear surface of
appliance shall be placed
against a wall.
Leave a minimum clearance
of 30cm above the oven, a
minimum clearance of 20cm
is required between the oven
and any adjacent walls.
(3) Do not remove the legs
from the bottom of the oven.
(4) Blocking the intake and/
or outlet openings can
damage the oven.
(5) Place the oven as far
away from radios and TV
as possible. Operation of
microwave oven may
cause interference to your
radio or TV reception.
2. Plug your oven into a
standard household outlet.
Be sure the voltage and
the frequency is the same
as the voltage and the
frequency on the rating
label.
WARNING: Do not install
oven over arange cooktop
or other heat-producing
appliance. If installed near
or over a heatsource, the
oven could be damaged
andthe warranty would be
void.
The accessible
surfacemay be
hot duringoperation.
20cm
30cm
20cm
min85cm
0cm
12
2. Microwave Cooking
Press " "once, "P100" displays. Then turn " "to select the function
you want.
Turn
" " to adjust the cooking time.
Press "
" to start cooking.
Example: If you want to use 80% power to cook for 20 minutes, you can
operate the oven as the following steps.
1.Clock Setting
4) Turn " " to adjust the minute figures, the input time should be within
0--59.
1) Press " " once, the LED will display "P100",
" " indicator will be lighted.
This microwave oven uses modern electronic control to adjust cooking parameters
to meet your needs better for cooking.
When the microwave oven is electrified,the oven will display "0:00", buzzer will ring
once.
2) Turn " " to adjust the hour figures, the input time should be within
0--23.
3) Press " ", the minute figures will flash.
5) Press " " to finish clock setting. ":" will flash.
Note: 1) If the clock is not set, it would not function when powered.
2) During the process of clock setting, if you press " " or no operation
in one minute, the oven will exit the setting.
2) Turn "
" to choose 80% power, the
LED will display "P80".
3) Turn " " to adjust the cooking time until the oven display"20:00"
(The maximum cooking time is 95 minutes.)
4) Press " " to start cooking, ":" will light and the
" " indicator will flash (Buzzer will sound five times after finishing).
1) Press " , the hour figures will flah.
OPERATION INSTRUCTION
NOTE: the step quantities for the adjustment time of the coding switch are as follow:
0---1 min : 5 seconds
1---5 min : 10 seconds
5---10 min : 30 seconds
10---30 min : 1 minute
30---95 min : 5 minutes
Microwave Power Chart
Microwave Power
80% 50% 30% 10%100%
GB
"
13
Press " " to confirm the [power.
Press " " to confirm power.
3. Grill Cooking
4. Combination Cooking
55%
45%
36%
64%
Note: Combination instructions
3) Press the " " key to start cooking. The" " will flash, ":" will be lighted.
1) Press the " " key
function is selected.
2) Turn " " to adjust the cooking time. The maximum cooking time is 95 minutes.
1) Press the " " key
(The maximum cooking time is 95 minutes.)
" key to start cooking. The cooking indicators will
flash and ":" will light.
Instructions
Microwave Power
Grill Power
LED Display
1
2
GB
14
twice , "G " displays and grill
Press " " to confirm power.
twice, " G " displays.
2) Turn " " to select "C-1" or "C-2". Press " " to confirm the power.
3) Turn " " to adjust the cooking time.
4) Press "
5. Speedy Cooking
" key to start cooking
with full microwave power for 30 seconds. The cooking time will add 30 seconds by
every press on " " key,and the maximum setting time is 95 minutes.
Note: Time can be increased by press " " button except weight defrost and
The default power level is P30. It is not adjustable.
1) Press " " key once, the LED will display "dEF1".
2) Turn " " to select the cooking time. At the same time, " " and
" " will be lighted. The time setting is from 00:05 to 95:00.
3) Press " " key to start defrosting.
" " and " " indicators will flash .
6. Defrost By Time
"
" key to cook with 100% microwave power.
This program can be set as the first one of multi-stage.
1).When the oven is in the waiting states, press "
2).In waiting state, turn " " left to choose cooking time directly then press
auto menu program.
9.Multi-Stage Cooking
Two stages of cooking can be maximumly set. If one stages is defrosting, it will be put in
the first stage automatically. The buzzer will ring once after each stage and the next stage will
begin.
Note: Auto menu cannot be set as one of the multi-stage.
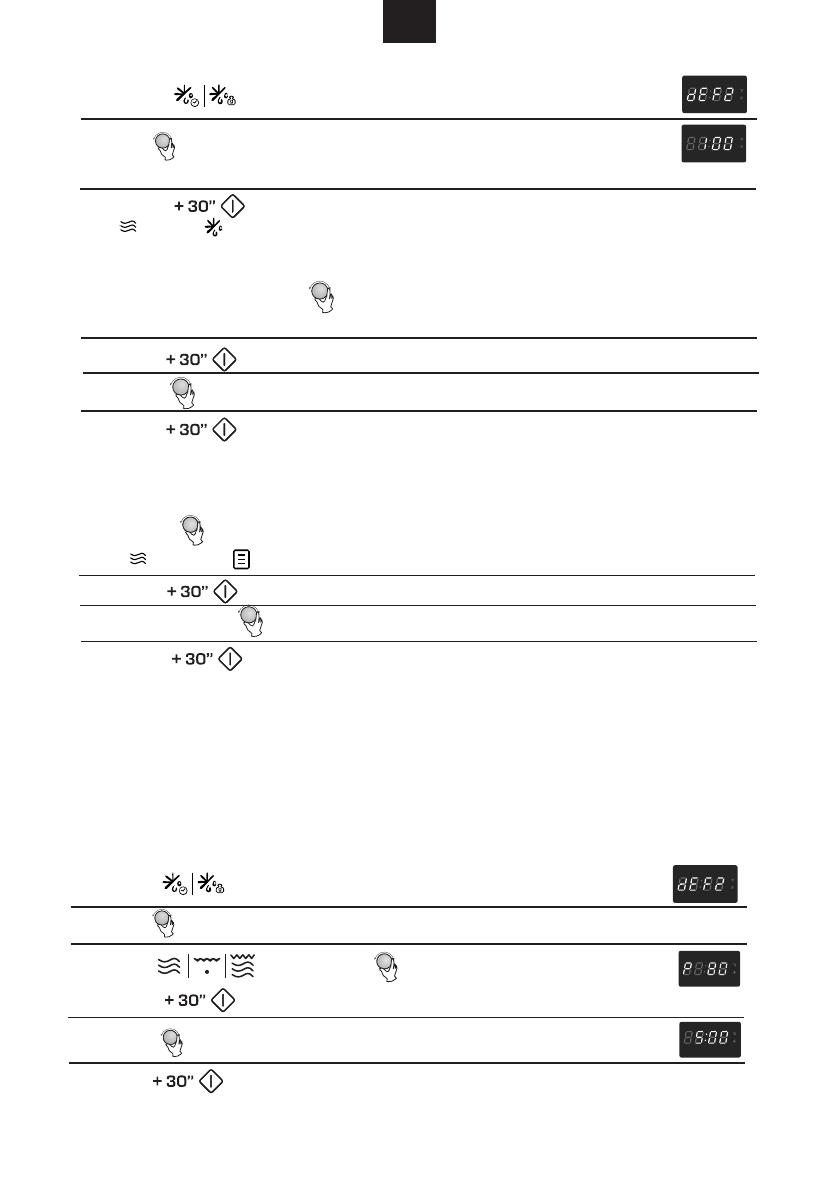
Example: if you want to defrost the food of 500g + 80% microwave power for 5 minutes.
The steps are as following:
1) Press " "twice, "dEF2" displays;
2) Turn " " to adjust the weight of the food. Stop turning when "500" displays;
3) Press" " once, turn " "o choose 80% microwave power;
4) Turn " " to adjust the cooking time of 5 minutes;
5) Press " " to start cooking.
states.
Note: When the first stage finish, buzzer sounds once then the second stage
begins.
When all of them finish, buzzer sounds five times and the unit turn
back to the waiting
GB
15
Press " " to confirm the power;
Weight
1) Press " " pad twice,the LED will display "dEF2".
3) Press " " key to start defrosting.
" " and " " indicators will flash and "g" indicator will go out.
2) Turn " " to select the weight of food.At the same time, "g" will light.
The weight should be 100-2000g.
7. Defrost by
8. Auto Menu
1). In waiting states,
turn " " right to choose the menu you need.
"A-01","A-02"...."A-10" will display in order.
3) Press " " to start cooking.
When cooking finish, buzzer will sound five times. If the clock has been set before,
the current time will be displayed, otherwise, 0:00 will be displayed.
2). Turn " " to select the menu from b-1 to b-4.
For example: to cook the pasta.
1) Turn " " right until "A-07" displays and pasta menu is selected.
" " and " " indicator will light.
3) Press " " to start cooking.
When cooking finish, buzzer will sound five times. Then turn back to waiting states.
" to confirm the selected main menu.
2) Press "
" to confirm the selected main menu.
2) Press "
3). Stop turning " " when "b-4" displays.
10. Pre-set Function
1) Set the clock first. (Consult the instruction of clock setting.)
2) Input the cooking program. Two stages can be set at most. Defrosting
should not be set here.
Note: 1) Clock must be set first. Otherwise,pre-set function will not work.
2) If the pre-set program has been set without the cooking program,
the whole setting will be used as an alarm clock. That means when
pre-set time arrives, buzzer will sound five times only.
5) Press " minute figures will flash.
6) Turn " " to adjust the minute figures, the input time should
be within 0--59.
4) Turn " " to adjust the hour figures, the input time should be within
0--23.
3) Press " ". The current clock is displayed. The hour figure flash;
7) Press " " to finish setting. ":" will light, buzzer will
ring twice when the time arrives, then cooking will start automatically.
GB
", the
16
13. Inquiring Function
(1) In cooking state, press " ", the current microwave power
will be displayed for 3 seconds.
(2) In pre-set state, press " " to inquire the time for delay start cooking.
The pre-set time will flash for 3 seconds, then the oven will turn back to the clock display.
(3) During cooking state, press " " to check the current time. It will be displayed
for 3 seconds.
11. ECO Function
In waiting state, Press " " once or if no operation in 1 minute, the screen
will be off. At this time, press any button to turn the screen on.
Note: 1). The oven cannot enter ECO mode if the door is open.
2). Press any button or open the door to turn the screen on under ECO mode.
3). If enter ECO mode under child lock state, recover to still child lock state.
Silent Mode
In waiting states, press “ ”, and then press “ ” simotanoesly in 3 seconds
to enter silent mode. All the buttons and buzzers will stop ringing under silent mode.
To active the sound: in waiting state, press “ ”, and then press “
simotanoesly in 3 seconds to exit the silent mode.
12.
GB
17
15. Protection of Fan
When the microwave or combination cooking works over 5 minutes, it stops working
at the last 15 seconds, only fan runs.
16. Protection Function of Magnetron Control Pipe
When the unit runs for 30 minutes with high power level, it will adjust to 80% microwave power
to protect the magnetron control pipe.
This function works under multi-stage and other states.
17. Specification
(1) The buzzer will sound once when turning the knob at the beginning;
(2) " " must be pressed to continue cooking if the door is opened during cooking;
(3) Once the cooking programme has been set , " " is not pressed
in 1 minute. The current time will be displayed. The setting will be cancelled.
(4) The buzzer sounds once by efficient press, inefficient press will be no responce.
14. Lock-out Function for Children
Lock: In waiting state, press " " for 3 seconds, there will be a long "beep" denoting
entering into the children-lock state and LED will display " " and "
" will light.
Lock quitting: In locked state, press " " for 3 seconds, there will be a long "beep"
denoting that the lock is released, and LED will turn back to the clock stae, " " will go out.
Auto menu Chart
Display
Menu
Weight(g)
A-01
A-02
A-03
A-04
A-05
A-06
A-07
200
350
350
400
400
400
200-400
1 cup
200
450
250
50(add water 500ml)
GB
b-1 Pizza reheat
b-2 Bread reheat
b-3 Savoury pie
b-4 Dough
200
400
500
POTATOES
b-1 Steam
b-2 Baked
b-3 Gratin
b-4 French fries
400
200
MEAT
b-1 Chicken
b-2 Turkey
b-3 Pork
b-4 Red meat
800
800
450
800
FISH
b-1 Mussels
b-2 SalmonFish
b-3 Tuna Filet
b-4
Sea
bass
VEGETABLES
b-1 Broccoli
b-2 Spinach
b-3 Carrots
b-4 Fennel
HOT BEVERAGE
b-1 Milk(1 cup/240ml)
b-2 Coffee(1 cup/120ml)
b-3 Tea
b-4 Hot chocolate
PASTA-RICE
b-1 Pasta parcels
b-2 Rice
b-3 Soup
(reheat vegetable soup)
b-4 Pasta
Power
P100
P100
P80+P0+P80
P30
P100
P100
P100
P100
P100
200
350
P80
P80
P80
P80
P100
P100
P100
P80+P0
1 cup
1 cup
P100
P100
P100
P70
P80
P100+P50
P100
1 cup
P80
18
500
C-1
500
C-1
C-1
BAKERY
Auto menu Chart
GB
19
Display
Menu
Weight(g)
A-08
b-1 Biscuits
b-2 Cake
b-3 Jam
b-4 Muffins
200
400
Power
P80+P0+P80
1 cup
P80
400
P100+P0
P100
PATISSERIE
A-10
b-1 Dried food
b-2 Homemade yogurt
b-3 Wholemeal pasta
b-4 Legumes
HEALTHY
100
1 liter
P80+P0
150(add water 500l)
500
P100
P100
P30
A-09
b-2 Broth
b-3 Sterilization
b-4 Baby milk
200
1 bottom
BABY
150
100 ml
P80+P0
P100+P0
P100
P30
b-1 Pureed Baby Food
1 / 1

Candy CMXG20DR User manual

Category
Microwaves
Type
User manual
This manual is also suitable for

Ask a question and I''ll find the answer in the document

Finding information in a document is now easier with AI

Ask the document