Page is loading ...

Redesigned from the inside out
This re-designed Cat Enclosure has the netting being pulled from the inside, out
towards the sturdy steel frame. This design ensures the net can be tensioned as
taught as possible, a feature that provides the safest environment for your cat.
This is a crucial safety feature that can’t be replicated by simple “slip-over” net
designs.
Being a unique design, following the instructions will absolutely help you
to assemble the enclosure without hassle. Not following the instructions
step-by-step will cause undue time and possible damage to your new
enclosure.
Note: If possible, the enclosure is built much easier with the help of 1 assistant.
Contents:
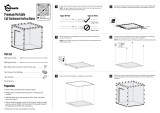
Prior to construction please ensure you have received all the required components. Your 2 parcels should contain:
• Steel Frame (20pcs with pin lock and 20 without)
• 8 x 3-way Connectors AND 4 x 4-Way Connectors
• 1 x Enclosure Net
• 1 x Hammock and Shade Sail
• 1 Quick Release Carabiner
Required Tools: Scissors
Step 1: Connect Poles Together
Lay the poles on the floor and group them into their two types.
Type 1: Pinlock at BOTH ends
Type 2: Pinlock at 1 end and pinlock HOLE at the other end
Connect all Type 1 poles into a Type 2 pole. DO NOT connect them into connectors at this stage.
IMPORTANT: The Ends of each TYPE 1 Pole are slightly dierent. One end (Long end) is designed for inser-
tion into a type 2 Pole, whilst the other end (short end) is designed for insertion into a corner connector.
Cat Portable
Assembly Instructions
VERY IMPORTANT:
Please be sure to read carefully
and follow the instructions
purrr-fectly!
We highly recommend you
view our step-by-step Instruc-
tional Video on our website.
Simply scan the QR code:
- OR -
Head to our website:
www.catnets.com.au/cat-portable-instruction-vid

Step 2: Prepare Netting Base Openings
To ensure the frame assembly is quick and easy, a minor adjustment to the PVC base is required. Lay your net out
in an open space, and identify the corner openings of the PVC base. Firstly move the large PVC Flap out of the
way into the centre of the enclosure. Using a sharp pair of scissors, simply cut approximately 2cm off the PVC
opening on an angle up to the corner junction. Don’t cut too high as to interfere with the rope or enclosure
stitching. Cut through BOTH layers and repeat the process on both sides. Please see the below photo or contact
us for a video of the process.
Step 3: Feed Poles through Webbing & Connect
Slide 1 of your connected poles through the centre of the PVC base opening on each of the 4 sides of the enclo-
sure webbing. It is best to have your PIN LOCK facing towards the centre of your enclosure. Once all 4 poles are
inserted you can commence connecting them to the corner connectors.
IMPORTANT: For the enclosure assembly to work, the connectors must be orientated correctly.
THE RUBBER CAPS ON THE BOTTOM CONNECTORS MUST BE FACING THE GROUND. FAILURE TO FOLLOW
THIS STEP WILL ENSURE THE ENCLOSURE FRAME WILL NOT CONNECT.
Step 4: Create the Frame
The remaining poles can now be installed to create the cube shaped structure. As per the above step, the
connectors must be orientated correctly.
THE RUBBER CAPS ON THE TOP CONNECTORS MUST BE FACING THE SKY. FAILURE TO FOLLOW THIS STEP
WILL ENSURE THE ENCLOSURE FRAME WILL NOT CONNECT.
At this stage, the majority of the netting should just be laying loosely on the ground in the centre of the enclo-
sure.
Cut along the line

Step 5: Attach the netting
The netting now needs to be pulled upwards to be attached to the completed frame. Identify the WHITE Velcro
attachments, as these indicate the top corners of the netting. Pull the white velcros up to each corner and attach
loosely for now.
You should now be able to see the net forming shape, and it is a simple manner of working your way around the
enclosure and pulling the Velcro attachments tight. Once you have pulled all velcros tight, you will want to
retighten the white corner velcros and any other velcros to ensure the netting is pulled outwards towards the
frame as tight as possible. There are 6 PVC flaps in each bottom corner. Pull them underneath the frame and to
the outside of the enclosure. Attach them to the frame using the bottom Velcro on the vertical pole. This safely
secures the corners. (see video for a demonstration). You should now have a completed frame and tight netting.
RECOMMENDATIONS:
For extra stability you can use TENT PEGS (not supplied) and/or ROPE (not supplied) to secure the frame to the ground. In
most situations this is not required, however we recommend monitoring the frame during high wind periods, and secure
accordingly. Tie rope from the top corners gives the best results in extremely high wind areas.
NOTICE: Upon completion of your new cat enclosure, customers are advised to closely monitor the initial behaviour of your
cat(s) when inside the enclosure. By use of this enclosure, you are acknowledging having read and accepted our conditions
of trade, a copy of which can be viewed at:
http://www.catnets.com.au/conditions.pdf
IMPORTANT CAUTION: DO NOT OVER-CLOSE ZIP BUCKLES AT L-JUNCTION
When approaching the corner where the 2 Zippers meet, each slider will stop approximately 2cm from the end of the chain.
This distance apart will be sufficient enough to fit the Locking Carabiner around the two sliders.
Pulling the slider with excessive force where they meet at the L-Junction can cause permanent damage to your zip. The
damage to the zip will result in the slider sliding off the end of the zip (which can not be put back on).

Cat Shade Sail Installation Instructions
This shade sail comes separate and requires attachment to your netting
enclosure. There are no permanent attachments for the shade sail so you
can move its position as required and you can add more if necessary.
The shade sail can be placed on top of the enclosure covering the whole
roof or it can be set covering half the roof and half the side.
It is attached using the velcro tabs that are already attached to the shade
sail. Use of this shade sail will increase the “wind catch” of the enclosure.
Please monitor your enclosure carefully during high winds, and adjust
the positioning of your shade sail to minimise the wind catch.
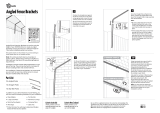
Cat Hammock Installation
Instructions
This Hammock comes separate and requires attachment to your netting
enclosure. Please READ THE FOLLOWING INSTRUCTIONS CAREFULLY
BEFORE STARTING.
There are no permanent attachments for the Hammockso you can move
its position as required and you can add more if necessary.
Step1: Lay the hammock on the floor inside the enclosure to identify the
orientation required.
Note the 3 attachment points:
1: the right angled corner (eyelet only)
2: Corner eyelet only
3: Corner Velcro pre-attached
Step 2: The corner eyelet (pictured) is attached to the frame using the
existing Velcro that is attaching the netting to the frame. Select the
preferred height based on any of the existing Velcro connections.
Each Velcro connection of the netting has 2 tabs. From the outside of the
enclosure undo both tabs of the Velcro. Feed one of the tabs back into
the enclosure, pass it through the corner eyelet and pass back out of the
enclosure and reattach to the frame. (As the velcro passes in and out of
the enclosure keep it immediately adjacent to the corner of the enclo-
sure.) Once it is reattached to the frame: use the other tab of Velcro to
lock the hammock Velcro in position tightly.
Step 3: Redo the above step for the #2 attachment point (the end corner that doesn’t have a pre-attached Velcro)
Step 4: The remaining corner (#3) of the hammock should have a long pre-attached Velcro tab. Pass this Velcro out of the
enclosure and attach as tight as possible to the frame, adjacent to the existing netting Velcro tabs.
Undo both tabs of the netting Velcro and retighten them on top of the hammock Velcro to lock the hammock Velcro into
position.
www.facebook.com/Catnets
Visit our website: www.catnets.com.au
Share your photos with the community at:
/