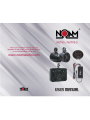
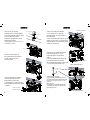
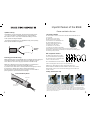
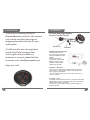
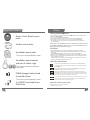
NOAM NUTV5-S is a complete marine audio system that combines speakers, an amplifier, and a controller for a fully functional audio setup. It's waterproof and designed for outdoor use, making it ideal for boats, ATVs, UTVs, and other marine vehicles. The system includes a pair of 5.25-inch marine speakers with passive radiators for enhanced bass, an 8-inch marine subwoofer, a 4-channel marine amplifier with variable crossovers, and a waterproof Bluetooth controller for wireless music streaming and control.
NOAM NUTV5-S is a complete marine audio system that combines speakers, an amplifier, and a controller for a fully functional audio setup. It's waterproof and designed for outdoor use, making it ideal for boats, ATVs, UTVs, and other marine vehicles. The system includes a pair of 5.25-inch marine speakers with passive radiators for enhanced bass, an 8-inch marine subwoofer, a 4-channel marine amplifier with variable crossovers, and a waterproof Bluetooth controller for wireless music streaming and control.


-
 1
1
-
 2
2
-
 3
3
-
 4
4
-
 5
5
-
 6
6
-
 7
7
-
 8
8
-
 9
9
-
 10
10
-
 11
11
-
 12
12
-
 13
13
-
 14
14
-
 15
15
-
 16
16
-
 17
17
-
 18
18


NOAM NUTV5-S User manual
- Type
- User manual
- This manual is also suitable for
NOAM NUTV5-S is a complete marine audio system that combines speakers, an amplifier, and a controller for a fully functional audio setup. It's waterproof and designed for outdoor use, making it ideal for boats, ATVs, UTVs, and other marine vehicles. The system includes a pair of 5.25-inch marine speakers with passive radiators for enhanced bass, an 8-inch marine subwoofer, a 4-channel marine amplifier with variable crossovers, and a waterproof Bluetooth controller for wireless music streaming and control.
Ask a question and I''ll find the answer in the document
Finding information in a document is now easier with AI
Related papers


Other documents
-
Wet Sounds WW-BT-VC User manual
-
 Friengood Solar Bluetooth Speaker 12W,IPX6 Waterproof Portable Wireless Speaker User guide
-
InCarTec 23-005 User manual
-
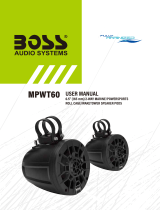 Boss Audio MPWT60 User manual
-
Zhenjiang Electronics B6-1 User manual
-
Boss Audio System MPWT60W User manual
-
 Attero Tech BoomBox NA4 User manual
-
Boss MPWT60RGBW 6.5-Inch 2 Way Marine PowerSports Roll Cage Speaker User manual
-
MB QUART Installation Installation guide
-
Boss B6ABY User manual


