
1

Table of contents
1 INTRODUCTION.............................................................................................................................4
2 MAIN FEATURES............................................................................................................................4
3 THE REMOTE CONTROL...............................................................................................................5
4 FRONT AND REAR PANEL.............................................................................................................7
4.1 FRONT PANEL .......................................................................................................................... 7
5 FIRST INSTALL...............................................................................................................................8
6 BASIC USE....................................................................................................................................10
6.1 TV CHANNEL AND PROGRAMME INFORMATION............................................................... 10
6.2 DETAILED INFORMATION ABOUT THE CURRENT PROGRAMME.................................... 10
6.3 TV CHANNEL AND PROGRAMME LIST................................................................................12
6.4 TV CHANNEL LIST..................................................................................................................12
6.5 ELECTRONIC PROGRAMME GUIDE (EPG).......................................................................... 13
7 MENU INFORMATION..................................................................................................................14
7.1 MENU....................................................................................................................................... 14
7.2 FAVOURITES........................................................................................................................... 16
7.3 HDTV SETTING....................................................................................................................... 17
7.3.1 RESOLUTION...................................................................................................................18
7.3.2 TV SCREEN FORMAT ..................................................................................................... 18
7.3.3 DISPLAY FORMAT........................................................................................................... 19
7.4 PARENTAL CONTROL............................................................................................................ 19
8 INSTALLATION.............................................................................................................................22
8.1 INSTALLATION OF THE DIGITAL TV ANTENNA................................................................... 22
8.2 BASIC INSTALLATION............................................................................................................22
8.3 MANUAL SEARCH ..................................................................................................................23
8.4 AUTO SEARCH .......................................................................................................................23
8.5 ANTENNA POSITION.............................................................................................................. 24
8.6 CHANNELS SETTINGS........................................................................................................... 24
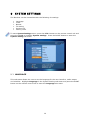
9 SYSTEM SETTINGS.....................................................................................................................26
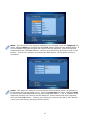
9.1 LANGUAGE..............................................................................................................................26
9.2 TIMER ......................................................................................................................................29
9.3 BANNER...................................................................................................................................31
9.4 TV SETTING ............................................................................................................................ 32
9.5 PRODUCT INFORMATION ..................................................................................................... 34
9.6 FACTORY RESET ................................................................................................................... 34
10 SOFTWARE/FIRMWARE UPGRADE...........................................................................................35
10.1 USB INTERFACE SOFTWARE UPGRADE.......................................................................... 35
10.2 OVER THE AIR SOFTWARE UPGRADE.............................................................................. 36
11 SPECIFICATION ...........................................................................................................................37
2

3

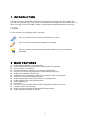
1 INTRODUCTION
This owner’s manual is intended to describe the procedures for operating the TEAC DMB-T HD
DIGITAL Terrestrial Receiver. This product is a high performance Digital TV Terrestrial Receiver. It
offers users with all free-to-air DMB-T Digital TV programmes being broadcasted in Hong Kong.
Icons
In this manual, the following icons are used :
This icon means that a remote control button is used.
This icon means that special attention is required.
This icon means that the user should pay attention to the procedures
described.
2 MAIN FEATURES
Support MPEG-2/MPEG-4 Part 10 (H.264)
Fully compliant with Hong Kong DMB-T digital terrestrial TV standard
Easy to operate user interface
Automatic detection of changes in TV channels configurations
Easy to use channels and programmes management user interface
English and Traditional Chinese OSD
Support Electronic Programme Guide (EPG), Teletext or other TV information
Favourite TV channels management system
Display of information on the current and next TV programmes
Support different video and output interfaces
USB compliant port
RS-232 Port
e-SATA Port (for connection with our other designated products in the future)
Parental control and censorship
HDMI connection for output of High Definition Digital Images
Support upgrade through Over The Air
4

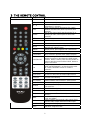
3 THE REMOTE CONTROL
Photograph Key Function
MUTE Disable Audio output
STANDBY Switch to stand-by
0…..9
0-9 numeral buttons, for input of numbers or for
selecting a TV channel
LIST
Open current channel programme list / switch
between favorites lists / wake up receiver from
stand-by
SWAP
Recall last channel while watching digital TV or
listening to radio / wake up the receiver from
stand-by
RED Function key
GREEN Function key
YELLOW Function key
BLUE
Display Signal strength and Signal quality after
pressing the <INFO> button
MENU Display menu, press again to exit current menu
EXIT Back to previous menu without saving
UP/DOWN Move selection up/down within menus and lists
LEFT/RIGHT
While watching a channel, the LEFT/RIGHT
buttons increases or decreases the audio output
volume. Within a menu, press the LEFT button to
return to previous menu and the RIGHT button to
enter a sub-menu.
OK
Call up a programme list for the current channel
while watching digital/TV or listening to the radio.
In a menu, this button serves to confirm a
selection.
PGUP/PGDW Page up/down in lists
VOL+/VOL- Increase or decrease the audio output volume
CH+/CH-
Select next/previous channel / wake up the
receiver from stand-by
V FORMAT Switch between PAL and NTSC video formats
A. Ratio Set video output aspect ratio to 4:3 or 16:9
SCALE
Switch between display modes Letter Box, Pans
can and FULL
TELETEXT TELETEXT function key
SUBTITLE Switch between different subtitles
TV/RADIO
Switch between TV and RADIO (a reserved
feature)
RES.
Switch video output resolutions between 576P,
720P and 1080I
Audio
Switch between Left channel audio output, Right
channel audio output and Stereo audio output
LANGUAGE Change audio language output
EPG Electronic Program Guide
5

6

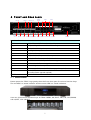
4 FRONT AND REAR PANEL
RS-232
USB
COAX
VIDEO 1
POWER
LOOP
OUT
ANT IN
YPbPr
Optical
SPDIF
ETHERNET
HDM
I
L-AUDIO 2-R
S-Video
VIDEO 2
L-AUDIO 1-R
E-SATA
Rear Panel
ANT IN Digital Terrestrial TV Broadcast signal input
Loop OUT Output of Digital Terrestrial TV Broadcast signal
Video 1 & Video 2 Composite video signal output
Audio Analog Audio output
Optical Digital audio output
YPbPr High Definition Component video output
HDMI Digital HDTV video output with HDCP. HDMI version 1.1
RS-232 RS-232 communication port for firmware upgrade
USB USB1.1 Port for firmware upgrade
Coaxial Coaxial Digital audio output
Ethernet Ethernet port for Interactive TV (future upgrade required)
e-SATA Extend SATA interface for connection with external hard disk for video
recording (future upgrade required)
POWER IEC Power Connector ~AC100-240V
4.1 FRONT PANEL
Please press the “TEAC” logo gently then the front door open for various function keys.
The red LED is a power indicator and the green LED is a signal indication.
User can access those function keys as follow: MENU, OK, EXIT, CH+/UP, CH-/DOWN,
VOL+/LEFT ,VOL-/RIGHT
7

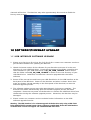
5 FIRST INSTALL
Note: A Digital TV Antenna is supplied with the TEAC DMB-T HD DIGITAL Terrestrial
Receiver. The Antenna should be used where the user is within an area with Digital Terrestrial TV
coverage but the premises in which the user intends to use the Receiver has not yet been upgraded
with Digital Terrestrial TV receiving capability. (Please refer to “Installation” for details.) If you do not
know whether the building concerned has been upgraded with Digital Terrestrial TV receiving
capability, you may make relevant enquiries with your building management.
Please connect the Receiver to your television set (HDMI cable recommended) and that
the antenna is connected to the “ANT IN” input connector on the Receiver. Connect one
end of the IEC Power Cable to the Receiver and the other end to power supply. Switch
on your TV set and the Receiver.
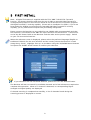
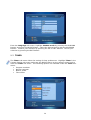
When the welcome screen is displayed, please select the preferred language (English or
traditional Chinese) for the user interface and the country where the Receiver is used
(Hong Kong, China). Highlight “Set-up” on the Menu using the ‘UP/DOWN Arrow’ buttons
and press the “RIGHT Arrow” button to confirm your selection.
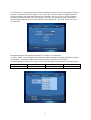
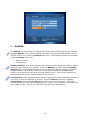
If you decide to use the Flat Panel Antenna, please turn ‘On’ the Antenna Power.
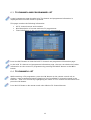
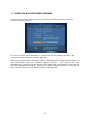
The Receiver will start to search for available channels and a few minutes are required to
complete this operation. When a TV channel is detected, its corresponding Signal
strength and Signal quality are displayed.
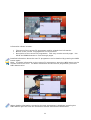
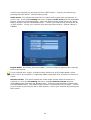
If channel scanning is completed successfully, a list of channels found during the
scanning process is displayed on screen.
8

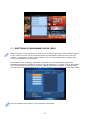
If no channel is found during the channel scanning process, the user may adjust antenna
position to obtain optimal TV signal. To do this, the user can select an appropriate RF
Channel used by the broadcast station (for example, UHF 22, 35 or 37 for Hong Kong)
using the manual channel scanning interface, and the corresponding signal Strength,
signal quality and the name of the channel will be displayed. The user may re-scan for
TV channels.
Hong Kong Digital Terrestrial Broadcast TV Stations and Channels
(In early 2008, only one digital TV broadcast station located in Temple Hill District will be
in operation. For other digital TV broadcast stations, please refer to future
announcements issued by The Office of the Telecommunication Authority of Hong Kong.)
Broadcast Station Channel 22 Channel 35 Channel 37
Temple Hill Yes Yes Yes
9

6 BASIC USE
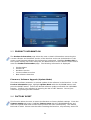
6.1 TV CHANNEL AND PROGRAMME INFORMATION
A semi-transparent information banner is displayed at the bottom of the screen when:
• the TV channel is changed (displayed for 5 seconds)
• the INFO button is pressed
Information presented in the banner includes:
• Channel name and channel number
• you may press the BLUE button on the remote control unit to check the signal
strength and signal quality of the current TV channel
• Information on the current and the next TV programmes
• Time elapsed and time remaining (indicated by bar-graph) for the current TV
programme and the scheduled time for the next TV programme
If the information banner is displayed permanently, press the EXIT button on the remote to hide it.
6.2 DETAILED INFORMATION ABOUT THE CURRENT PROGRAMME
To get detailed programme information, press the INFO button when the information
banner is shown.
10

Information shown includes:
• The name of the current TV programme and its related time information
• Nature of the current TV programme and its duration
• Description of the current TV programme. This may contain several pages. Use
PGUP and PGDW buttons to scroll through pages.
Detailed information about the next TV programme can be obtained by pressing the INFO
button again.
Note: To obtain information on the current TV programme, press the INFO button on the
remote control unit once. To obtain information on the next TV programme, press the
INFO button twice.
When detailed information concerning the next programme is displayed, pressing the
INFO button again will hide the information banner and detailed information.
11

6.3 TV CHANNEL AND PROGRAMME LIST
A semi-transparent page showing brief TV channel and programme information is
displayed when the LIST button is pressed.
This page contains the following information:
• All TV channel names and numbers
• Brief description of current and next TV programmes
• Time information on the current and next TV programmes
Press the EXIT button to hide the brief TV channel and programme information page.
In the brief TV channel and programme information page, the user can obtain the further
information on the current TV programme by pressing the RIGHT button or the INFO
button.
6.4 TV CHANNEL LIST
While watching a TV programme, press the OK button on the remote control unit to
display a semi-transparent banner showing a list of available TV channels stored in the
Receiver. View a TV channel by highlighting the name of a TV channel on the banner and
press the OK button.
Press the EXIT button on the remote control unit to hide the TV Channel banner.
12

6.5 ELECTRONIC PROGRAMME GUIDE (EPG)
While watching a TV programme or listening to a radio programme, press the EPG button
on the remote control unit to open the Electronic Programme Guide for the current TV
channel. Information on the current and next TV or radio programmes including their
names and schedule are displayed.
Press INFO button to display extended information for the highlighted programme.
Extended information includes the name of the programme, its nature, a brief description
of the programme, and its time schedule. Where information consists of several pages,
you can press the PGUP/PGDW buttons on the remote control unit to scroll through pages.
Press the INFO button again to quit extended information.
13

In the EPG menu, press the UP/DOWN buttons to highlight the next or previous TV
channels for the corresponding programme information. Press the LEFT/RIGHT buttons
to view the previous or next day programme information. The EPG information will be
updated automatically.
7 MENU INFORMATION
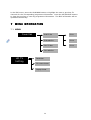
7.1 MENU
Favorites
FAV1 Edit TV list
Edit radio list
FAV 2
Fav TV lists
FAV 3
Fav radio list
Resolution
HD TV
Setting
TV screen format
Display format
14

Parental
Control
PIN Code
Parental control
Parental rating
Lock TV channels
Lock radio
Installation
Manual search
Auto search
Antenna position
Channel setting
Language
Timer
Banner
TV setting
Product info
Factory reset
System
Press the MENU button on the remote control unit TO enter the Main Menu screen. The
following information is displayed:
• Favourites
• HDTV Settings
• Parental control
• Installation
• System Setting
15

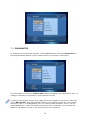
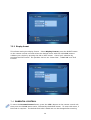
7.2 FAVOURITES
To manage lists of favourite channels, use the MENU button and select Favourites by
pressing the RIGHT button on the remote control unit to enter its sub-menu.
The first option on the menu, Edit TV lists, allows managing your Favourite TV lists, i.e.
adding or removing TV channels in your Favourite TV lists.
To edit your Favourites TV lists, first select the list to manage. In the menu, select the
choice Edit TV lists, then press RIGHT button on the remote control unit. The current
list name, “FAV 1”, is highlighted in red. To select another Favourite TV list, use the
UP/DOWN buttons. Once the desired Favourite TV list is selected, you can press the
RIGHT or OK button to enter in the sub-menu for the chosen list.
16

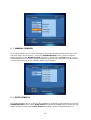
Channels sub-menu allows adding and removing channels in a particular Favourite TV
list: press RIGHT button to edit the list. Use UP/DOWN buttons and PGUP/PGDW buttons
to select the desired TV channel (its name is highlighted in red), then press “OK”. A small
“heart” icon appears next to the name of the channel. Once completed, you can press
LEFT button to confirm your choice or press EXIT button to cancel.
7.3 HDTV SETTING
To enter the HDTV Setting menu, press the MENU button on the remote control unit, then press the
DOWN button twice, followed by the RIGHT button. HDTV Setting menu allows the user to set
miscellaneous parameters for audio and video outputs. Press the RIGHT button on the
remote control unit to enter the sub-menu. Press the UP/DOWN button to highlight a
selection and press the OK button to confirm selection. To return to previous menu,
press the LEFT button or the EXIT button.
17

7.3.1 Resolution
If a High Definition TV set is connected to the HDMI output of the Set Top Box, the
resolution can be adjusted to match the TV Set capabilities.
Select Resolution, press “right arrow” button and select the desired choice with the “up
arrow” and “down arrow” buttons. The possible choices are:
• 1080I
• 720P
• 576P
• AUTO
The default setting is 576P.
Validate your choice by pressing the OK or LEFT button on the remote control unit.
Cancel the choice by pressing the EXIT button.
7.3.2 TV Screen format
This allows setting the screen aspect ratio. Select TV Screen format, press the RIGHT
button and select the desired choice with the UP/DOWN buttons. Validate your choice by
pressing the OK or LEFT button. Cancel selection by pressing the EXIT button. The
possible choices are:
• 4:3
• 16:9
The factory default setting is 4:3.
18

7.3.3 Display format
This allows setting the display format. Select Display format, press the RIGHT button
on the remote control unit and select the desired choice with the UP/DOWN buttons.
Validate your choice by pressing the OK or LEFT button. Cancel your selection by
pressing the EXIT button. The possible choices are “Letter Box”, “PANSCAN” and “Full
Screen”.
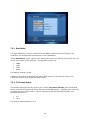
7.4 PARENTAL CONTROL
To enter the Parental Control menu, press the MENU button on the remote control unit,
then press the DOWN button twice, followed by the RIGHT button. To enter this menu, a
PIN-code is required. The default PIN-code is 0000 and can be changed after entering
19

the Parental Control sub-menu. If a new PIN-code is set by the user, please remember
this new PIN-code.
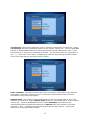
The Receiver has a parental control system with a PIN-code protection. It allows
activation or deactivation of the parental control function, set parental rating (allow
viewing of TV programmes suitable for a certain age), and lock (prevent viewing) TV
channels.
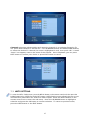
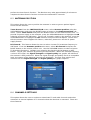
PIN code menu allows changing the PIN code. Select Modify to enter the Pin Code
menu. Enter your new PIN-code next to the “New PIN” and the “Confirm new
Pin” boxes. Select “Accept” to confirm your new PIN-code.
Parental control menu allows activation or deactivation of the parental control
feature using the following parameters:
• Activate parental control, a PIN code is always necessary
20
Page is loading ...
Page is loading ...
Page is loading ...
Page is loading ...
Page is loading ...
Page is loading ...
Page is loading ...
Page is loading ...
Page is loading ...
Page is loading ...
Page is loading ...
Page is loading ...
Page is loading ...
Page is loading ...
Page is loading ...
Page is loading ...
Page is loading ...
Page is loading ...
-
 1
1
-
 2
2
-
 3
3
-
 4
4
-
 5
5
-
 6
6
-
 7
7
-
 8
8
-
 9
9
-
 10
10
-
 11
11
-
 12
12
-
 13
13
-
 14
14
-
 15
15
-
 16
16
-
 17
17
-
 18
18
-
 19
19
-
 20
20
-
 21
21
-
 22
22
-
 23
23
-
 24
24
-
 25
25
-
 26
26
-
 27
27
-
 28
28
-
 29
29
-
 30
30
-
 31
31
-
 32
32
-
 33
33
-
 34
34
-
 35
35
-
 36
36
-
 37
37
-
 38
38


Ask a question and I''ll find the answer in the document
Finding information in a document is now easier with AI
Related papers
Other documents
-
ADB i-Can 1110SV User manual
-
JVC TV Receiver TU-DB1SFR User manual
-
Electrolux ETV45000X User manual
-
-
John Lewis JLBITV21 User manual
-
Hitachi 19LD2550BB Instructions For Use Manual
-
Thomson THT504+ Owner's manual
-
-
Sanyo CE19LD95-B User manual
-