Chevrolet Tahoe 2019 User guide

Category
Mobile phones
Type
User guide

This manual is also suitable for

Chevrolet Tahoe 2019 boasts an array of features to enhance your driving experience. Its power front seats with memory positions offer customizable comfort, while the folding 2nd and 3rd-row seats provide ample cargo space and easy access. The Rear Seat Reminder alerts you to check the rear seats before exiting, ensuring the safety of your passengers. Additionally, the programmable power liftgate with hands-free operation allows for convenient loading and unloading.

Chevrolet Tahoe 2019 boasts an array of features to enhance your driving experience. Its power front seats with memory positions offer customizable comfort, while the folding 2nd and 3rd-row seats provide ample cargo space and easy access. The Rear Seat Reminder alerts you to check the rear seats before exiting, ensuring the safety of your passengers. Additionally, the programmable power liftgate with hands-free operation allows for convenient loading and unloading.

1
2019 TAHOE/SUBURBAN
chevrolet.com
Review this Quick Reference Guide for an overview of some important features in your
Chevrolet Tahoe/Suburban. Some optional equipment described in this guide may not be included in
your vehicle. More information can be found in your Owner’s Manual and at my.chevrolet.com/learn.
For easy reference, keep this guide with your Owner’s Manual in your glove box.
Certain restrictions, precautions, and safety procedures apply to your vehicle.
Please read your Owner’s Manual for complete instructions.
GETTING TO KNOW YOUR
2
Instrument Panel
Illumination
Control/Exterior
Lamp Control
4WD
Control
F
Traction Control and
StabiliTrak/Front and Rear
Park Assist
F
/Lane Keep
Assist
F
/Hill Descent Control
F
/
Adjustable Pedals
F
/Power
Assist Step
F
Buttons
Driver
Information
Center
Turn Signal/
Windshield
Wipers
Lever
Audio Next/
Previous Favorite
Station Controls
(behind steering
wheel)
Integrated
Trailer
Brake
Control
F
Cruise Control/
Collision Alert
F
/
Heated Steering
Wheel
F
Buttons
INSTRUMENT PANEL
Audio Volume
Controls
(behind
steering wheel)
Driver
Information
Center
Controls/Voice
Recognition
Buttons
Tilt/
Telescopic
F
Steering
Wheel
Control
Low Fuel
Traction Control Off
Lane Keep Assist Warning
Vehicle Ahead
Brake System
Cruise Control Set
StabiliTrak Active
StabiliTrak Off
Security
Tow/Haul Mode
Lights On Reminder
Airbag Readiness
SYMBOLS
3
Tow/Haul
Button
Driver’s Heated/
Ventilated Seat
Buttons
F
Climate
Controls
Passenger’s
Heated/Ventilated
Seat Buttons
F
Accessory
Power Outlet/
USB Ports
Engine
Start/Stop
Button
F
Chevrolet
Infotainment System
Rear Climate
Controls
Refer to your Owner’s Manual to
learn about the information being
relayed by the lights, gauges
and indicators on the instrument
cluster.
See In Brief in your Owner’s Manual.
Check Engine
Antilock Brake System
Low Tire Pressure
Door Ajar
F
Optional equipment
Oil Pressure
Charging System
Seat Belt Reminder
Hill Descent Control
4
STARTING THE VEHICLE
With the vehicle in Park or Neutral, rotate the key clockwise
to the Start position.
TURNING OFF THE VEHICLE
Shift to Park.
Push the key all the way in (1) and then rotate the key
counter-clockwise to the Lock/Off position (2).
See Driving and Operating in your Owner’s Manual.
Unlock
Press to unlock the
driver’s door.
Press again to unlock
all doors.
Lock
Press to lock all doors.
Press and hold the
Lock/Unlock buttons to automatically
fold/unfold the power mirrors
F
.
Note: To change the Auto Mirror Folding
setting, go to Settings > Vehicle > Comfort and
Convenience.
Liftglass
F
Press twice to open the liftglass.
Power Liftgate
F
Press twice to open or close the power
liftgate.
Vehicle Locator/Panic Alarm
Press and release to locate your vehicle.
Press and hold to activate the alarm.
Press again to cancel the alarm.
Remote Vehicle Start
Press and release the Lock button
andthen press and hold the button
until the turn signal lamps flash (about
4seconds) to start the engine from
outside the vehicle. After entering the
vehicle, turn on the ignition.
During a remote start, the engine will
run for 15 minutes.
Remote Start can be extended once by
repeating the remote start procedure.
Press and hold the
button until
the parking lamps turn off to cancel a
remote start.
The heated/ventilated seats
F
will turn
on during a remote start (if selected in
the Vehicle Settings menu) when out-
side temperatures warrant.
Note: If a key fob is left in the vehicle when
locking the vehicle, the Remote Left in Vehicle
Alert may sound. To change the remote lock,
unlock, and remote start settings, go to Settings
> Vehicle > Remote Lock, Unlock, Start.
See Keys, Doors and Windows in your Owner’s Manual.
F
Optional equipment
KEYED IGNITION SYSTEM (IF EQUIPPED)
REMOTE KEYLESS ENTRY TRANSMITTER (KEY FOB)
F
1
2
5
The Remote Keyless Entry (RKE) transmitter
must be in the vehicle to turn on the ignition.
STARTING THE ENGINE
With the vehicle in Park or Neutral, press
the brake pedal and then press and hold
the ENGINE START/STOP button to start
the engine. The green indicator on the
button will illuminate.
Note: If the RKE transmitter battery is weak, place
the transmitter in the pocket in the center console
to enable the engine to start. Replace the transmitter battery as soon as possible.
STOPPING THE ENGINE/OFF
Shift to Park and press the ENGINE START/STOP button to turn off the engine.
ACCESSORY MODE
With the engine off and the brake pedal NOT depressed, press the ENGINE START/
STOP button to place the ignition system in the accessory mode. The amber indicator
on the button will illuminate.
See Driving and Operating in your Owner’s Manual.
The Keyless Entry System enables operation of the doors and ignition without removing
the Remote Keyless Entry transmitter from a pocket or purse. The transmitter must be
within 3 feet of the door being unlocked or within 3 feet of the liftgate.
KEYLESS UNLOCKING
With the transmitter within range:
Press the lock button on the driver’s
door handle to unlock the driver’s door;
press itagain within 5 seconds to unlock
alldoors.
Press the lock button on a passenger
door handle to unlock all doors.
Press the touchpad on the liftgate
handle to open the liftgate.
KEYLESS LOCKING
With the ignition off, the transmitter out of the vehicle, and all doors closed:
Press the lock button on any door handle to lock all doors immediately.
If Passive Locking is turned on, all doors will lock automatically after a short delay.
Note: To change the door lock and unlock settings, go to Settings > Vehicle > Remote Lock, Unlock, Start.
See Keys, Doors and Windows in your Owner’s Manual.
F
Optional equipment
KEYLESS (PUSHBUTTON) START
F
KEYLESS ENTRY SYSTEM
F
6
SEAT ADJUSTMENTS
A. Seat Cushion Adjustment
Move the front horizontal control to
move the seat forward or rearward,
ortotilt, raise or lower the seat.
B. Seatback Adjustment
Move the vertical control to recline or
raise the seatback.
C. Lumbar Adjustment
Move the rear control fore/aft to
increase/decrease lumbar support or up/
down to raise/lower the lumbar location.
SET MEMORY POSITIONS
F
1. With the vehicle in Park and the ignition
on, adjust the power driver’s seat, power
adjustable pedals
F
, power outside mir-
rors
F
, and power tilt/telescopic steering
column
F
tothe desired positions.
2. Press and release the SET button and
then press and hold button 1 on the
driver’s door until two beeps sound.
3. Repeat the steps using button 2 for a
second driver.
SET EXIT POSITION
1. With the vehicle in Park and the ignition on, adjust the power driver’s seat, power
adjustable pedals power
F
, and power tilt/telescopic steering column
F
to the desired
positions.
2. Press and release the SET button and then press and hold the Exit button on the
driver’s door until two beeps sound.
RECALL POSITIONS
Press and hold button 1 or 2 or the Exit button until the stored position is reached.
Releasing the button before the stored position is reached cancels the recall.
The memory/exit positions can be programmed to be recalled automatically when the
ignition is turned on/off (for exit recall, the driver’s door must be opened).
To set the Auto Memory Recall or Easy Exit Options, go to Settings > Vehicle > Comfort
and Convenience > Auto Memory Recall or Easy Exit Options.
POWER FRONT SEATS
F
Optional equipment
See Seats and Restraints in your Owner’s Manual.
BA C
7
FOLDING 2ND-ROW SEATS
The 2nd-row seats fold and tumble to provide more cargo space and access to the
3rd-row seats.
1. Lower the head restraint, unbuckle the seat
belt, make sure nothing is under or in front
of the seat, and move the front seat forward
enough to allow room for the folded seat.
2. Lift the lever on the lower outboard side
of the 2nd-row seat. The seatback will fold
forward.
3. Lift the lever again to tumble the seat
forward.
POWER FOLDING 2ND-ROW SEATS
F
1. Lower the head restraint, unbuckle the seat
belt, make sure nothing is under or in front
of the seat, and move the front seat forward
enough to allow room for the folded seat.
2. Press the Seat Release button (A) on
the panel behind the rear doors or the
x2
button (B) in the rear cargo area to fold the
seat forward. Press either button again to
tumble the seat forward.
UNFOLDING 2ND-ROW SEATS
1. Pull down the seat until it latches to the floor.
2. Lift up the seatback until it locks in place.
FOLDING 3RD-ROW SEATS
The 3rd-row seats fold to provide more
cargospace.
1. Lower the head restraint, unbuckle the seat
belt, and make sure nothing is on the seat.
2. Lift the lever on the rear of the seat. The
seatback will fold forward.
UNFOLDING 3RD-ROW SEATS
Pull the strap on the rear of the seat to raise the seatback to the upright position.
POWER FOLDING/UNFOLDING 3RD-ROW SEATS
F
1. With the vehicle in Park, lower the head restraint, unbuckle the seat belt, and make
sure nothing is on the seat.
2. Press and hold the bottom of the Seat Release button (C) in the rear cargo area to
fold the seat flat.
3. Press and hold the top of the button to raise the seatback.
REAR SEATS
F
Optional equipment
See Seats and Restraints in your Owner’s Manual.
C
B
A
8
REAR SEAT REMINDER
UNIVERSAL REMOTE SYSTEM
F
F
Optional equipment
When the vehicle is turned off, a chime may sound and a Rear Seat Reminder mes-
sage may display on the Driver Information Center. The system does not actually detect
objects in the rear seat. It works by monitoring when a rear door is opened and closed,
under certain conditions. The feature is active only once each time the vehicle is turned
on and off. Always check the rear seat before exiting the vehicle.
To turn the Rear Seat Reminder on or off, go to Settings > Rear Seat Reminder.
See Seats and Restraints in your Owner’s Manual.
The Universal Remote System on the
overhead console enables your vehicle to
control 3 different devices, ranging from
garage doors and gates to home lighting.
Go to www.homelink.com for detailed
videos and instructions on how to program
the Universal Remote System. For additional
assistance, call 1-800-355-3515.
See Instruments and Controls in your Owner’s Manual.
PROGRAMMING THE LIFTGATE HEIGHT
1. Turn the Power
Liftgate knob
to the 3/4 mode
position.
2. Open the liftgate.
3. Adjust the liftgate
manually to the
desired height.
4. To save the setting, press and hold the
button next to the liftgate latch for 3
seconds. The turn signals flash and a
beep sounds when the setting is saved.
See Keys, Doors and Windows in your Owner’s Manual.
OPEN/CLOSE THE POWER LIFTGATE
Press the
Power Liftgate button on
the Remote Keyless Entry (RKE) trans-
mitter twice.
Press the
Power Liftgate knob on
the overhead console.
Press the touchpad on the liftgate
handle to open the liftgate.
Press the button next to the liftgate
latch to close the liftgate.
HANDS-FREE OPERATION
F
To open or close the liftgate hands-
free, kick your foot straight in and out
under the center of the rear bumper.
Do not swing your foot side-to-side.
The RKE transmitter must be within 3
feet of theliftgate.
POWER PROGRAMMABLE LIFTGATE
F
9
HEAD-UP DISPLAY
AUTOMATIC OPERATION
1. Press AUTO.
2 Set the temperature.
The system automatically controls the fan speed, air delivery, air conditioning and recir-
culation to reach the set temperature. Allow time for the system to reach the desired
temperature. If the functions are manually adjusted, automatic operation is turned off.
SYNC TEMPERATURE SETTINGS
Press SYNC to link the passenger’s and rear climate temperature settings to the
driver’s setting. When the passenger’s or rear climate setting is adjusted, the differ-
ent temperature setting is displayed.
REAR CLIMATE CONTROLS
Press the
Power button to turn the rear climate controls on/off.
Press the
button to lock out the rear controls. Rear climate control operation
is controlled using the front controls.
See Climate Controls in your Owner’s Manual.
Rear
Power
Control
Driver’s
Heated/
Ventilated
Seat
Buttons
F
Passenger’s
Heated/
Ventilated
Seat
Buttons
F
AUTO
Rear
Automatic
Operation
Rear Fan
Speed
Rear
Control
Lock-out
Rear Air
Delivery
Rear
Temperature
AUTO
Driver’s Temp.
Control/
Automatic
Operation
/
Defog
Mode/
Bi-level
Mode
/
REAR
Defrost Mode/
Rear Window/
Outside Mirror
Defogger
SYNC
Passenger’s
Temp. Control/
Link setting to
driver’s setting
/
Vent
Mode/
Floor Mode
Fan
Speed
Control/
On/Off
A/C/
Air Conditioning
Control/
Recirculation
Mode
AUTOMATIC CLIMATE CONTROLS
F
Optional equipment
10
The Driver Information Center (DIC) or
Customizable Driver Display on the instru-
ment cluster displays a variety of vehicle
messages and system information.
Use the control pad on the right side of the
steering wheel to select the Info (includes
trip and fuel information), Audio, Phone,
Navigation
F
, and Settings menus.
CONTROLS
Press the
or button to move between the display zones.
Press the
or button to move through the menus.
Press the button to open a menu, or to select or reset an item.
CHANGING DISPLAY THEMES
The Customizable Driver Display features
three display themes: Standard, Technology,
and Media. The style of the display will
change depending on the selected theme.
1. Use the control pad to display the
Settingsmenu.
2. Select Display Theme.
3. Select the desired theme.
See Instruments and Controls in your Owner’s Manual.
DRIVER INFORMATION CENTER/CUSTOMIZABLE
DRIVER DISPLAY
F
Customizable Driver Display
DIC with Navigation
F
shown
HEAD-UP DISPLAY
F
The Head-Up Display (HUD) projects some operating information onto the windshield.
TheHUD controls are located on the left side of the instrument panel.
HUD
HUD
Lift up or press down to adjust the position
of the image on the windshield. Itcannot be
adjusted side-to-side.
INFO
Press to select a display view.
+ –
Lift up or press down to brighten or dim the
display. Hold down to turn off the display.
See Instruments and Controls in your Owner’s Manual.
F
Optional equipment
11
Push to Talk
Press to answer an incoming call or to use
natural voice recognition
F
with the audio,
Bluetooth
F
or navigation
F
system.
Press and hold to activate voice pass-thru
or Siri® Eyes Free
F
on a paired cell phone.
End Call/Mute
Press to end or decline a call.
Press to mute/unmute the speakers.
Volume
(behind right side of steering wheel)
Press the top or bottom button to adjust
the volume.
Next/Previous Favorite Station
(behind left side of steering wheel)
Press the top or bottom button to display
the current station or track. Press the top
or bottom button again to go to the next or
previous favorite radio station or track.
Next/Previous Favorite Station button shown. Volume
button is located behind the right side of the steering
wheel.
AUDIO STEERING WHEEL CONTROLS
See your Infotainment System Manual.
DOME LAMPS
OFF
Press to turn off the lamps at all times,
even when a door is open.
DOOR
Press to have the lamps turn on automati-
cally when a door is open.
ON
Press to turn on all dome lamps.
INSTRUMENT PANEL LIGHTING
Instrument Panel Brightness
Rotate the thumbwheel on the left side of
the instrument panel to adjust the instru-
ment panel lighting.
LIGHTING
See Lighting in your Owner’s Manual.
F
Optional equipment
12
BACK
Move back one
level in the
menus
Home
page
Eject
disc
Interaction
Selector:
Touch to display
the favorites list
TUNE/MENU
Tune radio
stations/Open and
select menus
Applications
F
:
Touch a screen
icon to access an
application
Additional Pages:
Touch to view
additional pages
of applications
(if available)
Power/
Volume
MEDIA
Select USB,
Bluetooth, AUX
Open/Close
the storage
compartment
RADIO
Select AM,
FM, XM
F
SEEK
Previous/Next
radio station or
track
Refer to your Owner’s Manual for important information about using the infotainment system while
driving.
CHEVROLET INFOTAINMENT WITH
8-INCH* SCREEN & NAVIGATION
F
F
Optional equipment *Screen measured diagonally
The infotainment system uses a Bluetooth or USB connection to link to a compatible
device, such as a smartphone, cell phone, USB flash drive or portable audio player/iPod®,
and offers hands-free voice control. For assistance, contact Customer Assistance at
1-855-4-SUPPORT (1-855-478-7767) or visit my.chevrolet.com/learn.
Infotainment System with Navigation
F
shown
13
F
Optional equipment *Screen measured diagonally
MANAGING HOME PAGE ICONS
The Home page icons can be arranged in anyorder.
1. Press the Home button.
2. To enter edit mode, touch and hold the Home page icon to move.
3. Continue holding the icon and drag it to the desired position, and then release.
4. Press the Home button to exit edit mode.
STORING FAVORITES
Up to 60 radio stations from all bands (AM, FM or XM
F
), media (song, artist, album, and
genre with device connected to a USB port), phone contacts and navigation destina-
tions
F
can be stored in any order.
1. Select the desired radio station, media favorite, navigation destination or contact.
2. Touch and drag up the
Interaction Selector at the bottom of the screen to display
the favorite screen buttons.
3. Touch and hold one of the favorite screen buttons until a beep is heard, indicating it
isstored.
4. Repeat the steps to store another favorite item.
To change the number of favorites displayed, go to Settings > Radio.
NATURAL VOICE RECOGNITION
Control the music source and make phone calls hands-free (after pairing your Bluetooth-
enabled phone) using the natural voice recognition system.
1. Press the
Push to Talk button on the steering wheel.
2. The radio will play a prompt followed by a beep.
3. After the beep, say what you want it to do using natural speech.
(Examples: “Call Amanda” or “Tune FM 104.3.” Say “Help” for assistance.)
APPS
In-vehicle apps — connecting to music, news, weather, travel information, sports, enter-
tainment and more — are available for download to the radio through the Apps icon on
the Home page. Downloading and using the apps requires internet connectivity, and may
require a data plan, accessed through the vehicle’s 4G LTE Wi-Fi hotspot, if active, or a
mobile device hotspot.
TEXT MESSAGE ALERTS
Text message alerts play a text message over the audio system and allow a response
with a preset message. The text messaging feature must be set up when the cell phone is
paired. Messages can be viewed on the infotainment screen only when the vehicle is not
moving.
Touch
Text to view the text message inbox.
For assistance with the MyLink system, contact Customer Assistance at
1-855-4-SUPPORT (1-855-478-7767) or visit my.chevrolet.com/learn.
See your Infotainment System Manual.
CHEVROLET INFOTAINMENT WITH
8-INCH* SCREEN & NAVIGATION
F
14
With the vehicle’s available 4G LTE Wi-Fi hotspot, up to 7 devices (smartphones, tablets
and laptops) can be connected to high-speed internet.
To retrieve the SSID and password for the hotspot, go to Settings > Wi-Fi > Manage
Wi-Fi Networks.
Note: For more information on use and system limitations, visit my.chevrolet.com/learn.
See Instruments and Controls in your Owner’s Manual.
4G LTE WI-FI® HOTSPOT
Refer to your Owner’s Manual for important information about using the Bluetooth system whiledriving.
Before using a Bluetooth-enabled device in the vehicle, it must be paired with the
in-vehicle Bluetooth system. The pairing process is disabled when the vehicle is moving.
Notall devices will support all functions. For more information, visit
my.chevrolet.com/learn.
PAIR A PHONE
1. To use voice recognition, press the
Push to Talk button; after the beep, say
“Pair phone,” or use the MENU knob or the infotainment screen to select the Phone
icon > Phones > PairDevice.
2. Start the pairing process on the phone. From your phone’s Bluetooth settings, select
the name shown on the infotainment screen.
3. Confirm the codes that appear on the infotainment screen and the phone.
4. When pairing is complete, the phone screen is displayed. Your phone book may be
downloaded depending on the phone.
STREAMING AUDIO
With a paired device connected via Bluetooth, press the MEDIA button until Bluetooth
is displayed on the touch screen to stream audio from the device. For full control of
the device, connect it to a USB port.
See your Infotainment System Manual.
The Wireless Charging system for mobile devices is located on the storage tray on top of
the center console. To check mobile device compatibility, visit my.chevrolet.com/learn.
See your phone retailer for details on required phone accessories.
1. The vehicle must be on or Retained Accessory Power must be active.
2. Remove all objects from the charging pad.
3. Place the device, face up, on the
symbol on the pad, aligned with the rear rib.
4. Move the device slowly until the battery charging symbol displays on the infotainment
screen. If not charging, remove the device for 3 seconds and rotate it 180 degrees.
See Instruments and Controls in your Owner’s Manual.
BLUETOOTH® SYSTEM
WIRELESS CHARGING
F
F
Optional equipment
15
The system includes a Blu-ray/DVD/CD player, two USB ports, HDMI/MHL input, wireless
digital headphones, a remote control, and two screens on Suburban models.
Press the release button to open the video screen.
Push up the screen when not in use. The screen
turns on/off automatically.
Use the remote control to select the same or adif-
ferent source for each screen from the rear seats.
To access the Rear Seat Infotainment controls from
the front seat, select Video on the Home page.
See your Infotainment System Manual.
REAR SEAT INFOTAINMENT SYSTEM
F
F
Optional equipment
TEEN DRIVER
Teen Driver Mode allows multiple keys to be registered for beginning drivers. When
active, the system automatically activates certain safety systems, allows setting of
some features, and limits the use of others. An in-vehicle Report Card records vehicle
data about driving behavior. When the vehicle is started with a registered key, a Driver
Information Center message displays that Teen Driver is active.
To create a Personal Identification Number, register a key, change Teen Driver Mode
settings, or access the Report Card, go to Settings > Teen Driver.
See your Infotainment System Manual.
APPLE CARPLAY™
ANDROID AUTO™
Apple CarPlay capability is available through a compatible smartphone using the
Projection icon on the Home page of the infotainment system. No app is required.
1. Connect your compatible phone by plugging the Lightning cable into a USB data port.
Use your device’s factory-provided Lightning cable. Aftermarket cables may not work.
2. The Projection icon will change to Apple CarPlay. Touch the Apple CarPlay icon to have
your apps displayed.
For more information, call 1-855-478-7767 or visit my.chevrolet.com/learn.
See your Infotainment System Manual.
Android Auto capability is available through a compatible smartphone using the
Projection icon on the Home page of the infotainment system.
1. Download the Android Auto app to your phone from the Google Play Store.
2. Connect your compatible phone by plugging the phone USB cable into a USB data port.
Use your device’s factory-provided USB cable. Aftermarket cables may not work.
3. The Projection icon will change to Android Auto. Touch the Android Auto icon to have
your apps displayed.
For more information, call 1-855-478-7767 or visit my.chevrolet.com/learn.
See your Infotainment System Manual.
16
F
Optional equipment
Some vehicle features can be customized using the audio controls and menus or the
touch screen buttons
F
.
CHANGING VEHICLE SETTINGS
The Vehicle Settings menu may include Climate
and Air Quality, Collision/Detection Systems,
Comfort and Convenience, Lighting, Power
Door Locks, and Remote Lock/Unlock/Start.
Use the MENU knob or the touch screen to:
1. Select Settings on the Home page.
2. Select Vehicle.
3. Select the desired menu item.
4. Select the desired feature and setting. Settings are saved automatically.
5. Select BACK to exit each menu.
Safety or driver assistance features are no substitute for the driver’s responsibility to operate the
vehicle in a safe manner. The driver should remain attentive to traffic, surroundings and road conditions
at all times. Read your Owner’s Manual for important feature limitations and information.
SAFETY ALERT SEAT
F
– The driver’s seat pulses — left side, right side, or simultaneously
— to alert the driver of the direction of potentialhazards.
Audible notification may be selected instead ofSafety Alert Seat pulsing notification.
Tochange the alert setting, go to Settings > Vehicle > Collision/Detection Systems >
AlertType.
FORWARD COLLISION ALERT
F
– The
Vehicle
Ahead Indicator is green when a vehicle is detect-
ed and is amber when following a vehicle ahead
much too closely. When approaching a vehicle
directly ahead too rapidly, a red alert flashes on
the windshield and the Safety Alert Seat pulses or
rapid beeps sound (if selected).
Press the
Collision Alert button on the left
side of the steering wheel to set the alert timing to Far, Medium, or Near. This is also
the Adaptive Cruise Control
F
following gap setting. The setting is displayed on the
Driver Information Center.
To set the Forward Collision Alert and Forward Automatic Braking systems to Alert
and Brake, Alert, or Off, go to Settings > Vehicle > Collision/Detection Systems >
Forward Collision System.
VEHICLE PERSONALIZATION
DRIVER ASSISTANCE SYSTEMS
F
Optional equipment
See Instruments and Controls in your Owner’s Manual.
17
FORWARD AUTOMATIC BRAKING
F
– In potential front-end imminent collision situations
with detected vehicles, the brakes may be applied, if you have not already done so, to
help reduce damage or help avoid collisions at very low speeds with vehicles directly
ahead. Forward Automatic Braking works at speeds of 5–50 mph or, if also equipped with
Adaptive Cruise Control
F
, at speeds above 2 mph.
To set the Forward Automatic Braking and Forward Collision Alert systems to Alert
and Brake, Alert, or Off, go to Settings > Vehicle > Collision/Detection Systems >
Forward Collision System.
LANE KEEP ASSIST WITH LANE DEPARTURE WARNING
F
– The system may help you
avoid collisions due to unintentional lane departures. The Lane Keep Assist Indicator
is green if the system is available to assist. If the vehicle approaches a detected lane
marking without using a turn signal in that direction, the system may assist by gently
turning the steering wheel and displaying an amber .
If active driver steering is not detected, the amber may flash and the Safety Alert
Seat may pulse or beeps may sound (if selected) on the side of the departure direction
as the lane marking is crossed. The Lane Keep Assist system does not continuously steer
the vehicle; the driver needs to steer and be in complete control of the vehicle.
Press the Lane Keep Assist button on the left side of the instrument panel to turn
the system on oroff.
LANE CHANGE ALERT WITH SIDE BLIND ZONE ALERT
F
– While driving, the system
displays a warning symbol on the left or right side mirror when a vehicle is detected
in that side blind zone area or rapidly approaching that area. The warning symbol flashes
if a turn signal is activated when a vehicle has been detected on the same side.
To turn the system on or off, go to Settings > Vehicle > Collision/Detection Systems >
Lane Change Alert.
REAR VISION CAMERA – When the vehicle is in Reverse, a view of the area behind the
vehicle displays on the infotainment system. Vehicle speed must be below 8 mph.
To turn the Rear Vision Camera Guidelines or Rear Park Assist Symbols on or off, go to
Settings > Rear Camera.
REAR CROSS TRAFFIC ALERT
F
– When the vehicle is in Reverse, the system warns of
cross-traffic coming in either direction by displaying a red alert on the infotainment
screen and pulsing the left or right side of the Safety Alert Seat or sounding 3 beeps (if
selected).
To turn the system on or off, go to Settings > Vehicle > Collision/Detection Systems >
Rear Cross Traffic Alert.
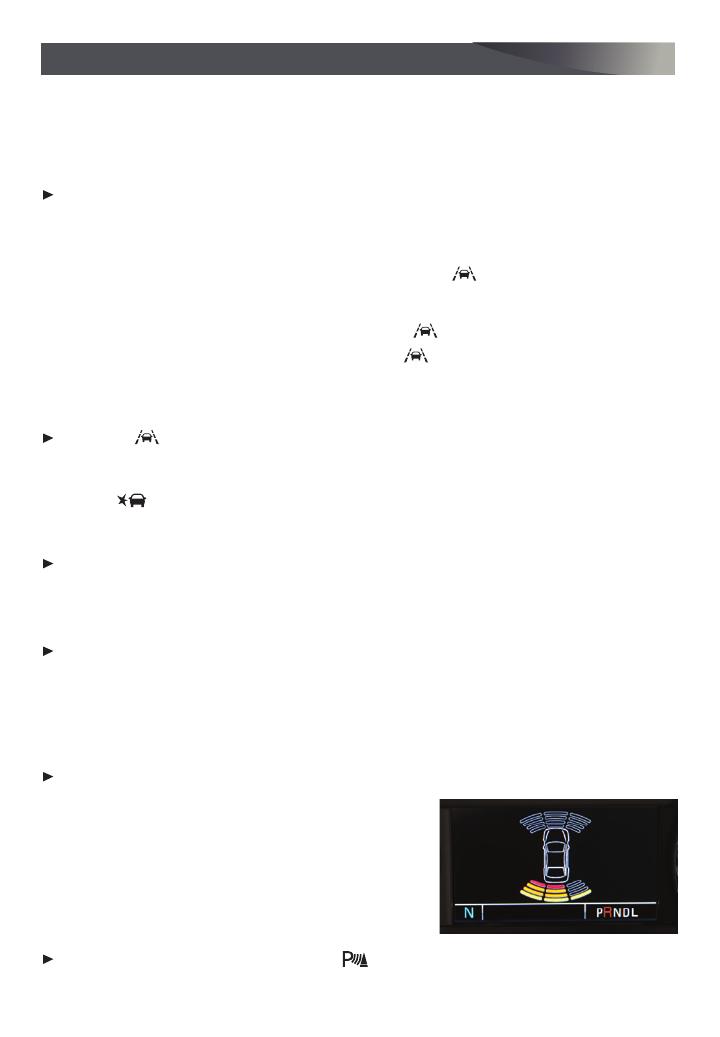
FRONT
F
AND REAR PARK ASSIST – During low-speed
parking maneuvers, the system provides “distance to
closest object” information on the Driver Information
Center and the Safety Alert Seat pulses or a beep
sounds (if selected). When an object is very close, the
Safety Alert Seat pulses or a continuous beep sounds
(if selected).
To turn the system on or off, press the Park Assist button on the left side of the
instrument panel.
DRIVER ASSISTANCE SYSTEMS
F
Optional equipment
See Driving and Operating in your Owner’s Manual.
18
SETTING CRUISE CONTROL
1. Press the On/Off button. The Cruise Control symbol will illuminate in white on
the instrument cluster.
2. When traveling at the desired speed, press the SET– button to set the speed. The
symbol will illuminate in green on the instrument cluster.
ADJUSTING CRUISE CONTROL
RES+ Resume/Accelerate
Press to resume a set speed.
When the system is active, press once to increase speed
1 mph; press and hold to continue increasing speed.
SET– Set/Coast
When the system is active, press once to decrease speed
1 mph; press and hold to continue decreasing speed.
Cancel
Press to cancel the Cruise Control without erasing the set speed from memory.
Pressing the brake pedal also will cancel the Cruise Control.
The set speed is erased when Cruise Control or the vehicle ignition is turnedoff.
ADAPTIVE CRUISE CONTROL
F
The system maintains the set speed and a following gap — the time between your vehicle
and a vehicle detected directly ahead — by accelerating or braking automatically while you
continue to steer.
SELECTING THE FOLLOWING GAP
Press the
Following Distance Gap button on the left side of the steering wheel to
set a following gap of Far, Medium orNear. This is also the Forward Collision Alert
F
setting.
See Driving and Operating in your Owner’s Manual.
Hill Descent Control sets and maintains vehicle speed from 1–19 mph while descending a
steep incline in a forward or reverse gear.
1. Press the
Hill Descent Control button on the left side of the instrument panel.
Vehicle speed must be below 31 mph to enable the system. The Hill Descent Control
symbol will illuminate on the instrument cluster.
2. Increase or decrease speed by applying the accelerator or brake pedal, or use the
Cruise Control +/– buttons. The adjusted speed becomes the new set speed. The
symbol flashes when the brakes are being applied to maintain vehicle speed.
See Driving and Operating in your Owner’s Manual.
HILL DESCENT CONTROL
F
CRUISE CONTROL
F
Optional equipment
19
The traction control system limits wheelspin and the StabiliTrak
®
stability control system
assists with directional control of the vehicle in difficult driving conditions. Both systems
turn on automatically every time the vehicle is started.
Turn off traction control if the vehicle is stuck and rocking the vehicle is required.
Press the
Traction Control/StabiliTrak Off button on the left side of the instrument
panel to turn traction control off or on. The Traction Control Off light will illuminate
on the instrument cluster when the system is off.
See Driving and Operating in your Owner’s Manual.
The ITBC system can be used to adjust the amount
of power output, or Trailer Gain, available to the
trailer brakes. The control panel is located on the
left side of the instrument panel. ITBC information
is displayed on the Driver Information Center.
Adjust the Trailer Gain by pressing the +/–
adjustment buttons on the control panel.
Squeeze the levers together (left lever does not
move) on the control panel to manually apply the trailer brakes.
See Driving and Operating in your Owner’s Manual.
The
Low Tire Pressure warning light on the instrument cluster illuminates when one
or more of the vehicle’s tires is significantly underinflated. Fill the tires to the proper tire
pressures listed on the Tire and Loading Information label, located below the driver’s
door latch. Current tire pressures can be viewed on the Driver Information Center.
The Tire Fill Alert provides visual and audible alerts to help when inflating a tire to the
recommended tire pressure (does not apply to spare tire). When the recommended
pressure is reached, the horn sounds and the turn signals change from flashing to solid.
Refer to your Owner’s Manual for information about normal monthly tire maintenance.
See Vehicle Care in your Owner’s Manual.
The Tow/Haul Mode adjusts the transmission shifts to reduce shift cycling, such as when
towing or hauling heavy loads or driving on steep grades.
Press the
Tow/Haul Mode button on the end of the shift lever to turn the system
on or off.
See Driving and Operating in your Owner’s Manual.
TRACTION CONTROL AND STABILITRAK SYSTEMS
INTEGRATED TRAILER BRAKE CONTROL (ITBC)
F
TIRE PRESSURE MONITOR WITH TIRE FILL ALERT
TOW/HAUL MODE
F
Optional equipment
20
1-800-CHEV-USA (1-800-243-8872) TTY Users: 1-888-889-2438
As the owner of a new Chevrolet, you are automatically enrolled in the Chevrolet
Roadside Assistance program for up to 5 years/60,000 miles, whichever occurs first,
at no expense to you. Chevrolet’s Roadside Assistance toll-free number is staffed by a
team of trained advisors who are available 24 hours a day, 365 days a year, to contact a
service provider for light services (fuel delivery, jump-starts, flat tire and lock-outs) or
make arrangements to tow your vehicle to the nearest Chevrolet dealer for any repairs.
OnStar Roadside Assistance
If you have a current OnStar Safety & Security plan, push the blue OnStar button or red
Emergency button to get the help you need. An OnStar advisor will use GPS technology
to pinpoint your vehicle location and contact the nearest service provider.
To learn more about OnStar services, press the blue OnStar button, visit onstar.com, call
1-888-4-ONSTAR (1-888-466-7827), or refer to your Owner’s Manual.
Get to know your vehicle inside and out with the Chevrolet Owner Center. Check out
personalized information including an online Owner’s Manual and helpful how-to videos,
track your service history and warranty status, manage your OnStar and Connected
Services vehicle plans, review your current Vehicle Diagnostics report (active service
account required) and more. Create an account today at my.chevrolet.com.
Download the myChevrolet app to your compatible smartphone (or device) and, if your
vehicle is properly equipped, you can start or turn off your engine, lock or unlock your
doors, view key diagnostic information, set parking information and more.
The app is available on select Apple and Android devices. Service availability, features
and functionality vary by vehicle, device and data plan. Device data connection required.
Visit onstar.com for more details. Download the mobile app from your compatible mobile
device’s app store.
ROADSIDE ASSISTANCE
CHEVROLET OWNER CENTER
MYCHEVROLET MOBILE APP
84161723 A
!84161723=A!
Certain restrictions, precautions and safety procedures apply to your vehicle. Please read your Owner’s Manual
for complete instructions. All information contained in this guide is based on the latest information available at
the time of printing and is subject to change without notice. Copyright 2018 General Motors. All rights reserved.
We recommend always using ACDelco or genuine GM service parts.
  • Page 1 1
  • Page 2 2
  • Page 3 3
  • Page 4 4
  • Page 5 5
  • Page 6 6
  • Page 7 7
  • Page 8 8
  • Page 9 9
  • Page 10 10
  • Page 11 11
  • Page 12 12
  • Page 13 13
  • Page 14 14
  • Page 15 15
  • Page 16 16
  • Page 17 17
  • Page 18 18
  • Page 19 19
  • Page 20 20

Chevrolet Tahoe 2019 User guide

Category
Mobile phones
Type
User guide
This manual is also suitable for

Chevrolet Tahoe 2019 boasts an array of features to enhance your driving experience. Its power front seats with memory positions offer customizable comfort, while the folding 2nd and 3rd-row seats provide ample cargo space and easy access. The Rear Seat Reminder alerts you to check the rear seats before exiting, ensuring the safety of your passengers. Additionally, the programmable power liftgate with hands-free operation allows for convenient loading and unloading.

Ask a question and I''ll find the answer in the document

Finding information in a document is now easier with AI