Keating Of Chicago iFM User manual
- Category
- Wall & ceiling mounts accessories
- Type
- User manual
This manual is also suitable for

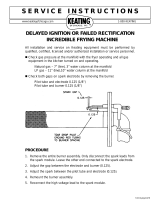
SERVICE INSTRUCTIONS
INSTALLATION INSTRUCTIONS FOR SPARK
IGNITION MODULE #037981
For IFMs With Spark Iginition Module Mounted in the Blower Box
1. Remove blower box front cover from the cabinet. Remove blower box cover from the base plate exposing the obso-
lete dual electrode spark iginition module (Part # 019724) and the relight circuit box.
SpkIgModInst_037981_BB
9/08
www.keatingofchicago.com 1-800-KEATING
2. Locate wire # 16, 20, 18 and 69 between the old spark module and relight circuit. Disconnect and discard the wires.
Discard the wire # 15 and 17 connected between the terminal board and relight circuit.
3. Disconnect wire # 16, 20, 23, 31, and 69 from the old spark module.
4. Locate the two spark iginition electrode leads connected between the dual-spark iginition module and the two burner
electrode assemblies that are mounted behind the IFM’s control panel back.
5. For gaining access to the two burner electrode assemblies, unscrew and remove the control panel followed by the
control panel back. Unplug both ends of each of the spark iginition electrode leads, one end from the obsolete spark
module and the other end from the corresponding burner electrode assembly. Discard the two unplugged spark iginition
electrode leads.
6. The dual-electrode obsolete spark iginition module is totally disconnected from the IFM circuit. Unscrew and discard
the module. Also disconnect the wire # 19 from the relight circuit. Unscrew the relight circuit box and discard it.
Part # 037983
Part # 037983
FIG 1. WIRING DIAGRAM FOR IFMs WITH DUAL−ELECTRODE SPARK IGNITION
MODULE (PART # 019724) AND RELIGHT CIRCUIT

SERVICE INSTRUCTIONS
INSTALLATION INSTRUCTIONS FOR SPARK
IGNITION MODULE #037981
For IFMs With Spark Iginition Module Mounted in the Blower Box
www.keatingofchicago.com 1-800-KEATING
SpkIgModInst_037981_BB
9/08
7. Drill holes and mount the two new modules (Part # 037978) keeping in mind the length of the new spark electrode
leads (length: 24”, Part # 037551) and the space occupied by the two modules. Use pan head screws # 8-32 x 3/4”, # 8-
32 hex nuts and internal tooth lock washers #8.
Part # 037983
Part # 037983

10. Connect the 1/4” quick disconnect end of the new spark electrode lead (Part # 037551) to the male tab of the
single-electrode spark ignition module. Take the other end of the lead to the burner electrode assembly behind the IFM’s
control panel back. Repeat the same procedure for the other spark electrode lead. Secure the connections.
11. Re-attach the control panel back followed by the control panel. Screw the blower box cover to the base plate and
re-assemble all the components.
8. Drill holes and mount the 120V AC DPDT relay with round head screws # 6-32 x 3/8”, # 6-32 hex nuts and internal
tooth lock washers #6. The location should be in accordance with the two new modules and the length of the wires on
the wire harness.
9. Make connections between the two modules by installing the supplied wire harness. Refer to Fig. 2 below for detailed
wiring. Dashed lines in Fig. 2 show the removed and discarded wires. Dashed lines in Fig. 3 below show the
added/rewired connections. Solid lines show unaltered wiring in both Fig. 2 and 3.
SpkIgModInst_037981_BB
9/08
SERVICE INSTRUCTIONS
INSTALLATION INSTRUCTIONS FOR SPARK
IGNITION MODULE #037981
For IFMs With Spark Iginition Module Mounted in the Blower Box
www.keatingofchicago.com 1-800-KEATING
Part # 037983
Part # 037983
FIG 2. WIRING DIAGRAM FOR IFMs WITH DUAL−ELECTRODE SPARK
IGNITION MODULE (PART # 019724) AND RELIGHT CIRCUIT KIT
FIG 3. WIRING DIAGRAM FOR IFMs WITH TWO
SINGLE−ELECTRODE SPARK IGNITION MODULES
(REPLACEMENT, PART # 037978) AND 120VAC DPDT RELAY
(PART # 008088)
-
 1
1
-
 2
2
-
 3
3


Keating Of Chicago iFM User manual
- Category
- Wall & ceiling mounts accessories
- Type
- User manual
- This manual is also suitable for
Ask a question and I''ll find the answer in the document
Finding information in a document is now easier with AI
Related papers
-
 Keating Of Chicago Incredible Frying Machine SERIES 2006 User manual
-
 Keating Of Chicago MG-4 User manual
-
 Keating Of Chicago SERIES 2000 User manual
-
 Keating Of Chicago 0107 User manual
-
 Keating Of Chicago Pasta Maker Gas Custom Pasta System User manual
-
 Keating Of Chicago Series 2009 Owner's manual
-
 Keating Of Chicago Hot Plate Gas Owner's manual
-
 Keating Of Chicago 7/05 User manual


Other documents
-
Griffin iFM User manual
-
Keating Incredible Frying Machine Pre 2000 User manual
-
-
-
-
-
-
-
-