Page is loading ...

MANUEL D’INSTRUCTION FR
INSTRUCTION MANUAL EN
MANUAL DE INSTRUCCIONES ES
GEBRUIKSHANDLEIDING PT
INSTRUCCIONES NL
MANUAL DA
GEBRUIKSHANDLEIDING CS
Réfrigérateur - FR
Refrigerator - EN
Refrigerador - ES
Frigorífico - PT
Koelkast - NL
Køleskab - DA
Lednička - CS
DRL1624J

Dear Customer,
You have just acquired a DE DIETRICHfridge and we would like to thank you.
Our research teams have created this new generation of appliances for you. Their quality,
design,features and technological advances make them exceptional products, and reveal our
unique know-how.
Your new DE DIETRICHfridge will blend harmoniously into your kitchen and will perfectly
combinefood preservation performance and ease of use. We wanted to offer you a product of
excellence.
In the DE DIETRICHproduct range, you will also fi nd a wide choice of hobs, ovens,
microwaves,hoods, dishwashers, cookers, freezers, that you can coordinate with your new DE
DIETRICHfridge.
Visit our website www.dedietrich-electromenager.com, where you will fi nd our latest
innovationsas well as useful and complementary information.
DE DIETRICH
Setting New Values
As part of our commitment to constantly improving our products, we reserve the right to make
changes to thembased on technical advances to their technical and functional features and
appearance.
Warning:
Before installing and using your appliance, please carefully read this Guide to Installation
and Use, which willallow you to quickly familiarise yourself with its operation.

3
CONTENTS
1. FOR THE USER’S ATTENTION .................................................................... 4
Safety and warning information ........................................................................ 4
Disposal ......................................................................................................... 5
Installation ..................................................................................................... 6
2. INTRODUCTION TO YOUR APPLIANCE ....................................................... 8
Overview ........................................................................................................ 8
Reverse Door .................................................................................................. 9
Kits for installation ...................................................................................... 10
Install the appliance .................................................................................... 10
3. USING YOUR APPLIANCE ..................................................................... 13
Control Panel ............................................................................................... 13
Operation .................................................................................................... 13
4. CLEANING AND MAINTENANCE ........................................................... 14
5. TROUBLESHOOTING ................................................................................ 15

4
1. FOR THE USER’S ATTENTION
This appliance is in accordance with the EU guidelines
Safety and warning information
For your safety and correct usage,
before installing and first using the
appliance, read this user manual
carefully, including its hints and
warnings.
To avoid to do damage, mistakes and
accidents, it is important to make sure
that all people using the appliance are
thoroughly familiar with its operation
and safety instructions.
Save these instructions and be sure that
they remain with the appliance if it is
moved or sold, so that a using it
throughout its life will be properly
informed on its correct appliance usage
and safety.
Manufacturer cannot be responsible for
damages caused by omission.
GENERAL SAFETY AND WARNINGS
This appliance is intended to be used in
household and similar applications such
as:
- Staff kitchen areas in shops, offices
and other working environments;
- Farm houses and by clients in hotels,
motels and other residential type
environments;
- Bed and breakfast type environments;
- Catering and similar non-retail
applications
Safety for children and
others who are vulnerable people:
This appliance can be used by
children aged from 8 years and above
and persons with reduced physical,
sensory or mental capabilities or lack of
experience and knowledge if they have
been given supervision or instruction
concerning use of the appliance in a
safe way and understand the hazards
involved.
Children shall not play with the
appliance.
Cleaning and user maintenance shall
not be made by children without
supervision.
Keep all packaging away from
children as there is risk of suffocation
Do not let children play with the
appliance, keep pets away.
Old appliances must immediately be
operated as unusable. Unplug and turn
off the power cable flush with the
appliance. Make the door lock
inoperable, or better yet, remove the
door to prevent such a child or animal
may remain trapped inside while
playing.
If problems occur, and that you cannot
solve with the following advice we give
you (see "Troubleshooting"), use only
the approved customer service centres
or to a qualified professional.
WARNING
To avoid a hazard due to instability of
the appliance, it must be installed, fixed
if necessary, in accordance with the
instructions.
Maintain clear of obstruction
ventilation openings in the appliance
enclosure or in the built-in structure.
Do not use mechanical devices or

5
other means to accelerate the defrosting
process than those recommended by
the manufacturer.
Do not damage the refrigerant circuit.
Do not use electrical appliances
inside the food storage compartments of
the appliance, unless they are clearly
recommended by the manufacturer.
Do not store explosive substances
inside this appliance such as aerosols
containing flammable gases propellants.
Do not place the appliance in direct
sunlight.
Do not expose to flame.
Stop the appliance and unplug it
before cleaning or moving it.
For models equipped with a water
dispenser or ice maker compartment, fill
or connect only with a drinking water
supply.
If the supply cord is damaged, it
must be replaced by the manufacturer,
its after sales service or similarly
qualified persons in order to avoid a
hazard.
Cooling agents and insulation used in
this product contain flammable gases.
When you scrap the appliance, do it
from an authorized collection point. Do
not expose to flame
Refrigerant
Refrigerant isobutene (R600a) is
contained within the refrigerant circuit
of the appliance; it is a gas more
environmentally friendly, which is
nevertheless flammable.
During transportation and installation of
the appliance, ensure that none of the
components of the refrigerant circuit is
damaged.
Caution: risk of fire
If the refrigerant circuit should be
damaged:
- Avoid opening flames and any source
of ignition.
-Thoroughly ventilate the room in which
the appliance is located.
It is dangerous to alter the specifications
or modify this product in any way.
Any damage to the electric cord may
cause short-circuit, fire, and/or electric
shock.
Disposal
This symbol indicates that this
product should not be treated as
household waste.
Your appliance contains recyclable
materials. It is marked with this logo to
indicate that used appliances must be
delivered to an authorized collection
point.
Check with your dealer or technical
services in your area to find out the
points for used appliances closest to
your home. The appliance recycling
organized by your manufacturer will be
done under the best conditions,
according to the European directive on
waste electrical and electronic
equipment.
Thank you for your help in protecting
the environment.
Some packing materials of this device
are also recyclable. Recycle them and
play a role in protecting the
environment by depositing them in the
containers provided for this purpose.
In accordance with the most recent
legislation on the protection and respect
for the environment, your appliance
does not contain HFC’s, but a refrigerant
called R600a. The exact type of
refrigerant used in your appliance is also
clearly indicated on the rating plate

6
located inside the appliance, on the left
wall down. R600a is a non-polluting gas
that does not harm the ozone layer and
whose contribution to the greenhouse
effect is virtually zero.
Installation
WARNING: Correct installation
of your device complying with the rules
that are given in this installation guide
and use will allow you to keep your food
in good conditions and with optimized
energy consumption.
· If your appliance has wheels,
remember that they are only used to
facilitate small movements. Do not move
on longer distance.
· Make an initial cleaning before
connecting your device to the mains.
Before any maintenance, disconnect
your device. Do not pull the power cord
but directly enter the profile.
· Place the unit in a dry and ventilated
room.
· Avoid balconies, porches, decks;
excessive heat in summer and cold in
winter could prevent proper operation
of your device, or even damage.
· Do not place it near a heat source
such as radiator or oven for example.
· Keep a minimum distance between
your refrigerator and other furniture: 3
to 5 cm on the sides and 10 cm above
for good air circulation around the unit.
· Place the appliance at a suitable
distance from the wall using the
spacers if they provided in the
accessory bag.
· Your appliance has been designed for
optimum performance in a room
temperature. We then say that it is
designed for a special "climate class".
This climate class is clearly stated on
the rating plate located inside your
appliance, on the left wall down.
Beyond these temperatures, the
performance of your appliance may be
reduced.
Classe
Temperature
SN
from + 10°C to + 32°C
N
from + 16°C to + 32°C
ST
from + 16°C to + 38°C
T
from + 16°C to + 43°C
Advice:
After installation of your appliance, set
its feet so that it is slightly tilted
backwards, it will facilitate the closing of
the door.
Before putting food, clean the interior
and exterior of your appliance with
bicarbonate of soda dissolved in water
(1 tablespoon of bicarbonate for 4 litres
of water). Do not use alcohol, abrasive
powders or detergents which could
damage the surfaces. (See chapter
"Cleaning your appliance").
ELECTRICAL CONNECTION
The electrical installation must comply
with the applicable standards and must
be able to withstand the maximum
power indicated on the rating plate.
The plug must be properly grounded.
We cannot be held responsible for any
incident caused by defective electrical
installation.
Electrical Installation Tips
• Do not use extension cable or adapter
or power strip.
• Never remove the grounding.
• The socket must be easily accessible
but out of reach of children.
In case of doubt, ask to your installer.
Your device is compliant with EU
directives and their modifications.
ENERGY SAVING
To reduce the power consumption of

7
your appliance:
• Install it in a suitable location (see
"Installing your appliance").
• Keep doors open for as short time as
possible.
• Do not put hot food in your
refrigerator or freezer, particularly if they
are soups or preparations which emit a
large amount of steam.
• Ensure the optimal functioning of your
device by not letting accumulate too
much frost in the freezer (defrost it
when the ice thickness exceeds 5-6 mm)
and periodically cleaning the condenser
(see "Maintenance your device ").
• Regularly check the door seals and
make sure that they always close
effectively. If this is not the case, please
contact service after sales service.
• Do not let it set at too low a
temperature.
• Not fulfilling with drawers, bins and
shelves arrangement could lead to
increased energy consumption.
WARNING:
If the unit was shipped to home in a
horizontal position, place it vertically and
wait two hours before plugging it in. A
small amount of oil may have flowed
into the refrigeration circuit, you need to
give it time to flow back towards the
motor before connecting the appliance,
otherwise you may damage it.
Before any maintenance, disconnect the
power plug. Do not pull the power cable
but directly enter the profile.
CLEANING AND MAINTENANCE
Before cleaning, unplug the appliance
and turn off the power.
Do not clean the appliance with
metal objects, a steam system, volatile
oils, organic solvents or abrasives.
Do not use sharp objects to remove
ice. Use a plastic scraper.
To replace the light bulb, if operation
is possible by the user himself, please
refer to the "Maintenance" of this
manual. Always be sure to unplug your
appliance before.
WARNING: If the appliance is equipped
with a LED lighting, it can only be
replaced by a qualified technician.

8
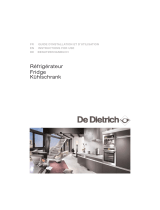
2. INTRODUCTION TO YOUR APPLIANCE
Overview
Control panel
and Light
Glass
Shelves
Baclonies
Crisper Cover
Crisper

9
Reverse Door
Tools required: Philips screwdriver, Flat bladed screwdriver, Hexagonal spanner.
Important! Reversing the door is a 2-people job
Ensure the unit is unplugged and empty.
To take the door off, it is necessary to tilt the unit backwards. Avoid laying it flat as this may damage the cooling system. Rest
the unit on something solid so that it will not slip during the door reversing process.
All parts removed must be saved to do the reinstallation of the door.
1. Unscrew the top hinge. Then lift the door and place it on a padded
surface to avoid scratching.
2. Remove bottom hinge pin from right to left.
3. Unscrew top hinge pin from the hinge. Then turn the hinge over and screw hinge pin.
4. Re-fit the door and then upper hinge on left side. Ensure the door is
aligned horizontally and vertically, so that the seals are closed on all sides
before finally tightening the upper hinge. If necessary, use a spanner to
tighten the hinge.

Installation
10
1220~1230m
m
1210m
m
1220m
m
Kits for installation
Guide x 2 Guide Cover x 2
Slider x 2 Slider Cover x 2
Short Screw x 13 Long Screw x 2 Rubber Seal x 1
Install the appliance
1. Ensure the size of cabinet and ventilation are enough.
≥38mm
≥550mm
min.
200 cm
2
540mm
540mm
15mm
1182mm
18mm
min.
200 cm
2

Installation
11
2. Slowly and carefully push the appliance into the cabinet.
Ensure the opening side is as close to the cabinet wall as possible.
3. Screw a guide to holes in the side of appliance door with short screws.
Insert the slider into the guide, then fully open and close appliance door
and wooden door to check whether wooden door can fully and
smoothly close.
Sli der
Screws
Guide
4. Open the appliance door and the wooden door together. Once the
door opens and closes at all angles, mark the position of the slider. Take
slider out of guide and fix slider with wooden door by two short
screws. Then fix slider cover onto the slider.
5. Unscrew the guide from appliance door.
6. Repeat step 2 to 5 to fix another slider and
cover.
Screws
Sli der
7. Fit two guides with sliders and fix them with short screws.
Then fix guide covers with guides.

Installation
12
8. Double check the door can close and open smoothly and appliance is
sealed well. If not, slightly adjust the unit. Then fix bottom bracket with
wooden cabinet with two long screws.
9. Fix top bracket with wooden cabinet by short screws.
10.Attach rubber seal to the gap between unit and wooden
cabinet on the side from which the door opens.

Daily Use
13
3. USING YOUR APPLIANCE
First use
Cleaning the interior
Before using the appliance for the first time, wash the interior and all internal accessories with lukewarm water and some neutral
soap so as to remove the typical smell of a brand new product, then dry thoroughly.
Important! Do not use detergents or abrasive powders, as these will damage the finish.
Control Panel
1 2 3 4 5
Smart
L2
Super
L3
B1
Adjust
Mode
B2
L1
Buttons
B1– Press to adjust setting of compartment in cycle of 1,2,3,4, to 5.
B2– Press to select mode from Smart, Super and user setting.
Lights
L1 – show the setting of fridge compartment.
L2 – light on once Smart mode is selected.
L3 – light on once Super mode is selected.
Operation
Temperature Setting
1. Press Mode button (B2) to select user setting.
2. Press Adjust button (B1) to adjust the setting of appliance. Lower setting means lower temperature.
Smart Mode
Press Mode button (B2) to select Smart mode.
The appliance will automatically run according to the ambient temperature around the appliance.
Super Mode
Press Mode button (B2) to select Super mode.
The appliance will run to make the freezer compartment the coldest. After 54 hours, temperature will automatically be restored to
its original setting.
Turn off the appliance
Press and hold Adjust button (B1) for 5 seconds, the appliance will turn off. Press 5seconds again to turn on the appliance.
Door open alarm
The alarm will sound when door is left open for 90 seconds and it will not stop until the door is closed.
Accessories Movable shelves
The walls of the refrigerator are equipped with a series of runners so
that the shelves can be positioned as desired.

Daily Use
14
Positioning the door shelves
To permit storage of food packages of various sizes, the door shelves
can be removed and placed at different heights. To make these
adjustments, proceed as follows: gradually pull the shelf in the
direction of the arrows until it comes free.
Hints for fresh food refrigeration
To obtain the best performance:
Do not store warm food or evaporating liquids in the appliance.
Do cover or wrap the food, particularly if it has a strong flavour
Meat (all types): wrap in polythene bags and place on the glass shelves above the vegetable drawer.
For safety, store in this way only one or two days at the most.
Cooked foods, cold dishes, etc...: these should be covered and may be placed on any shelf.
Fruit and vegetables: these should be thoroughly cleaned and placed in the special drawer(s) provided.
butter and cheese: these should be placed in special airtight containers or wrapped in aluminum foil or polythene bags to
exclude as much air as possible.
Milk bottle: these should have a cap and should be stored in the balconies on the door.
Bananas, potatoes, onions and garlic, if not packed, must not be kept in the fridge.
4. CLEANING AND MAINTENANCE
Cleaning
For hygienic reasons, the interior of the appliance, including interior accessories, should be cleaned regularly.
Caution! Before carrying out any maintenance operation, disconnect the power supply.
Never clean the appliance with a steam cleaner. Moisture could accumulate in electrical components, danger of electrical
shock! Hot vapors can lead to the damage of plastic parts. The appliance must be dry before it is put back into service.
Important! Ethereal oils and organic solvents can attack plastic parts, e.g. lemon juice or the juice from orange peel, butyric
acid, or cleanser containing acetic acid.
Do not allow such substances to come into contact with the appliance parts.
Remove the food from the freezer. Cover them well and store them in a cool place.
Switch off the appliance and remove the plug from the mains. Switch off the circuit breaker, or turn off the fuse.
Clean the inside and the accessories with lukewarm water and some neutral soap. Regularly check the door seals and wipe clean to ensure
they are free from debris.
Rinse and dry thoroughly.
Never use detergents, abrasive powders, highly perfumed cleaning products or wax polishes to clean the interior as this will damage the
surface and leave a strong odor.
Once everything is dry, place the appliance back into service.
Clean drain hole
To avoid defrost water overflowing into the fridge, periodically clean the drain hole at back of
fridge compartment. Use a cleaner to clean the hole as showed in right picture.
Replace the lamp
The internal light is a LED type. To replace the lamp, please contact qualified technician.

Daily Use
15
5. TROUBLESHOOTING
Caution! Before troubleshooting, disconnect the power supply. Only a qualified electrician of
competent person must do the troubleshooting that is not in this manual.
Important! There are some sounds during normal use (compressor, refrigerant circulation).
Problem
Possible cause
Solution
Appliance is turned off.
Press “Adjust” button for 5 seconds to
turn on the appliance.
Appliance does not
work
Mains plug is not plugged in
or is loose
Insert mains plug.
Fuse has blown or is defective
Check fuse, replace if necessary.
Socket is defective
Mains malfunctions are to be
corrected by an electrician.
The food is too warm.
Temperature is not properly
adjusted.
Please look in the initial Temperature
Setting section.
Door was open for an extended
period.
Open the door only as long as
necessary.
A large quantity of warm
food was placed in the
appliance within the last 24
hours.
Temporarily set a colder temperature
The appliance is near a heat
source.
Please look in the installation
location section.
Appliance cools too
much
Temperature is set too cold.
Temporarily set a hotter temperature
Unusual noises
Appliance is not levelled
Adjust the wood cabinet if it is not
levelled.
The appliance is touching the
wall or other objects.
Move the appliance slightly.
A component, e.g. a pipe, on
the rear of the appliance is
touching another part of the
appliance or the wall.
If necessary, carefully bend the
component out of the way.
Water on the floor
Water drain hole is blocked.
See the Cleaning section.
If your appliance is still not working properly after making the above checks, please contact the After
Sales Center.
/