Page is loading ...

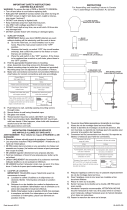
FRONT VIEW
TALL GLASS
SHORT
GLASS
TOP VIEW
IMPORTANT SAFETY INSTRUCTIONS
LIGHTED BULB IS HOT!
WARNING: To reduce the risk of FIRE or INJURY TO PERSON:
• Turnoffandallowtocoolbeforereplacingbulb.
• BulbgetsHOTQUICKLY!Contactswitchonlywhenturningoff.
• DONOTremaininlightifskinfeelswarm.(Lightisintense,may
cause“sunburn”)
• DONOTlookdirectlyatlightedbulb.
• Keepmaterialsawayfrombulbthatmayburn.
• UseONLYwithwattagespeciedorlower.
• DONOTtouchbulbatanytime,useasoftcloth.Oilfromskin
maydamagebulb.
• DONOToperatexturewithmissingordamagedglass.
1) TURN OFF POWER.
IMPORTANT:Beforeyoustart,NEVERattemptanywork
withoutshuttingofftheelectricityuntiltheworkisdone.
a) Gotothemainfuse,orcircuitbreaker,boxinyourhome.
Placethemainpowerswitchinthe“OFF”position.
b) Unscrewthefuse(s),orswitch“OFF”thecircuitbreaker
switch(s),thatcontrolthepowertothextureorroomthat
youareworkingon.
c) Placethewallswitchinthe“OFF”position.Ifthextureto
bereplacedhasaswitchorpullchain,placethoseinthe
“OFF”position.
2) Attachmountingstraptooutletbox.(Screwsnotprovided)
3) Threadhexnutontothreadedpipesothat5threadsare
exposedabovehexnut.Threadthatendofthreadedpipeinto
mountingstrapandtightenhexnutagainstmountingstrap.
4) Makewireconnections(connectorsnotprovided.)Reference
chartbelowforcorrectconnectionsandwireaccordingly.
5) Pushxturetowall,carefullypassingthreadedpipethrough
hole.
6) Securexturetowallusingthreadedcap.
7) Setglassthenspacerdownoversocket.
IMPORTANT:Positionofeachglasspieceshouldbeasillustrated.
Whilefacingxture,shortglasspieceshouldbeinstalledon
theleft.Tallglasspieceshouldbeinstalledontheright.
8) Attachsocketringtospanner.
9) Lowerspannerwithsocketringattacheddownoversocketand
threadsocketringontosocket.Tightensocketringtosecure
glassinplace.(DONOTovertighten.)
10) Insertrecommendedbulb.CAUTION: DONOTtouchbulbwith
barehands.Ifthishappens,cleanbulbwithdenaturedalcohol
andalintfreecloth.
11) Placeglasssleevedownoverbulb.
Connect Black or
Red Supply Wire to:
Connect
White Supply Wire to:
Black White
*Parallel cord (round & smooth) *Parallel cord (square & ridged)
Clear, Brown, Gold or Black
without tracer
Clear, Brown, Gold or Black
with tracer
Insulated wire (other than green)
with copper conductor
Insulated wire (other than green)
with silver conductor
*Note: When parallel wires (SPT I & SPT II)
are used. The neutral wire is square shaped
or ridged and the other wire will be round in
shape or smooth (see illus.)
Neutral Wire
DateIssued:8/3/12 IS-42942-CB
INSTRUCTIONS
For Assembling and Installing Fixtures in Canada
Pour L’assemblage et L’installation Au Canada
MOUNTINGSTRAP
COLLLIERDEFIXATION
THREADEDCAP
BOUCHONFILETÉE
SOCKETRING
BAGUEDELA
DOUILLE
GLASS
VERRE
SPACER
ENTRETOISE
THREADEDPIPE
TUBEFILETÉE
HEXNUT
ECROUHEXAGONAL
GLASSSLEEVE
MANCHONDEVERRE
BULB
LAMPE
SPANNER
TRICOISE
/


