
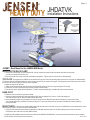
JHDRMT - Rack Mount for the JENSEN MINI Radio
MOUNTING THE RACK CLAMP:
1. Remove the 2 Clamp Bolts, using the supplied 5/32” hex key, separate the clamp and place the bottom half under the rack where
you want to locate the mount on the rack.
2. Place the top half of the clamp on the rack and install the Clamp Bolts. Tighten until you cannot move the clamp assembly.
TOP PLATE: The top plate of the JHDRMT can be mounted using any one of the three mounting holes across the top of the plate, for added exibility.
The mount comes fully assembled utilizing the center mounting hole and may not need to be changed. This will depend on the location you chose to attach
the mount to the rack and where you want the radio to be placed.
To adjust the angle of the Top Plate:
1. Slightly loosen the three Small Silver Set Screws in the Ball-Socket under the Top Plate, using the supplied 1/8” Hex Key.
2. Position the Top Plate to the desired angle and then re-tighten all three equally.
To lock the ball in place, tighten the Black Set Screw. To move or adjust the angle again, the Black Set Screw must be loosened.
BASE PIVOT:
The Base Pivot can be turned to any direction needed.
1. Remove the Shaft Bolt holding the Shaft onto the Base Pivot using the supplied 3/16” hex key. Lift the Shaft straight out.
This allows access to the 1/8” Base Pivot Bolt inside the Base Pivot.
2. Loosen the Base Pivot Bolt using the supplied 1/8” hex key enough to lift the Base Pivot and clear the locking pin on the top of the clamp.
Turn to the desired location and make sure that the locking pin is in one of the locking holes on the bottom of the Base Pivot before tightening
the Base Pivot Bolt.
MOUNT RADIO: At this point you should be able to determine the position of the Top Plate. Once you are satised that you have positioned the mount
exactly where you want it, it is time to mount the JHD MINI radio.
1. Using the 4 M4 machine screws that were included with the JHD MINI, attach the radio to the Top Plate matching up the 4 holes on the back
of the radio to the 4 holes on the top Plate (AMPS Pattern).
Complete the radio installation per the instructions included with the JENSEN JHD MINI Radio. Contact the vehicle manufacturer for advice regarding
the best location for Power and Ground connections.
37200042 REV-A
JHDATVK
Installation Instructions
Page 1-2

RACK MOUNT PART #JHDATVK INCLUDES:
(1) JHDRMT
(1) JXHDARMT
(1) JXHDRMT
(1) 3/16” Hex Key
(1) 5/32” Hex Key
(1) 1/8” Hex Key
LIMITED WARRANTY DISCLAIMER:
High Gear Specialties, Inc. (“High Gear”) warrants the Techmounts (the “Mount”), as described and identied in the accompanying installation instructions,
to be free from defects in material and workmanship for a period of one (1) year from purchase (the “Warranty Period”). All warranty claims by the customer
shall be made to High Gear Specialties, Inc., 940 W. Oakland Avenue, Suite A10, Oakland, FL 34787. Replacements shall not interrupt or prolong the term
of this Warranty.
High Gear’s obligation under this Warranty is limited, at its sole and exclusive option, to either the repair or replacement of the Mount where a defect has
been claimed during the Warranty Period, and which is returned, freight prepaid, to High Gear at the address given above. Upon inspection by High Gear,
the Mount or parts thereof which prove to be defective will be repaired or replaced at no charge.
THE WARRANTY SET FORTH ABOVE IS EXCLUSIVE AND NO OTHER WARRANTY, WHETHER WRITTEN OR ORAL, IS EXPRESSED OR IMPLIED.
HIGH GEAR SPECIFICALLY DISCLAIMS THE IMPLIED WARRANTIES OF MERCHANTABILITY AND FITNESS FOR A PARTICULAR PURPOSE.
The warranties set forth herein apply only to the original customer and are conditional upon the customer giving prompt notice to High Gear of any dis-
covered defects during the Warranty Period. High Gear shall not be responsible for any other defects or damage, including, but not limited to, any defects
or damage caused by or resulting from: (a) alterations to the Mount by anyone other than High Gear; (b) accident; (c) damage due to an intentional or
negligent act of a third party; (d)
abuse or negligence; (e) wear and tear.; (f) mishandling; (g) failure to use the Mount in a safe and reasonable manner, or (h) force majeure. If the Mount,
in the judgment of High Gear, shows evidence of having been altered, modied or repaired without the authorization of High Gear, the warranties set forth
herein shall not apply.
High Gear’s cumulative liability for damages of any kind whatsoever arising out of the use or possession of the Mount, regardless of the form of action,
whether in contract or tort, including negligence or strict liability, shall be limited to the purchase price of the Mount that caused the damages or that is the
subject matter of, or is directly related, to the cause of action.
IN NO EVENT SHALL HIGH GEAR BE LIABLE FOR INDIRECT, SPECIAL, INCIDENTAL, CONTINGENT OR CONSEQUENTIAL DAMAGES ARISING
OUT OF THE USE OR POSSESSION OF THE MOUNT, WHETHER OR NOT HIGH GEAR HAS RECEIVED NOTICE OF THE POSSIBILITY OR CER-
TAINTY OR SUCH DAMAGES OR LOSSES.
# 25575 v1
WARNING:
The mount which you have just purchased is intended for the convenient transport of electronic equipment and other portable items on your motorcycle,
ATV and UTV. Improper installation or use of the mount can potentially result in serious injury or death. We strongly recommend that you closely follow
the accompanying installation instructions and employ good judgment in your use of the mount. Do not allow yourself to become distracted by whatever
equipment or other item is secured by the mount when you are riding. Always wear a helmet, proper eyewear and protective clothing when riding, and
never ride when under the inuence of alcohol or drugs.
# 25584 v1

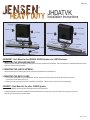
JXHDARMT - Rack Mount for the JENSEN JXHD35 Speaker and JAN139 Antenna
1. MOUNTING THE SPEAKER BRACKET:
Attach the Speaker Bracket to the Mounting Plate per the instructions included with the Speakers. Attach the speaker to the Speaker Bracket also per the
instructions included with the Speakers.
2. MOUNTING THE JAN139 ANTENNA:
Attach the Antenna to the mounting plate per the instructions included with the JAN139 Antenna.
3. MOUNTING THE RACK CLAMP:
1. Remove the 2 Clamp Bolts, using the supplied 5/32” hex key, separate the clamp and place the bottom half under the rack where
you want to locate the mount on the rack.
2. Place the top half of the clamp on the rack and install the Clamp Bolts. Tighten until you cannot move the clamp assembly.
JXHDRMT - Rack Mount for the other JXHD35 Speaker
Same as JXHDARMT above except skip step #2, Mounting the JAN139 Antenna.
Complete the Speaker and Antenna installation per the included instructions using the wire loom and cable ties to organize and tie up any
loose wiring to keep everything neat and orderly.
37200042 REV-A
JHDATVK
Installation Instructions
Page 2-2

RACK MOUNT PART #JHDATVK INCLUDES:
(1) JHDRMT
(1) JXHDARMT
(1) JXHDRMT
(1) 3/16” Hex Key
(1) 5/32” Hex Key
(1) 1/8” Hex Key
LIMITED WARRANTY DISCLAIMER:
High Gear Specialties, Inc. (“High Gear”) warrants the Techmounts (the “Mount”), as described and identied in the accompanying installation instructions,
to be free from defects in material and workmanship for a period of one (1) year from purchase (the “Warranty Period”). All warranty claims by the customer
shall be made to High Gear Specialties, Inc., 940 W. Oakland Avenue, Suite A10, Oakland, FL 34787. Replacements shall not interrupt or prolong the term
of this Warranty.
High Gear’s obligation under this Warranty is limited, at its sole and exclusive option, to either the repair or replacement of the Mount where a defect has
been claimed during the Warranty Period, and which is returned, freight prepaid, to High Gear at the address given above. Upon inspection by High Gear,
the Mount or parts thereof which prove to be defective will be repaired or replaced at no charge.
THE WARRANTY SET FORTH ABOVE IS EXCLUSIVE AND NO OTHER WARRANTY, WHETHER WRITTEN OR ORAL, IS EXPRESSED OR IMPLIED.
HIGH GEAR SPECIFICALLY DISCLAIMS THE IMPLIED WARRANTIES OF MERCHANTABILITY AND FITNESS FOR A PARTICULAR PURPOSE.
The warranties set forth herein apply only to the original customer and are conditional upon the customer giving prompt notice to High Gear of any dis-
covered defects during the Warranty Period. High Gear shall not be responsible for any other defects or damage, including, but not limited to, any defects
or damage caused by or resulting from: (a) alterations to the Mount by anyone other than High Gear; (b) accident; (c) damage due to an intentional or
negligent act of a third party; (d)
abuse or negligence; (e) wear and tear.; (f) mishandling; (g) failure to use the Mount in a safe and reasonable manner, or (h) force majeure. If the Mount,
in the judgment of High Gear, shows evidence of having been altered, modied or repaired without the authorization of High Gear, the warranties set forth
herein shall not apply.
High Gear’s cumulative liability for damages of any kind whatsoever arising out of the use or possession of the Mount, regardless of the form of action,
whether in contract or tort, including negligence or strict liability, shall be limited to the purchase price of the Mount that caused the damages or that is the
subject matter of, or is directly related, to the cause of action.
IN NO EVENT SHALL HIGH GEAR BE LIABLE FOR INDIRECT, SPECIAL, INCIDENTAL, CONTINGENT OR CONSEQUENTIAL DAMAGES ARISING
OUT OF THE USE OR POSSESSION OF THE MOUNT, WHETHER OR NOT HIGH GEAR HAS RECEIVED NOTICE OF THE POSSIBILITY OR CER-
TAINTY OR SUCH DAMAGES OR LOSSES.
# 25575 v1
WARNING:
The mount which you have just purchased is intended for the convenient transport of electronic equipment and other portable items on your motorcycle,
ATV and UTV. Improper installation or use of the mount can potentially result in serious injury or death. We strongly recommend that you closely follow
the accompanying installation instructions and employ good judgment in your use of the mount. Do not allow yourself to become distracted by whatever
equipment or other item is secured by the mount when you are riding. Always wear a helmet, proper eyewear and protective clothing when riding, and
never ride when under the inuence of alcohol or drugs.
# 25584 v1
-
 1
1
-
 2
2
-
 3
3
-
 4
4


Jensen Heavy Duty JHDATVK User manual
- Type
- User manual
Ask a question and I''ll find the answer in the document
Finding information in a document is now easier with AI
Related papers

Other documents
-
Voyager JXHDARMT Installation guide
-
-
-
Husky T-124C Owner's Manual And Assembly Manual
-
CFMoto UFORCE Series Owner's manual
-
-
Polaris Victory Cross Country / 8-Ball / Tour / Magnum Owner's manual
-
Bush Hog Harrow Owner's manual
-
Victory Motorcycles Victory Cross Roads / Country / Ness Sig / Tour INTL Owner's manual
-
CFMoto CFORCE 600 Owner's manual