Page is loading ...

NOTE: DIAGRAMS & ILLUSTRATIONS ARE NOT TO SCALE.
HEARTH PRODUCTS
KITS AND ACCESSORIES
750,253M
REV. NC 06/2008
INSTALLATION INSTRUCTIONS FOR FACADE KITS
FOR USE WITH ADAGIO™ DIRECT-VENT GAS FIREPLACES
TM
FPO
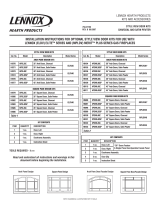
KIT CONTENTS:
1 ea. Facade Assembly
1 ea. Left Gate
1 ea. Right Gate
TOOLS / SUPPLIES NEEDED:
None
GENERAL INFORMATION
These decorative facade kits are offered in two attractive styles, Iron Garden
Gate and Copper Garden Gate. If you encounter any problems or need
clarification of these instructions, contact you local distributor or dealer.
Note: The framing of the appliance will need to be elevated by 3/4"
minimum above the floor to allow for the proper fit of the facade (i.e. 3/4"
board as platform). See Installation Instructions Manual.
INSTALL ONLY WHEN FIREPLACE IS OFF AND COOL.
ALL WARNINGS, PRECAUTIONS AND INSTRUCTIONS PROVIDED IN THE
INSTALLATION INSTRUCTIONS MANUAL AND THE CARE AND OPERATION
MANUAL PROVIDED WITH THE APPLIANCE APPLY TO THESE INSTRUC
-
TIONS. THOROUGHLY READ AND FOLLOW THE INSTRUCTIONS PRO
-
VIDED WITH THE APPLIANCE BEFORE PROCEEDING TO THE FOLLOWING
INSTRUCTIONS.
Cat. No Model Description
H5775 ADAGIO-IG Garden Gate, Vintage Iron Facade
H5776 ADAGIO-CPD Garden Gate, Vintage Copper Facade
1
Figure 1 - Kit Contents
Iron Garden Gate Facade
Copper Garden Gate Facade
Installer: Leave This Instruction Sheet With The Appliance.
Consumer: Retain This Instruction Sheet For Future Reference.
INSTALLATION INSTRUCTIONS
1. Install the appliance, firebox liner and logs per the Installation Instruc-
tions Manual provided with appliance and the Installation Instruction
Sheet provided with the firebox liner kit (sold separately).
Hanging Brackets
Back of Facade Shown

2
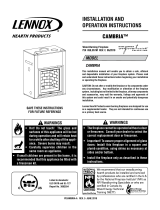
2. Install the facade onto the fireplace face per instructions in
Figure 2.
4. See
Figure 5 for instructions on accessing the control compartment.
The gated doors must be open to access the control compartment
door. To open; pull doors open until magnet latches release.
Figure 5 - Opening the Control Compartment Door
Figure 2 - Install Facade
Control Compartment Door
Control Compartment
Magnet
Magnet
3. Install the left and right side gates as shown in Figures 3 and 4. The
hinges on the gates hang on the hinge pins on the facade.
Ensure that hinge is
fully seated as shown
Door Hinge
Facade Hinge Pin
Door Hinge
Facade Hinge Pin
Figure 3 - Align Door Hinges Over Facade Hinge Pins
Figure 4 - Lower Door Over Pins Until Fully Seated
Figure 6
To open, pull the hinged door forward and down as shown. To close, hinge
the door closed until magnets secure it in place.
Printed in U.S.A. © 2008 Lennox Hearth Products
P/N 750,253M REV. NC 06/2008
Lennox Hearth Products reserves the right to make changes at any time, without notice, in design, materials, specifications, prices and the discontinuance of colors, styles and products. Consult
your local distributor for fireplace / insert code information.
NOTE: DIAGRAMS & ILLUSTRATIONS ARE NOT TO SCALE.
Lennox Hearth Products
1110 West Taft Avenue • Orange, CA 92865
Completed
Installation
Tabs on Bracket
Assemblies (2
places each side)
Slots on Fireplace
(2 places each side)
Facade
Align the tabs on the
bracket assemblies all
the way into the slots
on fireplace, then push
facade down to ensure
engagement.
Note: There are two
mounting positions on the
facade hanging brackets
to better accommodate a
range of facing thick-
nesses. Adjust to the
notch on the hanging
bracket that works best
for your installation.
/