11
Section 2: Operating
7/03/07
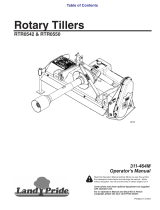
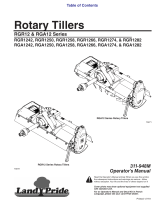
RTA2064, RTA2072, RTR2064 & RTR2072 Rotary Tillers 311-328M
Land Pride
Table of Contents
Section 2: Operating
Transporting
!
CAUTION
When traveling on public roads whether at night or during the
day, use accessory light and devices for adequate warning to
operators of other vehicles. Comply with all federal, state and
local laws.
1. When raising the tiller to the transport position, be
sure that driveline does not contact tractor or tiller.
Adjust the tractor’s 3-point hitch lift height so that the
tiller tines are not lifted more than 14 inches off the
ground to prevent damage to the driveline.
2. Be sure to reduce tractor ground speed when
turning; and, leave enough clearance so the tiller
does not contact obstacles such as buildings, trees
or fences.
3. Select a safeground travel speed when transporting
from one area to another. When traveling on
roadways, transport in such a waythat fastermoving
vehicles may pass you safely.
4. Whentravelingoverroughorhillyterrain,shifttractor
to a lower gear.
Parking
The following steps should be taken when preparing to
store the tiller or unhitch it from the tractor. Also see
Storage in the “Maintenance and Lubrication” section
starting on page 17 for additional information on long
term storage of your tiller.
1. Park the tiller on a level, solid area.
2. Shut off tractor engine and engage parking brake.
3. Set parking stand to desired height for re-hook-up
and install pin to lock in place.
4. Unhitch from tractor.
5. SeeStorageinthe“MaintenanceandLubrication”
section on page 17 if tiller is not going to be used for
a long period.
General Notes for Field Operations
Beforebeginningtotillthefollowinginspectionshouldbe
performed:
1. Check oil level in gearbox and chaincase. Refer to
Lubrication in the “Maintenance and Lubrication”
section starting on page 14.
2. Check that all plugs have been replaced properly in
the gearbox and chaincase.
3. Check drive chain tension. Refer to Drive Chain in
the “Adjustment” section on page 13.
4. Be sure all tiller tines, bolts and nuts are tight.
5. Be certain all guards and shields are in place and
secure.
IMPORTANT: AlwaysdisengagePTObeforeraising
the tiller to transport position.
6. Grease driveline shaft and all other grease fittings.
7. Clear the area to be tilled of rocks, branches and
other foreign objects.
8. Tall grass and weeds may need to be mowed before
tilling.
9. Operate with 540 rpm PTO tractor.
10. At first begin tilling at a slow forward speed and shift
up as ground conditions warrant.
11. Tiller should be operated with the tiller deck level to
the ground.
12. Tiller tines will cut better at a faster rotor speed than
at reduced throttle.
13. Do not engage PTO at full throttle.
14. Tilling should not be done in wet conditions as soil
will stick to tines.
15. Aftertillingthefirst50feet,stopandchecktoseethat
the tiller is adjusted properly.
16. Donot make turns or attemptto backup while tiller is
in the ground. See important note below.
17. Do not engage PTO with machine in the fully raised
or lowered position.
18. Periodically check for foreign objects wrapped
around the rotor shaft and remove them after
disengaging PTO, turning off tractor, and removing
ignition key.
Operating Check List
In addition to design and configuration of equipment,
hazard control and accident prevention are dependent
upon the awareness, concern, prudence and proper
training involved in its operation, transport, maintenance
and storage of equipment. Before beginning to operate
your Rotary Tiller, the following inspection should be
performed.
Operating Checklist
✔ Check Reference
Read “Important Safety Information”
Page 1
Read all of the Tractor Hook-Up and preparation
instructions.
Page 9
Read “Operating Instructions”
Page 11
Lubricate the tiller as needed. Refer to Lubrica-
tion.
Page 18
Check the tiller initially and periodically for loose
bolts & pins, Torque Values Chart.
Page 23
Make sure all guards and shields are in place.
Page 11
Checkinitiallyandperiodically forloosebolts,pins,
and chains.
Page 11
IMPORTANT: Turning or backing up with rotary
tines in the ground will damage the tiller.