Page is loading ...

OWNER'S MANUAL
Mix
,
n
Machine
™
VITA-MIX CORPORATION
Vita-Mix Corporation • Foodservice Division
8615 Usher Road
Cleveland, OH 44138
(440) 235-4840 • (800) 437-4654 • (440) 235-0214
XMMOO1 5/99 Pined in USA
Mix
Mix
,
,
n
n
Machine
Machine
F R O Z E N D E S S E R
T M I X E R
VITA - M IX
®
F O O D S E R V I C E
Mix
Mix
,
,
n
n
Machine
Machine
F R O Z E N D E S S E R T M I X E R
VITA -MIX ®
F O O D S E R V I C E

THE "MIX'N MACHINE” MIXER COMBINES A FAST
STRONG INDUCTION MOTOR WITH DIFFERENT STYLES
OF SAFE PLASTIC AGITATORS. BY RAPIDLY MOVING
THE CUP UP AND AROUND THE AGITATOR, A THOROUGH
MIXING JOB CAN BE ACCOMPLISHED IN AN AVERAGE
OF 10 SECONDS. THE HAZARDOUS STAINLESS STEEL
AGITATORS OF OTHER BRANDS, (USED IN THE CENTER
OF THE CUP TO AVOID CUTTING CUPS AND HANDS),
TAKE MUCH LONGER TO DO THE SAME JOB. WITH THE
MIX'N MACHINE, THE CUSTOMER IS SERVED FASTER
WITH A MINIMUM OF LABOR AND MACHINE TIME.
MAKE SURE YOUR OPERATORS LEARN TO MOVE
THE CUP UP AND DOWN AND AROUND TO ACHIEVE
MAXIMUM BENEFITS FROM THIS MACHINE.
Thank you for purchasing the
Mix
,
n Machine
™
by Vita-Mix®!

1
12
FIVE YEAR LIMITED PARTS ONLY WARRANTY
This appliance is guaranteed to operate satisfactorily for a period of ve (5) years
from the date of purchase, when used in accordance with the instruction manual. This
guarantee does not apply in cases of tampering, misuse, abuse, re, ooding, or other
abnormal conditions. Cosmetic changes, such as discoloration of parts of the product in
the hands of the user or the effects of the use of abrasive cleaners will not be warranted
or considered defects. The cleaning or removal of food products along with any damage
caused by allowing them to build up is not covered by this warranty. This warranty further
excludes distortion, wear or breakage of the splash guard, mixing agitator, or spoon drive
shaft extension and damage to the foot control caused by water or other contaminants.
The intended purpose for which this guarantee applies is the mixing of miscellaneous
food items into soft serve ice cream or other condiments of similar viscosity in individual
cups for retail sale. All parts are warranted against defects in materials and workmanship.
The splash guard, mixing agitator, or spoon drive shaft extension and foot control are not
included in the ve (5) year warranty.
For Warranty service return the defective mixer, components, or accessories prepaid
to Vita-Mix or its local service station:
1. Evidence of Purchase and Date
2. Description of problem
3. Complete name, return address and phone number
Your unit will be repaired or replaced (with equivalent equipment) at the option
of the Vita-Mix Corporation and returned, at owner's expense, in rst class operating
condition to the sender. Parts and labor will be at no charge when in accordance with all
the conditions in this warranty. Do not return the splash guard with the mixer. Make sure
all returned items are well packaged.
Vita-Mix may, at its option, require the return of the defective parts. Replacing parts
yourself per instructions provided will not void or reduce your warranty. However, Vita-
Mix will not pay for labor not provided directly by Vita-Mix.
This guarantee is in lieu of all other guarantees, express or implied. No representative
or other person is authorized or permitted to make any guarantee or to assume any liability
not strictly in accordance with the foregoing. This warranty gives you specic legal rights
which may vary from state to state.
(Outside USA other warranties may apply)
Shipping Damage - Notify the Shipper & Carrier Immediately
Via-Mi Cowoaion
Foodeice Diiion
8615 Usher Road
Cleveland, Ohio 44138
(800) 437-4654 • (440) 235-0214
Fax: (440) 235-9670
IMPORTANT SAFEGUARDS
When using this mixer or any other electrical appliance, basic safety precautions
should always be followed, including the following:
1. Read all instruction before operating
2. To protect against electrical shock, do not put motor chamber (top of mixer)
into water or wash the upper portion of the mixer with excess water.
3. Children should not be allowed around appliances without close supervision.
4. Make sure the mixer is sitting or mounted solidly on a sturdy surface during
use.
5. Unplug the power cord from the wall outlet when not in use, before disassembling,
when putting on or taking off parts, or when cleaning other than power washing
the agitator.
6. Avoid contacting moving parts.
7. The use of attachments not recommended or sold by Vita-Mix may cause re,
electric shock, injury or other damages.
8. Do not use outdoors.
9. Do not let power cord hang over edge of counter or touch hot surfaces.
10. Do not operate any appliance with a damaged cord or plug or after the appliance
malfunctions, or is dropped or damaged in any manner.
11. Keep hands, nger, wash cloth, and other items away from agitator when
running.
12. Always keep splash guard in place while running.
13. The mixer comes equipped with a three-prong (grounding) plug which mates
with a standard three prong wall outlet. Make sure your outlet has a properly
installed and functional ground.
14. When using the foot pedal control, make sure it is located where it will not be
activated unintentionally. When the mixer is not likely to be used, turn off the
front switch, so the unit cannot accidentally be started with the foot pedal.
SAVE THESE INSTRUCTIONS

11
2
PERMANENT AGITATOR SHAFT ALIGNMENT
The Agitator shaft extension (#SCM-800) is threaded onto the end of the motor shaft
with slinger (DDR-800) sandwiched between (Right handed thread). This shaft is
always aligned before leaving the factory, however, a side load, blow during shipping,
moving, or use could cause misalignment.
Tighen Shaf Eenion:
Caution Shock hazard - Unplug the cord rst. Make sure the shaft extension is
threaded tight onto the motor shaft with slinger centered and square. A loose shaft
will always act misaligned and cause vibration. To tighten, remove black cap and
hold motor shaft with a screw driver in the slot on the top end. Then turn the agitator
with your hand until tight. If tools must be used to hold the shaft extension, be sure
to protect it from being scratched as that would reduce its cleanability.
Realignmen:
If the shaft is still misaligned, then rotate the shaft by hand while holding a mark-
ing pen close to the lower end. The rst spot to touch and leave a mark is the side of
the shaft most out of alignment. Lay the MIX'N MACHINE on its back (remove the
plastic agitator to avoid breakage) and hit the marked side of the shaft with a rub-
ber mallet. Repeat the process until the marking pen leaves a mark most of the way
around the shaft and the unit runs smooth. Regulate your mallet blows to move the
shaft towards the center without over shooting.
INTRODUCTION
Mixing various candies, cookies, fruits, nuts, liquid avors and other food items
into ice cream or frozen yogurt has made unlimited different combinations of avors
and textures available with only one freezer or starting avor.
The development of counter top and wall mount mixers have made this unlimited
resource available to even very small retail outlets or any where with limited counter
space at an affordable cost. The economic advantages of this process are enormous.
Mixing these combinations directly in the individual serving cup leaves a minimum
of waste and clean up.
Vita-Mix has engineered the Mix'n Machine to best meet the economic and
practical needs of the commercial user as follows:
1. Motor: Features a heavy duty ball bearing induction motor (like a commercial
drill press) with plenty of power and years of life expectancy for the busiest year-
round establishments.
By contrast, the Mix'n Machine does not have brushes (like a hand drill), belts,
couplings, extra bearings, or gears to consume power, produce extra heat, make
noise, require alignment, or wear out.
The Vita-Mix motor is further designed to maintain the optimal speed
(3485 RPM) throughout the load range. This feature will keep your product
more consistent.
The motor has been carefully sized with plenty of power to perform its function,
but not enough to present a safety hazard.
2. Drive: The motor mounted shaft has no separate drive components; it uses heavy
duty prealigned ball bearings - no extra parts or noise.
3. Permanent Agitators: Soft serve and Hard ice cream permanent agitators are
made out of FDA and NSF approved food safe material and present smooth,
rounded surfaces to the cup at any contact point. They are safer for people, cups
and product. (Use Mix'n Machine cup holders for hard ice cream).
4. The new patented disposable spoon agitator option now makes the Mix'n Machine
into a self serve process or eliminates a clean up step for an operator. This agitator
is also designed for operator safety. (Now you have the option to convert your
Standard Mix'n Machine to either the Permanent Agitator Model or to a Disposable
Spoon Agitator Model regardless of which Model you start with.)
5. Splash Guard: Made of clear attractive acrylic, it catches food material thrown
from the blade. It conveniently rotates up and out of your way for easy operation
and is easily removed for cleaning.

3
10
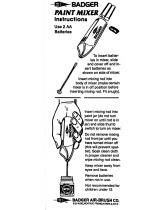
MIX'N MACHINE
PARTS LIST
PARTS LIST
Diagam# Q Deciwion Pa o
Iem#
M1 1 Stainless Steel Frame A S Y-
801
M2 1 Induction Motor (120 V) with Capacitor A S Y-
800
M4 1 Cap PLS-801
M6 2 Jumper Wires W I R-
801
M7 3 Cap Retaining Screws FST-801
M8 1 Snap in Rocker Switch C T L-
800
M9 1 5 Amp Circuit Breaker (120 V) C T L-
801
M10 1 Cord - U.S. W I R-
800
M11 1 Right Angle Strain Relief C O N-
800
M12 4 Motor Mounting Screw FST-800
M13 1 Slinger D D R-
800
M23 1 Front Label LBL-833
M24 4 Pivot Pin FST-803
M25 4 Pivot Pin Mounting screws FST-804
M30 1 Moving Sliding Splash Guard Cup PLS-836
M33 8 Fasteners FST-804
M34 1 Top Cover - wall mount STM-811
M35 1 Base - wall mount STM-813
M36 3 Front Label - wall mount LBL-834
M37 1 Agitaor Shaft Extension-wall mount SCM-807
M38 1 Vibration Damper Pad RBB-805
6. Moving Splash Guard: Made out of NSF and FDA Certied polycarbonate
material, it moves up and down along with the cup, catches food material thrown
from the agitator wall over all 360˚, inhibits throw out at the top, and thus keeps
the inside of Mix'n Machines and counter tops cleaner as well as (for wall mount
units) protecting the whole working area. Also, it is a built-in cup limiter which
prevents agitators from going through the bottom of cups. It is easily removed
for cleaning. You may want extra sliding splash guard cups to keep a clean
machine all the time. The sliding splash guard snaps onto the ends of the rods.
When mixing, this splash guard sits on top of the cup collar and rides up and
down with your motion. It prevents splash from the top when mixing and it
catches spin off from the agitator when it drops back into its resting position.
The splash guard is easily removed for cleaning.
The splash guard serves as a cup limiter to protect the bottom of 16 oz. cups
with disposable collars from penetration with mixing spoons. The spacer tubes
(2 enclosed) can be slid on the rods just above the sliding splash guard. These
t snugly on the rods and stay in place when cleaning. With these tubes in place,
the splash guard serves as a cup limiter for 12 oz. cups with disposable collars.
Simple spacer tubes of other lengths on the sliding rods can be used to protect
other smaller cups.
7. Frame: It is a simple, strong stainless steel design with splash area joints sealed
and internal radii provided.
8. Foot Control: A grounded foot control may be purchased for easy one-handed
operation. (optional)
9. Warranty: You get a ve year limited parts only warranty - see warranty
description on page 12 of this booklet for full details.
10. Wall mount Mix'n Machine: This is also a simple, strong stainless steel design
available only with moving splash guards. This unit can be mounted on the side
of a cabinet or on the wall, saving counter space.
11. Wall mount drip pans available: To catch dripping from agitators of wall mount
Mix'n Machines. These drip pans are easily removed for cleaning.
12. Moving splash guard Mix'n Machine: This is similar to the Standard Mix'n
Machine except it comes with the moving splash guard which functions as a
built-in cup limiter as well as keeps the inside of the housing cleaner.

9
4
MIXING PROCEDURE
1. Put soft serve product into a serving cup along with ingredients such as liquid
avoring, and ground solids such as candy, coolies, fruit or other condiments.
2. Snap on mix-through collar. Slide power mixing spoon up onto the shaft until it
snaps into place. (Disposable spoon units only.)
3. Mixing procedure for hard ice cream: Use cup holder or use sturdy cup to prevent
the agitator from going through the side of the cup. This hard ice cream agitator is
specially designed to mix the product at 5˚F (scooping temperature) aggressively
and thoroughly without wasting time.
4. Hold the cup securely in your hand and with a swirling motion, rotate cup up and
over the spinning agitator and completely around all sides of the cup. Moving the
cup so the agitator goes to the bottom of the cup and back up to the top of the cup,
to thoroughly mix the dessert. This also will decorate the dessert fully without
leaving a 'spunned' look down in the center of the cup. (If ice cream is hard, this
should be done slowly.) Develop your own technique for the nished product
characteristics you want. The agitator will do some chipping and breaking of the
solids. However, it is not intended to completely pulverize them because solid
chunks are expected to be evident in the nal product.
5. Both the permanent agitator and the disposable spoon agitator are designed to
reduce the possibility of damage when contacting a paper cup. However, they
should not be forced or held solidly against the side or bottom of the cup.
6. If the cup is hard to hold, either work the agitator into the mix more slowly or
start with softer ice cream. Do not continue to operate if you are having trouble
holding the cup.
7. When nished mixing, hold the top edge of the cup up around the still-turning
agitator for a few seconds to allow excess mixture to be thrown back off the
agitator and be caught by the cup or Mix'n Machine "mix-through collar."
8. FOR THE CLEANEST OPERATION WITH EITHER STANDARD UNITS OR
WALL MOUNT UNITS, use the "spoon agitators" and the Mix'n Machine "mix-
through collars" (both disposable). Turn off the mixer with the spoon still in the
cup and serve the customer.
9. This mixing action will normally take 10 seconds with soft serve ice cream and
a little more for hard ice cream. Some combinations may take more depending
upon additives, ice cream temperature, technique, and nal product desired. See
specic recipes for more detailed information. Most competitive blenders have
poorly designed agitators preventing safe aggressive mixing of the product while
it is still rm. Slow mixing wastes time and melts your product. Both of which
reduce your prots.
10. Use of Moving Splash guard: This splash guard moves up and down on top of
either a permanent or disposable cup collar. It will not restrict the circular and up
and down motion required for fast, efcient mixing. Because of its unique design,
it catches the food material thrown from the agitator and shields material from
being thrown out the top, providing for more complete protection.

8
CLEANING INSTRUCTIONS
PERMANENT AGITATOR:
1. Fill a durable square or rectangular container to within 1” of the top with hot (110˚F)
water containing Ivory liquid detergent (1 oz. per qt.). The container must be deep
enough to submerge the entire agitator and the shaft.
2. Hold the container up around the agitator and shaft, all the way up to the bottom
of the motor chamber, and turn the mixer on. Run for about 15 seconds. Repeat
several times. Make sure all portions of the shaft whichever contact food have been
submerged. (Sliding splash guard cups must be removed for this cleaning opera-
tion).
3. Repeat step 2, except use 105˚F rinse water.
4. Repeat step 2, except use 100ppm solution of Stera-R-Sheen Green label and run
agitator and shaft under solution for a minimum of two minutes total. To mix solu-
tion use one heaping tablespoon (1 ounce) of Stera-R-Sheen Green Label per gallon
of warm water (105˚F).
5. Resanitize at the start of the day per above instructions.
ALL MODELS:
6. Unplug the mixer.
7. Wall Mount Units only: Remove the sliding splash guard cup (*) and wash in a
detergent solution and sanitize. Do not use any abrasive material or paper towels
which would scratch the surface. Also avoid cleaners which contain ammonia (most
window cleaners contain ammonia). Not recommended for dishwashers.
*(To remove the moving sliding splash guard cup, squeeze the travel rods together and
slide the guard down. To mount the sliding splash guard cup slide the sliding splash
guard cup up over the rods till they snap in place. Resanitize at the start of the day.)
8. Cleaning the travel rods: To clean the travel rods just wipe them off. DO NOT
remove the rods from the mixer.
9. All stainless steel surfaces may be cleaned and disinfected with any commercial
cleaning solutions. However, do not spray any water or other uids into the motor
chamber. Do not use excess liquid around the switch, motor protector, or cord entry
hole. Abrasive may leave noticeable changes in the surface nish. Make sure all areas
in and around the motor enclosure are dry before plugging the mixer back in.
10. The foot control should be kept dry. Do not leave it on the oor when mopping or
washing the oor. When cleaning is required, unplug and clean with damp rag. Wait
until thoroughly dry before plugging back in.
Note: Never try to wipe the shaft when running. The rag can be ripped from your
hand resulting in severe unbalance with possible personal injury or damage to the
equipment.
The spoon agitator is disposable and should be discarded after one use.
PRESSURE SWITCH
BREAKER
CORD 120V INPUT
Brown
Lt. Blue
Yellow w/Green
Blue
Blue
Blue
Blue
Blue
Brown
Red
Brown
Yellow
Green
w/Y
ellow
M
O
T
O
R
ON/OFF SWITCH
M21
(2)
M2
M9
M10
M8

VIT A-M IX
®
FO ODS ERV IC E
Mix
,
n
Machine
F
R O Z E N D E S
S E R T M I X E
R
VIT A-MI X
®
FO ODS ERV ICE
Mix
,
n
Machine
F R O Z E N
D E S S E
R T M I X E
R
VIT A-M IX
®
FO ODS ERV IC E
Mix
,
n
Machine
F R O Z E N D E
S S E R T M I X E
R
7
6
FOOT CONTROL INSTRUCTIONS
To use the momentary foot switch to control the mixer, plug the foot control
provided into a grounded outlet. Plug the mixer cord onto the back of the foot control
plug. In this mode, both switches must be on to run the mixer. Leave the mixer switch
turned on during periods when you wish to use the momentary foot control. Make
sure the foot control is kept where it will not be activated accidentally.
MOTOR PROTECTION
Your mixer is equipped with a motor protector mounted on the right side of the
motor enclosure. Should your motor be kept from turning (locked rotor) or otherwise be
over loaded, the motor protector will trip. Should this occur, make sure the motor is free
to rotate and wait a short period for it to cool down before pushing the motor protector
button back and restarting the motor. Never remove or bypass your motor protector.
REPLACING PERMANENT AGITATORS
The Permanent Agitator is threaded into the shaft with a right handed thread. To
install or remove it, hold agitator in one hand and the shaft in the other, and turn it
in or out as required. Do not use tools on either the shaft or agitator as they could be
damaged. When you use the last agitator order more for your stock.
PARTS REPLACEMENT INSTRUCTIONS
The component parts diagram shows most of what you need to know to service
this appliance. However, the following specic instructions should be followed.
CAUTION SHOCK HAZARD:
1. Always make sure the unit is unplugged before removing the top or attempting any
kind of repairs.
2. Only replace parts with the correct parts provided by Vita-Mix or an authorized
distributor.
3. Before restarting, always make sure the unit is wired correctly per schematic,
that the safety ground is securely attached, and the cap is replaced.
4. Never pull or push on the agitator shaft and do not use it to carry or move the mixer,
as excessive side force could cause shaft bending and misalignment resulting in
noise, vibration, and reduced bearing life. (See shaft alignment instruction)
MOUNTING KITS WITH INSTRUCTIONS ARE AVAILABLE FOR WALL
MOUNT MIX'N MACHINES.
The Mix'n Machine models VMO804 and VMO804A mount on either the front
left or right hand side of a cabinet, or a piece of equipment. They can also be mounted
on the wall. Fasteners are provided for wood surfaces.
For ush mounting, the Mix'n Machine must project above the top of the cabinet
or equipment to allow clearance for the cord and top vent. If this is not possible use
stand-off mounting in KIT805. Cut out the template provided and tape it on the surface
where you want to mount the Mixer.
To mount on a wooden surface, drill (3) 1/8" pilot holes. Place the eyelets or
stand-off plastic mounting plate and tighten the screws in place.
The mixer can be mounted or removed from the cabinet or wall easily without
tools.
WHEN THE MIXER IS NOT MOUNTED, TAKE SPECIAL CARE NOT TO
BEND THE SLIDING RODS OR SHAFT, AS THIS WOULD PREVENT THEIR
SMOOTH ACTION.
NOTE: Hole sizes are different for different types of surfaces. Select the correct drill
size and type of surface before drilling. Stand-off mounting will require KIT805.
MOUNTING INSTALLATION
/