Fender Bassman 300-300 Pro Owner's manual
- Category
- Musical Instrument Amplifier
- Type
- Owner's manual
This manual is also suitable for
Page is loading ...
Page is loading ...

Important Safety Instructions
This symbol warns the user of dangerous voltage levels
localized within the enclosure.
This symbol advises the user to read all accompanying
literature for safe operation of the unit.
∆ Read, retain, and follow all instructions. Heed all warnings.
∆ Only connect the power supply cord to an earth grounded AC
receptacle in accordance with the voltage and frequency ratings
listed under INPUT POWER on the rear panel of this product.
∆ WARNING: To prevent damage, fire or shock hazard, do not
expose this unit to rain or moisture.
∆ Unplug the power supply cord before cleaning the unit exterior
(use a damp cloth only). Wait until the unit is completely dry
before reconnecting it to power.
∆ Maintain at least 6 inches (15.25 cm)of unobstructed air space
behind the unit to allow for proper ventilation and cooling of the
unit.
∆ This product should be located away from heat sources such as
radiators, heat registers, or other products that produce heat.
∆ This product may be equipped with a polarized plug (one blade
wider than the other). This is a safety feature. If you are unable
to insert the plug into the outlet, contact an electrician to replace
your obsolete outlet. Do not defeat the safety purpose of this
plug.
∆ Protect the power supply cord from being pinched or abraded.
∆ This product should only be used with a cart or stand that is
recommended by the manufacturer.
∆ The power supply cord of this product should be unplugged from
the outlet when left unused for a long period of time, or during
electrical storms.
∆ This product should be serviced by qualified service personnel
when: the power supply cord or the plug has been damaged; or
objects have fallen, or liquid has been spilled onto the product;
or the product has been exposed to rain; or the product does not
appear to operate normally or exhibits a marked change in
performance; or the product has been dropped, or the enclosure
damaged.
∆ Do not drip nor splash liquids, nor place liquid filled containers on
the unit.
∆ CAUTION: No user serviceable parts inside, refer servicing to
qualified personnel only.
∆ Fender
®
amplifiers and loudspeaker systems are capable of
producing very high sound pressure levels which may cause
temporary or permanent hearing damage. Use care when
setting and adjusting volume levels during use.
∆ WARNING: The unit must only be connected to a safety agency
certified power source (adapter), approved for use and compliant
with applicable local and national regulatory safety requirements.
Instrucciones de Seguridad Importantes
Este símbolo advierte al usuario que en el interior de la
carcasa hay niveles peligrosos de voltaje.
Este símbolo advierte al usuario que lea toda la
documentación adjunta para utilizar la unidad con
seguridad.
∆ Lea las atentamente instrucciones y sígalas al pie de la letra.
Tenga en cuenta todas las instrucciones.
∆ Conecte únicamente el cable de alimentación eléctrica a una
toma de CA de acuerdo con las especificaciones de voltaje y
frecuencia que se indican en la potencia de entrada INPUT
POWER del panel posterior de este producto.
∆ ADVERTENCIA: Para evitar daños, incendios y descargas
eléctricas, no exponga esta unidad a la lluvia ni a la humedad.
∆ Antes de limpiar el exterior de la unidad, desconecte el cable de
alimentación (utilícese únicamente un paño húmedo). Deje que
la unidad se seque completamente antes de volver a conectarla
a la corriente.
∆ Para una ventilación y refrigeración adecuadas, deje un espacio
mínimo de 15.25 cm detrás de la unidad.
∆ Este producto deberá estar situado lejos de fuentes de calor
tales como radiadores, registros de calefacción u otros
productos que generen calor.
∆ Es posible que este producto esté equipado con un enchufe
polarizado (un blade más ancho que el otro). Esta es una
función de seguridad. Si no puede introducir el enchufe dentro
de la toma de corriente, póngase en contacto con un electricista
para que la cambie ya que podría estar anticuada. No anule el
propósito de seguridad de este enchufe.
∆ Tenga cuidado de que el cable de alimentación no se pinche ni
se erosione.
∆ Este producto sólo se debe utilizar con el soporte recomendado
por el fabricante.
∆ El cable de alimentación de este producto deberá estar
desconectado de la toma de corriente cuando no se vaya a
utilizar durante un período de tiempo largo o en caso de
tormenta eléctrica.
∆ Este producto deberá ser reparado por personal cualificado si:
el cable de alimentación o el enchufe están dañados, ha caído
algún objeto o se ha derramado líquido encima, el producto ha
estado expuesto a la lluvia, no funciona normalmente o muestra
signos de cambio en el rendimiento, ha sufrido algún golpe o la
caja esta dañada.
∆ Evite que goteen o salpiquen líquidos y no coloque recipientes
con líquidos sobre la unidad.
∆ PRECAUCIÓN: Contiene piezas cuyo mantenimiento no lo
puede realizar el usuario, sino sólo personal cualificado.
∆ Los amplificadores y altavoces Fender
®
pueden producir niveles
de presión acústica muy elevados, que pueden provocar daños
temporales o permanenetes en el oído. Utilice la precaución al
ajustar el volumen nivela.
∆ ADVERTENCIA: La unidad sólo se podrá conectar a una fuente
de alimentación certificada por un organismo de seguridad
(adaptador) cuyo uso esté autorizado y que cumpla los
requisitos de seguridad aplicables a nivel local y nacional.
Page is loading ...
Page is loading ...

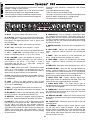
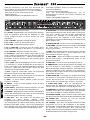
A. INPUT - Plug your electric bass guitar in here.
B. -6 dB PAD - Sensitivity / gain switch for the input signal.
Button IN provides a -6dB attenuation useful for electric
bass guitars with high output levels, such as basses with
active pickups.
C. CH 1 VOLUME - Adjusts the loudness of channel 1.
D. CH 1 LED - Illuminates when channel 1 is active.
E. CH 2 GAIN - Adjusts the channel 2 gain/distortion level.
F. CH 1 / 2 MIX LED - Illuminates when the ch select
button is IN indicating the Ch. 1 / Ch. 2 mix is active.
G. CH 2 VOLUME - Adjusts the loudness of channel 2.
H. CH SELECT - When this button is IN, both channel 1
and channel 2 are active. This button is used in
conjunction with the CH. 1 / 2 MIX knob. Using the
footswitch overrides this switch.
I. CH 1 / 2 MIX - Mixes the channel 1 and channel 2 output
levels. At “1”, only channel 1 is in the output mix. At “10”,
only channel 2 is in the output mix. By rotating the knob, an
optimum mix of both channels may be obtained.
J. LOW - Adjusts the low frequency level of both channels.
In its center notched position, the equalization is “flat” with
no modification.
K. HIGH - Adjusts the high frequency level of both
channels. In its center notched position, the equalization is
“flat” with no modification.
L. DEEP - Low frequency boost when this button is IN.
M. BRIGHT - High frequency boost when this button is IN.
N. MID NOTCH - Reduces the mid-frequency tones, giving
the amp a “punchy” sound when this button is IN.
O. GRAPHIC - Activates the graphic equalizer when this
button is IN. Using the footswitch overrides this switch.
P. LINE OUT - This switch is used in conjunction with the
line out jacks on the rear of the 300. When this button is
IN, the signal sent from the 300 includes frequency
shaping, channel switching and compression. The line out
signal does NOT include any effects which may have been
added via the effects loop. When the button is OUT the
signal is passed through the 300 without any tone shaping
or enhancement.
Q. GRAPHIC EQ - The 10 band-pass / band-reject filters
are spaced at octave intervals. Move each slider up to
boost or down to cut the level of each indicated frequency.
The EQ Trim slider will boost or cut the signal level through
the graphic EQ with the centered notched position having
no affect on the level.
R. GRAPHIC EQ LED - Illuminates when the graphic EQ is
active.
S. LOW COMP - Adjusts the compression ratio below
400Hz. Clockwise rotation increases the compression
ratio.
T. COMP - When this button is IN the compressors are
active. Using the footswitch overrides this switch.
U. HIGH COMP - Adjusts the compression ratio above
400Hz. Clockwise rotation increases the compression
ratio.
V. COMP LED - Illuminates when the compressor is active.
W. COMP EQ BAL - Mixes the low and high compressor
outputs. When the knob is at “1”, only the low compressor
is in the output mix. When the knob is at “10”, only the high
compressor is in the output mix. By rotating the knob, an
optimum mix of both compressors can be obtained.
X. INPUT LEVEL LED - Always indicates signal level.
Glows green above the compressor threshold. Glows red
above the pre-amp clipping/distortion threshold.
Y. COMP GAIN TRIM - This knob adjusts gain to
compensate for any level imbalance when the compression
circuitry has been engaged.
Z. TUNER ONLY - While this button is IN all outputs from
the amplifier are muted except to the tuner jack. Useful for
quick and silent bass tuning.
AA. MASTER VOLUME - Adjusts the overall volume level
of the 300 in conjunction with the gain controls of the active
channel(s).
BB. POWER LED - Illuminates when the 300 is ON and
receiving power.
CC. STANDBY - When the power switch and this switch
are ON, your 300 is ready to perform. In the standby
position, power is supplied only to the tube filaments and
sound will NOT come out of the amp. Using the standby
switch during short breaks eliminates tube warm-up time
and will increase tube life.
6
BB
BB
aa
aa
ss
ss
ss
ss
mm
mm
aa
aa
nn
nn
®®
®®
33
33
00
00
00
00
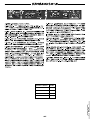
Congratulations on your purchase of a Bassman
®
300 bass
amplifier. Among its many features:
•300 Watts of output power into 2Ω, 4Ω, or 8Ω (selectable)
•Two channels for both clean and distortion outputs
•Vacuum tube pre-amplifier and power-amplifier design
•10-band graphic equalizer and split band compressor
•Footswitch with equalizer, compressor and channel
switching
•Low-noise differential effects loop
•Tuner out jack for pass-through tuning
•XLR and 1/4 inch line out jacks and a pass-through jack for
output to another amplifier or to a mixing console
•All steel chassis for enduring reliability

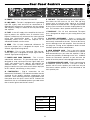
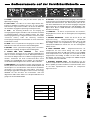
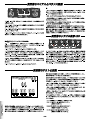
A. POWER - Turns the AC power ON and OFF.
B. LINE CORD - The 300 is equipped with a grounding
type IEC supply cord and must be connected to a
grounded AC receptacle in accordance with the voltage
and frequency ratings as shown on the rear panel of the
300 amplifier.
C. FUSE - In the AC supply of the amplifier the fuse will
help to protect the amplifier from an electrical fault.
Replace a failed fuse only with one of the same type and
rating (See Specification page). If the amplifier
repeatedly blows fuses, take the amplifier to an
authorized Fender® service center.
D. SEND - This 1/4 inch, unbalanced, differential, TS
(tip-sleeve) output jack is designed for output to an
external signal processing device.
E. RETURN - This 1/4 inch, balanced, TRS (tip-ring-
sleeve) input jack is designed to accept signal from an
external signal processing device.
F. POWER AMP PASS THROUGH - This 1/4 inch,
unbalanced, differential, TS (tip-sleeve) output jack is
designed to send a preamp line-level signal from your
“main” 300 amplifier to an “add-on” 300 amplifier for
additional output. Use a standard patch cord (1/4”
plugs) to connect this jack to the return effects loop jack
of the “add-on” 300 forming a “daisy-chain.”
G. FOOTSWITCH - Plug-in connection for the
footswitch (P/N 053895). The footswitch enables remote
switching of the graphic equalizer, compressors and
channels. These switching functions are disabled on the
front panel when this jack is used. NOTE: Connect the
footswitch with an unshielded speaker type cord rather
than a coaxial guitar cord for best results.
H. LINE OUT - Transformer balanced, line-level outputs.
Use either the XLR male or 1/4 inch, TRS (tip-ring-
sleeve) jacks to feed the 300’s signal to an external
power amplifier or sound console. The signal from either
of these jacks includes all the tone shaping done by the
300. This includes a bass speaker emulation circuit.
I. TUNER OUT - This 1/4 inch, unbalanced, TS output
jack is designed for output to your tuning device (not
included).
J. SPEAKER IMPEDANCE - Select a setting that
matches the total impedance load of the loudspeaker
enclosure(s) connected to the 300. Failure to do so may
result in damage to the 300 amplifier. See the chart on
this page for a listing of the impedance loads of some
common speaker cabinet combinations.
K. MAIN SPEAKER JACK - This is the main speaker
plug-in connection. There must ALWAYS be a speaker
load connected to this jack when the amplifier is ON to
prevent the possibility of damage to the unit. ALWAYS
connect or disconnect speakers to your 300 with the
power off and the power cord unplugged from the wall.
L. EXTERNAL SPEAKER JACK - Plug-in connection for
an additional speaker enclosure. This jack is wired in
parallel with the main speaker jack and must only be
used when another speaker is also connected to the
main speaker jack.
7
RR
RR
ee
ee
aa
aa
rr
rr
PP
PP
aa
aa
nn
nn
ee
ee
ll
ll
CC
CC
oo
oo
nn
nn
tt
tt
rr
rr
oo
oo
ll
ll
ss
ss
Speaker Cabinets
1 8Ω Cabinet
2 8Ω Cabinets
1 4Ω Cabinet
2 4Ω Cabinets
4Ω
LoadΩ
2Ω
4Ω
8Ω

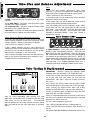
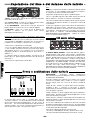
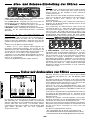
1. BIAS - Used with the bias test points to set the output
tube bias.
2. & 3. BIAS 100mV - Test points used to measure output
tube bias with a digital voltmeter.
3. & 4. BALANCE 0V - Test points used to measure output
tube balance with a digital voltmeter.
5. BALANCE - Used with the balance test points to set the
balance between the power amp tube sections.
Output Tube Bias & Balance Adjustment Instructions:
1. Turn on your 300 and let it warm up for at least two
minutes with the STANDBY switch in the ON position. Make
sure the amplifier is properly connected to a speaker.
2. Remove the bias controls cover box.
3. With a digital voltmeter set to its most sensitive DC
voltage scale, measure the voltage between the bias 100mV
test points (2 & 3) and with a screwdriver, turn the the bias
adjustment for a reading of .1 VDC (100 mVDC).
4. Next, connect the digital voltmeter to the balance 0V test
points (3 & 4) and turn the balance for a reading of 0 VDC.
5. Replace the bias controls cover box.
Notes:
•Make bias and balance adjustments ONLY when
necessary. If you are unsure about these settings take your
amp to the nearest authorized Fender® Service Center.
•Always set bias first, then set balance.
•If the output tubes can not be biased to at least 80mVDC,
replace the 6550C output tubes.
•If the output tubes can not be balanced, check the bias
setting and/or replace the 6550C output tubes.
•The tube trouble LEDs are NOT indicators of worn tubes.
If your tubes are worn and sound weak the LEDs will still
glow green. The trouble LEDs turn Red only after tube
failure has already occurred. DO NOT WAIT FOR TUBE
FAILURE TO REPLACE TUBES. (See Tube Testing &
Replacement section).
6. TUBE TROUBLE - These LEDs indicate tube failure or
trouble at their corresponding locations. When the LED
glows green, the tubes are operating. When the LED glows
red, a tube failure has blown the fuse at the corresponding
fuse location on the top surface of the chassis. NOTE: It is
normal for the LEDs to glow RED when the amp is in standby
mode. If a fuse blows, replace it only with one of the same
type and rating. If the amplifier repeatedly blows fuses, it
should be taken to an authorized Fender® service center.
8
TT
TT
uu
uu
bb
bb
ee
ee
TT
TT
rr
rr
oo
oo
uu
uu
bb
bb
ll
ll
ee
ee
LL
LL
EE
EE
DD
DD
ss
ss
TT
TT
uu
uu
bb
bb
ee
ee
TT
TT
ee
ee
ss
ss
tt
tt
ii
ii
nn
nn
gg
gg
&&
&&
RR
RR
ee
ee
pp
pp
ll
ll
aa
aa
cc
cc
ee
ee
mm
mm
ee
ee
nn
nn
tt
tt
TT
TT
uu
uu
bb
bb
ee
ee
BB
BB
ii
ii
aa
aa
ss
ss
aa
aa
nn
nn
dd
dd
BB
BB
aa
aa
ll
ll
aa
aa
nn
nn
cc
cc
ee
ee
AA
AA
dd
dd
jj
jj
uu
uu
ss
ss
tt
tt
mm
mm
ee
ee
nn
nn
tt
tt
Tube life varies depending upon playing style and
application. Power tubes have a shorter life than pre-amp
tubes which can last for many years. For continued
optimum performance from your amplifier, the tubes should
ONLY be replaced with the same type tubes as specified
above.
IMPORTANT: ALWAYS unplug the amplifier before
changing tubes and remember: THE TUBES GET HOT!
A simple way to check if the tubes are worn is to replace the
set in your amp with your spare set and listen for
improvement. (You carry a spare set of tubes and fuses,
don't you?)
•First, replace the OUTPUT tubes with new tubes; re-bias
and listen (bias/balance instructions are on the next page).
•Next, re-insert the original output tubes and re-bias.
Replace the PRE-AMP tubes with new tubes and listen.
•Finally, try replacing both the output (re-bias) and PRE-
AMP tubes with new tubes and listen.
If there is a marked improvement in the tone of your amp at
any point in this procedure, leave the new tubes in your amp
and purchase another spare set.
The 300's tube compliment consists of:
•One 12AT7A Tube (part #023531), (tube location V4)
•Three 12AX7WA Tubes (part #013341), (tube locations V1
thru V3.
•Six 6550C Tubes (part #048489), (tube locations V5 thru V10).

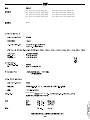
TYPE: PR 347
PART NUMBER: 021-3302-010 (120V, 60Hz) US 021-3312-010 (110V, 60Hz) TW
021-3332-010 (240V, 50Hz) AUS 021-3342-010 (230V, 50Hz) UK
021-3352-010 (220V, 50Hz) ARG 021-3362-010 (230V, 50Hz) EUR
021-3372-010 (100V, 50Hz) JPN 021-3392-010 (220V, 60Hz) ROK
POWER REQUIREMENTS: 900W
PREAMP SECTION
INPUT IMPEDANCE: 470kΩ
FULL POWER SENSITIVITY : 12mV
TONE CONTROLS: Treble: +/-15 dB @ 6kHz
Bass: +/-15 dB @ 40Hz
GRAPHIC EQUALIZER: +/-12 dB @ 31.5Hz, 63Hz, 125Hz, 250Hz, 500Hz, 1kHz, 2kHz, 4kHz, 8kHz, 16kHz.
MID NOTCH: -20 dB @ 700Hz
LOW BOOST: +10 dB @ 40Hz
HIGH BOOST: +10 dB @ 6kHz
COMPRESSOR:
CROSSOVER: 400Hz
RATIO: 1:1 Min to 4:1 Max
LINE OUT LEVEL: +6dB referenced to input (pre), 0dBV (post).
(transformer balanced)
POWER AMPLIFIER SECTION
INPUT IMPEDANCE: 20kΩ
POWER OUTPUT: 300W R.M.S. into 2, 4, or 8Ω @ <3% T.H.D.
SENSITIVITY : 1V R.M.S. (0dBv)
SPEAKER COMPLEMENT: Designed for use with the Bassman 410H Pro or Bassman 215
Bass Loudspeaker Enclosures
DIMENSIONS: Height: 10.1 in (25.7 cm)
Width: 25.5 in (64.8 cm)
Depth: 15.6 in (40 cm)
WEIGHT: 75 lb 34 kg
Product specifications are subject to change without notice.
9
SS
SS
pp
pp
ee
ee
cc
cc
ii
ii
ff
ff
ii
ii
cc
cc
aa
aa
tt
tt
ii
ii
oo
oo
nn
nn
ss
ss
Page is loading ...
Page is loading ...
Page is loading ...

TIPO: PR 347
NÚMERO DE PIEZA: 021-3302-010 (120V, 60Hz) US. 021-3312-010 (110V, 60Hz) TW
021-3332-010 (240V, 50Hz) AUS 021-3342-010 (230V, 50Hz) RU
021-3352-010 (220V, 50Hz) ARG 021-3362-010 (230V, 50Hz) EUR
021-3372-010 (100V, 50Hz) JPN 021-3392-010 (220V, 60Hz) ROK
REQUISITOS DE CORRIENTE: 900 W
SECCIÓN DEL PREAMPLIFICADOR
IMPEDANCIA DE ENTRADA: 470 kΩ
SENSIBILIDAD A TODA POTENCIA: 12mV
CONTROLES DE TONO: Agudos: +/-15 dB @ 6 kHz
Graves: +/-15 dB @ 40 kHz
ECUALIZADOR GRÁFICO: +/-12 dB @ 31,5 Hz, 63 Hz, 125 Hz, 250 Hz, 500 Hz, 1 kHz, 2 kHz, 4 kHz, 8 kHz, 16 kHz.
BOTÓN DE MEDIOS: -20 dB @ 700 Hz
AMPLIFICACIÓN BAJA: +10 dB @ 40 Hz
AMPLIFICACIÓN ALTA: +10 dB @ 6 Hz
COMPRESOR:
FRECUENCIA DE TRANSICIÓN: 400 Hz
RELACIÓN: 1:1 mín. a 4:1 máx.
NIVEL DE SALIDA: +6 dB respecto a la entrada (antes), 0 dBV (después).
(transformador con balance)
SECCIÓN DEL AMPLIFICADOR PRINCIPAL
IMPEDANCIA DE ENTRADA: 20 kΩ
POTENCIA DE SALIDA: 300 W R.M.S. a 2, 4 o 8Ω @ <3% T.H.D.
SENSIBILIDAD : 1V R.M.S. (0 dBv)
COMPLEMENTO DE ALTAVOZ: Diseñado para su utilización con cajas acústicas para
bajos Bassman 410H Pro o Bassman 215
DIMENSIONES: Height: 10.1 in. (25.7 cm)
Ancho: 25.5 in. (64.8 cm)
Fondo: 15.6 in. (40 cm)
PESO: 75 lbs. 34 kg
Las especificaciones del producto están sujetas a cambios sin previo aviso.
EE
EE
ss
ss
pp
pp
ee
ee
cc
cc
ii
ii
ff
ff
ii
ii
cc
cc
aa
aa
cc
cc
ii
ii
oo
oo
nn
nn
ee
ee
ss
ss
13
Page is loading ...
Page is loading ...
Page is loading ...
Page is loading ...
Page is loading ...
Page is loading ...
Page is loading ...

TIPO: PR 347
NUMERO DI PARTE: 021-3302-010 (120V, 60Hz) US. 021-3312-010 (110V, 60Hz) TW
021-3332-010 (240V, 50Hz) AUS 021-3342-010 (230V, 50Hz) RU
021-3352-010 (220V, 50Hz) ARG 021-3362-010 (230V, 50Hz) EUR
021-3372-010 (100V, 50Hz) JPN 021-3392-010 (220V, 60Hz) ROK
REQUISITI DI ALIMENTAZIONE: 900W
SEZIONE PREAMP
IMPEDENZA DI INGRESSO: 470kΩ
SENSIBILITÀ PER PIENA POTENZA: 12mV
CONTROLLI DI TONO: Alti: +/-15 dB @ 6kHz
Bassi: +/-15 dB @ 40Hz
EQUALIZZATORE GRAFICO: +/-12 dB @ 31,5Hz, 63Hz, 125Hz, 250Hz, 500Hz, 1kHz, 2kHz, 4kHz, 8kHz, 16kHz.
MID NOTCH: -20 dB @ 700Hz
LOW BOOST: +10 dB @ 40Hz
HIGH BOOST: +10 dB @ 6kHz
COMPRESSORE:
CROSSOVER: 400Hz
RAPPORTO: da 1:1 Min a 4:1 Max
LIVELLO USCITA DI LINEA: +6dB riferito all’ingresso (pre), 0dBV (post).
(bilanciato da trasformatore)
SEZIONE AMPLIFICATORE DI POTENZA
IMPEDENZA DI INGRESSO: 20kΩ
POTENZA: 300W valore quadratico medio per 2, 4 o 8Ω al 3% di
distorsione armonica totale
SENSIBILITÀ : 1V valore quadratico medio (0dBv)
COMPLEMENTO SPEAKER: Progettato per l’uso con Enclosure altoparlanti per basso
Bassman 410H o Bassman 215
DIMENSIONI: Altezza: 10.1 in. (25.7 cm)
Larghezza: 25.5 in. (64.8 cm)
Profondità: 15.6 in. (40 cm)
PESO: 75 lbs. 34 kg
Le specifiche dei prodotti sono soggette a modifica senza preavviso.
SS
SS
pp
pp
ee
ee
cc
cc
ii
ii
ff
ff
ii
ii
cc
cc
hh
hh
ee
ee
21
Page is loading ...
Page is loading ...
Page is loading ...
Page is loading ...
Page is loading ...
Page is loading ...
Page is loading ...
Page is loading ...
Page is loading ...
Page is loading ...

A PRODUCT OF:
FENDER® MUSICAL INSTRUMENTS CORP
CORONA, CA USA
Fender® and Bassman® are registered trademarks of FMIC
P/N 057731 REV A
-
 1
1
-
 2
2
-
 3
3
-
 4
4
-
 5
5
-
 6
6
-
 7
7
-
 8
8
-
 9
9
-
 10
10
-
 11
11
-
 12
12
-
 13
13
-
 14
14
-
 15
15
-
 16
16
-
 17
17
-
 18
18
-
 19
19
-
 20
20
-
 21
21
-
 22
22
-
 23
23
-
 24
24
-
 25
25
-
 26
26
-
 27
27
-
 28
28
-
 29
29
-
 30
30
-
 31
31
-
 32
32


Fender Bassman 300-300 Pro Owner's manual
- Category
- Musical Instrument Amplifier
- Type
- Owner's manual
- This manual is also suitable for
Ask a question and I''ll find the answer in the document
Finding information in a document is now easier with AI
in other languages
Related papers
-
Fender Super Bassman® Owner's manual
-
-
-
-
-
Fender Bassman 100 Rev C Owner's manual
-
-
-
Fender '65 Twin Reverb® Owner's manual
-
Other documents
-
ADVANCE DX1 Owner's manual
-
Koch STUDIOTONE Operating Instructions Manual
-
 T+A Elektroakustik Stereo Amplifier P 10 User manual
-
Evh 5150-III Owner's manual
-
SWR Stereo Amplifier SM-1500 User manual
-
-
Alesis GigaMix 8FX User manual
-
Zoom G3 Operating instructions
-
 SMc Audio SM-500SM-500 User manual
-
Williams Sound PLA-215 User manual

