FoodSaver V1085 is a versatile kitchen appliance that enables you to preserve the freshness of your food for longer, preventing freezer burn and spoilage. It comes with a range of features that make it easy to use and effective at keeping your food fresh.
With FoodSaver V1085, you can vacuum seal both dry and moist foods using FoodSaver bags and rolls. The vacuum sealing process removes air from the bags, which inhibits the growth of bacteria and molds, extending the shelf life of your food.
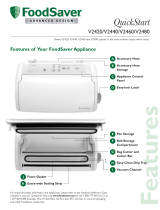
The device features an indicator light that lets you know when the vacuum sealing process is complete. It also has a built-in accessory port that allows you to connect FoodSaver accessories, such as canisters, universal lids, jar sealers, and bottle stoppers. These accessories enable you to vacuum seal a variety of containers, including jars, bottles, and canisters, making it easy to preserve liquids, delicate foods, and bulk items.
FoodSaver V1085 is a versatile kitchen appliance that enables you to preserve the freshness of your food for longer, preventing freezer burn and spoilage. It comes with a range of features that make it easy to use and effective at keeping your food fresh.
With FoodSaver V1085, you can vacuum seal both dry and moist foods using FoodSaver bags and rolls. The vacuum sealing process removes air from the bags, which inhibits the growth of bacteria and molds, extending the shelf life of your food.
The device features an indicator light that lets you know when the vacuum sealing process is complete. It also has a built-in accessory port that allows you to connect FoodSaver accessories, such as canisters, universal lids, jar sealers, and bottle stoppers. These accessories enable you to vacuum seal a variety of containers, including jars, bottles, and canisters, making it easy to preserve liquids, delicate foods, and bulk items.


-
 1
1
-
 2
2
-
 3
3
-
 4
4
-
 5
5
-
 6
6


FoodSaver V1085 is a versatile kitchen appliance that enables you to preserve the freshness of your food for longer, preventing freezer burn and spoilage. It comes with a range of features that make it easy to use and effective at keeping your food fresh.
With FoodSaver V1085, you can vacuum seal both dry and moist foods using FoodSaver bags and rolls. The vacuum sealing process removes air from the bags, which inhibits the growth of bacteria and molds, extending the shelf life of your food.
The device features an indicator light that lets you know when the vacuum sealing process is complete. It also has a built-in accessory port that allows you to connect FoodSaver accessories, such as canisters, universal lids, jar sealers, and bottle stoppers. These accessories enable you to vacuum seal a variety of containers, including jars, bottles, and canisters, making it easy to preserve liquids, delicate foods, and bulk items.
Ask a question and I''ll find the answer in the document
Finding information in a document is now easier with AI
Related papers
-
FoodSaver V1095 User manual
-
-
-
-
FoodSaver GameSaver Turbo User manual
-
-
-
 Tilia V2480 User manual
-
FoodSaver V2860 User manual
-
