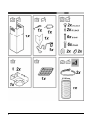
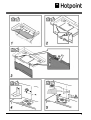
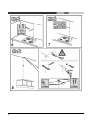
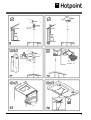
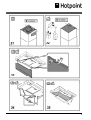
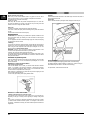
Hotpoint HXB9LSX is a range hood designed for domestic use. It can be used either in suction or filtering version, depending on your needs. In suction version, the fumes are conveyed outside of the building by means of a special pipe connected with the connection ring located on top of the hood. In filter version, one active charcoal filter is needed. The filter removes the grease and smells from the extracted air before sending it back into the room through the upper outlet grid. The hood has 4 speeds, including an intensive timed speed.
Hotpoint HXB9LSX is a range hood designed for domestic use. It can be used either in suction or filtering version, depending on your needs. In suction version, the fumes are conveyed outside of the building by means of a special pipe connected with the connection ring located on top of the hood. In filter version, one active charcoal filter is needed. The filter removes the grease and smells from the extracted air before sending it back into the room through the upper outlet grid. The hood has 4 speeds, including an intensive timed speed.


-
 1
1
-
 2
2
-
 3
3
-
 4
4
-
 5
5
-
 6
6
-
 7
7
-
 8
8
-
 9
9
-
 10
10
-
 11
11
-
 12
12
-
 13
13
-
 14
14
-
 15
15
-
 16
16


Hotpoint HXB9LSX is a range hood designed for domestic use. It can be used either in suction or filtering version, depending on your needs. In suction version, the fumes are conveyed outside of the building by means of a special pipe connected with the connection ring located on top of the hood. In filter version, one active charcoal filter is needed. The filter removes the grease and smells from the extracted air before sending it back into the room through the upper outlet grid. The hood has 4 speeds, including an intensive timed speed.
Ask a question and I''ll find the answer in the document
Finding information in a document is now easier with AI
Related papers
-
Whirlpool HXB9.8LT User guide
-
-
-
Hotpoint HTS93G User manual
-
Whirlpool WHSS 90F TS K Setup and user guide
-
-
-
-
Other documents
-
Ariston HBK 9 LS X User manual
-
Witt WUV60B-2 KJØKKENVENTILATOR User manual
-
ELICA Hidden User guide
-
Electrolux EFL326A Installation guide
-
-
KitchenAid KEWVP 80010 User guide
-
-
-
ELICA Fantasia User guide
-