Presto 06620 Operating instructions

Category
Barbecues & grills
Type
Operating instructions

This manual is also suitable for

I
NSTRUCTIONS
2003 by National Presto Industries, Inc.
Visit us on the web at www.GoPresto.com
11-inch Electric
Skillet
Roasts, fries, grills, stews,
one-dish meals.
Deluxe nonstick surface for
stick-free cooking and easy cleaning.
Dishwasher safe.
1
This is a
Listed appliance. The following important safeguards are recommended by most portable appliance manufacturers.
IMPORTANT SAFEGUARDS
To reduce the risk of personal injury or property damage when using electrical appliances, basic safety precautions should always be
followed, including the following:
1.
Read all instructions.
2.
Be sure that handles are assembled and fastened properly before using this appliance, (see page 2).
3.
Do not touch hot surfaces. Use handles.
4.
To protect against electrical shock, do not immerse control, cord, or plug in water or other liquid.
5.
Close supervision is necessary when any appliance is used by or near children.
6.
Unplug from outlet when not in use and before cleaning. Allow to cool before putting on or taking off parts, and before cleaning the
appliance.
7.
Do not operate any appliance with a damaged cord or plug or in the event the appliance malfunctions or has been damaged in any
manner. Do not operate if the legs become cracked or damaged. Return the appliance to the Presto Factory Service Department or to
the nearest Presto Authorized Service Station (see page 4) for examination, repair, or electrical or mechanical adjustment.
8.
The use of accessory attachments not recommended by the appliance manufacturer may cause injuries.
9.
Do not use outdoors.
10.
Do not let cord hang over edge of table or counter or touch hot surfaces.
11.
Do not place on or near a hot gas or electric burner or in a heated oven.
12.
It is recommended that this appliance not be moved when it contains hot oil or other hot liquid. If it must be moved when it contains
hot oil or other hot liquid, use extreme caution.
13.
Always attach heat control to appliance  rst, then plug cord into wall
outlet. To disconnect, turn control to OFF then remove plug from wall
outlet.
14.
Do not use appliance for other than intended use.
SAVE THESE INSTRUCTIONS
THIS PRODUCT IS FOR HOUSEHOLD USE ONLY.
A short power supply cord is provided to reduce the risk resulting from becoming entangled in or tripping over a longer cord.
Extension cords may be used if care is properly exercised in their use.
If an extension cord is used, the marked electrical rating of the extension cord should be at least as great as the electrical rating
of the appliance. The extension cord should be arranged so that it will not drape over the counter top or table top where it can
be pulled on by children or tripped over.
HOW TO ASSEMBLE
1.
Place unit upside down on an elevated surface for handle assembly. An elevated surface is necessary to prevent placing pressure
on one handle while installing the second handle. Failure to use an elevated surface may result in damage to the rst handle
installed.
2.
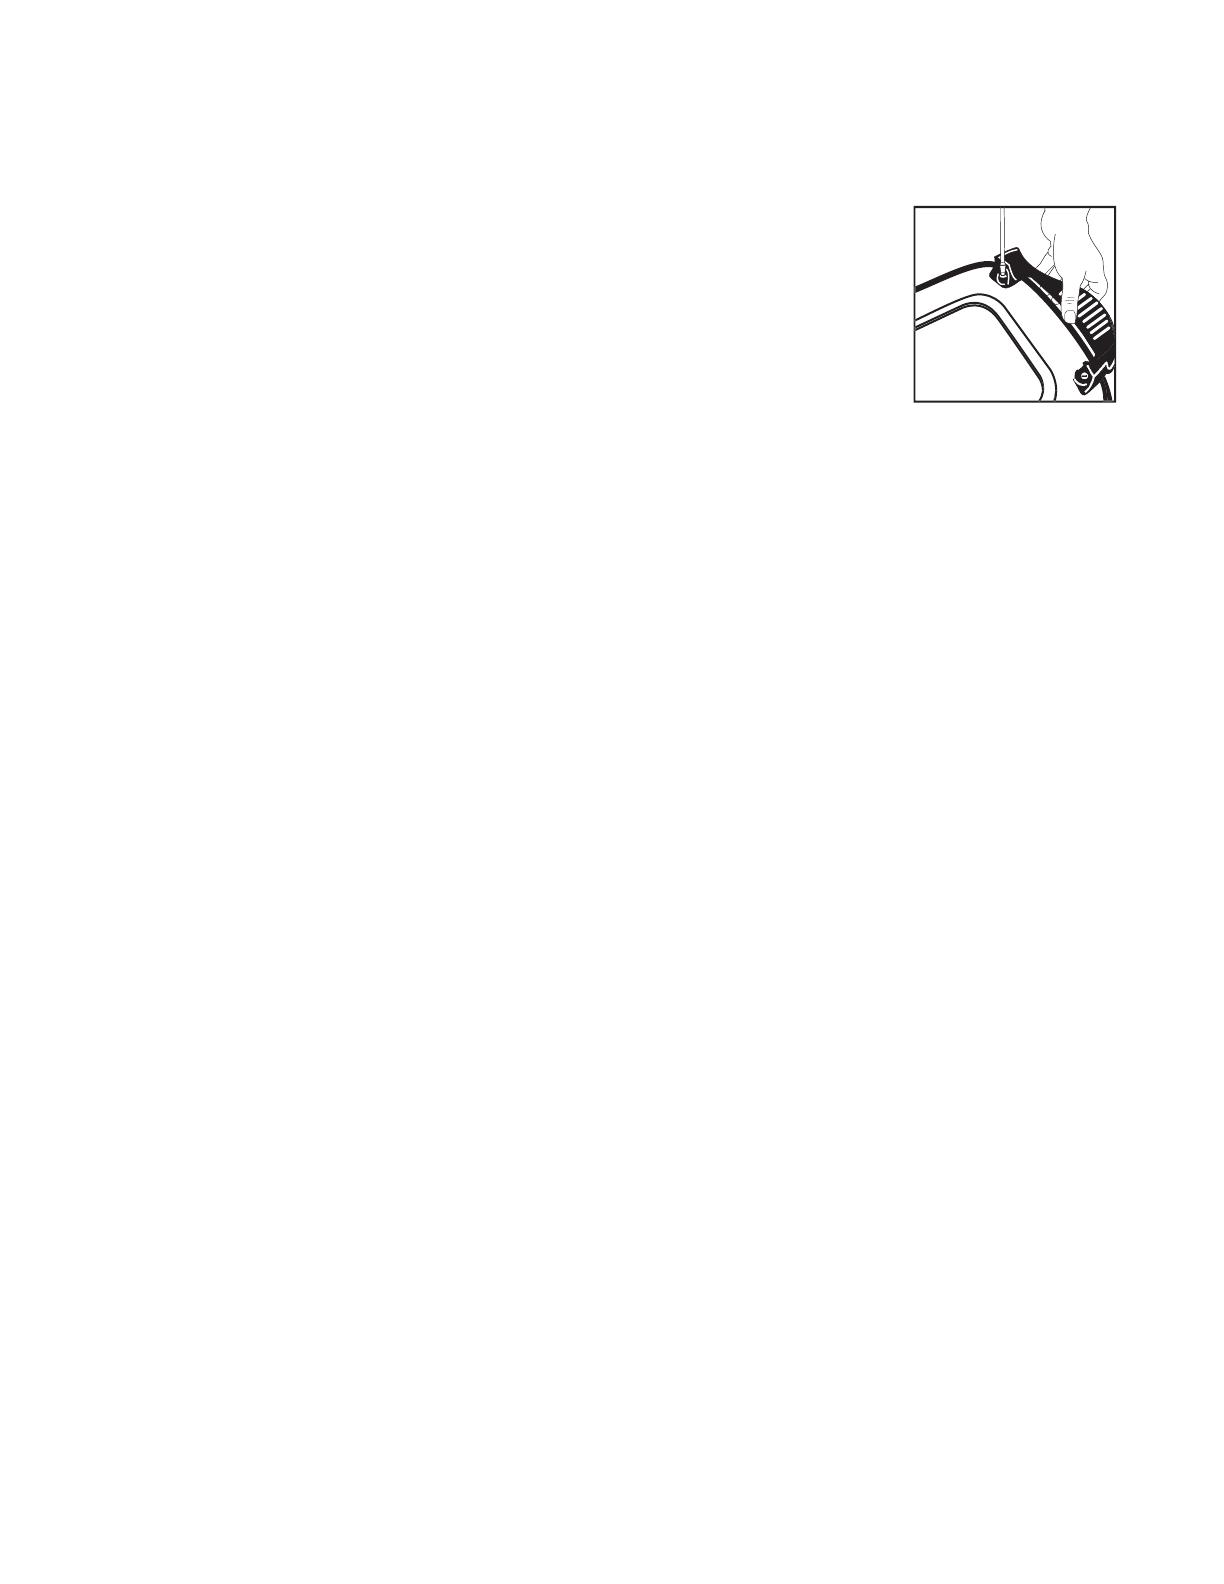
Remove the four screws from mounting projections on the skillet body.
3.
Position the handles on the skillet, lining up holes in the handles with mounting projections on the
skillet.
4.
Replace the screws and fasten securely, Fig. A.
Caution:
Overtightening can result in stripping of
screws or crack ing of handles and legs. When properly assembled, the skillet should sit level.
5.
To attach cover handle, remove the screws from the handle, place the handle over the holes in the
cover, replace the screws and fasten securely.
HOW TO USE
Before using for the  rst time, wash skillet in dishwasher or in warm, sudsy water, rinse and dry. Do not immerse Control Master
heat
control or let the heat control come in contact with any liquid. “Season” the nonstick cooking surface by rubbing lightly with cooking
oil. Remove excess oil with paper towel.
1.
Place skillet on a dry, level surface. To prevent possible heat damage to your counter top, place a heat resistant counter protector,
such as aluminum foil, under appliance.
2.
Insert the Control Master
heat control into the skillet so the two electrical pins on the skillet are fully inserted into the heat
control.
3.
Connect cord to a polarized outlet only. As a safety feature, this appliance has a polarized plug (one blade is wider than the other).
This plug will only  t in a polarized outlet one way. If the plug does not  t fully in the outlet, reverse the plug. If it still does not
t, contact a quali ed electrician. Do not attempt to defeat this safety feature.
4.
Turn Control Master
heat control to desired temperature (see page 3 for cooking temperatures). Remove cover and preheat skillet.
Pilot light goes off when selected temperature is reached (this takes approximately 10 to 15 minutes).
5.
Prepare food for cooking. Because the skillet features a nonstick  nish, food may be prepared with little or no oil.
6.
Place food in skillet and cook according to temperature-timetable (page 3). Heat should be adjusted according to personal
preference and particular food being cooked. During cooking, pilot light will go on and off indicating desired temperature is being
maintained.
7.
Turn heat control to OFF when cooking is completed. Unplug heat control from wall outlet then from appliance.
CARE AND CLEAN ING
Before initial use and after each subsequent use, wash skillet in dishwasher or in warm sudsy water, rinse and dry.
Do not immerse
Control Master
heat control in water or let it come in contact with any liquid.
For best results use nylon, plastic, wooden, or rubber utensils. Do not use metal utensils as they may scratch the nonstick surface. Do
not cut foods on the cooking surface.
After each use, clean the nonstick surface with a non-metal cleaning pad, such as Scotch-Brite Multi-Purpose Scrub Sponge* or
Scotch-Brite
Dobie Cleaning Pad*. Firm pressure can be applied, if necessary.
Do not use steel wool or abrasive kitchen cleaners.
Soaking the skillet to loosen food residue is not necessary. If, however, soaking the skillet is desired, do not soak for more than two
hours.
Soaking for more than two hours may damage the nonstick  nish.
In time, the nonstick nish may darken over the heating element. To remove this discoloration, use a commercial cleaner designed
for cleaning surfaces, such as dip-it
destainer**. These cleaners are available at most grocery and hardware stores. For best results,
follow the manufacturers instructions, being careful that any cleaning solution coming in contact with the exterior of the appliance
is wiped off.
After treating the skillet with a commercial cleaner, it is recommended that the cooking surface be wiped lightly with a cooking oil
before using. The outside nish of the skillet is easy to keep attractive and looking new. Simply wipe away spills and drips as they
occur. If food should happen to burn on, it can be removed with warm, sudsy water and a cleaning pad. Rinse and wipe dry.
IMPORTANT:
To ensure continued accuracy of the Control Master
heat control, avoid rough handling in use and storage.
Fig. A
*Scotch Brite and Dobie are trademarks of 3M.
** dip-it is a registered trademark of Ecolab, Inc.
2
TEMPERATURE –TIMETABLE
Approximate Cooking
Food
Temperature
Time in Minutes
FRYING
Bacon
.....................................................
300° - 325°
.................................
8-10
Canadian Bacon
......................................
275° - 300°
..................................
3-4
Chicken
...................................................
325° - 350°
................................
25-40
Eggs, Fried
..............................................
250° - 275°
..................................
3-5
Eggs, Scrambled
.....................................
250° - 275°
...................................
3-5
Fish
.........................................................
325° - 375°
..................................
5-10
French Toast
...........................................
300° - 325°
..................................
4-6
Ham
1
1
1
2
2
˝ thick
...........................................
325° - 350°
................................
10-12
3
3
3
4
4
˝ thick
............................................
325° - 350°
.................................
14-16
Hamburgers
1
1
1
2
2
˝ thick
...........................................
325° - 375°
................................
8-12
Liver
.......................................................
325° - 350°
................................
5-10
Minute Steak
..........................................
375° - 400°
.................................
4-5
Pork Chops
1
1
1
2
2
˝ thick
...........................................
325° - 375°
...............................
15-20
3
3
3
4
4
˝ thick
...........................................
325° - 375°
...............................
20-25
Potatoes, cottage fried
............................
300° - 350°
................................
10-12
Sausage
link
..................................................
300° - 325°
...............................
20-30
precooked
........................................
325° - 350°
...............................
10-12
Sandwiches, grilled
................................
300° - 325°
................................
5-10
Steak, Beef 1˝ thick
Rare
.................................................
350° - 400°
.................................
6-7
Medium
...........................................
350° - 400°
...............................
10-12
Steak, Beef 1
1
1
1
2
2
˝ thick
Rare
.................................................
350° - 400°
................................
8-10
Medium
...........................................
350° - 400°
...............................
18-20
BRAISING & ROASTING
Browning
..................................................
325° - 400°
..................................
5-10
Braising*
..................................................
200° - 225°
..................................
45-60
Roasting (on rack)
....................................
325° - 350°
..................................
60-90
STEWING
Browning
..................................................
325° - 400°
..................................
10-15
Stewing*
..................................................
200° - 225°
..................................
30-90
CASSEROLE DISHES
................................
Warm - 225°
.................................
30-60
BAKING
Pancakes
...................................................
350° - 400°
....................................
2-3
Upside Down Cake
..................................
225° - 300°
..................................
25-35
HOLDING TEMPERATURE
(after cooking period)
..................................
Warm
*Add additional liquid during cooking, if necessary, to obtain desired consistency.
3
SERVICE INFORMATION
If you have any questions regarding the operation of your Presto
®
appliance or need parts for your appliance, call our Consumer Service
Department weekdays between 8:00 AM and 4:30 PM (Central Time) at 715-839-2209 or write:
National Presto Industries, Inc.
Consumer Service Dept., 3925 North Hastings Way, Eau Claire, WI 54703-3703
You may also email inquiries to [email protected]. Inquiries will be answered promptly by telephone, letter, or email. When
writing, please include a phone number and a time when you can be reached during weekdays if possible.
Any maintenance required for this product, other than normal household care and cleaning should be performed by our Factory Service
Department or any Presto Authorized Service Station. Be sure to indicate date of purchase and a description of defect when sending
an appliance for repair. Send appliances for repair to:
Canton Sales and Storage Company
Presto Factory Service Dept., 555 Matthews Drive, Canton, MS 39046-0529
Appliances may also be repaired at any Presto Authorized Service Station. Check your yellow pages for Service Stations near you.
The Presto Factory Service Department and Presto Authorized Service Stations are equipped to service all PRESTO
®
appliances and
supply genuine PRESTO
®
parts. Genuine PRESTO
®
replacement parts are manufactured to the same exacting quality standards as
PRESTO
®
appliances and are engineered speci cally to function properly with its appliances. Presto can only guarantee the quality
and performance of genuine Presto
®
parts. “Look-alikes” might not be of the same quality or function in the same manner. To ensure
that you are buying genuine PRESTO
®
replacement parts, look for the PRESTO
®
trademark.
California residents seeking warranty or service information may call 1-800-877-0441.
Presto
Limited Warranty
This quality PRESTO
®
appliance is designed and built to provide many years of satisfactory performance under normal house-
hold use. Presto pledges to the original owner that should there be any defects in material or workmanship during the rst
two years after purchase, we will repair or replace it at our option. Our pledge does not apply to damage caused by shipping.
To obtain service under the warranty, return this PRESTO
®
appliance, shipping prepaid, to the Factory Service Department
or to the nearest Presto Authorized Service Station. When returning a product, please include a description of the defect and
indicate the date the appliance was purchased.
We want you to obtain maximum enjoyment from using this PRESTO
®
appliance and ask that you read and follow the in-
structions enclosed. Failure to follow instructions, damage caused by improper replacement parts, abuse or misuse will void
this pledge. This warranty gives you speci c legal rights, and you may also have other rights which vary from state to state.
This is Presto’s personal pledge to you and is being made in place of all other express warranties.
NATIONAL PRESTO INDUSTRIES, INC.
Eau Claire, WI 54703-3703
Form 72-450B
4
  • Page 1 1
  • Page 2 2
  • Page 3 3
  • Page 4 4

Presto 06620 Operating instructions

Category
Barbecues & grills
Type
Operating instructions
This manual is also suitable for

Ask a question and I''ll find the answer in the document

Finding information in a document is now easier with AI