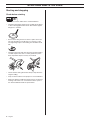
Husqvarna EA 850 is a versatile edger attachment that can be used together with a clearing saw or a trimmer. It is suitable for edging lawns and is a great addition to any homeowner's toolkit.
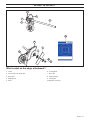
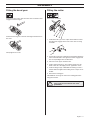
The EA 850 is easy to assemble and use. It comes with a bevel gear and a cutter, which are both made of durable materials. It has a robust design and is built to last.
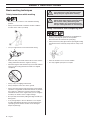
This attachment is lightweight and easy to handle, making it perfect for edging around flower beds, driveways, and other obstacles. It also features a blade guard that helps to protect the user from flying debris.
Husqvarna EA 850 is a versatile edger attachment that can be used together with a clearing saw or a trimmer. It is suitable for edging lawns and is a great addition to any homeowner's toolkit.
The EA 850 is easy to assemble and use. It comes with a bevel gear and a cutter, which are both made of durable materials. It has a robust design and is built to last.
This attachment is lightweight and easy to handle, making it perfect for edging around flower beds, driveways, and other obstacles. It also features a blade guard that helps to protect the user from flying debris.


-
 1
1
-
 2
2
-
 3
3
-
 4
4
-
 5
5
-
 6
6
-
 7
7
-
 8
8
-
 9
9
-
 10
10
-
 11
11


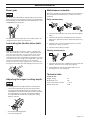
Husqvarna EA 850 is a versatile edger attachment that can be used together with a clearing saw or a trimmer. It is suitable for edging lawns and is a great addition to any homeowner's toolkit.
The EA 850 is easy to assemble and use. It comes with a bevel gear and a cutter, which are both made of durable materials. It has a robust design and is built to last.
This attachment is lightweight and easy to handle, making it perfect for edging around flower beds, driveways, and other obstacles. It also features a blade guard that helps to protect the user from flying debris.
Ask a question and I''ll find the answer in the document
Finding information in a document is now easier with AI
Related papers
-
Husqvarna 326ES User manual
-
-
Husqvarna 555RXT User manual
-
Husqvarna 355FRM User manual
-
-
-
-
-
-