Jenn-Air W2720 User manual

Category
Small kitchen appliances
Type
User manual

This manual is also suitable for

JENN-AIR
Use and Care Manual
Self Cleaning Wall Owv_s
Mode_sW24'10/W2/450,,_V2_O, )
WM;_7'20,WlVI_750,WW_460 & WW2750
MODEL W2750
For Microwave Oven, refer to Use and Care Manual for M167.
About Your Jenn-Air
Congratulations on your choice of a Jenn-Air waii oven. Your Jenn
convection oven combines the best of two cooking methods, convection
radiant bake (conventional) baking or roasting, in a se f-cleaning oven. (N
Only Models W2450, W2750, WM2750. WW2460 and WW2750 have
convection option.)
The Jenn-Air convection oven is actually a conventic:al oven that circuk
heated airwithin the oven. As both bake and broil heatir gelements cycle on
off with the thermostat, a fan keeps the heated air circuiating around the f(
The constantly recirculating heated air in the convecticn oven strips away
layer of cooler air that surrounds food. Consequently. many foods cook rr
quickly. Evenly distributed heat makes multiple rack coc<ing possible. Con\
tion roasted meats retain their natural flavor and juiciness with less shnnk
than radiant bake roasting.
In addition to the many exclusive benefits of cenvecticr_ cooking, your ove
also a fine full featured "bake and broil" oven.
You can cook your "old favorite" recipes as you have n the past. The radi
bake oven also gives you the flexibility of preparing various foods wi"
convection cooking may not be as beneficial, as when ccoking foods in cove
casseroles or clay pots.
The broil element is convenient for top browning and even broiling of food,,
The time bake feature can be used with either the convection or radiant b_
oven.
Before you begin cooking with your new oven, please take a few minutes to re
and become familiar with the instructions in this book. On the following pa(
you will find awealth of information regarding all aspects cf using your newov
By following the instructions carefully, you will be able to frilly enjoy and prop_
maintain your oven and achieve exce{lent resu{ts with the food you prepar{
Should you have any questions about using your Jenn-A;r oven, write to us.
sure to provide the model number.
Consumer Relations Department
Jenn-Air Company
3035 Shadeland Avenue
Indianapolis, IN 46226-Q901
2
Index
Baking
General Recommendations .......................................... 13
Convection Baking .................................................. 15-16
Baking Charts .......................................................... 14-15
Multiple Rack Cooking .................................................. 16
Broiling .......................................................................... 20-21
Cleaning
Auto-Clean ................................................................... 23
Self-Cleaning Process ............................................. 22-27
Other Cleaning Tips ................................................ 28-29
Clock Controlled Baking or Roasting ............................ 10-11
Clock Controls .................................................................. 8-9
Control Panel .................................................................... 6-7
Light Bulb Replacement ..................................................... 28
Minute Timer ................................................................................. 9
Oven Temperature Knob Adjustment ......................................... 29
Rack Positions ............................................................................ 12
Roasting
General Recommendations ...................................._............. 17
Radiant Baking Roasting ...................................................... 17
Convection Roasting........................................................ 18-19
Safety Precautions .................................................................... 4-5
Service Information................................................................ 30-31
3
SAFETY PRECAUTIONS
Read before operating your oven
All appliances - regardless of the manufacturer- have the poten
through improper or careless use to create safety probler
Therefore the following safety precautions should be observe,
1. Be sure your appliance is properly installed and grounded
a qualified technician.
2. Never use your appliance for warming or heating the roc
3. Children should not be left alone or unattended in area wh_
appliance is in use. They should never be allowed to sit
stand on any part of the appliance.
4. Wear proper apparel. Loose-fitting or hanging garme_
should never be worn while using the appliance.
5. Do not repair or replace any part of the appliance unl(
specifically recommended in this manual. All other servici
should be referred to an authorized Jenn-Air Service C_
tractor.
6. Flammable materials should not be stored in an oven.
7. Do not use water on grease fires. Smother fire orflame or L
dry chemical or foam-type extinguisher.
8. Use only dry potholders. Moist or damp potholders on I
surfaces may result in burns from steam. Do not let pothold
touch hot heating elements. Do not use atowel or other bul
cloth.
9. Use care when opening oven door. Let hot air or ste_
escape before removing or replacing food.
10. Do not heat unopened food containers. Build-up of pressu
may cause container to burst and result in injury.
11. Keep oven vent ducts unobstructed.
12. Always place oven racks in desired location while oven
cool. If rack must be moved while oven is hot, do not
potholder contact hot heating element in oven.
13. Do not clean door gasket. The door gasket is essential for a
good seal. Care should be taken not to rub, damage, or move
the gasket.
14. Do not use oven cleaners. No commercial oven cleaner or
oven liner protective coating of any kind should be used in or
around any part of the oven.
15. Clean only parts listed in this manual.
16. Before self-cleaning the oven, remove broiler pan and other
utensils.
17. Listen for fan. A fan noise should be heard during the broil
and cleaning cycles. If not, call a serviceman before self-
cleaning again.
18. DO NOT TOUCH HEATING ELEMENTS OR INTERIOR
SURFACES OF OVEN. Heating elements may be hot even
though they are dark in color. Interior surfaces of any oven
become hot enough to cause burns. During and after use, do
not touch, or let clothing or other flammable materials contact
heating elements or interior surfaces of oven until they have
had sufficient time to cool. Other surfaces of the appliance
may become hot enough to cause burns-among these sur-
faces are: oven vent openings and surfaces near these
openings, oven doors, windows of oven doors.
IMPORTANT SAFETY NOTICE AND WARNING
The California Safe Drinking Water and Toxic Enforcement Act of
1986 (Proposition 65) requires the Governor of California to
publish a list of substances known to the State of California to
cause cancer or reproductive harm, and requires businesses to
warn customers of potential exposures to such substances. Users
ofthis appliance are hereby warned that when the oven isengaged
in the self-clean cycle, there may be some low level exposure to
some of the listed substances, including Carbon Monoxide. Expo-
sure to these substances can be minimized by properly venting the
oven to the outdoors during the self-clean cycle.
Oven Operation
Oven Control Panels
Indicator lights:
Bake
Oven light switch
\
==,UI,=._., _T_` ,==_,..'
\
Selector knob \ Clock controls and minute timer
Door lock lever
Single Wall Ovens
Lower oven
selector knob
\ Lower oven
Upper oven indicator lights:
Upper oven
light switch
//Clean
Upper oven Door lock Upper oven minute timer
light switch selector knob lever temperature knob
Double Wall Ovens
Oven Light Switch
For some models, the oven light automatically comes on whenever the oven door
is opened. The oven light may beturned on bypushing the control panel switch in.
Light cannot be turned on during the self-cleaning process.
Selector Knob
This knob controls theoven operation. To operate the oven, turn to desired setting
and turn TEMPERATURE knob to desired setting.
The settings are:
OFF The oven will not operate when knob ison this setting. Keep
knob on this position when oven is not in use.
BAKE Use for radiant bake (conventional) baking or roasting.
'PIXIEBAKE Usewith clockcontrols for automatically starting and stopping
oven when baking or roasting inthe radiant bake oven.
CONVECT Useforconvection bakingor roasting. (Selectedmodels only.)
TIME CO_CT Use with clock controlsfor automatically starting and stopping
oven when baking or roasting in the convection oven.
(Selected models only.)
BROIL Use for top browning or oven broiling of foods.
CLEAN Use for self-cleaning process.
Temperature Knob
Use to set oven temperature. Be sure the indicator square is in line with the exact
temperature desired. This knob isused with alloven operation settings noted onthe
SELECTOR knob.
Door Lock Lever (All models except W2410 & WW2460)
Use to [ock oven for self-cleaning process.
Bake Indicator Light
Indicateswhen oven isturned toan operating position otherthanthe CLEANsetting.
Lightwill glow untilthe desired temperature isreached. Itwill cycleon and off asthis
temperature is maintained during cooking.
Lock Indicator Light
Will glow after the ovendoor has beenlocked andafterthe oventemperature isover
550OF. Doorwilllockautomaticallyandcannotbeopeneduntiloventemperature
drops below 550°F and the lock indicator light goes off.
Clean Indicator Light
Indicateswhenall controls havebeen properlysetforthe self-cleaning process, Light
will remain on during the entire cleaning process.
Clock Controls and Minute Timer
Features time of day, MINUTE TIMER, and clock controls to start and stop oven
automatically. (See pages 8-11)
Clock Controls
INDICATOR WORDS DISPLAY WINDOW
/
/ \,
12 HOUR Mh_UTE AND SECOND
TIME OF DAY CLOCK TIMER
Clock Setting
IMPORTANT: The clock isa12hour clock. Whenoven isfirstsupplied power or power
is interrupted, the display will show "00:00".
To set time of day on clock:
1. Turn SETdial counterclockwise untilthewordTIMEappears inthe DisplayWindow.
Then, turn the SET dial in either direction untilthe correct time appears in window.
2. Push ENTER button.
To change time of day set on clock: Repeat above sequence.
To check time of day when timer is in use: Push ENTER button. Time of
day will be displayed briefly, then display will return to timer function.
Minute Timer
IMPORTANT: This interval timer can be used to remind you when a period, up to 99
minutes and 00 seconds, expires. Itcan be used independently of any other oven activity
and can be set while another oven function is operating. The timerdoes notcontrol the
oven.
To set MINUTE TIMER:
1. Turn SET dial clockwise until desired number of minutes and seconds appear in the
Display Window.
EXAMPLE: Turn the dial to 5 for 5 seconds or to 5:00 for 5 minutes.
DISPLAY
5 SECONDS 5 MINUTES
IMPORTANT: This is the on/y function where time entered is in minutes and
seconds. Minutes are to the left of colon and seconds to right of colon.
2. Push ENTER button.
The indicator word TIMER will remain in Display Window during countdown.
Countdown will have display precedence over anything else programmed, such as
TiME BAKE. At end of time set, the indicator word TIMER will blink and timer will
beep. Beeping will continue every f 0 seconds for 15 minutes unless the CANCEL
button is pushed once. After CANCEL button is pushed. Display will return to time
of day or whatever is programmed on control panel.
To cancel MI_FI..YrE TIMER: Push CANCEL button once. Pushing CANCEL
button twice will cancel a//programming (time bake or serf-dean).
o"
Clock-Controlled Baking" or Raastlna
To set oven to start immediately and shut off automatically:
I. Turn SELECTOR knob to TIME BAKE orTIME CONVECT (SelectedModelsOnt_,
2. Turn TEMPERATURE knob to desired temperature.
3. Holdin STOP TIME button untilthe indicator wordsSTOPTIME appear in Displ_
Window.
4. Turn SET dial to time you want food to stop cooking.
EXAMPLE: If time of day is one o'clock and the roast needs to cook for 3 hour
the stop time would be four o'clock.
i.n t-1
i.u u
DISPLAY
TIME OF DAY STOP TIME
5. Push ENTER button to enter stop time.
The indicator word AUTO will appear in the Display Window and oven will st
heating. The BAKE indicator lightwillglow untilthedesiredtemperature isreach_
When stop time is reached, the oven shuts off and the indicator word AUTO
begin to blink and timer will beep. Seeping will continue every 10 seconds for
minutes unless the CANCEL button is pushed twice.
To set oven to start at future time and shut off automatically:
1. Turn SELECTOR knob to TIME BAKE or TIME CONVECT (Selected Models
Only).
2, Turn TEMPERATURE knob to desired temperature.
3. Hold in START TIME button until the indicator words START TIME appear in
DisplayWindow.
4. Turn SET dial to time you wish food to start cooking.
EXAMPLE: If time of day is _1:30 and the roast needs to start cooking at one
o'clock, turn dial until numbers 1:00 appear indisplay.
, l:3n
I
DISPLAY
TIME OF DAY START TIME
5. Push ENTER button to enter start time.
The indicator words STOP TIME will appear in Display Window as a reminder
set STOP TIME.
6. Turn SET dial to time you want food to stop cooking.
EXAMPLE: If star( time is one o'clock and the roast needs to cook for 3 hour_
the stop time would be four o'clock.
DISPLAY
START TIME STOP TIME
7. Push ENTER button to enter stop time.
The indicator word AUTO will blink in the Display Window. When start tim,
reached, the indicator word AUTO will remain in Display Window. The S,a
indicator light will glow until the desired temperature is reached. When stop t
is reached, the oven shuts off and the indicator word AUTO will begin to blink
timer will beep. Beeping willcontinue every 10 secondsfor 15minutes unless
CANCEL button is pushed twice.
lO
To check STAt_T TL_IE be/bre cooking begins: Hold inSTART TIMEbutt
until the words START TIME appear Jnthe Display Window. The star time wJ]l
displayed briefly, then Display will return to time of day.
To change ST._RT TIM_E before cooking begins:
1. Hold in START TIME button until the words START TIME appear in the Disp]
Window.
2. Turn SET dial to desired time.
3. Push ENTER button twice to enter new start time and stop time previot
programmed.
To check STOP TlIWIE: Hold in STOP TIME button until the words STOP TI
appear in the Display Window. The stop timewill be displayed briefly, then Display
return to on-going program.
To change STOP TItlE:
1. Hold in STOP TIME button until the words STOP T(ME appear in the DisF
Window.
2. Turn SET dial to desired time.
3. Push ENTER button to enter stop time.
To Cancel function programmed: Push CANCEL button twice to car
function, during programmed time or after time has expired.
NOTE: After clock-controlled baking, turn SELECTORandTEMPERATURE knoL
OFF position.
NOTE: Since food continues to cook if/eft in the oven,it is suggested that the c
controls be used primarily to start the oven when no one is in the kitcl
Provisions should be madetohave thefood removedassoonas thesignal
sounded.
NOTE: If morethan 7 seconds elapses between holding inSTART TIME butto
or STOP TIME button andturning the SET dial, the display window wi
automatically return to on-going program.
NOTE: Ifmorethan 1minute elapses between turning SETdialto a newtime an
entering new START TIME and STOP TIME, the entire program will t
cancelled and display will return to time of day clock.
11
Oven Operation Baking or Roasting
1. Locate oven racks on proper rack positions.
2. Turn TEMPERATURE knobto desired temperature.
3. TurnSELECTORknobtoBAKEorCONVECTsetting. WhentheBAKEINDICATO
UGHT cycles off,theoven ispreheated to theselected temperature. Place thefo(
intheoven. The BAKEINDICATOR LIGHTwillcycle onand offthroughoutthe bakir
process. Preheatonlywhen necessary. Referto baking and roasting sections as
when preheating is recommended.
4. After baking, turn both TEMPERATURE and SELECTOR knobs to OFF position
Rack Positions
The rack positions notedare generally recommended forthe best browning results ar
most efficient cooking times. For many food items, excellent results can be achieve
when usingone ofseveraldifferent rackpositions. Referto bakingand roastingsectior
for recommendations for specific foods.
Different Racks:
One flat rack and one offset rack were packaged withyour oven. The use ofthe oil's
rack is denoted in the list below and the charts as an "o" after the rack number. Son"
convection models received a second flat rack to be used for three rack baking.
Use Rack Position #1:
Large cuts of meat and large poultry, angel food cake, loaves of bread, custard p
dessert souffle.
Use Rack Position #2o (offset rack on #2):
Roasting small cuts of meat, loaves of bread, angel food cake.
Use Rack Position #2:
Roastingsmall cutsofmeat,cakes(tube, bundtorlayer)frozenfruit pie,pie shell,lar
casseroles.
Use Rack Position #30 (offset rack on #3):
Most bakedgoods on cookie sheets, frozen convenience foods, fresh fruit pie,cre_
pie, layer cakes, main dish souffle.
Use Rack Position #3:
Most baked goods on cookie sheets, cakes (sheet and layer).
Use Rack Position #40 (offset rack on #4):
Most broiling.
Multiple Rack Cooking:
Two racks, use#2o and#4. Three racks, use#1,#3o,and #4.(Note:three rackba_
is only possible in a convection oven.)
12
Baking
General Baking Recommendations
When cooking foods for thefirst time in yournewoven, userecipe cooking ti
and temperatures as a guide.
Usetested recipes from reliable sources.
Preheat the oven onlywhen necessary. Forbaked foods that riseand for ri,
browning, a preheated oven is better. Casseroles can bestarted in a cold o
Preheating takesfrom 6 to9minutes; placefood inovenafter BAKE/ND_CA"
LIGHT cycles off.
Arrangeoven racks beforeturning on oven, Follow suggested rack position
pages 12 and in various baking charts.
Allow about Ito1I/2inches ofspace between theovensidewalls andpanstos
proper air circulation.
When baking foods in morethan one pan, placethem onopposite corners o
rack. Stagger pans when baking on two racks so that one pan does not sl
another unless shielding is intended. (See above)
To conserve energy, avoid frequent orprolonged door openings. At the er
cooking, turn oven off before removing food.
Always test for doneness (fingertip, toothpick, sides pulling away from pan)
not rely on time or brownness as only indicators.
Use good quality baking pans and the size recommended in the recipe.
Dull, dark, enameled or glass panswill generally produce a brown, crisp c
Shiny metal pans produce a light, golden crust.
Frozen pies in shinyaluminum pans should bebaked on a cookie sheet on
2 or be removedto a dull or glass pan.
NOTE: Acooling fanwillcycle on during bakingor roasting. Thefanmay alsocon
to operate after the oven is turned off until the oven has cooled down.
13
Baking Cha_"_
j Radiant {
i Convect , Bake Radiant
Pan _ Rack" Temp. (°F) Convect Temp.(°F) Bake
Productand Type Size i Position Preheated*** : Time** Preheated' Time**
i i
CAKE i
Yellow - 2 layers 9" 12, 30, or 3 325 ° 23-28 350 ° 28-33
White - 2 layers 9" 2 3o or 3 325 ° 22-30 350° 25-30
Chocolate - 2 layers 9" 2, 3o, or 3 325° 25-30 350 ° 30-35
, Bundt tube i 2 ; 325 ° 38-45 350° 38-50
JAngel Food tube [1,2o, or 2 350 ° 30-35 375 ° 30-40
Pound Cake 9" loaf 2 300° 50-65 325 ° 55-70
Cupcakes 3o 325 ° 15-20 350 ° 15-25
Sheet Cake 9"x13" 3 325° 26-31 350 ° 32-35
PIES
Two Crust
Fruit, fresh 9" 30 3750-400 ° 45-60 400°-425°i 45-60
Fruit, frozen 9" 2 3750-400 ° 40-65 400°-425°; 40-65
One Crust
Custard, fresh 9" 1 325° 350° 40-50
Cream/Meringue 9" 3o 375° 8-12 400° 8-12
Pie Shell 9" 2 400°-425 ° 8-12 425°-450 ` 8-12
COOKIES
Chocolate Chip 3o, or 3 3250-350 ° 8-12 3500-375° I 8-12
Peanut Butter 3o, or 3 325°-350 ° 8-12 350°-375°I 8-12
Sugar 3o, or 3 8-12 350°-375 ° 8-12
Brownies 9x9" 30 325° 30-35 350 ° 33-38
BREADS, YEAST
Loaf loaf I, or 2o 350 ° 20-25 375° , 20-30
Rolls 3o 375° 10-15 3750-400 ° 10-20
BREADS, QUICK i
Loaf, Nut, Fruit loaf 1,20, or 21 325°-350 ° 40-60 350o-375 ° 50-70
I Gingerbread 9x9" 3o 325° 25-30 350° , 25-35
! Cornbread 8x8" 3o 375°-400 ° 15-30 4000-450 ° 15-30
i
'i Cornbread Muffins 3o 375° 10-15 400 ° , 10-20
I Biscuits 2, or 30 375%400 ° 8-12 400°-425 ° 8-12
! Muffins 3o 375 ° 10-15 400 ° 15-20
i
* An "o" after arack number impliesthat the offset rack shouldbe used.
** Thetimesgiven arebasedonspecificbrandsofmixesorrecipestested. Actualtimes willdepend
on the ones you bake.
*** The CONVECT temperature is 25°Flower than recommendedon packagemixor recipe.
14
Convection Baking Recommendations
iSelected ?,iodels Only!
As a general rule, when using recipes or prepared mixes developed for aradia
bake oven, set the oven temperature 25°F lower than the recipe recommend(
temperature. Times will be similar to or a few minutes less than reci_
recommended times. The chart on page 14 compares times and temperatur,
of many baked foods. Use this as a reference.
For better browning, large pans such as cookie sheets or rectangular baki
pans should be placed lengthwise, front to back, on the rack. This centers t
food in front of the convection fan for better air circulation which gives bet
overall browning.
Cookie sheets should be without sides and made of shiny aluminum. The b(
size to use for cookie sheets is 14" x 12" (overall size includes handles).
] o :•
Convec_lon Bz:_ng o_
Frozen Convenience Foods (Selected},rod,sisOn]<
J Preheating the oven is not necessary,
o Follow package recommendations for oven temperature, foil covering and us(
cookie sheets. Baking times will be similar. See chart below for some excepti,
and examples.
s Center foods in the oven. If more than one food item is being baked or if re,
are being baked on multiple racks, stagger foods for proper air circulation.
_' Most foods are baked on rack position #30.
" For multiple rack baking, use racks #1, 30 and 4. However, pizzas shoulc
placed on cookie sheets and baked on rack position #20, 3 and 4.
__Ee._'e are a few examp]es of times und temperu:u:-es:
FROZEN i CONVECTION OVEN i RADIANT BAKI
CONVENIENCE i Rack NOT PREHEATED ! PREHEATED
FOODS !Position Minutes iTemp. °F Minutes iTemp. C
Chicken,fried ! 30 i 35 375° 35-40 I 375°
i
Donuts,glazed ] 3o _ 7 300° 6-7 300°
Fish,batterfried 3 25 375° 25-30 } 375°
Frenchfries 3 18 450° 16-20 I 450°
/
Macaroni &Cheese 3o 47-50 375° 45-50 375°
(28oz)
PotPies 30 35-40 400° 35-40 / 400°
Pizza 3o 17-20 400° 15-17 425°
Turkey, slices w/gravy 30 55-60 375° 60 375°
(TV dinner-28 oz.)
15
Convection Cooking on Multiple Racks
(Selected _[ode|s Only)
Forbest results, bakefoods onone rackata time asdescribed inthis manual. HowevE
very good results can be obtained when baking quantities of foods on multiple rack
Quantity cooking provides both time and energy savings.
The convection oven is suggested for most multiple rack cooking, especially three ra¢
cooking, because thecirculating heated air results inmore even browningthan radia
Fortwo rack cooking,the radiantbakeoven provides verygood bakingresults especi_
when pans can be staggered, such as with layer cakes and fresh pies.
Many foods can be prepared on three racks at the same time. These are just a fl
examples: cookies, cupcakes, rolls, biscuits, muffins, pies, frozen convenience fee(
pizzas, appetizers, and snack foods.
To obtain the best results in multiple rack cooking, follow these suggestions:
Usetemperature and times in this manual as a guide for best results.
Fortworaekbaking, rackpositions#2oand4arebestformostbakedproductst
positions #2 and4 also provide acceptable results.
Forthree rack baking usepositions #1,3o and 4. One exceptionispizza. (See pa
t5.)
Sincefoods onpositions #1 and4 will usually bedone before foods on position #_
additional cooking time will be needed for browning foods on the middle rack, ,
additional minute is needed for thin foods such as cookies. For foods such
biscuits, rolls, or muffins, allow 1to 2 more minutes. Frozen piesand pizzas, whi
should be baked on a cookie sheet, need about 2to 4 more minutes.
Stagger small pans, such as layer cake pans, inthe oven.
Frozenpies inshiny aluminum pans should be placed oncookie sheets andbak
on rack positions #1, 3o and 4.
Cookiesheetsshouldbeplacedlengthwise, fronttoback, infrontofthefanform¢
even browning.
Ovenmealsarerecommendedforenergyconservation. Userackpositions#1a
30 or #20 and 4.
16
Roasting
General Roasting Recommendations
Preheating is not necessary.
For open pan roasting, place meat or poultry on the slotted portion ofthe two-
piece pan includedwith theoven. Donotadd water to the pan. Use open pan
roasting for tender cutsof meat. Less tender cutsof meat needto be cooked
by moist heat in a covered pan.
Forbest results, ameat thermometer isthe mostaccurate guide to degree of
doneness. The tip of the thermometer should be located in the thickest part
of a roast, not touching fat, bone, or gristle. For turkeys and large poultry
products, insert the tip of the thermometer into the thickest part of the inner
thigh.
Place roast fat side up to allow serf basting of meat during roasting.
Sincemeats continue tocook afterbeing removed fromtheoven, remove roast
from oven when it reaches an internaltemperature about5 degrees belowthe
temperature desired.
For less loss of juices and easier carving, allow about 15 minutes "standing
time" after removing meat from oven.
For best results in roasting poultry, thaw completely. Due to the structure of
poultry, partially thawed poultry will cook unevenly.
Radiant Bake Roasting Recommendations
]f preferred tender cuts of meat can be roasted in the radiant bake oven by
following the general recommendations given above. However, meats will
roast more quickly in the convection oven.
Radiant bake is best for less tender cuts of meat that require a longer, moist
heat method of cooking. Followyour recipe for times and temperatures for
covered meats.
Meats cookedin cooking bags, dutch ovens,orcovered roasting pansare best
cooked in the radiant bake oven.
Use meat roasting charts in standard cookbooks for recommended times and
temperatures for roasting in a radiant bake oven.
NOTE: A cooling fanwill cycleon during baking androasting. The fan also continues
to operate after the oven is turned off until the oven has cooled down.
17
Tender cuts of meat and poultry can be roasted to a rich golden brown in tl
convection oven. Follow general recommendations for roasting.
Referteconvection meatroastJngohartforrecommended cookingtemperaturea_
time. The chart can serve as aguide to help plan meal serving time.
Minutes per pound will vary according to the size, shape, quality, and init,
temperatureof meat aswellasthe electricalvoltage inyour area. Times are bas_
on refrigerator cold meat.
A large cut of meat will usually require fewer minutes per pound to roast than
smaller cut of meat.
Do not use a roasting pan with high sides; use pan provided with oven.
_, Do not cover meat. Allow the circulating hot air to surround the meat and seal
thejuices.
_, Since the breast meat on a large turkey cooks more quickly than the thigh are
placea "foilcap"ovarthebreast areaafter desired brownnessisreachedtoprevc
over browning. (See above)
, A stuffed turkey will requirean extra 30to 60 minutes depending on size. Stuff_
should reach an internal temperature of 165°F.
Con_/ection Roasting': F:_ozen to Finish
Meats (except poultry) may be roasted frozen to finish. Follow these guidelinesfor 1
most satisfactory results.
b Use temperatures for roasting fresh meats as recommended by most oookboo
GeneraJly, most meats are roasted at 325°F. For best results do not t
temperatures below 300°F.
, Usetimesforroastingfreshmeatsgiveninyourfavoritecookbooksasapproxim,
guides for roasting frozen meats. Roastingtimes will vary due to factors such
coldness of meat, size,quality,or cut. Ingeneral, roastingtimes forfrozen to fir
in the convection ovenwill beapproximately the same asfresh to finish in a rad
bake oven.
The guidelines given for roasting fresh meats inthe convection oven also appl
roasting frozen meats.
Insert meat thermometer midway during the cooking process.
18
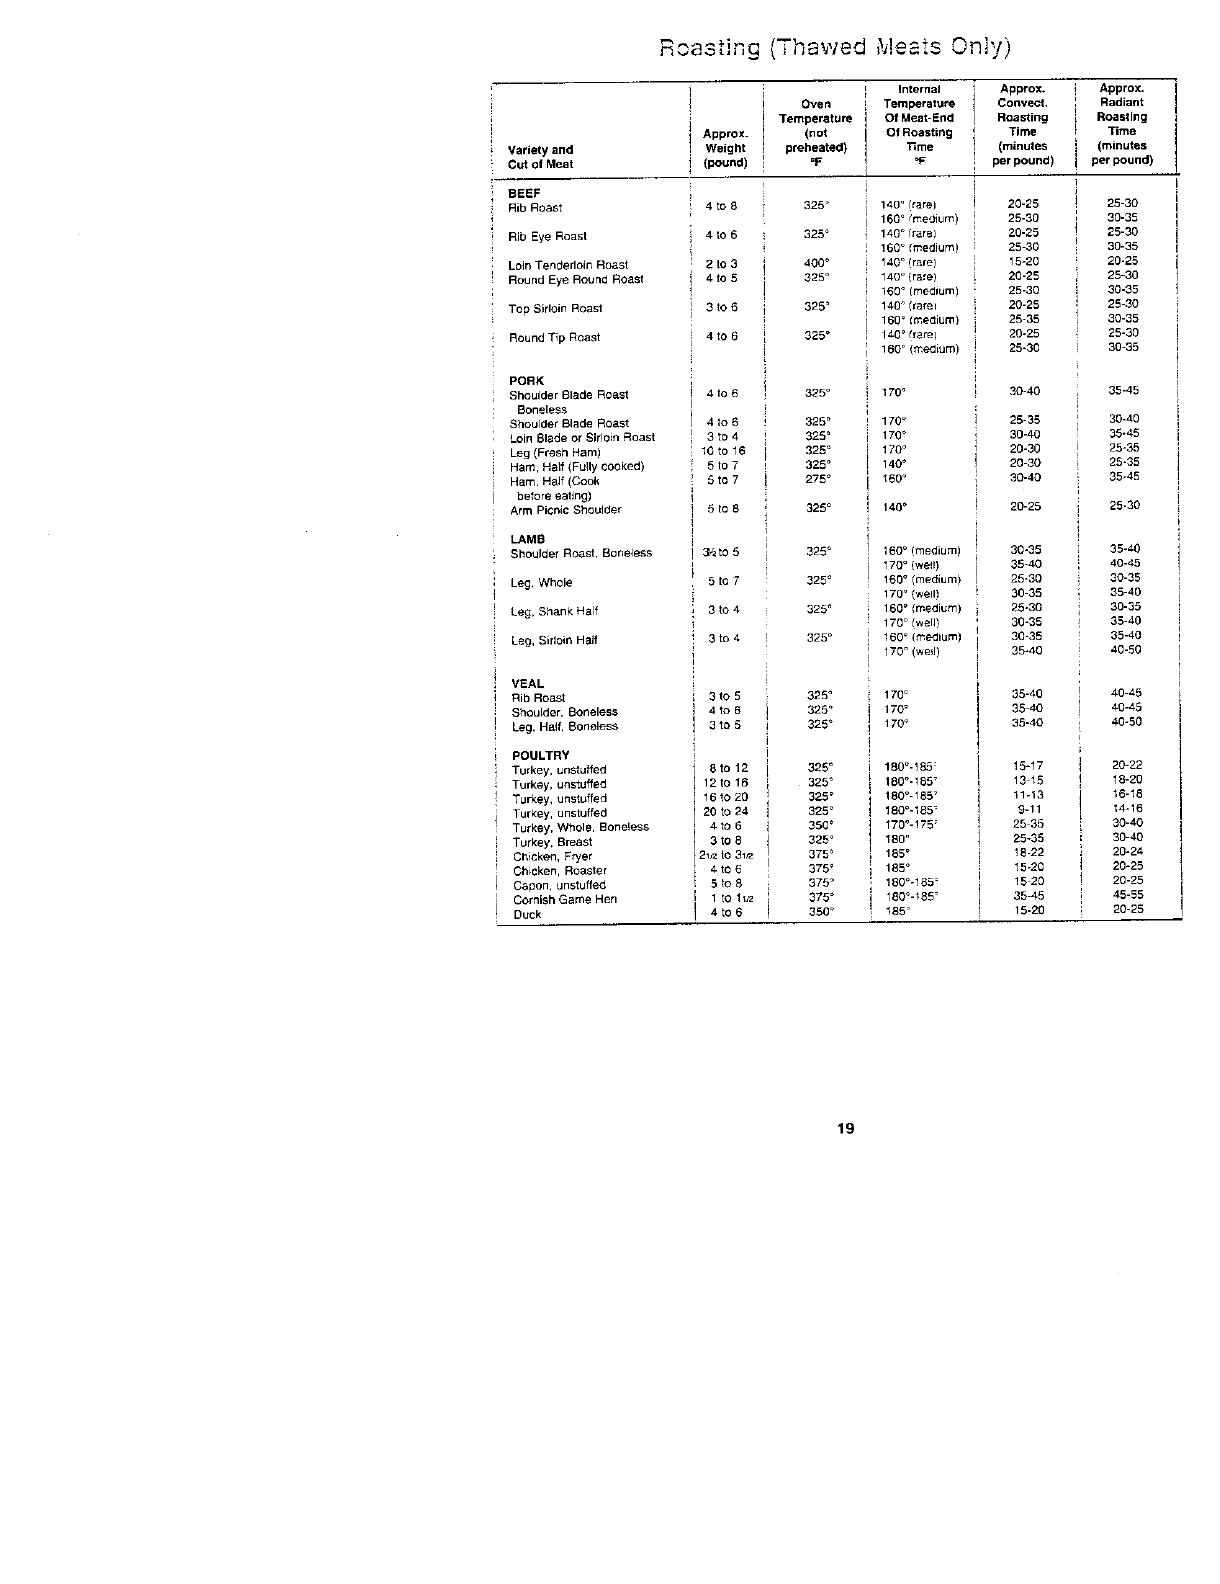
nvao.ng'-'"^*i (Thawed Meats Oniy)
_1 internal Approx. Approx,
! Oven Temperature Convect. Radiant
Temperature Of Meat-End Roasting Roasting
Approx. (not Of Roasting Time Time
Variety and Weight preheated) "Rme (minutes (minutes
Cut of Meat (pound) =F _F per pound) per pound)
BEEF
Rib Roast 4 to 8 325 ° 140 _ (rare) 20-25 25-30
160 _ (medium) 25-30 30-35
Rib Eye Roast 4 to 6 325 ° 140 ° (rare) 20-25 25-30
160 ° Imedium) 25-30 30-35
Loin Tenderloin Roast 2 to 3 400 ° 140 ° (rare} 15-20 20-25
Round Eye Round Roast 4 to 5 325 ° 140 ° {rare} 20-25 25-30
160 ° Imedium) 25-30 30-35
Top Sirloin Roast 3 io E 325 = 1404 (rarep 20-25 25-30
160_ Imectlum) 25-35 30-35
Round T_p Roast 4 to 6 325 ° 140_ 0arel 20-25 25-30
160° (medium) 25-30 30-35
PORK
Shoulder Blade Roast 4 to 6 325 ° 170° 30-40 35-45
Boneless
Shoulder Blade Roast 4 to 6 325" 170 ° 25-35 30-40
Loin Blade or Sirloin Roast 3 to 4 325 ° 170 ° 30_.0 35-45
Leg (Fresh Ham) ; 10 to 16 325 ° 170 ° 20-30 25-35
Ham, Half (Fully cooked) 5 to 7 325 ° 140 ° 20-30 25-35
Ham. Half (Cook 5 to 7 275 ° 160 ° 30-40 35-45
before eating)
Arm Picnic Shoulder 5 to 8 325 ° 140 _ 20-25 25-30
LAMB
Shoulder Roast, Boneless 3_to 5 325 ° 160 = (medium) 30-35 35-40
170 ° (weil) 35-40 40-45
Leg, Whole 5 to 7 325 ° 160 ° (medium) 25-30 30-35
170_(well) 30 35 35-40
Leg, Shank Half 3 to 4 325 ° 160_ Imedlum) 25-30 30-35
170° Iwel]) 3g-35 35-40
Leg, Sirloin Half 3 to 4 325 ° 160° (medium) 30-35 35-40
170° (wel) 35-40 40-50
VEAL
Rib Roast 3 to 5 325 _ 170 _ 35-40 40-45
Shoulder, Boneless 4 to 6 325 ° 170 ° 35-40 40-45
Leg. Haft, Boneless 3 to 5 325 ° 170 ° 35-40 40-50
POULTRY
Turkey, unstuffed 8 to 12 325 ° 180_-185 _ 15-17 20-22
Turkey, unstuffed 12 to 16 325 _ 180_.185 _ 13 15 18-20
Turkey, unstuffed 16 to 20 325 ° 180°-185 = 11-13 16-18
Turkey, unstuffed 20 to 24 325 ° 180°-185 _ 9-11 14-16
Turkey, Whole. Boneless 4 to 6 3500 170°-175; 25 35 30-40
Turkey, Breast 3 to 8 325 ° 180 _ 25-35 30-40
Chicken, Fryer 12 iz to 3 t2 375 _ 1B5° 18-22 20-24
Chicken, Roaster 4 to 6 375 _ 185° 15-20 20-25
Capon, unstuffed E 5 to 8 375 = 180°-185 = 15 20 20-25
Cornish Game Hen I 1 to lt_ 375 ° 180°-185 = 35-45 45-55
Duck I 4 to 6 350 ° 185 _ 15-20 20-25
19
Broiling
The broil element provides flexibility for broiling foods. Ifyou have a denn-Air g
recommend you use the grill for most of your broiling. There are some types of
that do require use of the oven broil element. These include foods such as .:
lobsters, meringue pies, or other foods which require top browning.
To Broil
1. Ptace oven rack on the rack position suggested in the chart. Distance from b
element depends onfoods beingprepared. Rackposition #4o (offset rack inpc
#4) is usually recommended unless otherwise stated.
2. Turn SELECTOR knob to BROIL setting.
3. Turn TEMPERATURE knob to 550°F.
4. Placefoodonroastingpanprovidedwithoven. After
top broil element isred place food inoven. Preheat-
ing takes a few minutes, or until element glows a
bright cherry red.
5. Leave oven door open at brofl stop position whenbroiling.
Broiling Tips
Tender cuts of meat or marinated meatsare best for broiling. This includes ri
loin cuts ofsteak, ground beef, ham steaks, lambchops,poultry pieces orfisl"
best results, steaks should be at least 1" thick. Thinner steaks should be
broiled.
Donot cover broiler grid with foilsince this preventsfat drippings from drainin
bottom of pan.
Before broiling, remove excess fat from meat and score edges of fat (do n,
into meat) to prevent meat from cuding. Salt after cooking.
To prevent dry surface on fishor lean meats, brush melted butter on top.
Foods that require turning should be turned only once during broiling. Turn
with tongs to avoid piercing and loss ofjuices.
Cooking times given in the chart are to be used only as a guide.
20
  • Page 1 1
  • Page 2 2
  • Page 3 3
  • Page 4 4
  • Page 5 5
  • Page 6 6
  • Page 7 7
  • Page 8 8
  • Page 9 9
  • Page 10 10
  • Page 11 11
  • Page 12 12
  • Page 13 13
  • Page 14 14
  • Page 15 15
  • Page 16 16
  • Page 17 17
  • Page 18 18
  • Page 19 19
  • Page 20 20
  • Page 21 21
  • Page 22 22
  • Page 23 23
  • Page 24 24
  • Page 25 25
  • Page 26 26
  • Page 27 27
  • Page 28 28
  • Page 29 29
  • Page 30 30
  • Page 31 31

Jenn-Air W2720 User manual

Category
Small kitchen appliances
Type
User manual
This manual is also suitable for

Ask a question and I''ll find the answer in the document

Finding information in a document is now easier with AI